The modeling going on here is of course always good but lately I just tune in for your writing! LoL
J
Dioramas
Do you love dioramas & vignettes? We sure do.
Do you love dioramas & vignettes? We sure do.
Hosted by Darren Baker, Mario Matijasic
Operation Anthropoid
jrutman

Joined: April 10, 2011
KitMaker: 7,941 posts
Armorama: 7,934 posts

Posted: Friday, November 02, 2018 - 01:20 AM UTC
Dioramartin

Joined: May 04, 2016
KitMaker: 1,476 posts
Armorama: 1,463 posts

Posted: Sunday, November 04, 2018 - 01:30 AM UTC
Thanks Jerry - well when the modelling temporarily thins out I ought to keep Lurkdom entertained somehow & all I got left is words. The next few weeks will be a grind because after completing Tram 1 there’s the paltry matter of building/revising Trams 2 & 3. I doubt many could stomach rehashing what I’ve already done (bad enough for me!) so I’ll minimise further blow-by-blows until all 3 are ready for painting. After that the next step has to be all the figures, and then the base itself in all its sprawling complicatedness – the horror…the horror… 


PolishBrigade12

Joined: January 31, 2009
KitMaker: 380 posts
Armorama: 366 posts

Posted: Sunday, November 04, 2018 - 04:47 AM UTC
Tim, you're whalin on this beauty, making some serious progress. I really like the interior of the trolley, pretty slick seat work, etc. This is getting better all the time Amigo. Ruck Over Bby!
Cheers, Ski.
Cheers, Ski.

TEACKO

Joined: October 27, 2018
KitMaker: 42 posts
Armorama: 41 posts

Posted: Sunday, November 04, 2018 - 01:38 PM UTC
Tim, this is an awesome build log, research, and historical presentation. Very enlightening in terms of bring the past, as it was, to the present moment. After perusing this build log I feel as if it has become a part of my own personal history due to the amount of presented details.
Thanks for sharing this with us.
Thanks for sharing this with us.
Dioramartin

Joined: May 04, 2016
KitMaker: 1,476 posts
Armorama: 1,463 posts

Posted: Monday, November 05, 2018 - 12:23 AM UTC
Thanks guys – Ski there’s no answer to that, too kind bro! Peter glad you’re on board also, you’d know all too well how consuming research can become. I’m often mulling over whether to skip a detail either because I think it’s beyond my capability, or due to that “jeez it’s not worth it just finish the %&!!2*” feeling. For either reason I have to judge & jury it out in the Court of Research Exemptions and it can go either way, not always in my favour – weird eh?! 

Kranta

Joined: October 10, 2014
KitMaker: 290 posts
Armorama: 290 posts

Posted: Monday, November 05, 2018 - 06:14 AM UTC
Very good work, Tim. I look forward to updates. 

Dioramartin

Joined: May 04, 2016
KitMaker: 1,476 posts
Armorama: 1,463 posts

Posted: Thursday, November 08, 2018 - 11:56 PM UTC
Thanks Ayhan & sorry to disappoint, all the weightlifting finally caught up with me & my back’s been giving me hell so haven’t even unpacked the trams yet. Next week hopefully 


cheyenne

Joined: January 05, 2005
KitMaker: 2,185 posts
Armorama: 1,813 posts

Posted: Friday, November 09, 2018 - 12:04 AM UTC
Slacker ..... you should be building through the pain , did we give up when the Germans bombed Pearl Harbor !!!!!!!!!!!
Hope you're feeling better man , love watchin you create !!!
Hope you're feeling better man , love watchin you create !!!
Kranta

Joined: October 10, 2014
KitMaker: 290 posts
Armorama: 290 posts

Posted: Friday, November 09, 2018 - 02:56 PM UTC
Hello, Tim. I wish you to get well soon. Bye. 

Dioramartin

Joined: May 04, 2016
KitMaker: 1,476 posts
Armorama: 1,463 posts

Posted: Tuesday, November 13, 2018 - 12:44 PM UTC
Thanks guys & Cheyenne you’re absolutely right – I felt so ashamed I cut short the intensive massage program by my dedicated team of recent Miss Venezuelas & demanded to be carried back to the workbench immediately. Well, the next day. Tomorrow for sure 


Dioramartin

Joined: May 04, 2016
KitMaker: 1,476 posts
Armorama: 1,463 posts

Posted: Saturday, November 17, 2018 - 01:11 AM UTC
Regaining the ability to bust some moves I made a bit of progress, more planning than doing & the upshot being most the outer roof of the MiniArt tram is cactus and needs re-fabricating as per the Prague version. But before that I had to modify the inner roof, and before that I had to make the new double-doors to ensure they fit properly. These photos show progressive dry-fittings, the last two incorporating a new strip all the way round the edge of the inner (and in this regard, outer) roof…
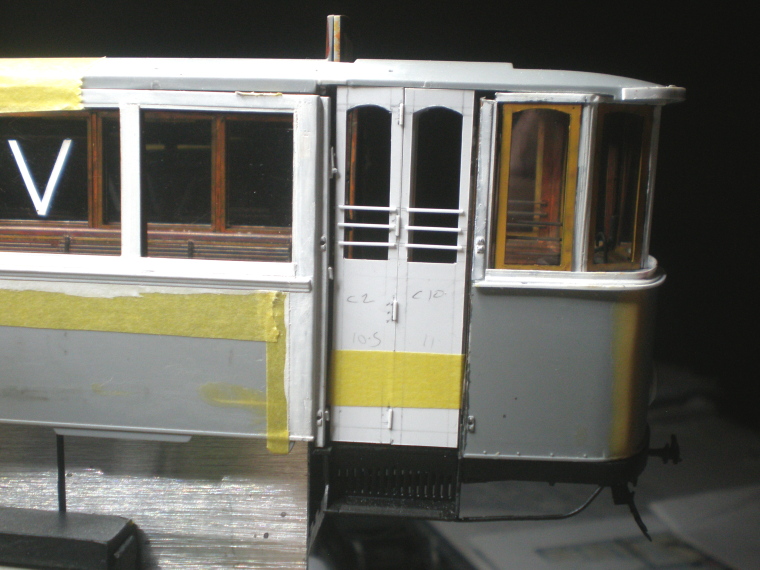
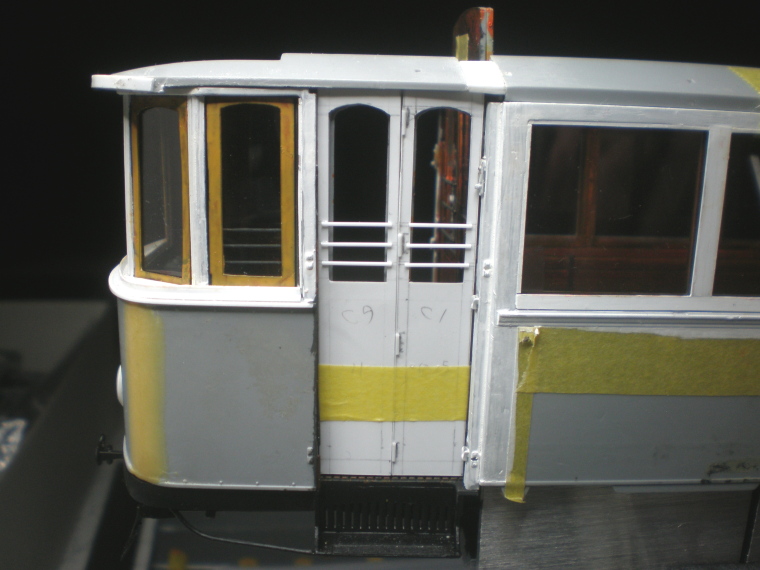

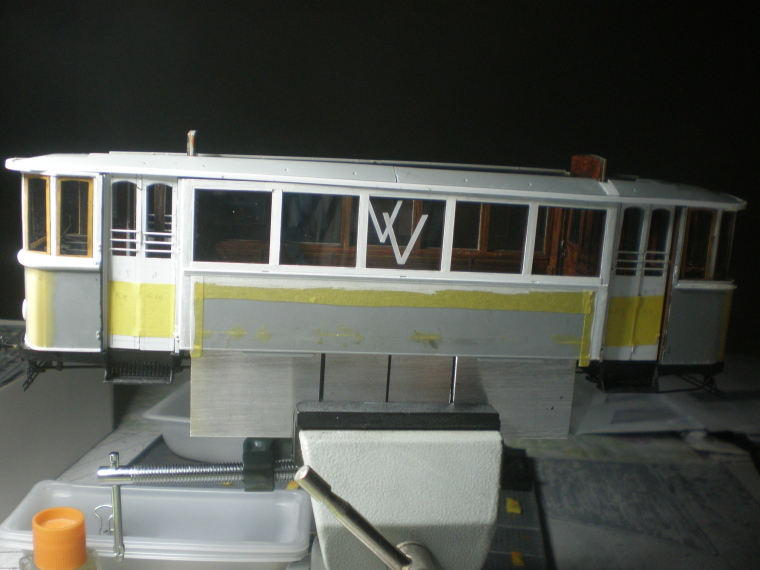
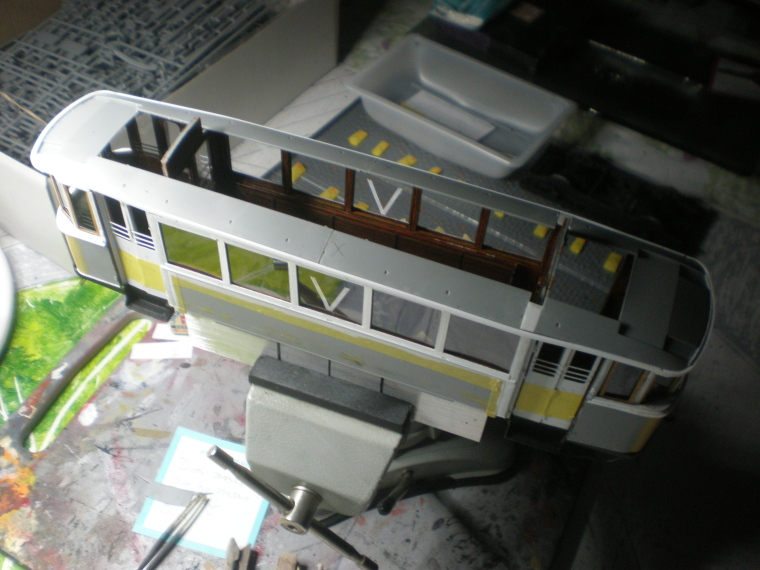
Lots of tidy-ups to do - it’s unsettling to go so far ahead without fixing obvious errors but the priority is still to work out how all the modifications & scratch-building fit together. As many would know there’s little worse than spending a lot of time perfecting a part, only to find it’s useless. Anyhow the doors should be OK so onwards/upwards to the last big piece of the jig-saw, the outer roof…

Issues - first, due to exploratory surgery earlier in this build by which I screwed up the right-hand inner-roof shortening (in above photo) the two halves are dimensionally different…as are the two cabs for the same reason. I found out the hard way it was feasible to shorten the other (left) end by just cutting off the two trailing ends without losing anything important. Having equalized them as much as possible I bonded them together with extra Evergreen because MiniArt only provided 2 nano-tabs - to be fair that’s because the two halves are designed to be primarily attached to/supported by the compartment & cab walls and just butted against each other, whereas I need to make the entire roof unit separately. It doesn’t quite sit flush on the tram body yet but I know why – it’ll need to be perfect because it must be detachable to get into the compartment during diorama photography, so glue can’t come to my rescue fit-wise.
Second, in the upper part of the photo is the kit roof, as mentioned mostly useless because of it’s bull-nosed ends plus it’s too long and wide – the inner roof shows the slot it must sit above except it’ll be even shorter because the outer roof only sat above the central compartment in Prague trams. That slot also need to be slightly narrower too, I haven’t got around to measuring it up yet. (The tram looks bigger because I had to rest it on its chassis, so it’s nearer the camera). Luckily all the locating points on the upper roof surface for the power pole framework fall within the dimensions of the central chunk I need to salvage. But just for fun the small square windows running down each side of the upper-roof superstructure are completely different too, that’ll all be the subject for next time.


Lots of tidy-ups to do - it’s unsettling to go so far ahead without fixing obvious errors but the priority is still to work out how all the modifications & scratch-building fit together. As many would know there’s little worse than spending a lot of time perfecting a part, only to find it’s useless. Anyhow the doors should be OK so onwards/upwards to the last big piece of the jig-saw, the outer roof…

Issues - first, due to exploratory surgery earlier in this build by which I screwed up the right-hand inner-roof shortening (in above photo) the two halves are dimensionally different…as are the two cabs for the same reason. I found out the hard way it was feasible to shorten the other (left) end by just cutting off the two trailing ends without losing anything important. Having equalized them as much as possible I bonded them together with extra Evergreen because MiniArt only provided 2 nano-tabs - to be fair that’s because the two halves are designed to be primarily attached to/supported by the compartment & cab walls and just butted against each other, whereas I need to make the entire roof unit separately. It doesn’t quite sit flush on the tram body yet but I know why – it’ll need to be perfect because it must be detachable to get into the compartment during diorama photography, so glue can’t come to my rescue fit-wise.
Second, in the upper part of the photo is the kit roof, as mentioned mostly useless because of it’s bull-nosed ends plus it’s too long and wide – the inner roof shows the slot it must sit above except it’ll be even shorter because the outer roof only sat above the central compartment in Prague trams. That slot also need to be slightly narrower too, I haven’t got around to measuring it up yet. (The tram looks bigger because I had to rest it on its chassis, so it’s nearer the camera). Luckily all the locating points on the upper roof surface for the power pole framework fall within the dimensions of the central chunk I need to salvage. But just for fun the small square windows running down each side of the upper-roof superstructure are completely different too, that’ll all be the subject for next time.


maartenboersma

Joined: October 10, 2010
KitMaker: 764 posts
Armorama: 742 posts

Posted: Saturday, November 17, 2018 - 02:16 AM UTC
Smooth moves


cheyenne

Joined: January 05, 2005
KitMaker: 2,185 posts
Armorama: 1,813 posts

Posted: Saturday, November 17, 2018 - 03:16 AM UTC
Nicely done Tim !!!
How's your back doing , mending I hope .
I went to my Dr and told him I had a weak back , he asked me how long have I had a weak back , I told him " oh about a week back " .
Yeah I know I told this one already .........
How's your back doing , mending I hope .
I went to my Dr and told him I had a weak back , he asked me how long have I had a weak back , I told him " oh about a week back " .
Yeah I know I told this one already .........
jrutman

Joined: April 10, 2011
KitMaker: 7,941 posts
Armorama: 7,934 posts

Posted: Saturday, November 17, 2018 - 03:50 AM UTC
Good to see you back at the grindstone! Nice work as usual here.
J
J
Dioramartin

Joined: May 04, 2016
KitMaker: 1,476 posts
Armorama: 1,463 posts

Posted: Wednesday, November 21, 2018 - 01:11 AM UTC
Thanks as always gentlemen & yes the L2/L3 vertebrae have completely relaxed so I’ve ditched the Quasimodo outfit & despite being out of town for the past few days there’ll be something fresh off the grindstone soon 

PolishBrigade12

Joined: January 31, 2009
KitMaker: 380 posts
Armorama: 366 posts

Posted: Friday, November 23, 2018 - 02:26 PM UTC
Progress is looking excellent Tim!
Dioramartin

Joined: May 04, 2016
KitMaker: 1,476 posts
Armorama: 1,463 posts

Posted: Friday, November 23, 2018 - 03:09 PM UTC
Thanks Ski, hope you don’t change your mind after this! The cabs were quite scary to modify but somehow the more I had to measure the roof elements for amendments the more spooked I became, probably because each step depended on accurate cutting/scratching in the previous step & there are several steps.
So here’s one side of the superstructure’s side-windows, kit vs. Prague, new frame verticals are Evergreen 1.5mm channel…

The line across the kit roof is the cut-off point, this was a test-fit of the window-run which showed that the I-beam glued along the inside slot of the inner roof would work as a way of necessarily narrowing it, but not so much as the channel for the window-run to rest in…
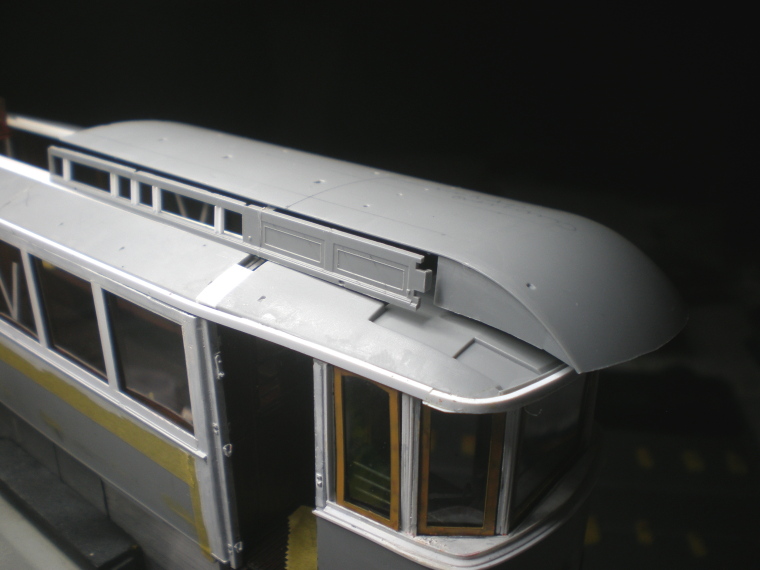
…so improvements comprised reinforcing the I-beam with an L-angle strip supporting it under the lip of the slot, and another strip of L-angle inside the channel to provide a snugger (is that a word?) fit for the window-run…
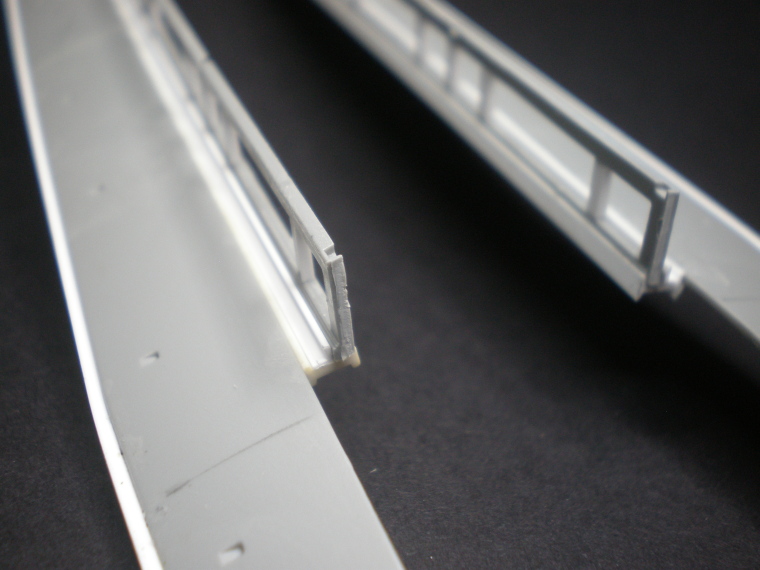
…& repeated for the other side…

Now for the outer roof, kit vs. dissection for the Prague version…
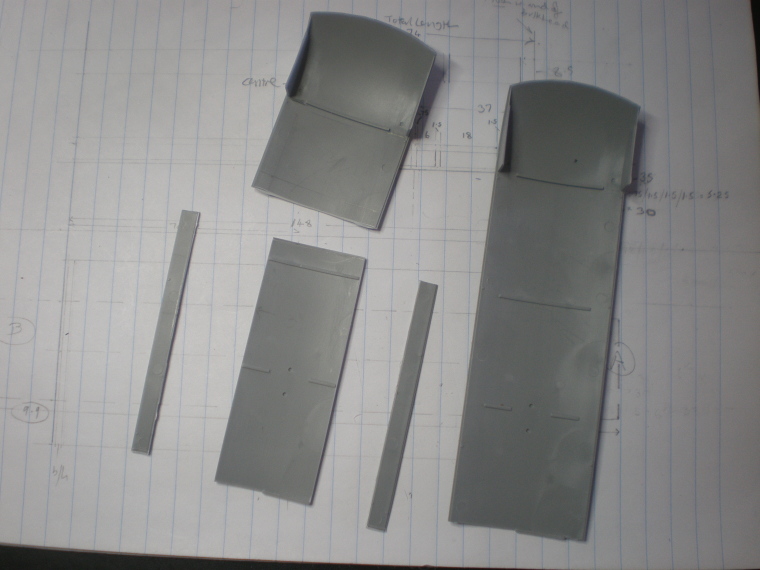
Just needs a trace of glue to secure it…
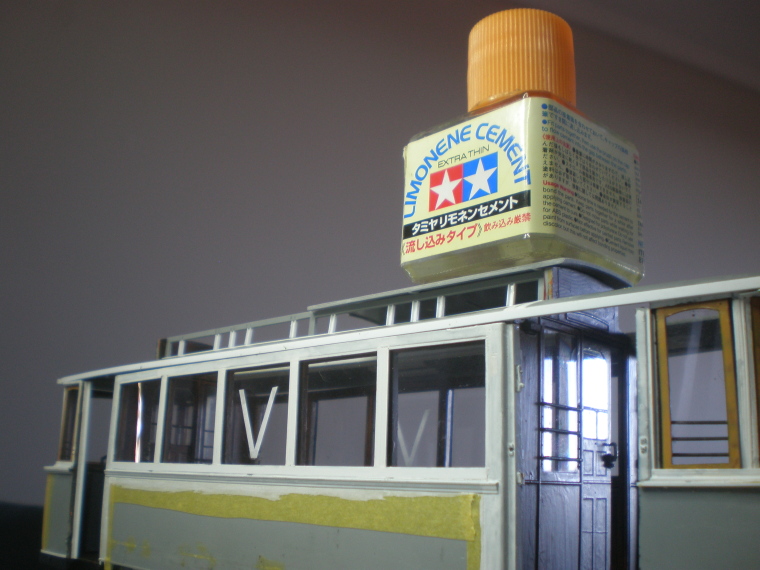
Yep, scariest of all are my superhuman powers of accurate measurement & surgical skills, it’s just astounding how it all just dropped into place perfectly no problem whatsoever…


So here’s one side of the superstructure’s side-windows, kit vs. Prague, new frame verticals are Evergreen 1.5mm channel…

The line across the kit roof is the cut-off point, this was a test-fit of the window-run which showed that the I-beam glued along the inside slot of the inner roof would work as a way of necessarily narrowing it, but not so much as the channel for the window-run to rest in…

…so improvements comprised reinforcing the I-beam with an L-angle strip supporting it under the lip of the slot, and another strip of L-angle inside the channel to provide a snugger (is that a word?) fit for the window-run…

…& repeated for the other side…

Now for the outer roof, kit vs. dissection for the Prague version…

Just needs a trace of glue to secure it…

Yep, scariest of all are my superhuman powers of accurate measurement & surgical skills, it’s just astounding how it all just dropped into place perfectly no problem whatsoever…


strongarden

Joined: May 14, 2012
KitMaker: 730 posts
Armorama: 624 posts

Posted: Friday, November 23, 2018 - 08:26 PM UTC
Tim hope you're feelin better!
Been lurking around for awhile but wanted to surface and say I really enjoy your work here.
Im speechless when scrolling thru the pgs, and I especially appreciate the problem solving adventures
Thanks in advance for seeing this thru to completion dude
Regards
Dave


Been lurking around for awhile but wanted to surface and say I really enjoy your work here.
Im speechless when scrolling thru the pgs, and I especially appreciate the problem solving adventures

Thanks in advance for seeing this thru to completion dude

Regards
Dave


jrutman

Joined: April 10, 2011
KitMaker: 7,941 posts
Armorama: 7,934 posts

Posted: Sunday, November 25, 2018 - 03:01 AM UTC
Looking at the mount of work you are doing with just one tram car,folks can get somewhat the idea of how freekin huge this project really is!
Nice!
J
Nice!
J

Blaubar

Joined: December 15, 2016
KitMaker: 261 posts
Armorama: 246 posts

Posted: Sunday, November 25, 2018 - 03:19 AM UTC
Holy smokes,
this has gone wild! Truly epic project you're having here. These tram cars just look amazing as they are, but your additions and customization are awesome. Loving this project.
/Stefan
this has gone wild! Truly epic project you're having here. These tram cars just look amazing as they are, but your additions and customization are awesome. Loving this project.
/Stefan
Dioramartin

Joined: May 04, 2016
KitMaker: 1,476 posts
Armorama: 1,463 posts

Posted: Sunday, November 25, 2018 - 09:52 PM UTC
Thanks guys as always for taking the time, yes Dave feelin’ loose again & as you, Jerry & Stef have reminded me this project’s somewhat larger than I’d imagined at the outset. I remember thinking when I first posted the idea that it would actually all be finished by Christmas latest – good thing I’m not a financial advisor or building contractor.
Even so I keep thinking this really shouldn’t be that much of an epic – a car, a couple of trams, a street, a tree & a few figures, on paper no big deal. Whoever said the devil’s in the detail (Shakespeare?), they were dead right. This’ll be the first & last time you’ll hear that today, the rage factor went off the scale with the tram roof. I’ve yet to work out why some days neither cyano or extra-thin cement will glue anything to anything else – it’s neither humid, dusty, cold or hot but both just disintegrated in several places during handling. The only obvious factor (to me) is that Evergreen doesn’t melt with MiniArt plastic using styrene glues at all, so I guess it’s a chemical mismatch.
Even so I keep thinking this really shouldn’t be that much of an epic – a car, a couple of trams, a street, a tree & a few figures, on paper no big deal. Whoever said the devil’s in the detail (Shakespeare?), they were dead right. This’ll be the first & last time you’ll hear that today, the rage factor went off the scale with the tram roof. I’ve yet to work out why some days neither cyano or extra-thin cement will glue anything to anything else – it’s neither humid, dusty, cold or hot but both just disintegrated in several places during handling. The only obvious factor (to me) is that Evergreen doesn’t melt with MiniArt plastic using styrene glues at all, so I guess it’s a chemical mismatch.


cheyenne

Joined: January 05, 2005
KitMaker: 2,185 posts
Armorama: 1,813 posts

Posted: Monday, November 26, 2018 - 01:26 AM UTC
Tim , you've always got beautiful scratch projects , I look at the work and say to myself , for me to do that would be like trying to pick up a turd from the clean end , just not happening .
When ever I find myself in that no glue will work on certain plastics situation I always use my standby Loctite power grab . Stuff works on everything , never failed me .
Now don't tell me you don't have that in Oz .

When ever I find myself in that no glue will work on certain plastics situation I always use my standby Loctite power grab . Stuff works on everything , never failed me .
Now don't tell me you don't have that in Oz .

jrutman

Joined: April 10, 2011
KitMaker: 7,941 posts
Armorama: 7,934 posts

Posted: Monday, November 26, 2018 - 02:19 AM UTC
Quoted Text
Thanks guys as always for taking the time, yes Dave feelin’ loose again & as you, Jerry & Stef have reminded me this project’s somewhat larger than I’d imagined at the outset. I remember thinking when I first posted the idea that it would actually all be finished by Christmas latest – good thing I’m not a financial advisor or building contractor.
Even so I keep thinking this really shouldn’t be that much of an epic – a car, a couple of trams, a street, a tree & a few figures, on paper no big deal. Whoever said the devil’s in the detail (Shakespeare?), they were dead right. This’ll be the first & last time you’ll hear that today, the rage factor went off the scale with the tram roof. I’ve yet to work out why some days neither cyano or extra-thin cement will glue anything to anything else – it’s neither humid, dusty, cold or hot but both just disintegrated in several places during handling. The only obvious factor (to me) is that Evergreen doesn’t melt with MiniArt plastic using styrene glues at all, so I guess it’s a chemical mismatch.
To set your mind at rest a bit,I have found super glue has 2 methods of bonding. If you have an extremely small,delicate part to attach that has to be held just a certain way,then the glue takes 2 weeks to dry.If you get a part in a wrong position or it makes contact with your skin,then it bonds less than instantaneously!
These properties seem to be constant with me,just sayin'.
J
Dioramartin

Joined: May 04, 2016
KitMaker: 1,476 posts
Armorama: 1,463 posts

Posted: Monday, November 26, 2018 - 03:00 AM UTC
Hey Chey, yes we got that here and it sure works but from memory it’s too thick for purpose, I gave up on even ordinary styrene glues for the same reason, oozing out like cream layers in a cake & wiping away the surplus only to find it taking the surface off with it. A lot of joints I’m doing now …but that’s not important right now, a lot of joins I’m doing now need the capillary action of the extra thin liquid. I guess the main problem – apart from the plastics incompatibility – are the relatively small contact areas, thin strips etc. I’ve tried lightly sanding the Evergreen and kit part to give it more “tooth” but doesn’t seem to help any. Other problem is the Loctite’s zero-seconds grab time – not having super-hero reflexes if I used that on this tram it would probably end up looking like the Hindenburg after its final descent.
Abso-f%***!^-lutely Jerry, that has been exactly my experience too. I timed one such attempt a few weeks ago – 45 minutes to set, room temperature 68% humidity (I checked)…”Bonds in Seconds” it says on the tube…yeah 2,700 of 'em. (Although redeeming feature is putting a puddle on a piece of glass & using some wire to apply it, handy as it usually lasts about 30 minutes before becoming unusable)

Abso-f%***!^-lutely Jerry, that has been exactly my experience too. I timed one such attempt a few weeks ago – 45 minutes to set, room temperature 68% humidity (I checked)…”Bonds in Seconds” it says on the tube…yeah 2,700 of 'em. (Although redeeming feature is putting a puddle on a piece of glass & using some wire to apply it, handy as it usually lasts about 30 minutes before becoming unusable)


strongarden

Joined: May 14, 2012
KitMaker: 730 posts
Armorama: 624 posts

Posted: Monday, November 26, 2018 - 04:28 AM UTC
Hey Tim I'm enjoying this just as much as I am impressed!
As for the glue not cementing properly, I feel your pain. Maybe, and I say maybe, MiniArt's plastic has a small percentage of vinyl (or whatever) in it's property.
And an ultra fine part might not be able to meld as well... with a non-MiniArt plastic. Like differing brands of primers and top coatings.
I know from exp their building's can be tricky to assemble and have them stay tight and true. It's been discussed here.
I know you've probably tried everything, just my 2c
Regards
Dave
As for the glue not cementing properly, I feel your pain. Maybe, and I say maybe, MiniArt's plastic has a small percentage of vinyl (or whatever) in it's property.
And an ultra fine part might not be able to meld as well...
 with a non-MiniArt plastic. Like differing brands of primers and top coatings.
 I know from exp their building's can be tricky to assemble and have them stay tight and true. It's been discussed here.
I know you've probably tried everything, just my 2c

Regards

Dave

 |


