Queensland, Australia
Joined: August 06, 2005
KitMaker: 3,353 posts
Armorama: 3,121 posts
Posted: Wednesday, August 29, 2018 - 04:03 PM UTC
Quoted Text
I intend to add some scratchbuilt details to the chassy.

Yeah, the chassis is looking slightly bare. Some axle housings, drive shafts, differentials, brakes, etc, etc, etc, ….

On the Bench:
Dust, styrene scraps, paint splotches and tears.

#490
Sofiya, Bulgaria
Joined: September 22, 2016
KitMaker: 1,432 posts
Armorama: 1,390 posts
Posted: Wednesday, August 29, 2018 - 06:01 PM UTC
Axle housings, differential and brake boosters are provided as castings, same as pressure bottles for braking system.
Piping will be added to connect varous elements of braking system.
And some wiring.
Plus the inevitable drain and check plugs-where they are not present.
Front axle will need some additions too- the shock absorbers being the most important, but also elements from the steering.


#490
Sofiya, Bulgaria
Joined: September 22, 2016
KitMaker: 1,432 posts
Armorama: 1,390 posts
Posted: Saturday, September 01, 2018 - 09:32 PM UTC
Status on my ZIL-130 build:

Piping for air brake system added:


Fuel lines with scratchbuild coarse fuel filter and scratchbuild brake valve(needs to be installed-6 lines to attach):

Shock absorbers on front axle scratchbuild and mounted.
Still considering whether detailing the engine does make sense-it will not be visible at all.Will see...


#521
Kentucky, United States
Joined: April 13, 2011
KitMaker: 9,465 posts
Armorama: 8,695 posts
Posted: Sunday, September 02, 2018 - 12:48 AM UTC
Angel, What a great job on the Tee air line on top of that rear differential. I can never get mine that clean and square. Kudos!

#490
Sofiya, Bulgaria
Joined: September 22, 2016
KitMaker: 1,432 posts
Armorama: 1,390 posts
Posted: Sunday, September 02, 2018 - 05:40 PM UTC
Thanks Mike!
Spent almost an hour installing(fighting) the brake valve and attaching all 6 connections:

Added power lines from the battery:


Queensland, Australia
Joined: August 06, 2005
KitMaker: 3,353 posts
Armorama: 3,121 posts
Posted: Sunday, September 02, 2018 - 09:06 PM UTC
Wow, more spaghetti than a pasta factory...
Very nice Angel.
On the Bench:
Dust, styrene scraps, paint splotches and tears.

#490
Sofiya, Bulgaria
Joined: September 22, 2016
KitMaker: 1,432 posts
Armorama: 1,390 posts
Posted: Sunday, September 02, 2018 - 10:12 PM UTC

Peter, soon I'll spice up the spaghetti with some salami(exhaust piping)...

Virginia, United States
Joined: July 05, 2004
KitMaker: 769 posts
Armorama: 461 posts
Posted: Monday, September 03, 2018 - 03:09 AM UTC
Here is my entry for the ResinII campaign. Verlinden Italian knight, 120mm.

Jesse
Time is a great teacher. Unfortunately, it kills all it's students.
Sofiya, Bulgaria
Joined: November 26, 2017
KitMaker: 393 posts
Armorama: 369 posts
Posted: Monday, September 03, 2018 - 03:25 AM UTC
Angel, you've succeeded! Congratulations!

#490
Sofiya, Bulgaria
Joined: September 22, 2016
KitMaker: 1,432 posts
Armorama: 1,390 posts
Posted: Monday, September 03, 2018 - 04:22 AM UTC
Thanks Kalin!
Look forward to see the progress on your Steyr 640 Ambulance.
Jesse, interresting choice!
I never dared assembling and painting figures-Kalin is painting them for me(very convenient)

...
Look forward to see how your build unfolds!

Sofiya, Bulgaria
Joined: November 26, 2017
KitMaker: 393 posts
Armorama: 369 posts
Posted: Monday, September 03, 2018 - 05:31 AM UTC
I have a slight problem with the fit of the individual items, but I hope in the near future to share with you my progress.
Virginia, United States
Joined: July 05, 2004
KitMaker: 769 posts
Armorama: 461 posts
Posted: Monday, September 03, 2018 - 11:43 AM UTC
Thanks Angel. Your build is coming along great! I am planning to put this guy into a diorama with 2 others fighting a dragon.
Jesse
Time is a great teacher. Unfortunately, it kills all it's students.

#490
Sofiya, Bulgaria
Joined: September 22, 2016
KitMaker: 1,432 posts
Armorama: 1,390 posts
Posted: Tuesday, September 04, 2018 - 12:42 AM UTC
Jesse,
I hope your 3 warriors "won't be crunchy and won't taste good with ketchup"

District of Columbia, United States
Joined: March 05, 2009
KitMaker: 154 posts
Armorama: 137 posts
Posted: Tuesday, September 04, 2018 - 12:55 PM UTC
Hi all,
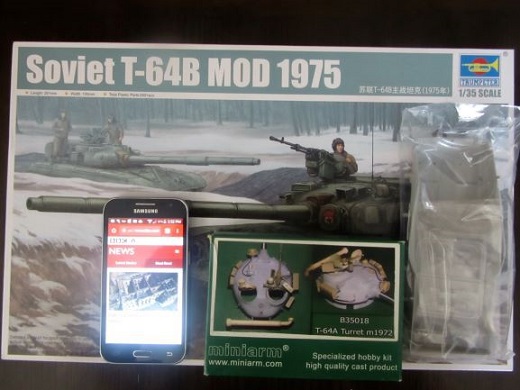
I will be building a Novorossian T-64a that fought in the battles around the Debaltsevo cauldron for this campaign. The main kit is the Trumpeter's T-64b, and I will be using a Miniart turret slightly modifying it to include smoke dischargers from CMK Kits. Some surgery will be needed to fit the turret.

Workbench:
T-34/85 (Dragon)
T-80U (Skit T-80UD + SP Designs conversion)
North Carolina, United States
Joined: September 16, 2004
KitMaker: 1,281 posts
Armorama: 1,222 posts
Posted: Wednesday, September 05, 2018 - 07:34 AM UTC
This will be my entry


#490
Sofiya, Bulgaria
Joined: September 22, 2016
KitMaker: 1,432 posts
Armorama: 1,390 posts
Posted: Friday, September 07, 2018 - 05:21 AM UTC
Raul and Chris- good luck with your builds!


#490
Sofiya, Bulgaria
Joined: September 22, 2016
KitMaker: 1,432 posts
Armorama: 1,390 posts
Posted: Friday, September 07, 2018 - 06:02 AM UTC
Queensland, Australia
Joined: August 06, 2005
KitMaker: 3,353 posts
Armorama: 3,121 posts
Posted: Friday, September 07, 2018 - 07:53 AM UTC
Looks fantastic Angel.
I hope the doors open, or all that detail will be wasted!
PS I do not think there were too many Dragon fighting Italian Knights. I think they left that to mad Greeks, that were Roman soldiers... and somehow became Patron saints of many other countries ???? and of course, Ogres and Donkeys...
"Oh. You're a GIRL Dragon...…"

On the Bench:
Dust, styrene scraps, paint splotches and tears.
Queensland, Australia
Joined: August 06, 2005
KitMaker: 3,353 posts
Armorama: 3,121 posts
Posted: Friday, September 07, 2018 - 08:10 AM UTC
Chris and Raul. Nice choices guys.
I finally settled on the Legend Israeli Puma. I will re-acquaint myself with their resin kits before doing the M88A2 conversion. I want to do that real justice. This will be a challenge anyway.
Start pic.

The etch and wire is included in the kit, but the pic also shows the AFV Club tracks I hope will fit. The link and length resin ones look a bit of a challenge, as are the instructions - just 4 A4 sized pages, one of which is just a photo of the parts!
I just noticed no decals either.
On the Bench:
Dust, styrene scraps, paint splotches and tears.
North Carolina, United States
Joined: September 16, 2004
KitMaker: 1,281 posts
Armorama: 1,222 posts
Posted: Friday, September 07, 2018 - 08:51 AM UTC
Quoted Text
Chris and Raul. Nice choices guys.
I finally settled on the Legend Israeli Puma. I will re-acquaint myself with their resin kits before doing the M88A2 conversion. I want to do that real justice. This will be a challenge anyway.
Start pic.

The etch and wire is included in the kit, but the pic also shows the AFV Club tracks I hope will fit. The link and length resin ones look a bit of a challenge, as are the instructions - just 4 A4 sized pages, one of which is just a photo of the parts!
I just noticed no decals either.
That’s a lot of resin.
Queensland, Australia
Joined: August 06, 2005
KitMaker: 3,353 posts
Armorama: 3,121 posts
Posted: Friday, September 07, 2018 - 12:25 PM UTC
Oh yes it is. It has some hefty pour plugs too. The hull top piece alone weighs 127 grams trimmed of pour plug and fillets.
After posting I had a closer look at the kit and realised the lower hull is warped. First job, straighten that out.
On the Bench:
Dust, styrene scraps, paint splotches and tears.
Western Australia, Australia
Joined: May 05, 2006
KitMaker: 900 posts
Armorama: 510 posts
Posted: Sunday, September 09, 2018 - 08:53 PM UTC
Going to join in this campaign with a fellow that has been languishing in the stash for a few years

!/9 scale Modern Navy SEAL, Iraq, from Special Ops Models.
I've got four of their figures but haven't started one yet. The quality looks pretty good, and after removing the pour stubs, test fitting of the limbs and torso goes quite nicely. The aluminium rifle barrel and brass flash suppressor look really nice too.
There are a few casting bubbles on the underside of the magazine and carry handle of the rifle, and a couple of prominent but not egregious mould seams on the limbs to take care of. Apart from that, this should be a fairly relaxed build.
Don't you feel more like you do now than you did when you came in?

#041
Kobenhavn, Denmark
Joined: July 20, 2006
KitMaker: 10,069 posts
Armorama: 4,677 posts
Posted: Saturday, September 15, 2018 - 12:21 AM UTC
Time to get started for this campaign.
I am building the Warhammer 30k mechanic is Knight. Entirely in resin.
The main parts were constructed in just one evening. Next is a white base coat and a lot of clean up of the parts.


Campaign'oholic - 252+ campaigns completed
Queensland, Australia
Joined: August 06, 2005
KitMaker: 3,353 posts
Armorama: 3,121 posts
Posted: Saturday, September 15, 2018 - 09:14 AM UTC
Wow Jesper. That is a lot in one night.
On the Bench:
Dust, styrene scraps, paint splotches and tears.

#490
Sofiya, Bulgaria
Joined: September 22, 2016
KitMaker: 1,432 posts
Armorama: 1,390 posts
Posted: Saturday, September 15, 2018 - 09:49 PM UTC
Peter, that's really a lot of resin!And a quite welcomed build,mate!
Iain, glad to see another resin figure in this Campaign!
And Jesper-I still remember the fine Sci Fi build you produced in Resin I Campaign.I'm sure that will be another stunner!
I'm finishing my one-week Greece holiday and will show some progress soon,
Till then-happy modeling everyone!


 ...
...


