Thanks Chuck!
I have a crush on these ancient T-34 (& derivatives) Zvezda kits.
This is the third one I'm building and each time I promise myself I'll do a plain OOB build, but then I end up doing a lot of surgery and producing a lot of own parts.
Maybe it's because the kits- like the real vehicles- are sturdy, not so sophisticated, withstand a lot of abuse and still live up to their purpose- providing modelling fun.
Campaigns: Active Campaigns
Campaigns that are either in planning or underway should be grouped here.
Hosted by Richard S.
Official Tank Destroyers Campaign
Posted: Thursday, April 16, 2020 - 03:53 AM UTC
Klaus-Adler
Campaigns Administrator
Scotland, United Kingdom
Joined: June 08, 2015
KitMaker: 1,505 posts
Armorama: 840 posts
Joined: June 08, 2015
KitMaker: 1,505 posts
Armorama: 840 posts
Posted: Thursday, April 16, 2020 - 05:22 AM UTC
Chuck, that's some great scratch building you've done there.
Angel, looking forward to seeing your build, remember a T34 is a tank and not a tank destroyer :-)
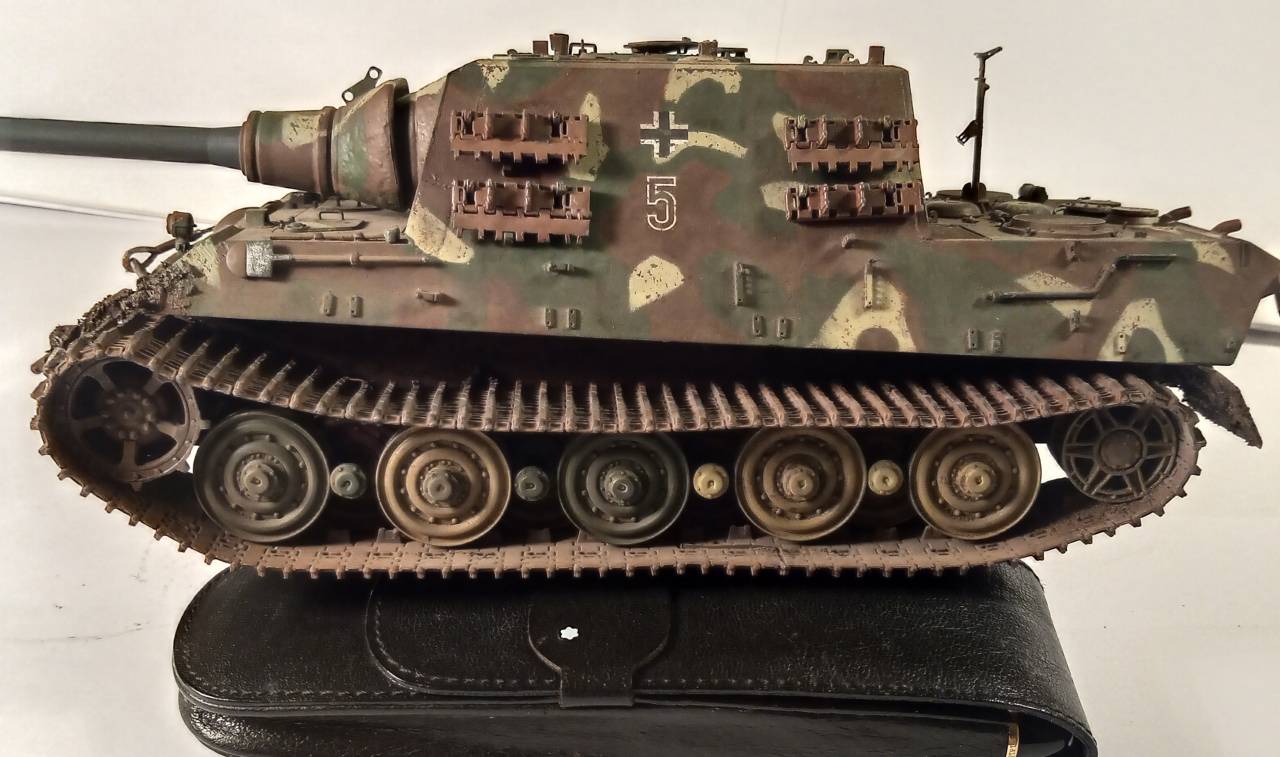
I've coated the jagdtiger with clear gloss and add the decals. I will post a picture tomorrow hopefully.
Angel, looking forward to seeing your build, remember a T34 is a tank and not a tank destroyer :-)
I've coated the jagdtiger with clear gloss and add the decals. I will post a picture tomorrow hopefully.
hetzer44
Maryland, United States
Joined: December 21, 2005
KitMaker: 241 posts
Armorama: 124 posts
Joined: December 21, 2005
KitMaker: 241 posts
Armorama: 124 posts
Posted: Thursday, April 16, 2020 - 05:32 AM UTC
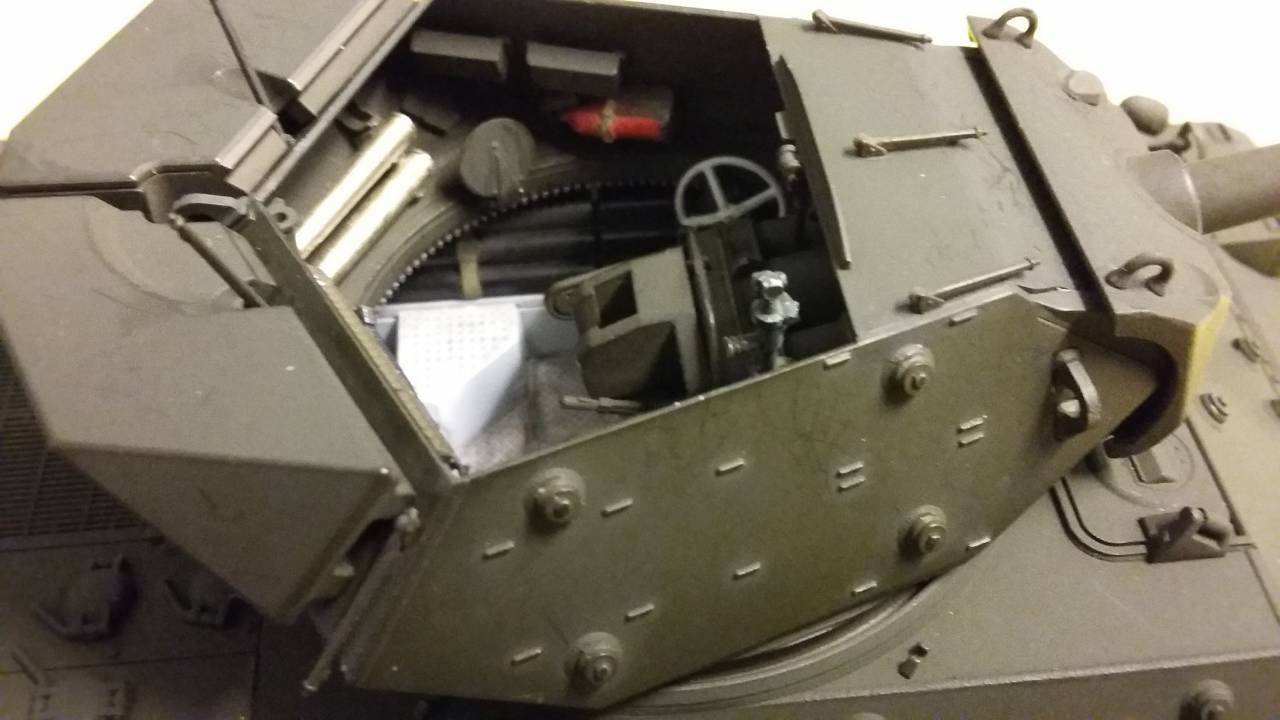
Thanks David. I'm not much of a scratchbuilder, but with all the open and exposed space, I really had little choice but to find some pics with some interior detail to replicate. Looking forward to your progress as well. Your work looks very promising and it may end up having me buy this kit to replicate your work.
Angel, yes I enjoy those older Zvezda kits too. I bought the old SU-100 Zvezda kit back when I visited Russia years ago. The box was marked, "Not for Sale Outside of the USSR." Rough detail, but very sturdy and strong so it would be ideal for making changes.
Cheers!
chuck
Angel, yes I enjoy those older Zvezda kits too. I bought the old SU-100 Zvezda kit back when I visited Russia years ago. The box was marked, "Not for Sale Outside of the USSR." Rough detail, but very sturdy and strong so it would be ideal for making changes.
Cheers!
chuck
Petro
Connecticut, United States
Joined: November 02, 2003
KitMaker: 984 posts
Armorama: 846 posts
Joined: November 02, 2003
KitMaker: 984 posts
Armorama: 846 posts
Posted: Thursday, April 16, 2020 - 06:06 AM UTC
Angel, your build skills are always a pleasure to view.
Chuck, looking good, and i agree, this campaign rocks.
David, is your paint job on the J Tiger based on a photo, or just a home brew?
Chuck, looking good, and i agree, this campaign rocks.
David, is your paint job on the J Tiger based on a photo, or just a home brew?
Johnnych01
England - South West, United Kingdom
Joined: June 29, 2019
KitMaker: 604 posts
Armorama: 506 posts
Joined: June 29, 2019
KitMaker: 604 posts
Armorama: 506 posts
Posted: Thursday, April 16, 2020 - 08:57 AM UTC
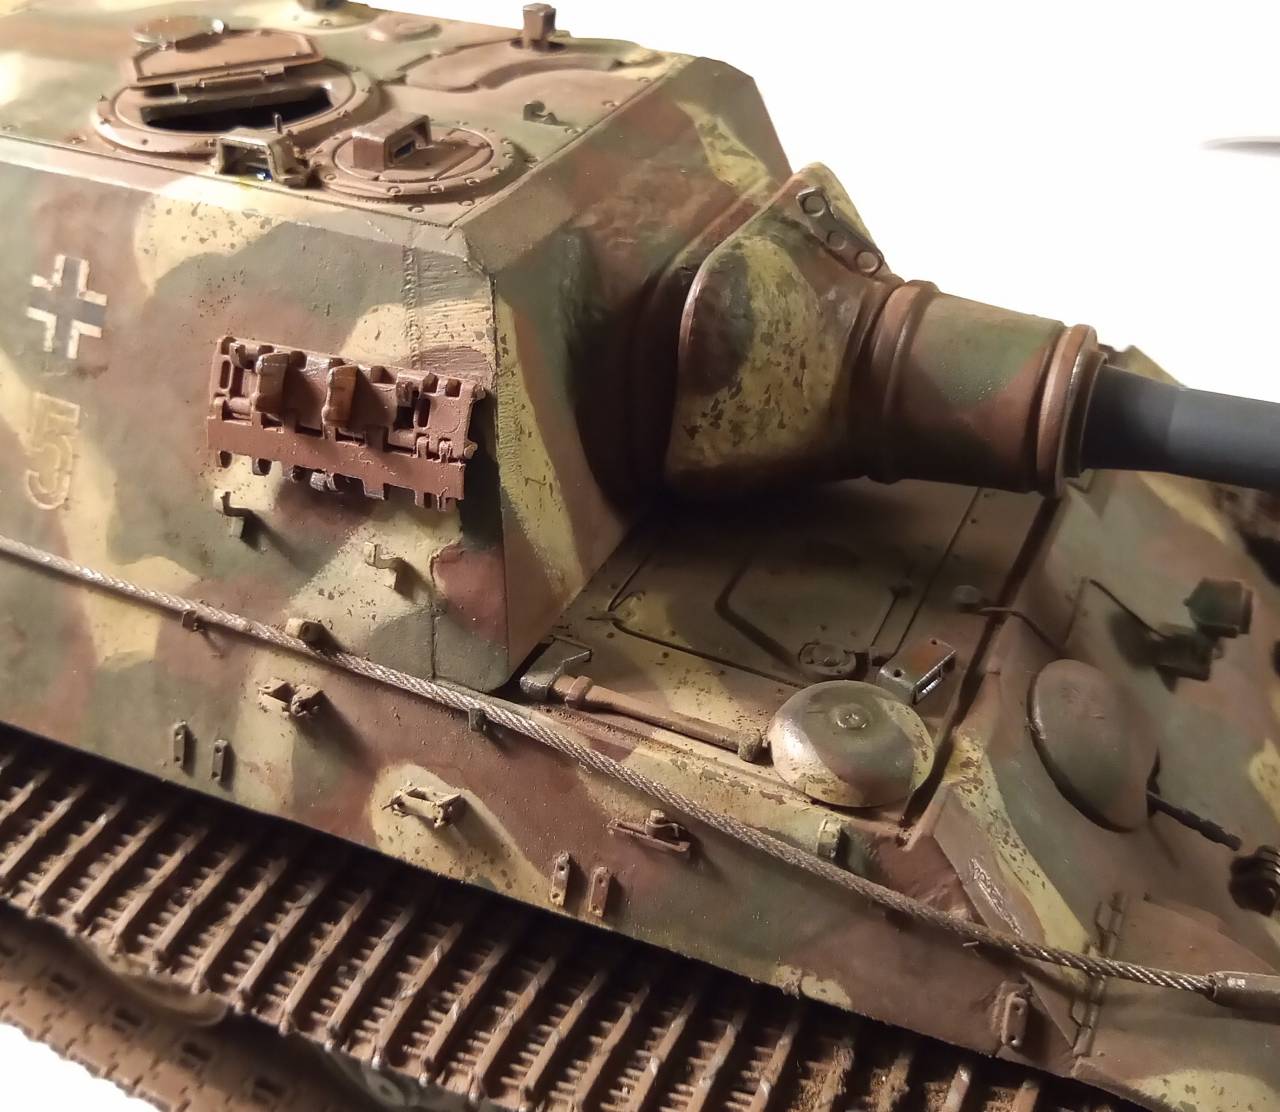
Well guy's, I'm calling this Jagdtiger finished. I'm pretty happy with how it turned out, and there are a few things that I would tweak it I did it again.
Although it was an old DML kit, it wasn't as bad as I thought initially.
Aftermarket set from voyager helped freshen it up, and I had a massive save from Norman when he donated a spare tamiya JTiger track he had, so thanks again Norman.
Hope people enjoy the finished result, it was good fun to build. Paints were tamiya acrylics and life colour dunklegelb, a raw Sienna wash and mig weathering powders.
And thanks to David for organising the campaign.
Stay safe and happy modelling.
nsjohn
Scotland, United Kingdom
Joined: July 26, 2018
KitMaker: 279 posts
Armorama: 265 posts
Joined: July 26, 2018
KitMaker: 279 posts
Armorama: 265 posts
Posted: Thursday, April 16, 2020 - 10:40 AM UTC
And again, you're more than welcome. Delighted to see that they have been put to such good use. The sag is particularly impressive given the difficulties you had to begin with. Once again it shows what can be achieved with an older model, with the necessary skills which you obviously have in abundance.
Johnnych01
England - South West, United Kingdom
Joined: June 29, 2019
KitMaker: 604 posts
Armorama: 506 posts
Joined: June 29, 2019
KitMaker: 604 posts
Armorama: 506 posts
Posted: Thursday, April 16, 2020 - 10:52 AM UTC
Thanks Norman for your very kind remarks ... If I hadn't had those heavenly tamiya tracks, I would still be crying as I tried to put those DML indi links together lol.
This has been a few firsts for me, first campaign I've ever joined, first model I have finished and posted pics of so I was very happy to of finished it.
panzerman1
Maryland, United States
Joined: September 30, 2010
KitMaker: 430 posts
Armorama: 291 posts
Joined: September 30, 2010
KitMaker: 430 posts
Armorama: 291 posts
Posted: Thursday, April 16, 2020 - 07:58 PM UTC
John, thanks. Besides the cut-a-way, I'm leaving the top hull loose to view the interior.
Oliver, thanks.
Peter, yes, it does resemble it. Like in the one movie it took the rear corner off of a trailer.
Robert, nice to see another Hetzer in the campaign. Have fun.
Oliver, wonderful work. You bring exacting detail to your build.
LiquorRanch, I like the camo paint scheme on your Pak armed 234.
Chuck, good progress on your build. I like the scratchbuilt detail on the interior.
Tom, thanks. Yes, those tank crews must of been a lot smaller than we are today. Nice work on your Kanonen Jagpanzer.
Angel, nice work on your Bulgarian Su-100. All those early kits had voids over the fenders..... pain in the butt.
Nathan, nice kit for the campaign. Have fun.
David, I like the camo paint scheme on your Jagtiger.
John, truly a wonderful finish to your Jagtiger. Weathering really brought it to life.
Good luck to everyone on their projects. Bill
panzerman1
Maryland, United States
Joined: September 30, 2010
KitMaker: 430 posts
Armorama: 291 posts
Joined: September 30, 2010
KitMaker: 430 posts
Armorama: 291 posts
Posted: Thursday, April 16, 2020 - 08:05 PM UTC
Update on my 1/48 Bandai Hetzer.
Engine compartment is finished. Now it's ready for painting.
Started detailing the main gun. Bandai left quite a lot of detail off of this item.
Thanks for viewing. Good luck to all on your projects. Bill
Engine compartment is finished. Now it's ready for painting.
Started detailing the main gun. Bandai left quite a lot of detail off of this item.
Thanks for viewing. Good luck to all on your projects. Bill
Klaus-Adler
Campaigns Administrator
Scotland, United Kingdom
Joined: June 08, 2015
KitMaker: 1,505 posts
Armorama: 840 posts
Joined: June 08, 2015
KitMaker: 1,505 posts
Armorama: 840 posts
Posted: Friday, April 17, 2020 - 03:37 AM UTC
Hi Willaim,
thanks very much but your bandai hetzer is leaps and bounds ahead of my jagdtiger, i love all the scratchbuilding you have done, it looks fantastic.
i have managed to get the guinea pig back from the vets and that has now cost me £560 which is about $683.00 and nope we don't have medical insurance... it's actually very hard to get for guinea pigs. little Dillon is still not well and is really annoyed with me for taking him to the vets, every time i talk to him he turns away and refuses to engage with me... i really am getting the cold shoulder... all this technology in the world and no one has figured out how to communicate with animals yet.
as promised here is a picture update which shows the decals added and a matt clear coat applied.
hetzer44
Maryland, United States
Joined: December 21, 2005
KitMaker: 241 posts
Armorama: 124 posts
Joined: December 21, 2005
KitMaker: 241 posts
Armorama: 124 posts
Posted: Friday, April 17, 2020 - 11:46 AM UTC
That Jagdtiger looks fantastic. Angel, yes I really like the Zvezda kits. Looking forward to getting hold of their SU-122. Panzerman, that Hetzer cutaway build looks great. Very inspiring. Really enjoying all these builds, even if I don't model that particular era.
Cheers!
chuck
Cheers!
chuck
nsjohn
Scotland, United Kingdom
Joined: July 26, 2018
KitMaker: 279 posts
Armorama: 265 posts
Joined: July 26, 2018
KitMaker: 279 posts
Armorama: 265 posts
Posted: Saturday, April 18, 2020 - 11:17 AM UTC
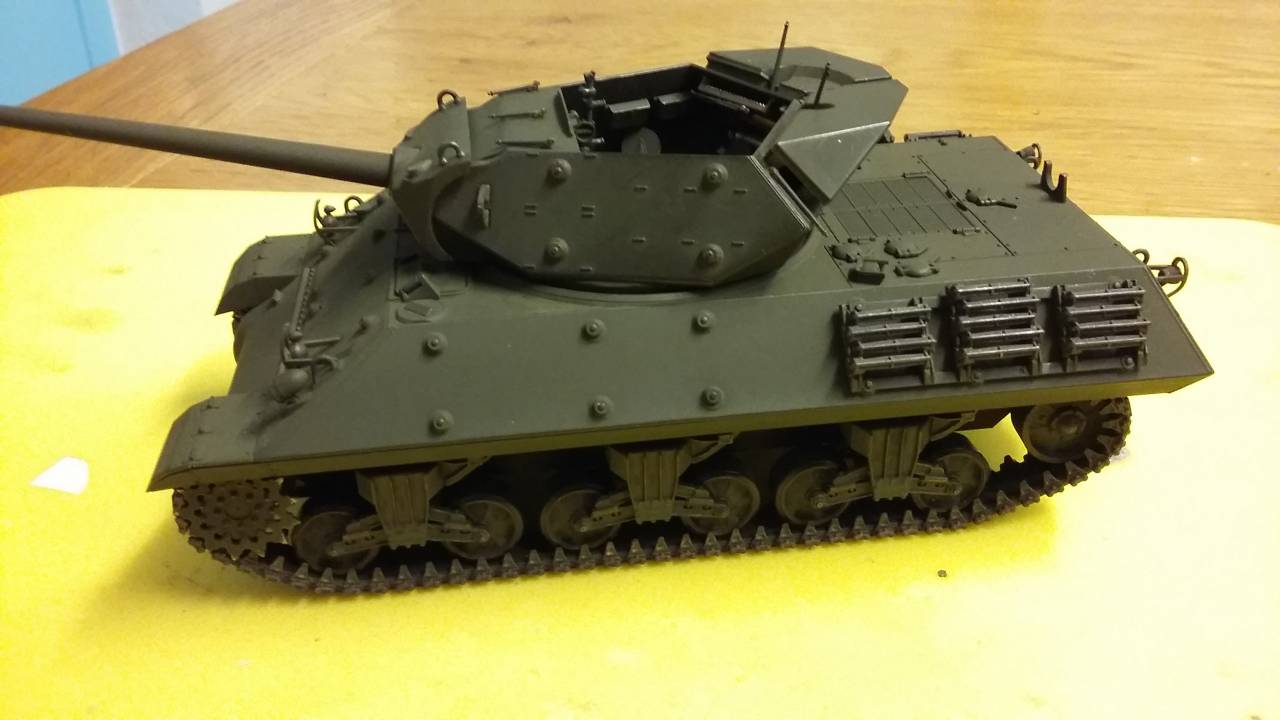
Time for an update on the M 10
Build is almost complete apart from the tools, and the 50 cal, which I tend to leave off until the weathering has been done, and also the upper hull has to be finally attached to the lower.
This is where she is at now.
Build is almost complete apart from the tools, and the 50 cal, which I tend to leave off until the weathering has been done, and also the upper hull has to be finally attached to the lower.
This is where she is at now.
nsjohn
Scotland, United Kingdom
Joined: July 26, 2018
KitMaker: 279 posts
Armorama: 265 posts
Joined: July 26, 2018
KitMaker: 279 posts
Armorama: 265 posts
Posted: Saturday, April 18, 2020 - 11:22 AM UTC
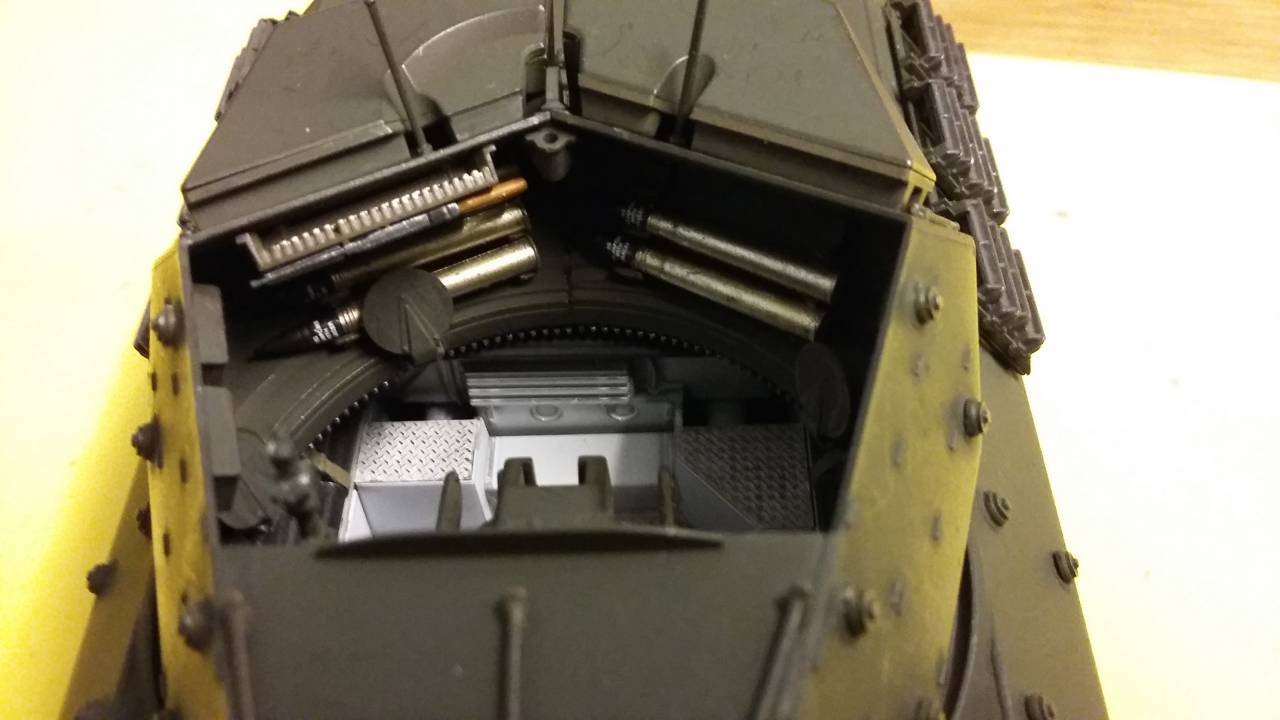
The build had been going along nicely and reasonably quickly until i came to the turret, which is extremely detailed and needed a lot of individual painting before and during assembly.
brekinapez
Georgia, United States
Joined: July 26, 2013
KitMaker: 2,272 posts
Armorama: 1,860 posts
Joined: July 26, 2013
KitMaker: 2,272 posts
Armorama: 1,860 posts
Posted: Saturday, April 18, 2020 - 11:40 AM UTC
Quoted Text
Update on my 1/48 Bandai Hetzer.
Engine compartment is finished. Now it's ready for painting.
Started detailing the main gun. Bandai left quite a lot of detail off of this item.
Thanks for viewing. Good luck to all on your projects. Bill
That is leaps and bounds beyond what I did with those kits as a youngster.
bison126
Correze, France
Joined: June 10, 2004
KitMaker: 5,329 posts
Armorama: 5,204 posts
Joined: June 10, 2004
KitMaker: 5,329 posts
Armorama: 5,204 posts
Posted: Sunday, April 19, 2020 - 05:24 AM UTC
William
I'm really impressed by your Hetzer.
Norman, the TD is looking good and the job you did inside the turret really pays.
Olivier
I'm really impressed by your Hetzer.
Norman, the TD is looking good and the job you did inside the turret really pays.
Olivier
nsjohn
Scotland, United Kingdom
Joined: July 26, 2018
KitMaker: 279 posts
Armorama: 265 posts
Joined: July 26, 2018
KitMaker: 279 posts
Armorama: 265 posts
Posted: Sunday, April 19, 2020 - 06:25 AM UTC
Thanks Oliver. I wasn't happy with the exterior paint on the turret as with all the handling during construction it was looking a bit scuffed, so this afternoon I masked off the interior and flashed over the outside, and I am now much happier with it. I also gave the hull a couple of coats of Tamiya clear, so I now have a matt turret and a semi gloss hull, which makes an interesting comparison. The clear seems to give a level of definition to the hull and to bring out the detail, which is less obvious with the pure matt finish. I will do the turret tomorrow to allow the paint to cure, and then later in the week deal with the decals.
Posted: Sunday, April 19, 2020 - 08:10 AM UTC
Chuck and William- I take my hat off for the scratchbuilt components in your builds, gentlemen!
John and David- these are nice JTigers!
Norman- very nice interior of you M-10.Those shell casings look like the real thing!
I'm moving along with my SU-100 build(and will refrain- as much as posiblle- from mentioning T-34 David ).
I found out the vehicle I model has some features, that are typical for a Czechoslovakian-made SU-100, while others point to a Soviet production(Omsk Factory) vehicle.
Two typical Czechoslovakian features are the exhaust guards and the second antenna(e) on the roof of the casemate:
I removed the organic fenders and glued the ones I made from copper sheet.
Then I took measurements from the spare box Zvezda gives and soldered it from copper sheet.Hassled with some Voyager hinges and now the lid of the spare box opens and closes:
Had to take care of some sink holes between the bolts on gun's mount and because Zvezdas bolts are not as prominent as the ones on my refference vehicle, I sanded them off and glued some Meng bolts.
I also added some welds using Mr.Surfacer 500 and a toothpick:
It has been a fun build sofar, more will come soon.
Take care and keep modelbuilding!
Johnnych01
England - South West, United Kingdom
Joined: June 29, 2019
KitMaker: 604 posts
Armorama: 506 posts
Joined: June 29, 2019
KitMaker: 604 posts
Armorama: 506 posts
Posted: Monday, April 20, 2020 - 12:24 AM UTC
TD is looking very good Norman, .... Im expecting alot of external stowage ? they seem to look better and more authentic crammed with kit ...
Angel, the SU-100 is coming along very nicely. You do amazing work with the home made fenders and the other little bits of detailing, keep it coming.
Klaus-Adler
Campaigns Administrator
Scotland, United Kingdom
Joined: June 08, 2015
KitMaker: 1,505 posts
Armorama: 840 posts
Joined: June 08, 2015
KitMaker: 1,505 posts
Armorama: 840 posts
Posted: Monday, April 20, 2020 - 02:32 AM UTC
you guys are really doing well and using that copper sheet to make parts for the kit is a brilliant idea.
i've added some grime and a bit of weathering to my jagdtiger, sorry about the poor picture, it was a rush job as i had to go down to the local pharmacy.
Posted: Monday, April 20, 2020 - 08:43 AM UTC
Thanks John!
And thanks David!
While I had a day off, the soldering gun had a busy day
I switched to 0,2mm. brass sheet for building the grille cover on the rear of my SU-100.
Used some Aber brass mesh, Voyager hinges, PE strips with bolts from my spares and some leftover Fruil 0,4 mm brass wire.
The grille cover can be opened and closed, but eventually it will be glued in place:
I also started building the spares boxes(2 big ones and 1 small one on the vehicle I model) and used the brass sheet for their bodies.They're soldered and waiting for their covers.
Take care,
Johnnych01
England - South West, United Kingdom
Joined: June 29, 2019
KitMaker: 604 posts
Armorama: 506 posts
Joined: June 29, 2019
KitMaker: 604 posts
Armorama: 506 posts
Posted: Monday, April 20, 2020 - 09:04 AM UTC
Wow..... That really somes up that totally amazing scratch building Angel.
Words fail me ... Your radio truck must of had the best soldered radio cables and fittings in your unit !!!
Posted: Tuesday, April 21, 2020 - 09:02 AM UTC
Thanks John!
I don't remember whether there was a soldering iron in the R-142N radiotruck spares.
But I'm pretty sure, that even if there was one, conscripts were not allowed to touch it.
We had a small Comms Maintenance Troop, responsible for all comms equipment repairs, and I still recall the sign above the workbench of the Lt.Colonel, who was in charge of this troop.
It read:
"Thank You" does not operate a screwdriver!
(it is rhymed in Bulgarian)
Posted: Tuesday, April 21, 2020 - 12:07 PM UTC
Hello Folks. This is my entry for the GB. Revell's 1/72 JagdPanther.
The Box
Before start picture
With less than 100 parts, the build went well.I had most of the assembly completed in less than an hour. I left the track assembly for later.
I picked this camo scheme as it was something different from my usual tri-colour schemes. Dunkel Gelb went on first. Once it had dried and gloss coated, I masked the sections that would remain DG.
The next colour sprayed was the dark grun.Once dry, it too was masked in preparation for the Rot Braun.
I resisted the urge to unmask immediately.....the resistance lasted 43 minutes before I broke
I then painted all the tools.....
....and added a wash to blend the colours a bit.
Next, the tracks went on. I never had a good experience with these type of link and length tracks. The drive sprocket was too narrow ans the tracks didn't fit over the guide teeth. I ended up cutting away the teeth from the front of the sprocket where the tracks would go on. I also wished the rear idler swing arm wasn't fixed in position. Despite my best efforts there was a gap of half a track link. Thankfully the Schutzen plates will hide that gap
Now I'm waiting for the glosscoat to dry before I start the weathering process.
Thanks for looking. Cheers
Posted: Tuesday, April 21, 2020 - 08:55 PM UTC
Angel,
Love the metal work!
Raj,
Perfect!
Love the metal work!
Raj,
Perfect!
phil2015
Illinois, United States
Joined: July 27, 2015
KitMaker: 502 posts
Armorama: 325 posts
Joined: July 27, 2015
KitMaker: 502 posts
Armorama: 325 posts
Posted: Wednesday, April 22, 2020 - 11:13 AM UTC
Is it too late for me to join? I probably won't start for a bit - I really need to wrap up some other projects. But this is the kit:
And this is the inspiration for the build:
Actually the image that caught my imagination originally is another image in Hell's Gate by Douglas Nash. It took me a bit to find a good online picture of the same vehicle.
I don't have that many pics of the vehicle so I'm not attempting a totally faithful reproduction, but it is the inspiration.
Regards,
Phil