Campaigns
Where Armorama group builds can be discussed, organized, and updates posted.
Got Wheels? Campaign 2020
petbat
Visit this Community
Queensland, Australia
Joined: August 06, 2005
KitMaker: 3,353 posts
Armorama: 3,121 posts
Posted: Friday, May 08, 2020 - 09:10 AM UTC
Okay put in some more bench time on the ShKh Dana. A lot of fiddly detailing has been required, as well as a rebuild of some of what I had done previously, due to getting much better walkaround pics of areas where I had made some guesswork:
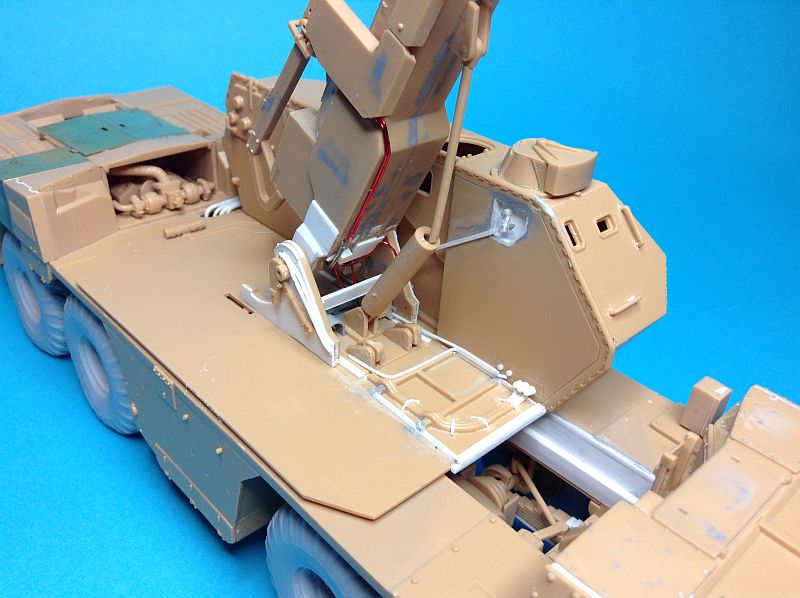
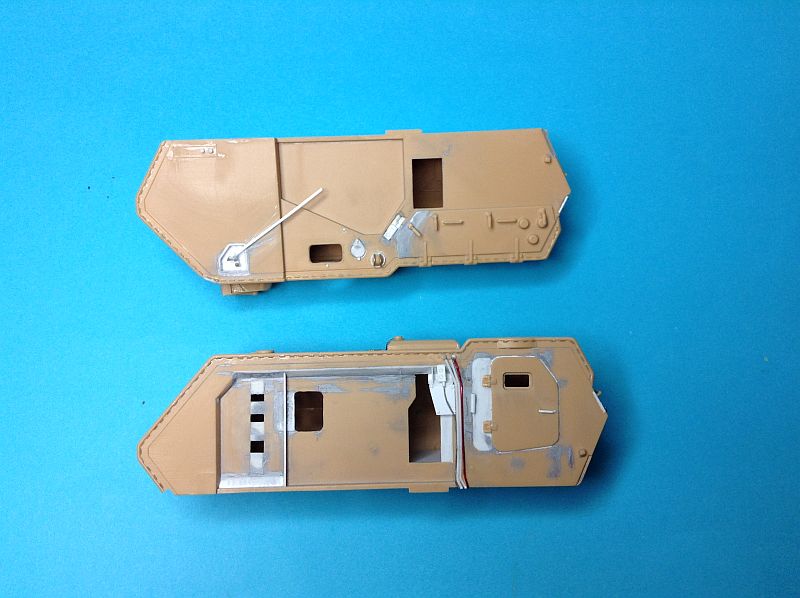
- Projectile compartment opening, wiring tubes, control box all replaced.
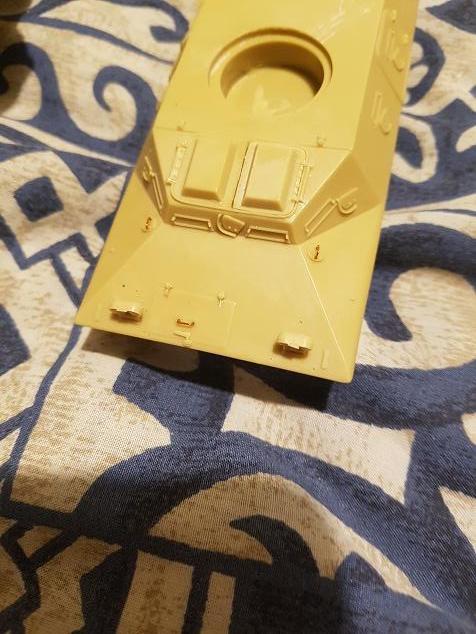
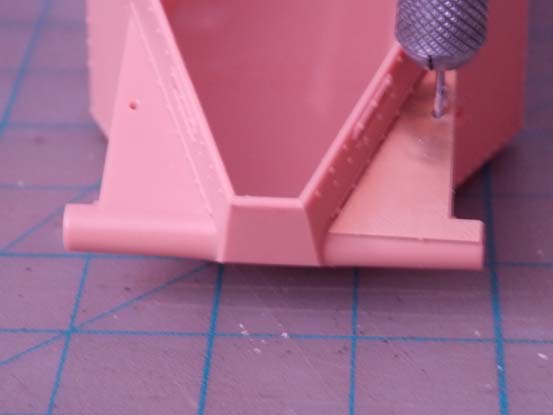
- Access holes in the front section added
- Angled plate below access holes added
- Spot welds added (inside and outside)
- Gunner access door relocated centrally under the gun hatch ring mount

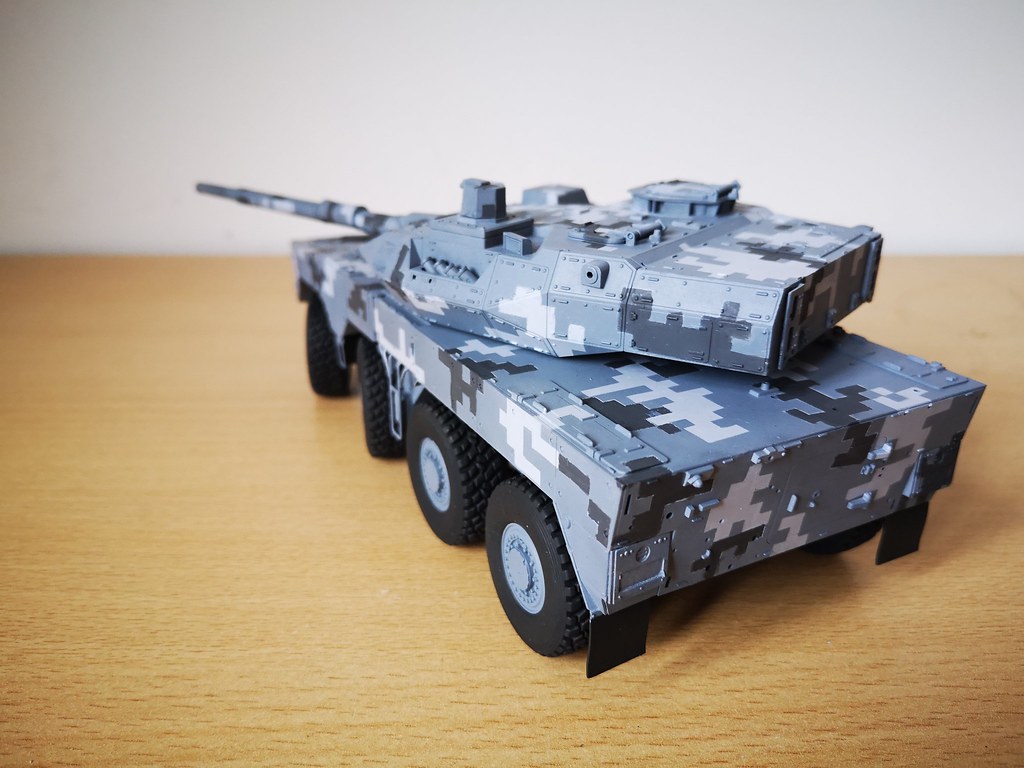
The proportions on the kit are quite distorted and even what I have done is not 100% correct, but the best I can do to align things as much as possible to the turret dimensions.


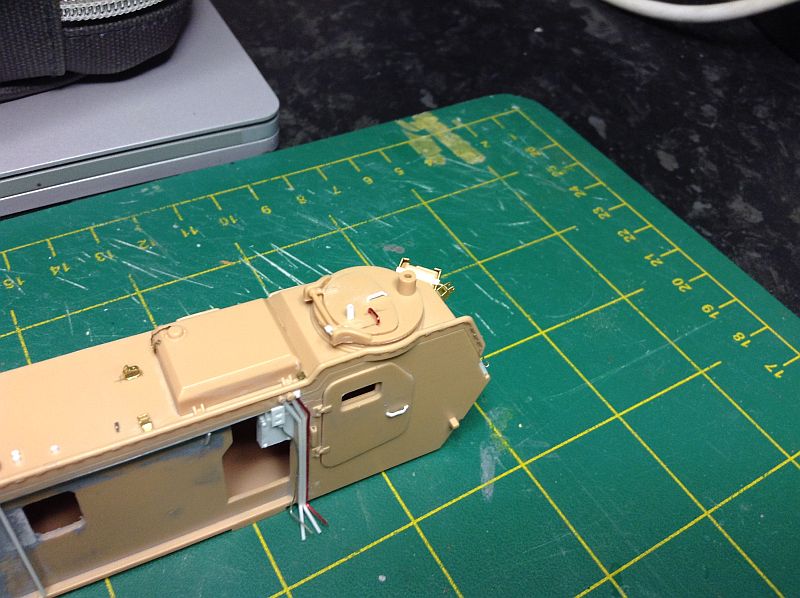
Scratch built tools and fittings missing from the kit, added hooks for the canvas cover sometimes fitted, clamps and straps, as well as the tie downs for further straps to be added later. Also replaced moulded on blob handles.

The etch on the panel in front of the MG hatch ring is in the kit, it is for the strut that supports the MG when not in use.... but the strut is not provided. Mainly due to the completely wrong and out of proportion mount for the MG they provide - the strut would not fit!


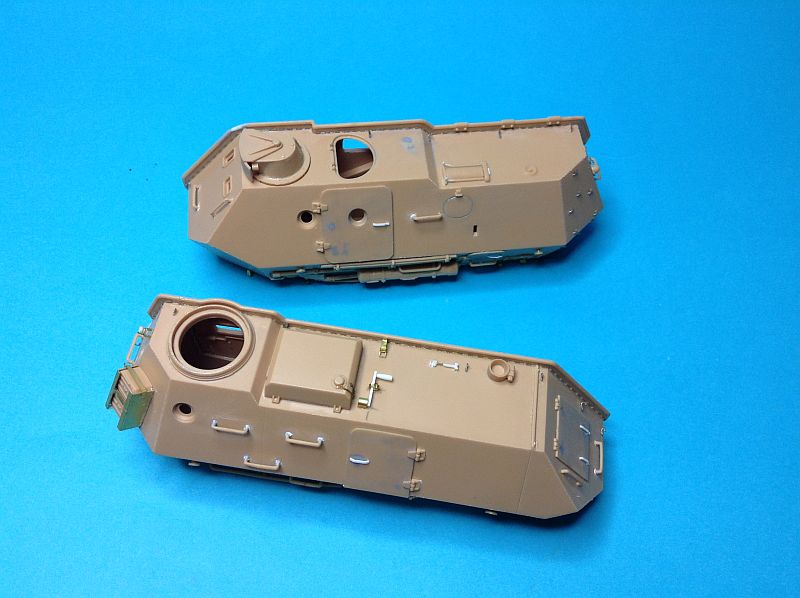
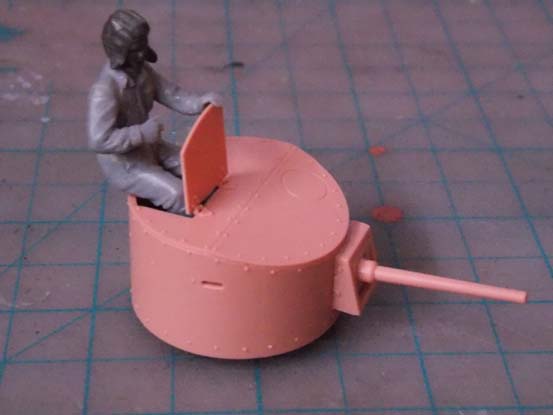
What HB Gives you a tube projection for a pin under the gun. Also note the additions already added to the hatch - HB give you just a single moulded on handle (Also note the original parts placement of the access door and projective opening before my mods)


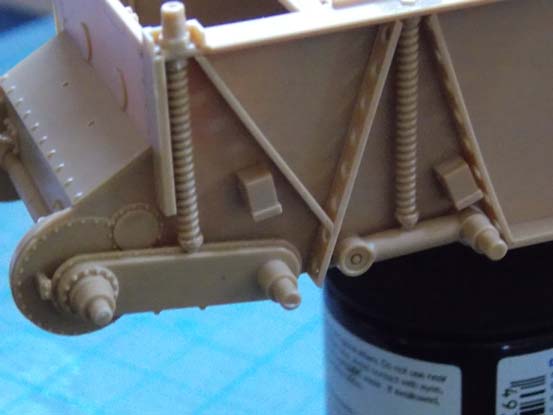
The offending DsHk M mount replaced by a scratch built one, with the gun now further forward, the recuperators(?) now correctly angled upward and closer to the gun, not horizontal and spaced out wide, plus RB barrel added. Still need to add the rear sights and the under gun box which needs to be made ... HB's is too big, too low, wrong shape and had no back! (and also would foul the before mentioned strut.)


And the major rebuild of the gum mounts under way... HB gives you the thin bits on the mount and a big empty space...


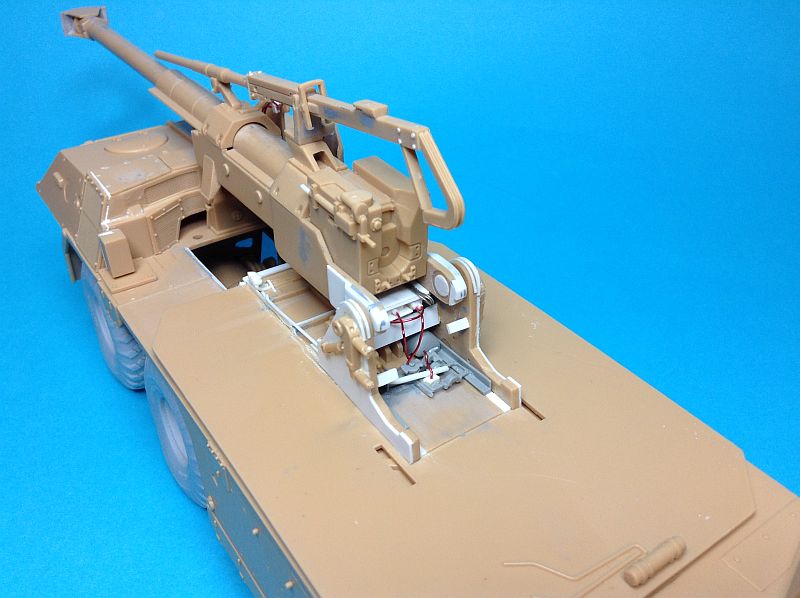
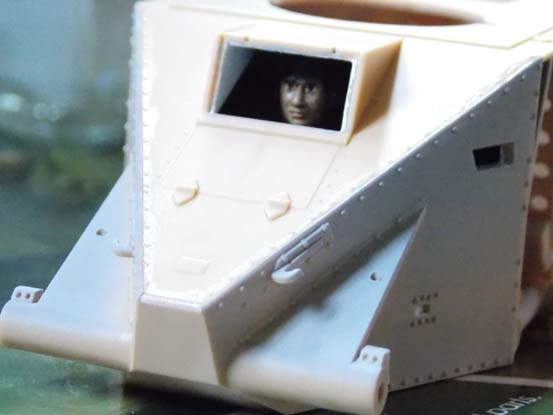
Lastly, the work in the front of the gun mount area. I have only done what is visible with the gun in its transport cradle. Anyone wanting to do the gun raised would have a more massive rebuild to undertake, as HB give you very little here and what they do give, is not even close to accurate.

I have also added the strut mechanism in the turret wall and replaced the point on the wall top front that HB give you with the correct bevelled profile
terminators
Visit this Community
France
Joined: February 20, 2012
KitMaker: 1,932 posts
Armorama: 1,907 posts
Posted: Friday, May 08, 2020 - 11:25 AM UTC
Nice pics, a lot of meticulous work.
bison126
Visit this Community
Correze, France
Joined: June 10, 2004
KitMaker: 5,329 posts
Armorama: 5,204 posts
Posted: Friday, May 08, 2020 - 06:26 PM UTC
Péter,
You should consider making this as a master for an AM company.

Olivier
BlackWidow
Visit this Community
European Union
Joined: August 09, 2009
KitMaker: 1,732 posts
Armorama: 326 posts
Posted: Friday, May 08, 2020 - 09:53 PM UTC
A lot of extra work on your Dana, Peter! Great stuff! Honestly, that would be too much for me ....

Have a nice weekend!
Torsten
deerstalker36
Visit this Community
Queensland, Australia
Joined: May 16, 2010
KitMaker: 232 posts
Armorama: 218 posts
Posted: Friday, May 08, 2020 - 11:04 PM UTC
lovely work on the dana Peter
JamesL27
Visit this Community
United States
Joined: June 02, 2013
KitMaker: 202 posts
Armorama: 199 posts
Posted: Saturday, May 09, 2020 - 09:13 AM UTC
That Dana's looking good. Didn't realize the kit had so many accuracy issues. I've got it in my stash, so this will be a nice reference for whenever I get around to building it.
robw_uk
Visit this Community
England - North East, United Kingdom
Joined: June 22, 2010
KitMaker: 1,224 posts
Armorama: 1,207 posts
Posted: Saturday, May 09, 2020 - 08:46 PM UTC
Great work on the Dana, I had thought of getting one, I wouldn't know it was inaccurate but now I Do I will probably pass ;-)


End of the weekend. Paint touched up (not too bad from a distance) and wheels done. Next stop adding the missing parts that I left off for safety/ease of painting and then see what markings I want to do...


terminators
Visit this Community
France
Joined: February 20, 2012
KitMaker: 1,932 posts
Armorama: 1,907 posts
Posted: Sunday, May 10, 2020 - 12:17 AM UTC
Very nice. I like the blue-grey color.
robw_uk
Visit this Community
England - North East, United Kingdom
Joined: June 22, 2010
KitMaker: 1,224 posts
Armorama: 1,207 posts
Posted: Sunday, May 10, 2020 - 01:09 AM UTC

Quoted Text

Very nice. I like the blue-grey color.


thanks Alex, that is AK Interactive "Ash Grey"
Klaus-Adler
Staff MemberCampaigns Administrator
MODELGEEK
Visit this Community
Scotland, United Kingdom
Joined: June 08, 2015
KitMaker: 1,505 posts
Armorama: 840 posts
Posted: Sunday, May 10, 2020 - 01:26 AM UTC
i have now started to add the grab handles to the V-100, it's going to take time as we are still nursing a sick guinea pig at the moment. so far i have done about half of them although that isn't apparent in this picture.

Klaus-Adler
Staff MemberCampaigns Administrator
MODELGEEK
Visit this Community
Scotland, United Kingdom
Joined: June 08, 2015
KitMaker: 1,505 posts
Armorama: 840 posts
Posted: Sunday, May 10, 2020 - 09:16 AM UTC
fixed the wheel rims that were damaged using to strip plasti-card.

Klaus-Adler
Staff MemberCampaigns Administrator
MODELGEEK
Visit this Community
Scotland, United Kingdom
Joined: June 08, 2015
KitMaker: 1,505 posts
Armorama: 840 posts
Posted: Wednesday, May 13, 2020 - 04:02 AM UTC
ok so i have made a little progress, this mostly due to the fact i am still working and not getting the furlough free paid holiday for umpteen weeks like so many others.

had a minor mishap with one of the repairs so i had to re-do it but it has now worked out fine and i have been able to prime the wheels with car primer paint.

petbat
Visit this Community
Queensland, Australia
Joined: August 06, 2005
KitMaker: 3,353 posts
Armorama: 3,121 posts
Posted: Wednesday, May 13, 2020 - 08:38 AM UTC
Thanks for the Kind words everyone.

Olivier, I would have to do a full under gun scratch build for an AM company to make it worth while - most guys want to build it with the gun raised... and with my luck, just when it was finished Meng or Takom would release one...

Looking good Rob. It really is a striking scheme and an eye catcher.

All the fun of a Resin kit there David. Does the resin smell bad when you sand it? Verlinden resin never seems to loose that smell, no matter how old the casting is... I'm getting a memory lesson from a Verlinden FIST conversion set right now.
Bigrip74
Visit this Community
Texas, United States
Joined: February 22, 2008
KitMaker: 5,026 posts
Armorama: 1,604 posts
Posted: Wednesday, May 13, 2020 - 12:10 PM UTC
Just enlisted and ordered this:
Klaus-Adler
Staff MemberCampaigns Administrator
MODELGEEK
Visit this Community
Scotland, United Kingdom
Joined: June 08, 2015
KitMaker: 1,505 posts
Armorama: 840 posts
Posted: Wednesday, May 13, 2020 - 02:17 PM UTC
Hi Peter, yep this verlinden kit has that unique smell alright and this kit has to be at least ten years old lol
SGTJKJ
#041
Visit this Community
Kobenhavn, Denmark
Joined: July 20, 2006
KitMaker: 10,069 posts
Armorama: 4,677 posts
Posted: Thursday, May 14, 2020 - 04:33 AM UTC

Quoted Text

Hi Peter, yep this verlinden kit has that unique smell alright and this kit has to be at least ten years old lol


I had the same kit - Got it as a special present for helping out in a hobby store when I was a big kid. That’s almost 30 years ago. 🙂 It is old for sure....

I have made some progress with my AB-43. The main scheme is on. Not a 100% satisfied with the pattern. Next time I will paint it freehand with a brush or airbrush. Anyway, now it is ready for weathering.

More to follow 🙂

robw_uk
Visit this Community
England - North East, United Kingdom
Joined: June 22, 2010
KitMaker: 1,224 posts
Armorama: 1,207 posts
Posted: Thursday, May 14, 2020 - 04:51 AM UTC

Quoted Text


Quoted Text

Hi Peter, yep this verlinden kit has that unique smell alright and this kit has to be at least ten years old lol


I had the same kit - Got it as a special present for helping out in a hobby store when I was a big kid. That’s almost 30 years ago. 🙂 It is old for sure....

I have made some progress with my AB-43. The main scheme is on. Not a 100% satisfied with the pattern. Next time I will paint it freehand with a brush or airbrush. Anyway, now it is ready for weathering.

More to follow 🙂


Nice clean build & paint, will you weather it and fade the paint?
petbat
Visit this Community
Queensland, Australia
Joined: August 06, 2005
KitMaker: 3,353 posts
Armorama: 3,121 posts
Posted: Thursday, May 14, 2020 - 08:18 AM UTC
Avery nice camo scheme Jesper, even if you are not 100% happy.
Bigrip74
Visit this Community
Texas, United States
Joined: February 22, 2008
KitMaker: 5,026 posts
Armorama: 1,604 posts
Posted: Saturday, May 16, 2020 - 09:20 AM UTC
My entry finally arrived today.
Hobby Boss M706 Commando Armored Car.

ComradeMP
#0
Visit this Community
United States
Joined: July 31, 2011
KitMaker: 472 posts
Armorama: 453 posts
Posted: Sunday, May 17, 2020 - 12:48 PM UTC
Haven't heard back about the BT tanks so I'll just put this here for now.....

Hobby Boss BT-2


The turret goes together real quick, a crew member for size comparison.


Basic hull construction is simple, there's even a pe guide for drilling out the hole for the headlights.


Suspension arms and springs


Top of the hull glues on simple, but you want to push down and forward when gluing the front part or you'll get a gap on the "nose". Put a driver, blocked off the space behind him and painted it black.


Placed the headlights and wiring, just need to place some styrene strip where the wiring meets the hull. Steering linkage modified so the wheels are turned to the left.
petbat
Visit this Community
Queensland, Australia
Joined: August 06, 2005
KitMaker: 3,353 posts
Armorama: 3,121 posts
Posted: Sunday, May 17, 2020 - 07:14 PM UTC
Looks great so far Comrade.

No news from Bruce yet? ... maybe PM him....
robw_uk
Visit this Community
England - North East, United Kingdom
Joined: June 22, 2010
KitMaker: 1,224 posts
Armorama: 1,207 posts
Posted: Tuesday, May 19, 2020 - 12:21 AM UTC
so all but the .50 cal is on. Next up is a touch up on the new (fiddly) parts with the ash grey then a coat of gloss varnish & decals (not sure which scheme yet)


ComradeMP
#0
Visit this Community
United States
Joined: July 31, 2011
KitMaker: 472 posts
Armorama: 453 posts
Posted: Wednesday, May 20, 2020 - 10:22 AM UTC

Quoted Text

Looks great so far Comrade.

No news from Bruce yet? ... maybe PM him....


Thanks. Just dropped a PM, hope to hear back.
terminators
Visit this Community
France
Joined: February 20, 2012
KitMaker: 1,932 posts
Armorama: 1,907 posts
Posted: Wednesday, May 20, 2020 - 12:16 PM UTC
Nice figure in the interior of the BT 2.
ComradeMP
#0
Visit this Community
United States
Joined: July 31, 2011
KitMaker: 472 posts
Armorama: 453 posts
Posted: Thursday, May 21, 2020 - 08:18 AM UTC
Thanks. Figures are still a weak spot for me.

So I heard back, seems the BT is OK if you fellas feel it fits in. So What is everyone else opinion?