

Quoted Text
Is anyone going to try adding more texture to the armor?
I hadn't thought about it, but I may just have to try that using Werner's (I believe) technique.


Is anyone going to try adding more texture to the armor?
You guys were perfectly right in chastizing me for it. Obvious only to me I guess. Will work on my communicating skills before posting again.


...I did, however, leave off the sandshields as I just don't think that they look right on a Sherman...

Well, if you leave off the sand shields you may want to add the sand shield attachement strip (my term) to the lower edge of the hull. If you look at Sherman pics, you'll see M4A1s without sand shields have this narrow strip of sheet metal on the lower edge of each hull side. These strips have holes in them, which I believe were where the bolts for the sand shields were attached. I used thin sheet styrene to make these things, then punched holes in them with a needle. It looks OK.
Of course that my violate the 'rules' of the group build!!

Definitely not looking hard enough my friend!
 (this isn't cool smiley it is blind smiley)
Week 2:
I just about finished the second step of the group build. This step is an easy one which consists of attaching the drive sprocket, idlers, bogies (from step one) and the rear hull panel. I opted to leave the bogies off for better access come paint time.
As usual, these parts needed some cleaning of seam lines and a little flash. Also the rear hull panel needs some filler for a cleaner fit.
How's everyone else coming along?

Quoted TextWeek 2:
I just about finished the second step of the group build. This step is an easy one which consists of attaching the drive sprocket, idlers, bogies (from step one) and the rear hull panel. I opted to leave the bogies off for better access come paint time.
As usual, these parts needed some cleaning of seam lines and a little flash. Also the rear hull panel needs some filler for a cleaner fit.
How's everyone else coming along?
I stopped at the end of Step Two - temporary diversion to complete a M45 Pershing Close Support Tank conversion of the Tamiya M26 Pershing. It's turned out quite nicely. I'll catch back up with the group be Week Four or so...
Gunnie

Geez, you aren't kidding! And to think that I even have picutre number 3 as my desktop wallpaper here at work. It has been in front of my face for weeks!
Andy--can you tell me the specifics of what you did. What size (thickness) plastic card did you use? Length is easy enough to figure out but how wide did you make it? I can't tell from the pictures how it is held onto the tank, any thoughts? How far apart did you space the holes? Finally, do you know of any good line drawings that show this hanger?

I stopped at the end of Step Two - temporary diversion to complete a M45 Pershing Close Support Tank conversion of the Tamiya M26 Pershing. It's turned out quite nicely. I'll catch back up with the group be Week Four or so...
Gunnie
Master of the Model Universe---where did you post a photo of your M-45 effort?
DJ


Master of the Model Universe---where did you post a photo of your M-45 effort?
DJ
--------------------------------------------------------------------------------
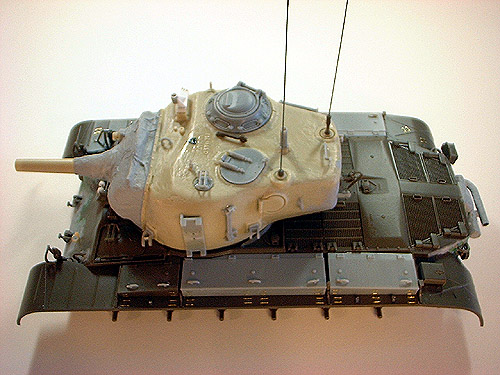
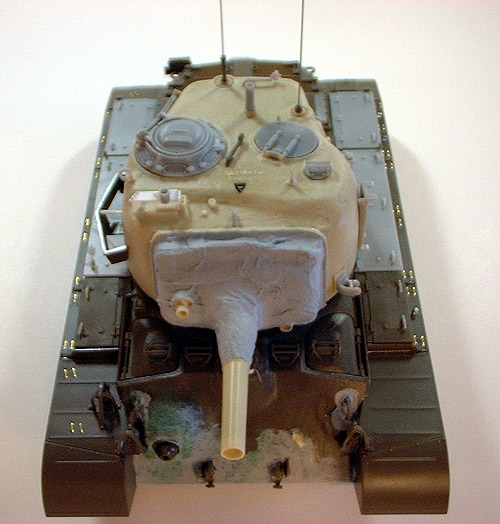
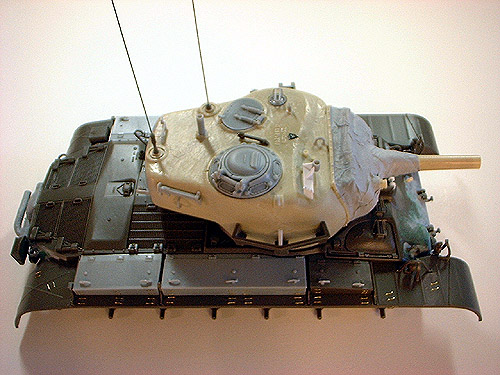
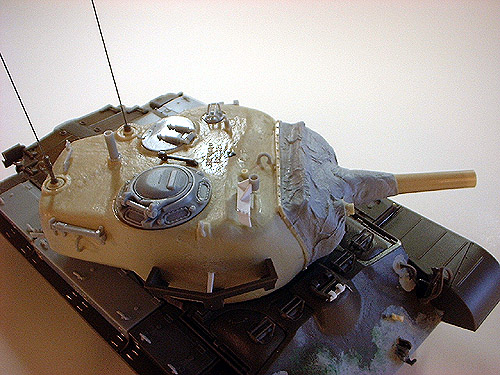
I haven't posted photos of the model anywhere - yet - but here's five in-progress photos I have in my scrap bin folder. I'll upload better replacement photos to my website page later on...
Quoted Text
Master of the Model Universe---where did you post a photo of your M-45 effort?
DJ
--------------------------------------------------------------------------------
I haven't posted photos of the model anywhere - yet - but here's five in-progress photos I have in my scrap bin folder. I'll upload better replacement photos to my website page later on...
Jim,
If those images represent the work in your "scrap bin" maybe DJ was right, and you are the "Master of the Model Universe".
Seriously, the model looks great. The images show an incredible attention to detail.
Later,
Tim

 I am having to sand the "tread" on all of teh road wheels, bad mold shift. Sure glad this isn't an HVSS suspension Looking ahead, once I get the boggies completed construction should allow me to catch up
 ...bummer

Eeeek! Sorry for the delay in action on my part. I've been very busy with the other things in life. There's a whole other world outside of modelling. ...bummer
Here is a pic of the added bolts to the bogies. The most important, I thought to add, are the three that are missing from the bottom of the bogie units. The others I added are the four to the track skids, and one more to the bottom of the return roller mount.
 |


