Campaigns
Where Armorama group builds can be discussed, organized, and updates posted.
OBG - The Official Thread
MonkeyGun
Visit this Community
England - North East, United Kingdom
Joined: August 07, 2005
KitMaker: 943 posts
Armorama: 825 posts
Posted: Tuesday, January 17, 2006 - 08:43 PM UTC
As promised some progress pics of my Pershing , will be doing some serious cleaning up of any glue marks and one or 2 seams still to be removed


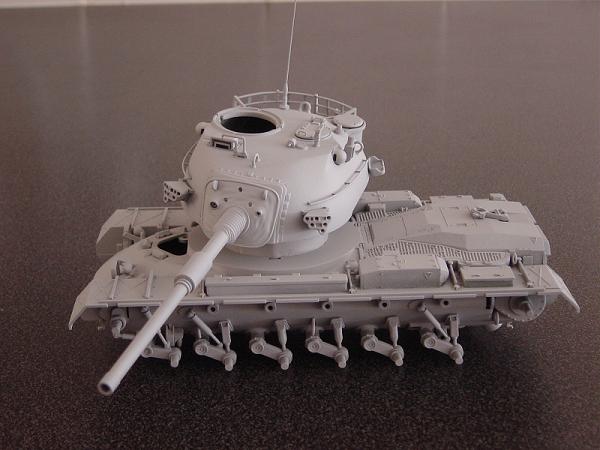
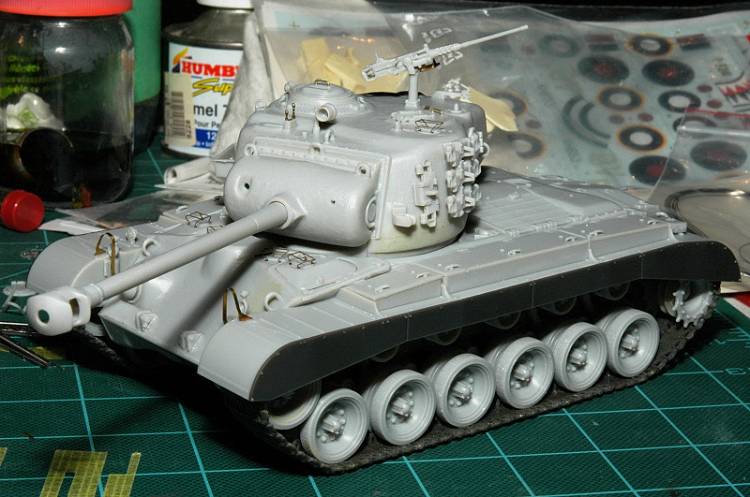
Added some detailing to the hatches and spruced up the 50cal with a spare set of eduard PE set . Used some spare bit of PE sprue to make the horn card and thinned out the kit headlight cards with some carefull sanding.


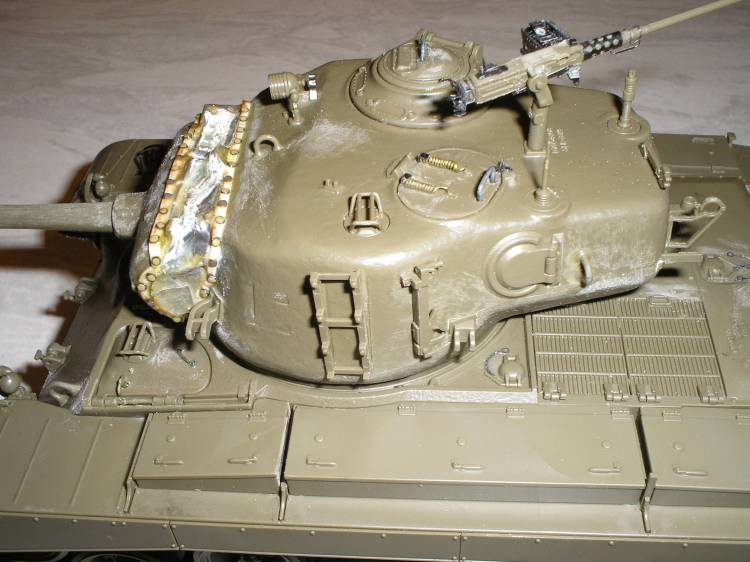
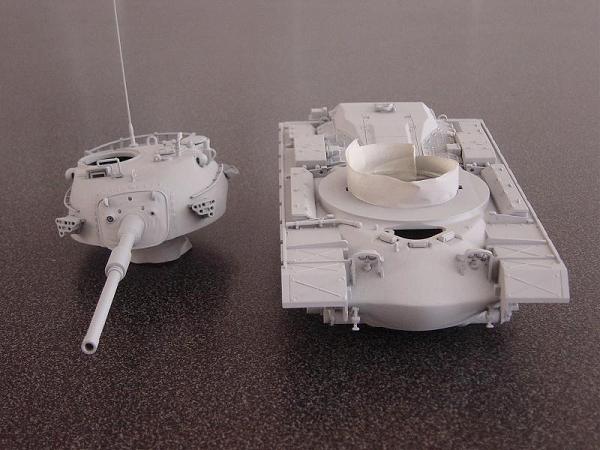
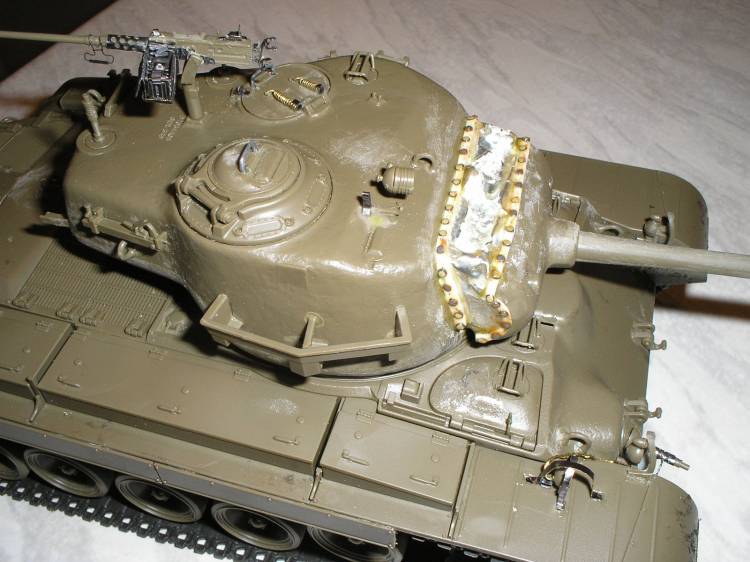
Made the hatch return springs from fine copper wire and made the mantlet cover from plastic card and lead foil.


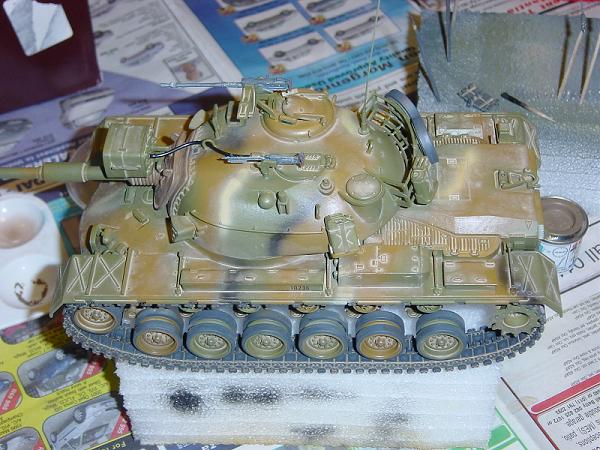
Made a new tow rope from piano wire and new brackets from spare PE sprue, made some tow pins from wire from a paper clip and added some milicast chains to the tow pins.


Ian
Clanky44
Visit this Community
Ontario, Canada
Joined: September 15, 2005
KitMaker: 1,901 posts
Armorama: 553 posts
Posted: Tuesday, January 17, 2006 - 08:55 PM UTC
Well done Ian!... nice extras thrown in. The rubber tracks look good, the cables look great! It's interesting to compare the differences of these two similar kits. You've added the telephone box on the upper right rear hull, which from previous threads, makes this a Korean War Pershing?!? Was that your intent? See the post I started under the Armour Forum (T26E3)

Frank
MonkeyGun
Visit this Community
England - North East, United Kingdom
Joined: August 07, 2005
KitMaker: 943 posts
Armorama: 825 posts
Posted: Tuesday, January 17, 2006 - 09:02 PM UTC
I do indeed intend to make it a Korean war version you get a nice set of markings for USMC version with the kit , still trying to figure out how to make the turnbuckles for the fenders


Ian

PS i notice neither of our kits have the prominent casting numbers on the gun mantlet
Clanky44
Visit this Community
Ontario, Canada
Joined: September 15, 2005
KitMaker: 1,901 posts
Armorama: 553 posts
Posted: Tuesday, January 17, 2006 - 09:12 PM UTC

Quoted Text

still trying to figure out how to make the turnbuckles for the fenders


I've got spares, you can use! :-) :-)

MonkeyGun
Visit this Community
England - North East, United Kingdom
Joined: August 07, 2005
KitMaker: 943 posts
Armorama: 825 posts
Posted: Tuesday, January 17, 2006 - 09:14 PM UTC


Ive got a few ideas on making some.

I presume I should have these on a korean war Pershing ?

Ian
Clanky44
Visit this Community
Ontario, Canada
Joined: September 15, 2005
KitMaker: 1,901 posts
Armorama: 553 posts
Posted: Tuesday, January 17, 2006 - 09:17 PM UTC

Quoted Text

:P

Ive got a few ideas on making some.

I presume I should have these on a korean war Pershing ?

Ian


Korean War Pershings,.... yes, WW2 Pershings, no.
MonkeyGun
Visit this Community
England - North East, United Kingdom
Joined: August 07, 2005
KitMaker: 943 posts
Armorama: 825 posts
Posted: Tuesday, January 17, 2006 - 09:19 PM UTC
Why did i know you where going to say that :-) :-) :-)


Ian
Clanky44
Visit this Community
Ontario, Canada
Joined: September 15, 2005
KitMaker: 1,901 posts
Armorama: 553 posts
Posted: Tuesday, January 17, 2006 - 09:21 PM UTC
Does the Tamiya kit not come with them?

Frank
MonkeyGun
Visit this Community
England - North East, United Kingdom
Joined: August 07, 2005
KitMaker: 943 posts
Armorama: 825 posts
Posted: Tuesday, January 17, 2006 - 09:26 PM UTC
Nope its pretty basic , I would have preferred they included a few extra details rather than messing around with the silly "working suspension".
They included the telephone box to make korean war version so why not include the turnbuckles

I know you do get them in the eduard set , but my budgets allready spent on this kit .

Ian
Clanky44
Visit this Community
Ontario, Canada
Joined: September 15, 2005
KitMaker: 1,901 posts
Armorama: 553 posts
Posted: Wednesday, January 18, 2006 - 12:28 AM UTC
If you PM me your address I could mail the Dragon ones to you, the're small enough and slim enough to pass through in an envelope, possibly secured in,... say 5 blank pages. I'll photograph the parts tonight and post them, see if you're interested.

Frank
MonkeyGun
Visit this Community
England - North East, United Kingdom
Joined: August 07, 2005
KitMaker: 943 posts
Armorama: 825 posts
Posted: Wednesday, January 18, 2006 - 01:10 AM UTC
Thanks Frank thats most kind , check your pm


Ian
PantherF
Visit this Community
Indiana, United States
Joined: June 10, 2005
KitMaker: 6,188 posts
Armorama: 5,960 posts
Posted: Wednesday, January 18, 2006 - 03:06 AM UTC
This is what I have decided to enter:


Not my first choice, but due to my schedule it'll fit in. The paint scheme is still undecided but the start will be sometime soon. More pics when that happens. :-)


Jeff
dexter059
Visit this Community
Region de Valparaiso, Chile
Joined: July 28, 2005
KitMaker: 1,569 posts
Armorama: 1,385 posts
Posted: Wednesday, January 18, 2006 - 03:34 AM UTC
Wow, that´s not a common kit, where did you get it'?

cheers
PantherF
Visit this Community
Indiana, United States
Joined: June 10, 2005
KitMaker: 6,188 posts
Armorama: 5,960 posts
Posted: Wednesday, January 18, 2006 - 08:52 AM UTC
Hey Klaus!

Ebay ... it's really weird what you can run across on there!


Jeff
Orffer
Visit this Community
Gauteng, South Africa
Joined: February 16, 2005
KitMaker: 44 posts
Armorama: 0 posts
Posted: Wednesday, January 18, 2006 - 11:56 AM UTC
Hi Guys & Gals

As promised, I'm posting my in progress pictures of my M48A5 US version.

Feel free to give me advice on my build.

Known Faults in my build:

1. I should have removed the skirting that makes it a M45A5 Korean version.

2. I should have filled the outer edge where the skirts for the Korean version fit.

3. I should have filled the gap in the lower hull, since my model will not be motorized, doh!

4. I should have tested my track fitting more carefully, since the tracks should have fitted more tightly.

And Now, without further adue ...


Regards

Dieter
eMan
#298
Visit this Community
Hong Kong S.A.R. / 繁體
Joined: August 08, 2002
KitMaker: 1,182 posts
Armorama: 665 posts
Posted: Wednesday, January 18, 2006 - 01:43 PM UTC
progress pic of my Tamiya M48-A3, ready to paint

Clanky44
Visit this Community
Ontario, Canada
Joined: September 15, 2005
KitMaker: 1,901 posts
Armorama: 553 posts
Posted: Wednesday, January 18, 2006 - 08:26 PM UTC

Quoted Text

Thanks Frank thats most kind , check your pm


Ian


Here's a photo of the parts in question, I'm in the process of finding out if I need the front fender turnbuckles. I've posted a message on the Armour forum, and hopefully Bob can reply quickly. I'll mail you the rear ones, but will wait for confirmation on the front parts.


This is the Pershing ready for paint, I used a bit of the Eduard PE set, just enough to enhance the final look.

MonkeyGun
Visit this Community
England - North East, United Kingdom
Joined: August 07, 2005
KitMaker: 943 posts
Armorama: 825 posts
Posted: Wednesday, January 18, 2006 - 08:41 PM UTC
No problem what so ever Frank , if you want to wait till Bob gets back to you with your answer thats fine by me.

Your Pershing looks great by the way , i like the periscope guards , they must have been fun to bend into shape
I used the kit supplied ones and they are a little on the thick side but thats somthing way beyond my scratchbuilding skills.

Oh and the catches in the stowage bins on the fenders look good , on the tamiya kit there not very well done

I replaced the cupola ring on mine today , i was looking through my scrap box and found a spare one , I think it came from my DML firefly spares and the detail in it is much much better and was a perfect fit .Plus theres somthing i want to try with the lens in the cupola which are more recessed in the DML cupola ring.
I intend, after ive painted them black/green , drop a little future on the lenses , ive seen a pic in a magazine done using this method and it really did look like glass

Ian
Elad
Visit this Community
Tel Aviv-Yafo, Israel
Joined: June 19, 2004
KitMaker: 458 posts
Armorama: 269 posts
Posted: Thursday, January 19, 2006 - 03:17 AM UTC

Quoted Text

Hi Guys & Gals

As promised, I'm posting my in progress pictures of my M48A5 US version.


Regards

Dieter


Dieter, thats a very good looking build. seems like a clean smooth build and the MERDC scheme came out perfect.

WTG!

Elad.
dexter059
Visit this Community
Region de Valparaiso, Chile
Joined: July 28, 2005
KitMaker: 1,569 posts
Armorama: 1,385 posts
Posted: Thursday, January 19, 2006 - 03:37 AM UTC
Dieter your M48A5 looks great! Love the MERDC camo, very clean paint...maybe someday I´ll try something similar (after I got a new airbrush, double actions for a change :-) )

Great Job keep it up

Cheers
Clanky44
Visit this Community
Ontario, Canada
Joined: September 15, 2005
KitMaker: 1,901 posts
Armorama: 553 posts
Posted: Thursday, January 19, 2006 - 11:28 AM UTC

Quoted Text

No problem what so ever Frank , if you want to wait till Bob gets back to you with your answer thats fine by me.

Ian


My wife will mail the four pieces today (friday), hope to see the trans-oceanic Pershing completed soon!

Frank
MonkeyGun
Visit this Community
England - North East, United Kingdom
Joined: August 07, 2005
KitMaker: 943 posts
Armorama: 825 posts
Posted: Thursday, January 19, 2006 - 03:54 PM UTC
Thankyou very much Frank , its much appreciated.

The are on me :-)
jcneel
Visit this Community
Texas, United States
Joined: June 13, 2004
KitMaker: 135 posts
Armorama: 124 posts
Posted: Thursday, January 19, 2006 - 09:06 PM UTC
Dieter - I really like the way your MERDC paint job came out. What type of paints and which colors did you use?

I would like to try and do a similar job on a M60A3 I have in my stash some day.

Currently am working on an M60 early conversion for this campaign. I am only planning to do an overall Drab Green paint job on that one....

Thanks

cn
betheyn
Staff MemberSenior Editor
AEROSCALE
#019
Visit this Community
England - South East, United Kingdom
Joined: October 14, 2004
KitMaker: 4,560 posts
Armorama: 510 posts
Posted: Friday, January 20, 2006 - 10:24 PM UTC
This is my entry for the OBG campaign. It is Trumpeters ex motorised M60 A3. A very simple OOB build as there were not a lot of parts for it as most of it was moulded on. Painted in Tamiya acrylics and will be weathered when i get round to building the dio for it.
Thanks, Andy (++)


Yes i know the tracks are horrible, mud will be a wonderful thing :-) .
MonkeyGun
Visit this Community
England - North East, United Kingdom
Joined: August 07, 2005
KitMaker: 943 posts
Armorama: 825 posts
Posted: Saturday, January 21, 2006 - 12:29 PM UTC
We are getting a great mix for OBG's nice work everyone.

I was wondering and i dont think it would be possible to do but never say never so here goes ....

That when the campaign ends if there was any way Elad could arrange the final gallery as a form of history/timeline starting with Pershings right throught to the M60's.

Any ideas ?

Ian