Campaigns
Where Armorama group builds can be discussed, organized, and updates posted.
OBG - The Official Thread
jcneel
Visit this Community
Texas, United States
Joined: June 13, 2004
KitMaker: 135 posts
Armorama: 124 posts
Posted: Sunday, January 22, 2006 - 06:26 AM UTC
Well, I got my base coat of paint applied today. Would have done more this weekend, but ended up not feeling well Saturday (noooo - couldn't have happened on a work day where I could have called in sick - had to be on the weekend....).

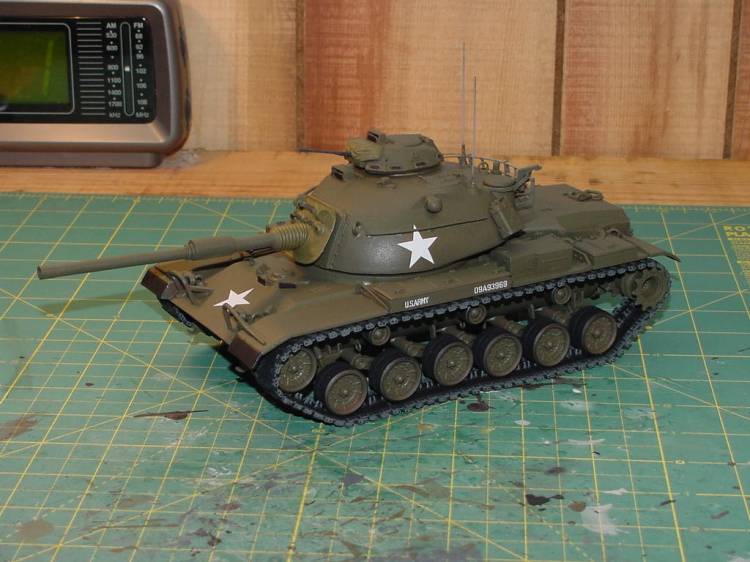
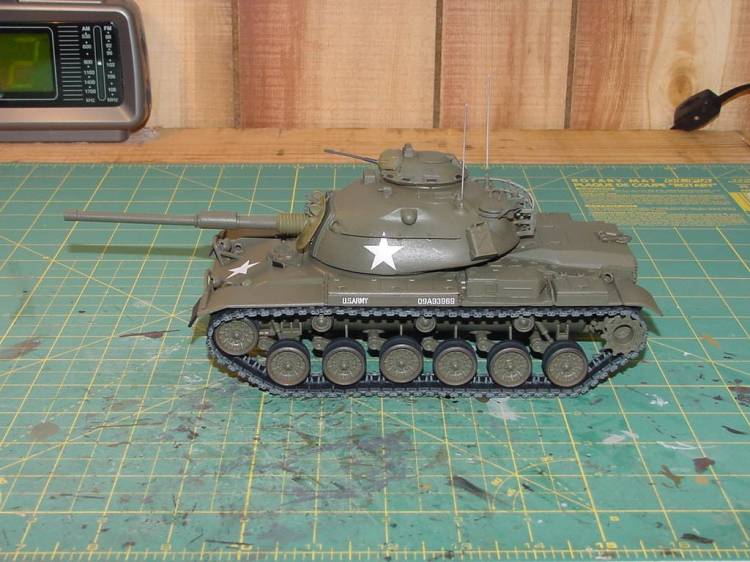
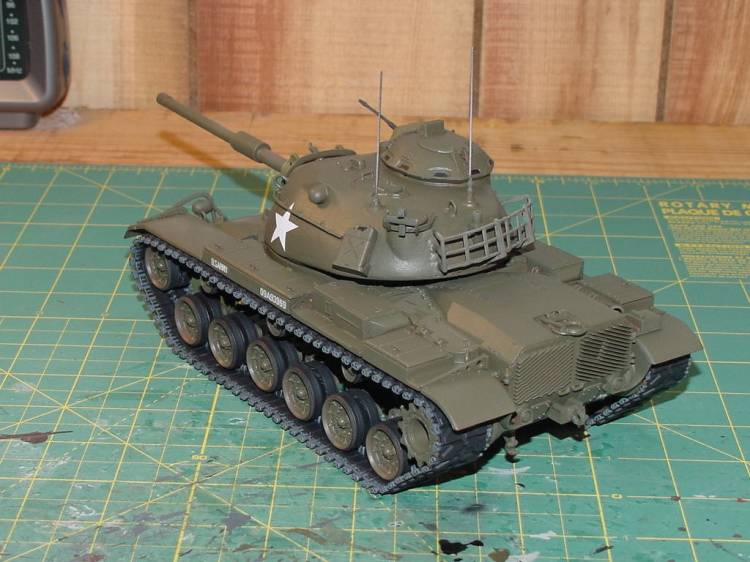
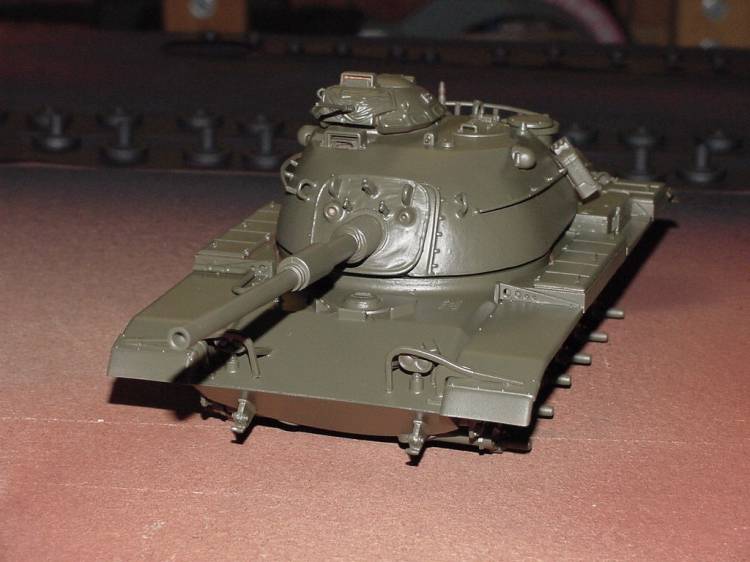
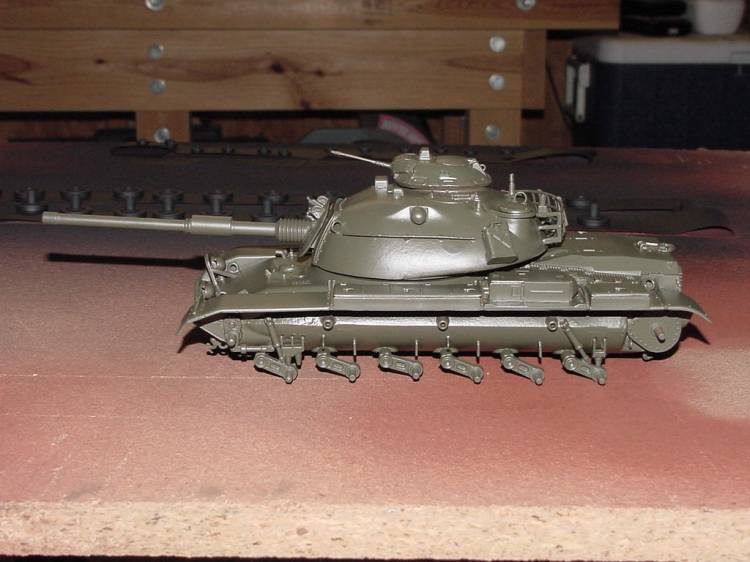
Anyway - still needs detail painting and touch-up - used Testor Drab Green. Not as nice as Dieter's MERDC scheme - but I'm saving that work for a M60A3 at a later date...

Hey Jim - I went back and modified the scope thing on the Driver's hatch - maybe not quite right - but better than it was, I think.

I also picked up a set of AFV Workable Tracks for the M60 series - just how exactly are these supposed to be put together so that they will be workable? As I see it, if I cement just one pin on each of the end tabs, the tracks will be moveable - but am afraid that I'll end up with some tabs in the wrong positions where the track wraps around the drive sprocket and the front return wheel, if you know what I mean.

Here's a couple more in progress pics:


later

cn
GunTruck
Visit this Community
California, United States
Joined: December 01, 2001
KitMaker: 5,885 posts
Armorama: 3,799 posts
Posted: Sunday, January 22, 2006 - 07:38 AM UTC
Aw - you painted it - you definately won't want to go back and make a detail change now! That's the problem with these long threads - information gets lost. I like it though - looks very nice! Congrats! Have you figured out markings for it yet?

The Driver's Hatch looks good. One thing I noticed, asked another tanker about, and went up to the real one here in California on Saturday to verify is that the M60 series only have the Fuel Filler Caps on the right side - none on the left. I went through all the pictures and drawings I have the the M60's and could not figure out why the model kits come molded with two of them. That's going to bug me until I can figure it out. Anyway, I stopped and removed the left-side Fuel Cap on both my conversions - and had to retouch the painted model...

The AFV Club individual links go together really easily. The instructions are on the reverse side of the box - and are spot-on for hassle-free assembly. You will have to cleanup every link - ejector pin marks on each inside track pad. No real bother - just time consuming. A new coarse file will make quick work of these - if you call some 3-4 hours "quick".

On my model, I have 78 links per side as opposed to the 81 suggested by the AFV Club instructions - too much slack with 81 links.


When done cleaning them up, I put together five links at a time, and slice a portion (four End Connectors) of the sprue that carries the End Connectors as suggested by AFV Club. Leave them on the sprue - as it becomes a handle for you to push on all five links at a time. Trim the sprue gates away with a sharp X-Acto Knife.

I do five sets of five links each, and then join those runs together. On my model shown above - there is no glue holding the runs together. If you're careful, the fit is tight enough to hold the links together without the need for glue at all. If you get rushed and try to assemble more links at a time, you run the risk of the track links flexing too much and breaking off the stubs for the End Connectors. It really pays to take your time using them. I made this mistake several years ago when I put them on my M60A2 MBT...

Gunnie
Orffer
Visit this Community
Gauteng, South Africa
Joined: February 16, 2005
KitMaker: 44 posts
Armorama: 0 posts
Posted: Sunday, January 22, 2006 - 10:57 AM UTC

Quoted Text


Dieter - I really like the way your MERDC paint job came out. What type of paints and which colors did you use?


Chris, I Used Humbrol paints for my M48A5. I took the picture in the evening with the flash on, so in daylight, the colors look better.

The colors that I used
1. Tamiya Light Gray Primer
2. Humbrol No 155, green - olive drab (or round about color
3. Humbrol No 26, camo brownish color
4. Humbrol No 7, buff, for the light stripes
5. Humbrol No 33 (I Think), FLAT BLACK
6. I coated the entire model with a clear gloss coat, that darkened the colors and gave it a gloss coat
7. Applied Humbrol No 29, Dark Earth as a wash on the model
8. I applied a tank gray to the road wheels, after studying reference pictures that indicate that the roadwheels are not entirely black.

I hope this helps....

I found that your colors tone down if you apply gloss coats. Maybe since I'm using Humbrol's clear gloss coat...

Regards

Dieter
Erik67
Visit this Community
Buskerud, Norway
Joined: July 31, 2005
KitMaker: 1,871 posts
Armorama: 1,423 posts
Posted: Monday, January 23, 2006 - 01:54 AM UTC
An update on my M-48 A5 Norwegian version:
The kit (Academy) turns out to be pretty good. Only miner modifications are necessary to build a nice "artic" version. The biggest drawback of the kit seems to be the rear grills. They are apparently a bit to small. I tried to fix this with some styrene strips, but it did not really turn out the way I wanted. Well,you can see for you selves.


Our M-48s had rubber mudflaps, instead of the steel ones on the kit. I made the flaps from the sort of rubber bands used by combat medics to help stop large bleedings from f.ex. a torn off arm or leg. It looks a bit over-scaled, but with some more details and paint it will hopefully turn out ok. However, it is allways nice to try something different.


Most modifications has to be done to the commanders cuppola. This M-48 will have a MG-3 as the turret machine gun mounted in a similar way as many Israeli tanks and APCs. I have also added wireing and a protectiv bar to the Infantry phone at the rear.


Hopefully I will finish my build by the end of the week, but usually my project goes way past my scheduled time :-)

Cheers
Erik
GunTruck
Visit this Community
California, United States
Joined: December 01, 2001
KitMaker: 5,885 posts
Armorama: 3,799 posts
Posted: Monday, January 23, 2006 - 02:21 AM UTC
Nice work Erik - I'm looking forward to seeing it completed! Don't worry about speed and time - you have plenty of both! :-)

Gunnie
MonkeyGun
Visit this Community
England - North East, United Kingdom
Joined: August 07, 2005
KitMaker: 943 posts
Armorama: 825 posts
Posted: Monday, January 23, 2006 - 07:37 PM UTC
Frank

I got those turnbuckles you sent me thankyou very very much

Will post some progress pics soon (including those turnbuckles in place) of the transantlantic Pershing :-)


Ian
ahueger
Visit this Community
Nordrhein-Westfalen, Germany
Joined: December 01, 2001
KitMaker: 217 posts
Armorama: 214 posts
Posted: Wednesday, January 25, 2006 - 02:53 AM UTC
Hiya,
made it to this thread ... finally ... Errr, Erik, watch out for the fenders stowage boxes on your 48 ... they should be reversed, other than that : cool, yet another idea for a M48 ...
Andreas
MonkeyGun
Visit this Community
England - North East, United Kingdom
Joined: August 07, 2005
KitMaker: 943 posts
Armorama: 825 posts
Posted: Wednesday, January 25, 2006 - 07:02 AM UTC
Glad you found us Ahueger


Ian
Erik67
Visit this Community
Buskerud, Norway
Joined: July 31, 2005
KitMaker: 1,871 posts
Armorama: 1,423 posts
Posted: Wednesday, January 25, 2006 - 11:35 AM UTC

Quoted Text

Errr, Erik, watch out for the fenders stowage boxes on your 48 ... they should be reversed...


...and you are so right. It has been fixed. Thanks

Erik
Elad
Visit this Community
Tel Aviv-Yafo, Israel
Joined: June 19, 2004
KitMaker: 458 posts
Armorama: 269 posts
Posted: Friday, January 27, 2006 - 01:43 AM UTC
I nearly finished assembly of the Tamiya M48A3 which I'm converting to reservist Magach 3 with the 105mm gun circa Yom Kippur war.
I'm using a Barrel Depot M68 and AFV Club's Cheveron tracks for M48/60.

when I mated the turret to the hull (both nearly completed and the hull fitted with the kit's rubber tracks) it occured to me that the turret looks too small and unproportional to the hull.

is that just me??
if it is not dimensionaly accurate, is Academy's M48A5 better or is it basically a copy with the same dimensional defects?
ahueger
Visit this Community
Nordrhein-Westfalen, Germany
Joined: December 01, 2001
KitMaker: 217 posts
Armorama: 214 posts
Posted: Saturday, January 28, 2006 - 02:38 AM UTC
Hi Elad,
kinda yes ... there's been some discussion about the M48 turret, it is said to be abt. 3mm too low. Me, I have never cared much as I figure it still captures the actual vehicle look quite well, but it could be rectified. You may check ML as it's been discussed there, if I recall that correctly Same goes for the Academy kit as it's based on the big T.
It might help if you lower the suspension abt. 1.5mm as this redices the overall impression ... if you have not already done this ...
Magach 3 you say? Cool, what colors do you use? I have found quite a load of interesting pics on the IDF forum, really nice site ...
Myself, I have mated the turret and hull of the Magach 6B Gal Batash, glued the skirts on and did a litlle this'n'that ... added some gear to the bustle and covered it with tarp, did a new mantlet armor suite and try to get the urdan cuppola movable, nice feat I thought Maybe I'm gonna shoot a pic later today ... the batteries on my digicam are low, soooooo
cheers - Andreas -
jcneel
Visit this Community
Texas, United States
Joined: June 13, 2004
KitMaker: 135 posts
Armorama: 124 posts
Posted: Saturday, January 28, 2006 - 03:43 AM UTC
Ok - here's my completed entry for the Old Blood & Guts - Patton Campaign.

This is my M60 A-nuthin' made from a Italeri Blazer kit with an AEF M60 early turret and miscellaneous parts from an Academy M48A5 and AFV Club M60 tracks (which are neat little buggers, by the way).

Finished in plain jane Green Drab with decals from my M60A2 kit and Archer Transfer stars.

Once again, thanks to Gunnie for inspiration, ideas and assistance!


and here it is sitting with my other already completed Pattons so far...


Later

cn
Elad
Visit this Community
Tel Aviv-Yafo, Israel
Joined: June 19, 2004
KitMaker: 458 posts
Armorama: 269 posts
Posted: Saturday, January 28, 2006 - 04:45 AM UTC

Quoted Text

It might help if you lower the suspension abt. 1.5mm as this redices the overall impression ... if you have not already done this ...
Magach 3 you say? Cool, what colors do you use? I have found quite a load of interesting pics on the IDF forum, really nice site ...
Myself, I have mated the turret and hull of the Magach 6B Gal Batash, glued the skirts on and did a litlle this'n'that ... Maybe I'm gonna shoot a pic later today...


hey Andreas,
thanks for the tip I did that and it corrected the porportion problems.
I heard that tip in the past but thought it was only true for the Academy kit.

I will be using Tamiya colours custom mixed.
I'm hope to get a tip about the actual tone used back then from a former ordnance officer I know.

please post some pics of your Magach. the variant you are building is the slickest looking of them all.
Erik67
Visit this Community
Buskerud, Norway
Joined: July 31, 2005
KitMaker: 1,871 posts
Armorama: 1,423 posts
Posted: Saturday, January 28, 2006 - 05:44 AM UTC
Hi guys
Some update pics on my M-48 A5(NO).
Buildin is more or less finished. Lessons learned: Use foil and NOT rubber for mudflaps. I had to cover my flaps with super glue to get the primer to stick. Smoke launchers are ex-Leopard and a bit remodelled. They are mounted a bit to high, but it is to late to fix it now. I added mesh to the turret basket, and made new tow wires from a piece of thin rope.

Erik


generalzod
Visit this Community
United States
Joined: December 01, 2001
KitMaker: 3,172 posts
Armorama: 2,495 posts
Posted: Saturday, January 28, 2006 - 06:22 AM UTC
Erik
Are the sprockets supposed to be on the front? Did you do some adding to the gun mantlet around the sides?
Erik67
Visit this Community
Buskerud, Norway
Joined: July 31, 2005
KitMaker: 1,871 posts
Armorama: 1,423 posts
Posted: Saturday, January 28, 2006 - 06:43 AM UTC

Quoted Text

Are the sprockets supposed to be on the front?


LoL, yes I know Chad. Elad has just pointed it out for me :-)
They are NOT supposed to be there, I just added them for the priming, and did not think of correcting them before taking the pictures. They are back in the box waiting for the first coat of paint. What was worse was the rear stowage boxes. I had installed them the wrong way... However, that has been fixed now. I guess that is the price to pay for building to fast. Stupid rookie mistake. I will now go over to the corner of my living room and be ashamed...

And yes, I added a mantlet cover made from putty and tissue.

Cheers
Erik
ahueger
Visit this Community
Nordrhein-Westfalen, Germany
Joined: December 01, 2001
KitMaker: 217 posts
Armorama: 214 posts
Posted: Saturday, January 28, 2006 - 12:33 PM UTC
Hey Elad,
o.k., here's some, I was really glad to get my hands on the Goffy conversion ... in the first place, but there's quite a lot to add to it. Basically I redid the mantlet armor and turret bustle. Still a long way to go. I use a base color b4 I finish any model, hence the green ...

Erik,
will be a cool kit, but I already said that ... you should however rework the connection between the turret halves, just a little sanding does the trick.
Chris,
the slick is really nice, a little too clean for my taste, but very well done, good to see you did all the tweaks and another nice AEF conversion. I really like it !
- Andreas -
LeoCmdr
Visit this Community
Alberta, Canada
Joined: January 19, 2005
KitMaker: 4,085 posts
Armorama: 3,917 posts
Posted: Saturday, January 28, 2006 - 02:52 PM UTC
Erik,
Great job on your Patton...thanks again for the images, it's great to see them on Prime Portal.

One thing I noticed about your turret is the sides of the mantlet. The Academy kit is incorrect about what they have put in the kit as the mantlet cover clamps.

The kit has these funny little steps along the side of the mantlet...totally incorrect. There should be flat rectangular bolt down clamps on the side of the mantlet to hold down the mantlet cover.

Your reference images have an excellent view of these clamps.

I look forward to seeing the splinter cam pattern.
Erik67
Visit this Community
Buskerud, Norway
Joined: July 31, 2005
KitMaker: 1,871 posts
Armorama: 1,423 posts
Posted: Saturday, January 28, 2006 - 04:24 PM UTC
Hi Jason
Yes, I had to upload the pics to prime portal since demand got a bit too much for me. I got way too many e-mails asking for the pics, so now they are out there, avaiable to you all.


Quoted Text

The kit has these funny little steps along the side of the mantlet...totally incorrect. There should be flat rectangular bolt down clamps on the side of the mantlet to hold down the mantlet cover.


This is my sunday afternoon project :-)

Cheers
Erik
Erik67
Visit this Community
Buskerud, Norway
Joined: July 31, 2005
KitMaker: 1,871 posts
Armorama: 1,423 posts
Posted: Saturday, January 28, 2006 - 07:06 PM UTC
Ok, first of all; You guys know way to much about the M-48 :-) . My initial idea was to build my Academy A5 OOB, but you guys keep correcting me, and I have no intention of letting you down. So, Jason, I suppose this one is for you since you noticed the area around the gun mantlet. I had no plan to correct this area, but now I have done it.(and I blame you, Jason :-) ).

So here we go:


These are the tools I used. Pretty basic stuff. The Tamiya diamond file is one of my favorite tools. Works very good on most materials.


I started by sawing of the strange "step thingys" on each side of the mantlet with a razor saw. Then using a fresh, curved blade to cut of excess plastic. Finally I used the diamon file and # 800 sand paper to smoothe it out.


The next step was filling the small gaps which occured after the rather brutal job. I used Blanco "correction fluid" which I find very nice for small gap fillings. It dries fast and is easily sanded.


When the area around the mantlet had been sanded, I added 1 mm strips of styrene to replicate the flat rectangular bolt down clamps on each side. The rivets were made from streched sprue. 7 bolt downs on each side.


Finally I gave it another coat of primer. I think the result turned out pretty good...

The whole job took 1 hour and 8 minutes. In between I watched Ski jumping on TV, had lunch and surfed Armorama.

Are we happy Jason? :-) :-) :-)

Erik
LeoCmdr
Visit this Community
Alberta, Canada
Joined: January 19, 2005
KitMaker: 4,085 posts
Armorama: 3,917 posts
Posted: Sunday, January 29, 2006 - 12:07 AM UTC
Erik,

I am happy just to see a non US version of the M48 being built, you are doing a great job. Don't change anything because of my comments.

The work you have now done to the mantlet is excellent...keep enjoying your Sunday.
Erik67
Visit this Community
Buskerud, Norway
Joined: July 31, 2005
KitMaker: 1,871 posts
Armorama: 1,423 posts
Posted: Sunday, January 29, 2006 - 12:16 AM UTC
He-He, no hard feelings, Jason
It was enjoyable to change the mantlet. I have just finished the build by adding a scratch built fire exstinguisher to the turret basket. Whats left is the TC MG mount and the splinter camo painting...

Erik
Cristiane
Visit this Community
Santa Catarina, Brazil
Joined: March 05, 2003
KitMaker: 522 posts
Armorama: 316 posts
Posted: Sunday, January 29, 2006 - 01:09 AM UTC
Hi Guys,

This model can be built for this campaign? M60A3?


Erik67
Visit this Community
Buskerud, Norway
Joined: July 31, 2005
KitMaker: 1,871 posts
Armorama: 1,423 posts
Posted: Sunday, January 29, 2006 - 01:18 AM UTC
Hi Cris
No problem with a M-60 A3. Looking forward to see your progress.

Erik
Cristiane
Visit this Community
Santa Catarina, Brazil
Joined: March 05, 2003
KitMaker: 522 posts
Armorama: 316 posts
Posted: Sunday, January 29, 2006 - 01:34 AM UTC

Quoted Text

Hi Cris
No problem with a M-60 A3. Looking forward to see your progress.

Erik


OK Erik.


I will participate with my M60A3 and I build this version: