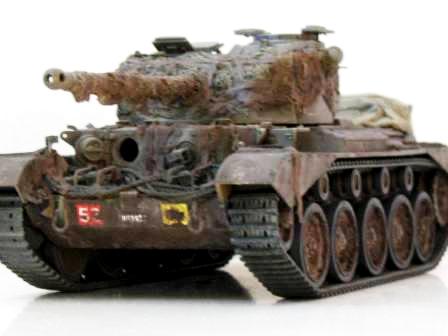
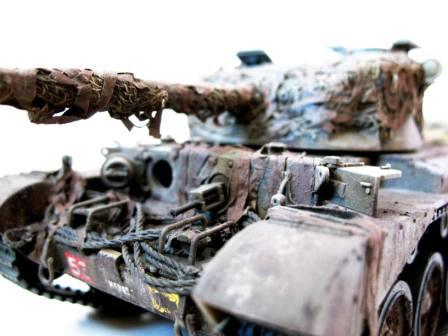
Here is where I am at with my build. Tamiya's Chieftan. I used a combination of the Eduard PE and On the Mark Model set. From what I have been told, the kit is actually a Mk3 not a 5. It shouldn't have the MRS guard on the muzzle, but I thought it looked so cool with it, I had to add it. Anyway, here she is. Thanks, "Q" ps. Still more work to do yet......
Campaigns
Where Armorama group builds can be discussed, organized, and updates posted.
Hosted by Darren Baker, Richard S.
Best of the British
Red4
California, United States
Joined: April 01, 2002
KitMaker: 4,287 posts
Armorama: 1,867 posts
Joined: April 01, 2002
KitMaker: 4,287 posts
Armorama: 1,867 posts
Posted: Wednesday, February 28, 2007 - 07:50 AM UTC
Red4
California, United States
Joined: April 01, 2002
KitMaker: 4,287 posts
Armorama: 1,867 posts
Joined: April 01, 2002
KitMaker: 4,287 posts
Armorama: 1,867 posts
Posted: Wednesday, February 28, 2007 - 08:04 AM UTC
Love the Pink Panther! After seeing this I had to share mine. Its an older build. I didn't paint mine pink though....next one I plan on it though. Sorry for the Hijack... "Q"
Posted: Wednesday, February 28, 2007 - 01:06 PM UTC
Quoted Text
Very nice Jesper...looks really good. I've never built a Zvezda kit, are they good?
Thanks for your nice comment - appreciated
Well, the Zvezda label covers a lot of kits. This one is actually the old Italeri kit. Decent, especially considering its age and low price tag. However, Zvezda also has some Dragon kits under their label as well.
Some of the other kits they are doing themselves (Mostly russian stuff) and they are pretty good except the tracks for some of the tanks. Again especially considering the price tag.
Posted: Wednesday, February 28, 2007 - 01:11 PM UTC
@Matthew, good job on the Chieftain. It looks very nice. What extra work do you need to do on it? It looks pretty finished to me maybe with the exception of some antennas and some weathering
Red4
California, United States
Joined: April 01, 2002
KitMaker: 4,287 posts
Armorama: 1,867 posts
Joined: April 01, 2002
KitMaker: 4,287 posts
Armorama: 1,867 posts
Posted: Wednesday, February 28, 2007 - 08:12 PM UTC
Quoted Text
It looks pretty finished to me maybe with the exception of some antennas and some weathering
Thanks for the kudos Jesper. I'm adding stowage to the bussle racks, plus the antennas, and some more weathering etc. Thanks again. "Q"
Red4
California, United States
Joined: April 01, 2002
KitMaker: 4,287 posts
Armorama: 1,867 posts
Joined: April 01, 2002
KitMaker: 4,287 posts
Armorama: 1,867 posts
Posted: Thursday, March 01, 2007 - 01:26 AM UTC
My Chieftan is finished. I added some goodies and a couple of epoxy tarps. Tarps came out fine, but I need to work on the straps. This was my first attempt at using putty for the straps. I think I got a handle on it for future builds. The weathering was kept somewhat light. Just a wash, and some selective dry-brushing here and there. Mig pigments used along the lower skirts for the dusty look. I took a tooth pick and replicated scratches along the skirts and the lower front hull. All the nicks and dings were done with Vellejo paints and oils. Thanks. "Q"
NebLWeffah
Alberta, Canada
Joined: October 13, 2004
KitMaker: 1,683 posts
Armorama: 1,248 posts
Joined: October 13, 2004
KitMaker: 1,683 posts
Armorama: 1,248 posts
Posted: Thursday, March 01, 2007 - 01:33 AM UTC
Very nice 'pink panther' Matthew, thanks for sharing. I particularly like the OD green paintjob and the .50 cal instead...looks really good!
Bob
Bob
Red4
California, United States
Joined: April 01, 2002
KitMaker: 4,287 posts
Armorama: 1,867 posts
Joined: April 01, 2002
KitMaker: 4,287 posts
Armorama: 1,867 posts
Posted: Thursday, March 01, 2007 - 02:05 AM UTC
Quoted Text
I particularly like the OD green paintjob
Its actually sand colored. :-) "Q"
Posted: Thursday, March 01, 2007 - 12:42 PM UTC
Great Chieftain, Matthew Looks very good with the tarps and the dusting.
The scratches in the dusty coat is pretty good. I have not thought of that before, so I will just steal your idea for my next project :-) :-)
Thanks for sharing
The scratches in the dusty coat is pretty good. I have not thought of that before, so I will just steal your idea for my next project :-) :-)
Thanks for sharing
spongya
Associate Editor
Budapest, Hungary
Joined: February 01, 2005
KitMaker: 2,365 posts
Armorama: 1,709 posts
Joined: February 01, 2005
KitMaker: 2,365 posts
Armorama: 1,709 posts
Posted: Thursday, March 01, 2007 - 09:36 PM UTC
Matthew
Beautiful weathering. I'm sorry to nag you with this, but how did you do the paint chips and scratches and weathering in general? I know, there's a million and one article out there, but since I like your finish, I'd like to replicate it... At least try. (Learning process, I guess.) So far I've been trouble making small and irregular paint chips that are convincing in color, position and shape. (Not to mention scratches...)
Thank you...
Red4
California, United States
Joined: April 01, 2002
KitMaker: 4,287 posts
Armorama: 1,867 posts
Joined: April 01, 2002
KitMaker: 4,287 posts
Armorama: 1,867 posts
Posted: Friday, March 02, 2007 - 12:06 AM UTC
Andras, Thanks for the kudos. Not a problem describing the weathering process. For the paint chips I use a couple of methods. For rusted chips I use a small brush and aplly irregular patches of Vallejo 872 Chocolate Brown, or 822 SS Camo Black Brown. I find these to be a good match for older rusted areas. Once dry I use a very thin wash of Burnt Sienna oil paint (Tube type) touched to the Vallejo paint. It will spider out and give a nice effect. For the other method, ie. newer, less sever chips, I use some Model Master flat black and some Titanium White, also a tube oils paint. I mix this as a dark gray to light gray color. Again using a very small brush, I apply it randomly where rocks and other debris would be thrown up by the tracks, and to other areas prone to contact.
*** I do all of this after the tank has been gloss coated, decaled, and then flat coated***
The streaks that represent rust and dirt are done with Burnt Umber and Raw Sienna oil paints. Small amounts are again applied with a small brush and allowed to set for a few minutes. I then use another dry brush and pull the paint downward repeatedly until I get the look I want.
I follow all of this with pastels along the lower half of the skirts, or hull area. It will cover up the paint chips slightly, which is what I try to achieve. The scratches are done over the pastels using a toothpick.
That's pretty much the gist of how I do it. Let me know if you need more info. Hope it helps. Thanks. "Q"
NebLWeffah
Alberta, Canada
Joined: October 13, 2004
KitMaker: 1,683 posts
Armorama: 1,248 posts
Joined: October 13, 2004
KitMaker: 1,683 posts
Armorama: 1,248 posts
Posted: Friday, March 02, 2007 - 04:32 AM UTC
Oops, sorry Matthew.
Sand it is. My monitor must need adjustment (or maybe my eyes....). Looks good and thanks for the weathering tips.
Bob
Sand it is. My monitor must need adjustment (or maybe my eyes....). Looks good and thanks for the weathering tips.
Bob
gbkirsch
Ohio, United States
Joined: June 04, 2005
KitMaker: 627 posts
Armorama: 455 posts
Joined: June 04, 2005
KitMaker: 627 posts
Armorama: 455 posts
Posted: Friday, March 02, 2007 - 09:46 AM UTC
Great looking Chieftain Matthew!!!
Gary
Gary
jazza
Singapore / 新加坡
Joined: August 03, 2005
KitMaker: 2,709 posts
Armorama: 1,818 posts
Joined: August 03, 2005
KitMaker: 2,709 posts
Armorama: 1,818 posts
Posted: Friday, March 02, 2007 - 10:42 AM UTC
Hi Matt,
Great work on the chieftain!
Just sent you a PM by the way.
Great work on the chieftain!
Just sent you a PM by the way.
Posted: Friday, March 02, 2007 - 01:33 PM UTC
Great looking Chief Matt
I haven't seen one of these,this well built and finished for years.
I can't recall seeing one in that cammo before ,looks cool.
Thanks for in info on the chipping,I'll try that on my next build.
Cheers
Andy
I haven't seen one of these,this well built and finished for years.
I can't recall seeing one in that cammo before ,looks cool.
Thanks for in info on the chipping,I'll try that on my next build.
Cheers
Andy
Red4
California, United States
Joined: April 01, 2002
KitMaker: 4,287 posts
Armorama: 1,867 posts
Joined: April 01, 2002
KitMaker: 4,287 posts
Armorama: 1,867 posts
Posted: Saturday, March 03, 2007 - 01:31 AM UTC
Thanks for the kudos guys. On my instruction sheet there is not one single english word. I had to rely on internet pics, and the box art for the camo colors. Not sure if they were correct, but I liked the final result. I have another chieftan on its way in the mail. Going to do a what if version of it in Israeli hands. Should prove to be rather interesting once complete. I'll keep a build log as I go. Thanks again. "Q"
Posted: Sunday, March 04, 2007 - 04:04 PM UTC
Cool,,,an Armorama Campaign that the Aeroscale guys can join in on
Im in!
This will give me a great excuse to build something from the old Airfix 1:72 RAF Refuelling Set.
Nige
Im in!
This will give me a great excuse to build something from the old Airfix 1:72 RAF Refuelling Set.
Nige
WARLORD
Associate Editor
Warszawa, Poland
Joined: April 23, 2003
KitMaker: 1,923 posts
Armorama: 868 posts
Joined: April 23, 2003
KitMaker: 1,923 posts
Armorama: 868 posts
Posted: Thursday, March 08, 2007 - 04:05 PM UTC
Here are some pics of my Cromwell tank. For painting I used Vallejo Russian Uniform and for postshading U.S. Olive Drab.
painted:
Postshaded:
Which images look better, darker or brighter ones?
painted:
Postshaded:
Which images look better, darker or brighter ones?
RCAC
Quebec, Canada
Joined: September 12, 2005
KitMaker: 32 posts
Armorama: 30 posts
Joined: September 12, 2005
KitMaker: 32 posts
Armorama: 30 posts
Posted: Sunday, March 11, 2007 - 07:26 AM UTC
Nice entries so far I like that Cheiftan
I started painting My Comet here are a couple of shots Basic clors are on and I started the weathering using Mig pigments. At the moment the weithring is at it's initial stages with caked and dried mud on the lower hull and wheels as well as along the Fenders a little on the engine deck and turret roof where the crew would walk about . I am working to get away from a monochromatic greenish look because the time and place for this vehicle is the end of February early March during the Rhine crossing battles. A times very muddy and wet" Sorry about the quality of the photos still not used to this new digital camera yet.
Regards
Brian
Posted: Sunday, March 11, 2007 - 06:42 PM UTC
Good job, Brian. Too bad about the camera - could use a few more pictures.
Thanks for sharing
Thanks for sharing
kevinb120
Virginia, United States
Joined: May 09, 2006
KitMaker: 1,349 posts
Armorama: 1,267 posts
Joined: May 09, 2006
KitMaker: 1,349 posts
Armorama: 1,267 posts
Posted: Thursday, March 15, 2007 - 02:06 AM UTC
I am getting ready to paint my little Stuart Honey. Does anyone know what MM colors will work for the yellow/blue two-tone of the 8th King's Irish Hussars, 7th Armoured Division?
Johnston_RCR
Ontario, Canada
Joined: April 01, 2006
KitMaker: 470 posts
Armorama: 367 posts
Joined: April 01, 2006
KitMaker: 470 posts
Armorama: 367 posts
Posted: Thursday, March 15, 2007 - 03:31 AM UTC
Some really great ones popping up now.
I am definately in for this campaign now, although I changed my kit. I found a Trumpeter AS-90 on sale and just cant resist a good sale.
Red4
California, United States
Joined: April 01, 2002
KitMaker: 4,287 posts
Armorama: 1,867 posts
Joined: April 01, 2002
KitMaker: 4,287 posts
Armorama: 1,867 posts
Posted: Thursday, March 15, 2007 - 06:51 AM UTC
Quoted Text
............... Does anyone know what MM colors will work for the yellow/blue two-tone of the 8th King's Irish Hussars, 7th Armoured Division?
If my memory serves me correctly, MM Middlestone should work for the yellow, and for the blue there are a couple of choices I found under the MM brands. 1) is FS35164 Intermediate Blue which has more gray to it, and 2) MM Flanker Blue Gray. They are very close to each other in color/hue, at least in my bottles they look close. Should be a good place to start though. Hope it helps, "Q"
kevinb120
Virginia, United States
Joined: May 09, 2006
KitMaker: 1,349 posts
Armorama: 1,267 posts
Joined: May 09, 2006
KitMaker: 1,349 posts
Armorama: 1,267 posts
Posted: Thursday, March 15, 2007 - 07:33 AM UTC
Flanker blue actually does sound about right in hue for that blue. The yellow was really throwing me for a loop. I'll have to pick some up, it just needs to be close in vibrance and tone, its always easy to tweak it a bit. Its kinda a pinkish yet mustardish hue I couldn't remember seeing anywhere else. Thanks!
kevinb120
Virginia, United States
Joined: May 09, 2006
KitMaker: 1,349 posts
Armorama: 1,267 posts
Joined: May 09, 2006
KitMaker: 1,349 posts
Armorama: 1,267 posts
Posted: Friday, March 16, 2007 - 05:54 AM UTC
I think I found the perfect colors after playing around at the LHS. MM British Gulf armor sand and US Navy blue-gray. They look exactly like the model in the photos. I cant wait to spray em, totally different from the normal colors I have