


Яusso-Soviэt Forum
Russian or Soviet vehicles/armor modeling forum.
Russian or Soviet vehicles/armor modeling forum.
Hosted by Darren Baker, Jacques Duquette
Build - Log Review of DML SU-100 Premium kit

JimF

Joined: July 05, 2002
KitMaker: 717 posts
Armorama: 621 posts
Posted: Wednesday, September 19, 2007 - 03:20 AM UTC
Looking forward to the updates. I have been really enjoying this blog, and getting lots of good info from it.
Jacques
Joined: March 04, 2003
KitMaker: 4,630 posts
Armorama: 4,498 posts

Posted: Wednesday, September 19, 2007 - 03:51 PM UTC
Ok, here we go again. And yes, I will take all the adulation I can get my hands on to keep me going. And a note of thanks to Ron Goins (Biffa) who, with his very nice builds over the last 6 weeks or so of the T-70 AND the 234/3 have shown me that these kits can be built nice AND quickly. Essentially he kicked me off my duff, and over the internet to boot. So I owe you one Ron... 
That said, I dove in to get myself up to speed on the building sequence. I had not realized how hesitant I was on adding PE and making some key decisions until I started looking over the progress of the kit. So I made some.
First, this kit is going to be pretty much buttoned up. I have no interior for this kit and no desire to scratch one. I might put a figure in the commanders hatch, so that will remain "loose" but otherwise the fighting compartment hatches are getting glued shut.
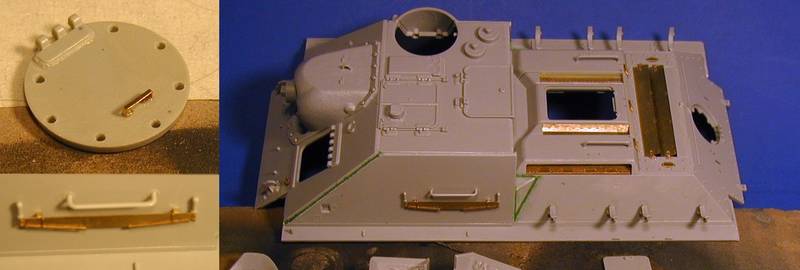
I shaved off the bolts on the round transmission access hatch and saved them for the scrap box (hex bolt heads can be difficult to get) and drilled out the holes for the bolts. The PE handle was added.(See picture below.)
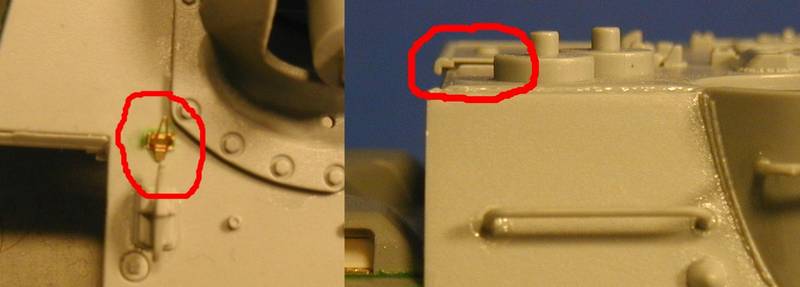
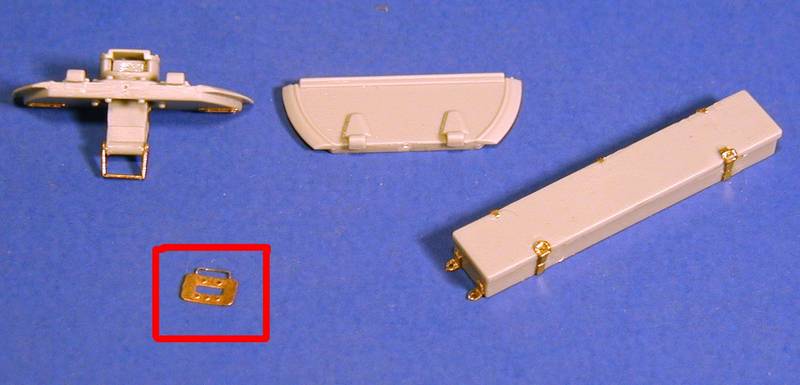
I added the PE tow shackle "holders". What you need to do is fold the "mounts" as needed, and then take the diamond shaped "rockers" and hold them on your thumb with the etching face up. Take a X-acto knife HANDLE and press the "rocker" into it, folding it top to bottom while rolling it against the blade. This will give it the right bend. As to accuracy, well, the PE pieces seem to be more show than substance, as the real "rockers" appear to be much thicker and heavier in photo's, more in line with the plastic parts provided by DML. (See photo with Red Line marking.)
I started adding grab-handles to the kit as noted in the instructions with one problem: the grab handle on the left hand side, above the hand-saw, has WAY overscale location circles. It would do you better to scrape them off and then glue the handle than to use the locator point. I made this mistake and so I will add a weld-bead around it in the future (or else try to scrape it off). Also, the PE hand-saw is a bit fiddly to build, especially the two PE brackets the saw goes "in". You will also need to remove the locator squares on the kit side as they do not corresponde with the PE piece attachment points.
I also had a issue with the rear fighting compartment hatch...it did not sit flush. I was not sure if this was a build issue or a engineering issue, and it is not toooooooo bad...see picture below.
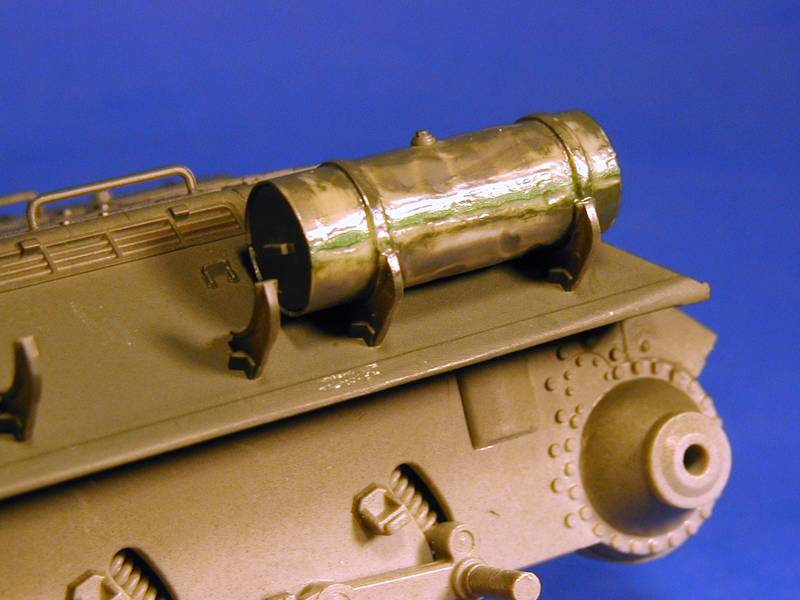
Now, for my taste I like to scrape off the locators on the fuel barrel brackets just because they always give me heartburn. I did not add the PE parts to the undersides because the new detailed plastic pieces really do not need it. Better to save those PE pieces for older DML kits that could use them...like the other SU-100 I am working on!
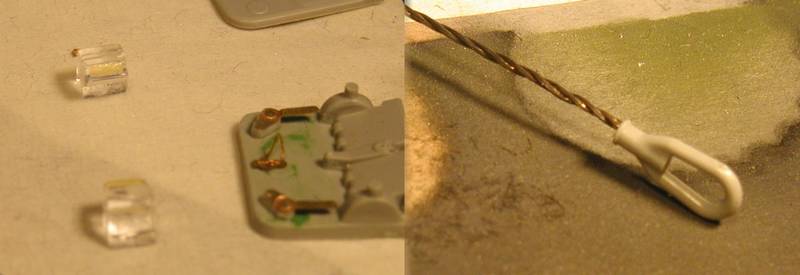
I am not sure that I will use the tow cable system or not, but I built it. You need to temper the provided wire (Use a bare flame to heat the metal until it is discoloured, this will make it pliable..and for gosh sakes, be CAREFULL! Hold it with something metal, like pliers, to act as a heat sink, do NOT burn down anything, and make SURE your glues, solvents and thinners are covered. And adequet ventillation. And say a prayer before you start. )
)
For the clear glass periscopes, I cut up some tamiya masking tape to the correct size of the glass viewport, stuck the tape on as a paint mask, and then dipped it is future floor polish. This seals the tape sides to the piece so that paint will not leak under AND the glue on the tape will not react to enamels and oils, or their thinners. I plan to paint the perscpes like this before glueing them inside the two halves of the drivers hatch. I am thinking either dark green or black, not sure yet.
Ok, off to bed. More soon.
That said, I dove in to get myself up to speed on the building sequence. I had not realized how hesitant I was on adding PE and making some key decisions until I started looking over the progress of the kit. So I made some.
First, this kit is going to be pretty much buttoned up. I have no interior for this kit and no desire to scratch one. I might put a figure in the commanders hatch, so that will remain "loose" but otherwise the fighting compartment hatches are getting glued shut.
I shaved off the bolts on the round transmission access hatch and saved them for the scrap box (hex bolt heads can be difficult to get) and drilled out the holes for the bolts. The PE handle was added.(See picture below.)
I added the PE tow shackle "holders". What you need to do is fold the "mounts" as needed, and then take the diamond shaped "rockers" and hold them on your thumb with the etching face up. Take a X-acto knife HANDLE and press the "rocker" into it, folding it top to bottom while rolling it against the blade. This will give it the right bend. As to accuracy, well, the PE pieces seem to be more show than substance, as the real "rockers" appear to be much thicker and heavier in photo's, more in line with the plastic parts provided by DML. (See photo with Red Line marking.)
I started adding grab-handles to the kit as noted in the instructions with one problem: the grab handle on the left hand side, above the hand-saw, has WAY overscale location circles. It would do you better to scrape them off and then glue the handle than to use the locator point. I made this mistake and so I will add a weld-bead around it in the future (or else try to scrape it off). Also, the PE hand-saw is a bit fiddly to build, especially the two PE brackets the saw goes "in". You will also need to remove the locator squares on the kit side as they do not corresponde with the PE piece attachment points.
I also had a issue with the rear fighting compartment hatch...it did not sit flush. I was not sure if this was a build issue or a engineering issue, and it is not toooooooo bad...see picture below.
Now, for my taste I like to scrape off the locators on the fuel barrel brackets just because they always give me heartburn. I did not add the PE parts to the undersides because the new detailed plastic pieces really do not need it. Better to save those PE pieces for older DML kits that could use them...like the other SU-100 I am working on!
I am not sure that I will use the tow cable system or not, but I built it. You need to temper the provided wire (Use a bare flame to heat the metal until it is discoloured, this will make it pliable..and for gosh sakes, be CAREFULL! Hold it with something metal, like pliers, to act as a heat sink, do NOT burn down anything, and make SURE your glues, solvents and thinners are covered. And adequet ventillation. And say a prayer before you start.
) For the clear glass periscopes, I cut up some tamiya masking tape to the correct size of the glass viewport, stuck the tape on as a paint mask, and then dipped it is future floor polish. This seals the tape sides to the piece so that paint will not leak under AND the glue on the tape will not react to enamels and oils, or their thinners. I plan to paint the perscpes like this before glueing them inside the two halves of the drivers hatch. I am thinking either dark green or black, not sure yet.
Ok, off to bed. More soon.

Jacques
Joined: March 04, 2003
KitMaker: 4,630 posts
Armorama: 4,498 posts
Posted: Thursday, September 20, 2007 - 10:31 AM UTC
You knew this was coming, right? I have to take a emergency "modellers leave of absence" as my mother is in the hospital again (5th time since June). I know you are all concerned, but please, no posts in this thread...I apprecaite you helping me keep this thread pure.
I am working on dealing with the fuel cells, I hope to have the log info up on Sunday/Monday.
I am working on dealing with the fuel cells, I hope to have the log info up on Sunday/Monday.
Jacques
Joined: March 04, 2003
KitMaker: 4,630 posts
Armorama: 4,498 posts
Posted: Monday, September 24, 2007 - 04:35 PM UTC
Dealing with the exterior fuel tanks.
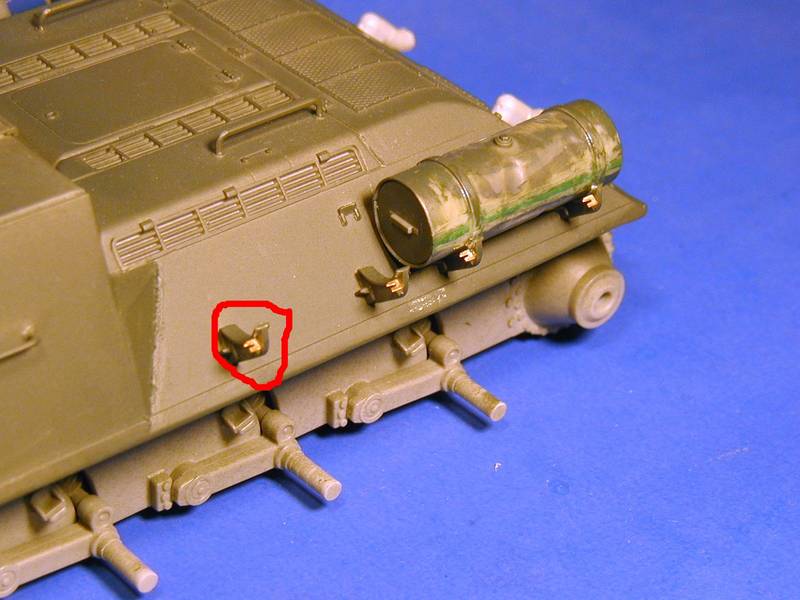
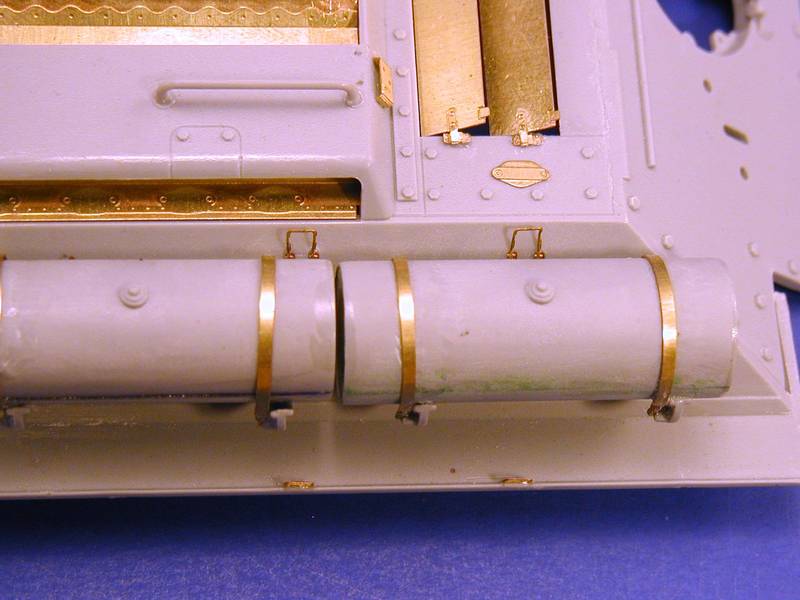
First, on kit 6075, I simply cut off the locator "pins" on the supports and added the damaged fuel tanks. I have not yet added the PE brackets on the supports. I settled the bands on the fuel tank to match up with the brackets. I also added prominent weld beads on the fuel tanks.
Of course, this is incorrect.
I then looked up what the real tanks looked like. They DO have a weld bead, but only on some. Some have had the weld bead ground down, some are very corsely done, and most were very thin and small bead lines. Also, the tie down straps and connecting brackets should be offset from the support, which is also just a bent to shape metal bracket, not a solid piece as depicted on the DML kits. Consulting reference photos will show this explicitly.
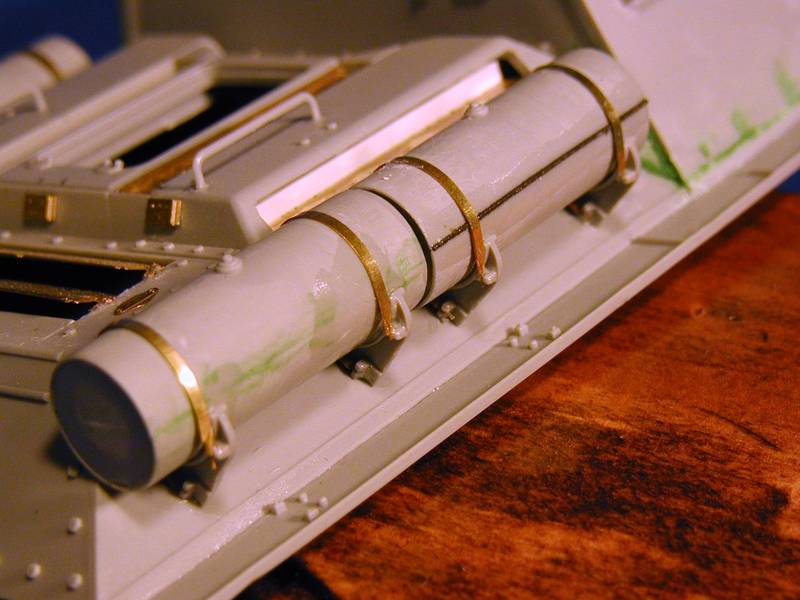
Going on to kit 6359, I carved off the molded on straps, sanded the fuel tanks smooth and still had to add some putty to clean it up. I also clipped off the molded on handles on the fuel tank end-caps, but I have not added them in the photo. Also, when cutting out the PE straps, leave the extra length of thin PE onthe ends of the strap, past where it narrows down...these are meant to represent the bolts that hang down past the securing nuts.
After much difficulty (really) the best way to deal with the fuel cells and straps are this: Glue on the supports to the tank. Then glue the fuel tanks to the supports. Let it dry for a good two days. Then start by adding the PE straps BEHIND the fuel tanks and come over the top and glue in front. Believe me, it is the easiest way.
So it is a but of an ordeal. The PE does make the area look better (at least right now without paint) but it is as hard as it looks. To be totally honest, if I do another SU-100 I may just bend some PE scrap into proper brackets and leave the fuel tanks off.
First, on kit 6075, I simply cut off the locator "pins" on the supports and added the damaged fuel tanks. I have not yet added the PE brackets on the supports. I settled the bands on the fuel tank to match up with the brackets. I also added prominent weld beads on the fuel tanks.
Of course, this is incorrect.
I then looked up what the real tanks looked like. They DO have a weld bead, but only on some. Some have had the weld bead ground down, some are very corsely done, and most were very thin and small bead lines. Also, the tie down straps and connecting brackets should be offset from the support, which is also just a bent to shape metal bracket, not a solid piece as depicted on the DML kits. Consulting reference photos will show this explicitly.
Going on to kit 6359, I carved off the molded on straps, sanded the fuel tanks smooth and still had to add some putty to clean it up. I also clipped off the molded on handles on the fuel tank end-caps, but I have not added them in the photo. Also, when cutting out the PE straps, leave the extra length of thin PE onthe ends of the strap, past where it narrows down...these are meant to represent the bolts that hang down past the securing nuts.
After much difficulty (really) the best way to deal with the fuel cells and straps are this: Glue on the supports to the tank. Then glue the fuel tanks to the supports. Let it dry for a good two days. Then start by adding the PE straps BEHIND the fuel tanks and come over the top and glue in front. Believe me, it is the easiest way.
So it is a but of an ordeal. The PE does make the area look better (at least right now without paint) but it is as hard as it looks. To be totally honest, if I do another SU-100 I may just bend some PE scrap into proper brackets and leave the fuel tanks off.
Jacques
Joined: March 04, 2003
KitMaker: 4,630 posts
Armorama: 4,498 posts
Posted: Tuesday, September 25, 2007 - 01:40 AM UTC
Here are 3 links to show you what the supports and tie down system should look like:
Prime Portal #1
Prime Portal #2
IPMS London #1
Look at the pictures of the fuel tanks and you can see the differences plain as day. I can see what DML was getting at, but maybe they should have redone this area now that I know what to look for. I have not yet come across any pictures of other mounting systems, so if anyone has a picture of a solid bracket like in the DML kits, please post it.
Off to the bench...gotta get done to make room for the MAZ tank transporter!
Removed by original poster on 10/02/07 - 10:07:17 (GMT).
Jacques
Joined: March 04, 2003
KitMaker: 4,630 posts
Armorama: 4,498 posts
Posted: Monday, October 01, 2007 - 03:06 PM UTC
Another week of insanity, but more progress!
I finished up the details on the kits i had left to do (brackets on kit 6075, barrel handles on kit 6359).
Nest I dove into the commander coupola. Looking over the PE detail pieces and the pictures of the real deal, it is better to use the plastic openings (red arrow) rather than the PE version as the plastic ones really look like the real deal...the PE ones make them look too thin and flat.
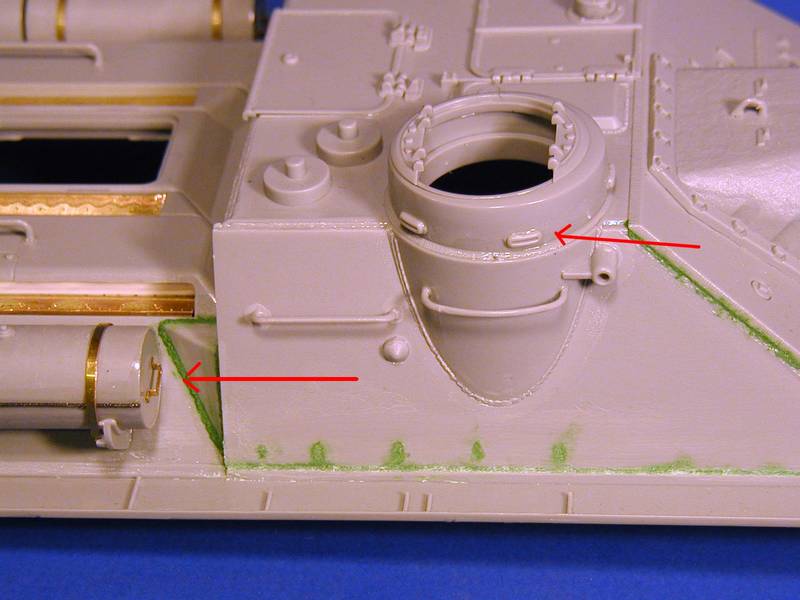
(the other red arrow is the barrel handle I added)
Another part that need to be skipped is the interior PE pieces for the observation slits (Red box below). While they are nicely done, they do not fit where they should between the plastic pieces that get sandwiched together. I am sure with a bit of ingenuity that they could be made to work reasonably well, but as it is, I am not sure they add enough interest for me to work on them. Maybe...
The hatches were put together and the PE bits added, no problems. The Tool box had the PE bits added and man, they are SMALL! My daughter was watching me work on one of the strap hooks and said "That is not fair!" My sentiments exactly, although it certainly looks good once it is done. But beware, those strap hooks are barely bigger than the end of the forceps, and they need to be bent into the shape of a L. *Shudder*
Oh well, off to work on it some more...
I finished up the details on the kits i had left to do (brackets on kit 6075, barrel handles on kit 6359).
Nest I dove into the commander coupola. Looking over the PE detail pieces and the pictures of the real deal, it is better to use the plastic openings (red arrow) rather than the PE version as the plastic ones really look like the real deal...the PE ones make them look too thin and flat.
(the other red arrow is the barrel handle I added)
Another part that need to be skipped is the interior PE pieces for the observation slits (Red box below). While they are nicely done, they do not fit where they should between the plastic pieces that get sandwiched together. I am sure with a bit of ingenuity that they could be made to work reasonably well, but as it is, I am not sure they add enough interest for me to work on them. Maybe...
The hatches were put together and the PE bits added, no problems. The Tool box had the PE bits added and man, they are SMALL! My daughter was watching me work on one of the strap hooks and said "That is not fair!" My sentiments exactly, although it certainly looks good once it is done. But beware, those strap hooks are barely bigger than the end of the forceps, and they need to be bent into the shape of a L. *Shudder*
Oh well, off to work on it some more...
Jurjen

Joined: September 21, 2003
KitMaker: 3,040 posts
Armorama: 1,016 posts

Posted: Wednesday, October 03, 2007 - 05:12 AM UTC
Good to see that you're up and running Jacques!  Your progress is of a very high standard and very inspirational. So keep it up and show us more!
Jurjen
(need to get back to the Strela)
Your progress is of a very high standard and very inspirational. So keep it up and show us more! Jurjen
(need to get back to the Strela)

Kylewaaagh
Joined: October 03, 2007
KitMaker: 34 posts
Armorama: 32 posts

Posted: Saturday, October 06, 2007 - 02:52 PM UTC
I've got a finished SU-100 sittin at home- its humbling to see how much more effort you've put in. I cant wait to see this sometime soon!!!

sgtreef
Joined: March 01, 2002
KitMaker: 6,043 posts
Armorama: 4,347 posts
Posted: Monday, October 08, 2007 - 01:48 PM UTC
This is one kick ass build Jacques.
Great work on the thing.
And you have to much free time on your hands
Or like Dave Tong to many elves building for you.
Great work on the thing.
And you have to much free time on your hands
Or like Dave Tong to many elves building for you.

kyivhomeless

Joined: October 10, 2007
KitMaker: 4 posts
Armorama: 3 posts
Posted: Wednesday, October 10, 2007 - 12:00 AM UTC
Great job, Jacues! I so like to read step-by-step building reviews!!
Wish you a lot of new releases!!!!
Good luck!
Wish you a lot of new releases!!!!
Good luck!
Jacques
Joined: March 04, 2003
KitMaker: 4,630 posts
Armorama: 4,498 posts
Posted: Wednesday, October 10, 2007 - 06:08 AM UTC
Sorry for the delay one and all, I have been compeeting! In fact, i am off today to Chicago and will not be back 'till Monday, but I will return with all the energy of a person who has been to a GREAT show, as always. Nothing like recharging the batteries of creativity.
Anyhow, most of hte last week has been spent looking over the kit, checking out details vs. references, and making adjustments. Here goes.
First: The fuel drum holders are remarkably like JS-II holders. I am thinking that there must either be a T-34 with those holders that DML took them from, or that they just carried them over. But so far as I can tell, the solid fuel drum holders would be very rare, or not-documented in WWII. I DO NOT have the T-34 Mythical Weapon book, so I cannot reference that, but web resources just do not show these holders. Sorry DML, seems like a goof on the T-34 series.
Now please, someone prove me wrong so I feel better about this!
Next, work on the front left corner: This gave me the most fits in this part. The tow shackle holder did not look right at all. Consulting references, it is a post with a screw top and a L shaped bracket that slides up and down the post to secure the shackles. Most photos I looked at were missing all pieces but the post, so it was a quick-loss area in real life I guess. I shaved off the molded on post and added .030 Evergreen rod. I shaved the bolt head off the top of the bracket and saved it to add to the post top. I then cleaned up the bracket to look like its proper L shape and drilled a hole in it to go on the post. Easy!
If you decide to use the PE light bracket, you will need to fill in the hole in the side of the upper hull, the PE piece will not look corect if you just place it in. You need to shave off the locating marks for the horn mount as well if you use the PE piece. (The dark green piece is a replacement I had to make when the carpet monster ate the kit piece. In fact, the carpet monster ate a LOT of pieces on this build, mostly PE. SIgh.)
The light itself can just be clipped off the plastic mount, but the Horn has to be carved off of its mount. Take a look , you will see what i mean. It is not as hard as it looks, but be carefull and take your time. The result is a nice plastic horn. that mounts very well on the PE mount.
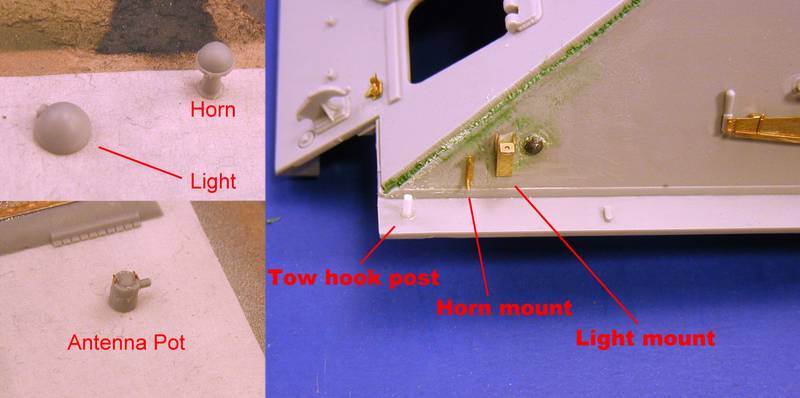
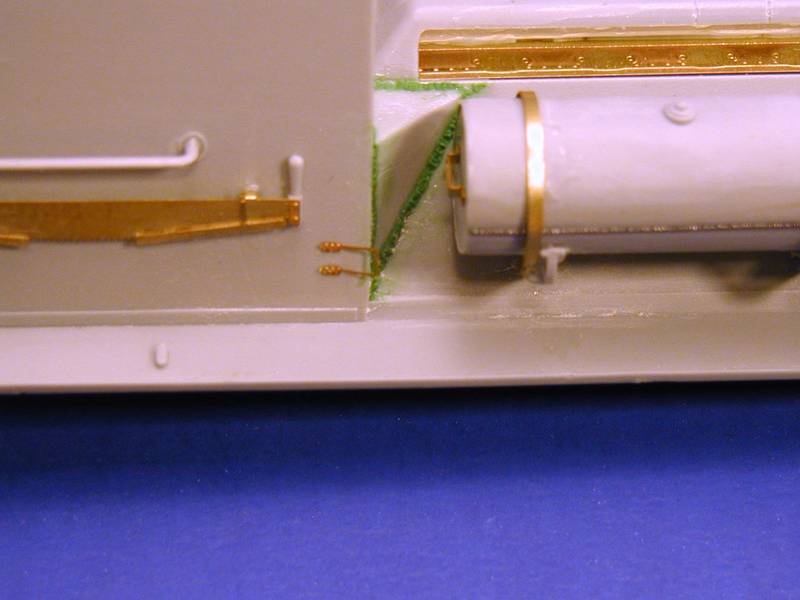
Also in the picture above is the Antenna Pot that goes on the other side of the hull, in front of the Commanders coupola. It gets 2 VERY TINY wing nut PE pieces. Again, about the size of the forceps tip, so be wary of TWEEZER LAUNCH!
So what is left to do? Tie Downs! Horray. I want to take a moment to say that while DML really tried to make a poor molded on detail look better, and it most certainly does, I think that the most accuracy could have been achieved by making these tie downs as plastic bits. I know they are small, and would be a paint to deal with both manufacturing and building, but the PE pieces are VERY delicate, and SMALL, and also incorrect. Since they are flat PE and the real thing is a round bar welded on, and the PE piece is flat and the weld detail is poor. I think DML could offer this small but prominent detail as a plastic piece if they put their minds to it, and with correct weld detail to boot. Also, directions on placement of the PE bits is a bit...vague. Pay attention to what you are doing and consult references for this. Resources I looked at showed them in a wide variety of areas (some most certainly post-war modifications), so here are the locations I put them:
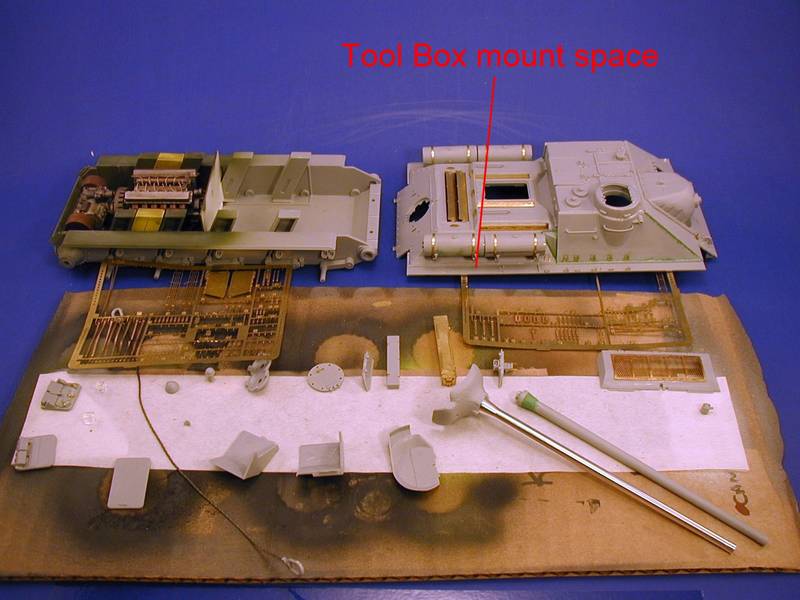
A final note dealing with the tool box from the last post with just the details added to the plastic form. Carefully dry fit this to the hull and notice which molded on details need to be removed for it to go on. While DML tells you to add details to the toolbox, they forget to tell you that some of the detail on the fender needs to be removed...just two pieces of square plastic bit, but still, it almost made me launch those PE details into the carpet when trying to figure out why the box did not sit flush...note to self, sometimes adding more pressure will NOT fix a problem.
So what is left? The wheels, the tracks, and those items in the picture above. There is a fair amount of PE left over, (discounting the fenders and grills I have to add after the first paint coat on the hulls) so there is spares box potential.
After all this work to get to the paint point, I have to say it is a mixed-bag kit. All the extra detail bits really make it look good, but it is not as well engineered as kits made from the "ground up" to have PE. It is still a challenging kit (And sometimes challenges are what we want) and good references are needed to help clarify the instructions. As noted, some details are nicer in PE, but still have the wrong look so they are only a half-step in the right direction.
My impression on building this kit, with all the scrutiny I could muster, is that it is worth its price. It may not be perfect, but it tries hard to make up for past mistakes. It is definately a good kit to work on for a transition from straight Out-of-the-Box builds to major modifications to kits as it has some areas that need extra work, but nothing substantial. It would be a good kit to work on for learning weld bead techniques, modifying small parts, adding PE details, and comparative thinking (Does the piece match the reference good enough to go on?). With a kit like this under a builders belt, they will be ready to move onto a true resin conversion, or to add a ABER detail set to a kit..etc.
Now, on to the PAINT JOB! See you next week.
In fact, i am off today to Chicago and will not be back 'till Monday, but I will return with all the energy of a person who has been to a GREAT show, as always. Nothing like recharging the batteries of creativity.Anyhow, most of hte last week has been spent looking over the kit, checking out details vs. references, and making adjustments. Here goes.
First: The fuel drum holders are remarkably like JS-II holders. I am thinking that there must either be a T-34 with those holders that DML took them from, or that they just carried them over. But so far as I can tell, the solid fuel drum holders would be very rare, or not-documented in WWII. I DO NOT have the T-34 Mythical Weapon book, so I cannot reference that, but web resources just do not show these holders. Sorry DML, seems like a goof on the T-34 series.
Now please, someone prove me wrong so I feel better about this!
Next, work on the front left corner: This gave me the most fits in this part. The tow shackle holder did not look right at all. Consulting references, it is a post with a screw top and a L shaped bracket that slides up and down the post to secure the shackles. Most photos I looked at were missing all pieces but the post, so it was a quick-loss area in real life I guess. I shaved off the molded on post and added .030 Evergreen rod. I shaved the bolt head off the top of the bracket and saved it to add to the post top. I then cleaned up the bracket to look like its proper L shape and drilled a hole in it to go on the post. Easy!
If you decide to use the PE light bracket, you will need to fill in the hole in the side of the upper hull, the PE piece will not look corect if you just place it in. You need to shave off the locating marks for the horn mount as well if you use the PE piece. (The dark green piece is a replacement I had to make when the carpet monster ate the kit piece. In fact, the carpet monster ate a LOT of pieces on this build, mostly PE. SIgh.)
The light itself can just be clipped off the plastic mount, but the Horn has to be carved off of its mount. Take a look , you will see what i mean. It is not as hard as it looks, but be carefull and take your time. The result is a nice plastic horn. that mounts very well on the PE mount.
Also in the picture above is the Antenna Pot that goes on the other side of the hull, in front of the Commanders coupola. It gets 2 VERY TINY wing nut PE pieces. Again, about the size of the forceps tip, so be wary of TWEEZER LAUNCH!
So what is left to do? Tie Downs! Horray. I want to take a moment to say that while DML really tried to make a poor molded on detail look better, and it most certainly does, I think that the most accuracy could have been achieved by making these tie downs as plastic bits. I know they are small, and would be a paint to deal with both manufacturing and building, but the PE pieces are VERY delicate, and SMALL, and also incorrect. Since they are flat PE and the real thing is a round bar welded on, and the PE piece is flat and the weld detail is poor. I think DML could offer this small but prominent detail as a plastic piece if they put their minds to it, and with correct weld detail to boot. Also, directions on placement of the PE bits is a bit...vague. Pay attention to what you are doing and consult references for this. Resources I looked at showed them in a wide variety of areas (some most certainly post-war modifications), so here are the locations I put them:
A final note dealing with the tool box from the last post with just the details added to the plastic form. Carefully dry fit this to the hull and notice which molded on details need to be removed for it to go on. While DML tells you to add details to the toolbox, they forget to tell you that some of the detail on the fender needs to be removed...just two pieces of square plastic bit, but still, it almost made me launch those PE details into the carpet when trying to figure out why the box did not sit flush...note to self, sometimes adding more pressure will NOT fix a problem.
So what is left? The wheels, the tracks, and those items in the picture above. There is a fair amount of PE left over, (discounting the fenders and grills I have to add after the first paint coat on the hulls) so there is spares box potential.
After all this work to get to the paint point, I have to say it is a mixed-bag kit. All the extra detail bits really make it look good, but it is not as well engineered as kits made from the "ground up" to have PE. It is still a challenging kit (And sometimes challenges are what we want) and good references are needed to help clarify the instructions. As noted, some details are nicer in PE, but still have the wrong look so they are only a half-step in the right direction.
My impression on building this kit, with all the scrutiny I could muster, is that it is worth its price. It may not be perfect, but it tries hard to make up for past mistakes. It is definately a good kit to work on for a transition from straight Out-of-the-Box builds to major modifications to kits as it has some areas that need extra work, but nothing substantial. It would be a good kit to work on for learning weld bead techniques, modifying small parts, adding PE details, and comparative thinking (Does the piece match the reference good enough to go on?). With a kit like this under a builders belt, they will be ready to move onto a true resin conversion, or to add a ABER detail set to a kit..etc.
Now, on to the PAINT JOB! See you next week.
GALILEO1
Joined: April 18, 2006
KitMaker: 1,794 posts
Armorama: 1,431 posts
Posted: Friday, December 07, 2007 - 03:10 PM UTC
Amazing work there Jacques. What type/brand of superglue to you use for the PE?
Looks great!
Rob
Looks great!
Rob

kevinb120
Joined: May 09, 2006
KitMaker: 1,349 posts
Armorama: 1,267 posts
Posted: Thursday, December 20, 2007 - 03:28 PM UTC
Looking good! I'm really interested in the SU100 kit, I'm surprised the hull was warped and they still can't figure out the engine hatch issue-what the heck is so hard about molding it without the grille?? Keep it up, I want to see her with some paint with all that work for the weld seams
Jurjen
Joined: September 21, 2003
KitMaker: 3,040 posts
Armorama: 1,016 posts
Posted: Monday, January 28, 2008 - 06:08 AM UTC
Hi Jacques!
What's the status on the SU-100? It is a real slow competition between the Strela and the SU-100, lol.
Keep it going Jacques!
What's the status on the SU-100? It is a real slow competition between the Strela and the SU-100, lol.
Keep it going Jacques!
Jacques
Joined: March 04, 2003
KitMaker: 4,630 posts
Armorama: 4,498 posts
Posted: Tuesday, January 29, 2008 - 06:01 PM UTC
Thanks Jurgen.
The kit is "primed" flat black right now, awaiting a free moment for me to finish it. I really should get them both done.
i am also building 6 kits for commission right now, including my first serious scratch-modification of a M2A3 Bradley, as well as writing the build review for this kit...I am trying to come up with a way to make the build reviews more user freindly and informative at the same time. It is not easy!
But your encouragement is welcome.

Yoni_Lev
Joined: September 20, 2007
KitMaker: 861 posts
Armorama: 394 posts

Posted: Tuesday, January 29, 2008 - 06:49 PM UTC
Hey Jacques...here's more encouragement!!
I've got one of these in "The Stash" waiting to be built (still in the shrink wrap, believe it or not) so I'm curious to see yours finished so I can get all gung-ho and break into the kit.
Of course, I've got about 10 projects in various stages of completion ahead of it, but what's one more at this point?
-YL

Chas78_wa
Joined: January 22, 2008
KitMaker: 50 posts
Armorama: 46 posts
Posted: Friday, March 07, 2008 - 04:11 AM UTC
Jacques, Are you being paid for your fine work?
Charlie
Charlie
Jacques
Joined: March 04, 2003
KitMaker: 4,630 posts
Armorama: 4,498 posts
Posted: Friday, March 07, 2008 - 06:55 AM UTC
Paid? No. This is a service I like to do for Amorama...it helps me imporve my skills and writing and I like to help fellow modellers as well.
Now, to be fair, Jim sent me the kit free of charge to do a build review, so it is not like I expected anything for this work. And if I decide to sell it at a later date? Icing on the cake.
Right now my problem is getting my photo area set up better. having it to setup, shoot, take down is a pain when trying to move along expediously. I have moved forward with the kit, but have to take pictures before I can do more...if it isn't one thing...
No. This is a service I like to do for Amorama...it helps me imporve my skills and writing and I like to help fellow modellers as well.Now, to be fair, Jim sent me the kit free of charge to do a build review, so it is not like I expected anything for this work. And if I decide to sell it at a later date? Icing on the cake.
Right now my problem is getting my photo area set up better. having it to setup, shoot, take down is a pain when trying to move along expediously. I have moved forward with the kit, but have to take pictures before I can do more...if it isn't one thing...
Jacques
Joined: March 04, 2003
KitMaker: 4,630 posts
Armorama: 4,498 posts
Posted: Tuesday, March 11, 2008 - 03:47 AM UTC
UPDATE!
I set up the photo booth, so here is where I am at:
Kit 6359 has been painted with black primer and then given a pre-shade coat of Polly Scale Black Green. Notice the patchwork look of the paint job. This is to allow the dark recess to remain really dark...for now.
Notice on the bottom that I finally found a air cleaner piece for the engine. I am not sure if I am going to mount it inside with the engine or if I will have it laying out...but at least I have something available. I will probably just cast it up in resin so I have a few for my other Maquette engines.
Kit 6075 has been painted with black primer and then given a pre-shade coat of Testors Dark green in the manner mentioned above. I have left the mantlet and barrel in this coloration for the photo. Notice the difference between how I did kit 6359 in a darker coloration and how the mantlet looks with this configuration.
Next I mix about 50% Testors dark green with 50% Testors sand. This mixture is then mixed with about 70% rubbing alchohol (which is the 70% alchohol version, not the 91% version of the alchohol. This makes a difference. I have noticed that Tamiya Acrylics mix well with the 91% stuff, but that Testors and Polly Scale paints work much better with the 70% version. 70% is pretty much "Standard" rubbing alchohol and the 91% is labelled as such as far as I have noticed.) Using this thin mixture, I carefully spray it on the larger open areas of the previousl green sprayed sections, still keeping the color out of the nooks and crannies. These are the general highlights and fading.
Why the alchohol? This allows the paint to dry a lot faster so that it does not pool or "run" as much when applied BUT...it will take several passes with the airbrush to get color to build up nicely, so patience and a steady hand is needed. Also, with this method you can control how much highlight is in each area, so you can start to add some tonal differences through the highlights to break up that monotone green color.
Off to do some more work while the booth is still up!

TankTrap

Joined: December 08, 2006
KitMaker: 456 posts
Armorama: 403 posts

Posted: Thursday, March 13, 2008 - 11:21 PM UTC
Very nice work there man but i can t help but say what a munter looking tank this is

Nito74

Joined: March 04, 2008
KitMaker: 5,386 posts
Armorama: 4,727 posts
Posted: Monday, March 24, 2008 - 01:48 AM UTC
Great work Jacques !!
First class build with the JS-2 and now i read this amazing Su-100 build...wow!
I guess i will have to send you my T-55 with the resin updates and the P/E sets...
A 5 star build !! Take care
First class build with the JS-2 and now i read this amazing Su-100 build...wow!
I guess i will have to send you my T-55 with the resin updates and the P/E sets...
A 5 star build !! Take care
210cav
Joined: February 05, 2002
KitMaker: 6,149 posts
Armorama: 4,573 posts
Posted: Wednesday, April 23, 2008 - 03:24 AM UTC
Fantastic workmanship....more!

Drader

Joined: July 20, 2004
KitMaker: 3,791 posts
Armorama: 2,798 posts
Posted: Wednesday, April 23, 2008 - 03:56 AM UTC
Are you sure about the air filter type, by that time wouldn't it have been upright Tsyklon filters in the final drive compartment? ISTR that the changeover happened before the T-34-85 (and derivatives) entered production.
David
David
Jacques
Joined: March 04, 2003
KitMaker: 4,630 posts
Armorama: 4,498 posts
Posted: Wednesday, April 23, 2008 - 05:12 AM UTC
Actually, I think you are right. I have been trying to get ahold of a SU-100 specific reference to make sure...
Sorry for the lack of updates, more non-model stuff than I can keep a handle on... I should be able to take photos soon, and away we will go...
Sorry for the lack of updates, more non-model stuff than I can keep a handle on...
I should be able to take photos soon, and away we will go...  |

WEB HOSTING BY


Copyright ©2021 Armorama and Kitmaker Network, a subsidiary of Silver Star Enterprises
All Rights Reserved. Please read our Conditions of Use and Privacy Policy.
All Rights Reserved. Please read our Conditions of Use and Privacy Policy.