Some slow work getting done on the flail have got the hull and turret built but have come too some problems with the resin while cleaning the parts up have found some not to be quite the right shape .Some of these parts would not pass the EURO parliment banana test (:.
Have managed to staighten a couple of parts up with the use of a hairdryer but does any of you guys know a better method for this.NOt used to resin this is a first try for me.some progess shots so far.
Campaigns
Where Armorama group builds can be discussed, organized, and updates posted.
Hosted by Darren Baker, Richard S.
Shermans!
beefy66
England - North East, United Kingdom
Joined: October 22, 2007
KitMaker: 971 posts
Armorama: 280 posts
Joined: October 22, 2007
KitMaker: 971 posts
Armorama: 280 posts
Posted: Monday, May 19, 2008 - 11:23 PM UTC
Posted: Monday, May 19, 2008 - 11:46 PM UTC
Quoted Text
Have managed to staighten a couple of parts up with the use of a hairdryer but does any of you guys know a better method for this. NOt used to resin this is a first try for me.some progess shots so far.
I have use hot water, but I am not the big resin builder myself, so have only tried it a couple of times. It works pretty well, but be aware that you need to be careful of parts that are made up of various thinknesses of resin. It is easy to bend some smaller/thinner parts unintentionally.
Hope this helps
Stampede
Østfold, Norway
Joined: December 06, 2007
KitMaker: 109 posts
Armorama: 107 posts
Joined: December 06, 2007
KitMaker: 109 posts
Armorama: 107 posts
Posted: Tuesday, May 20, 2008 - 11:48 AM UTC
Some updates on my 105 HVSS in my build log here.
flakgunner
Illinois, United States
Joined: January 19, 2006
KitMaker: 657 posts
Armorama: 456 posts
Joined: January 19, 2006
KitMaker: 657 posts
Armorama: 456 posts
Posted: Tuesday, May 20, 2008 - 09:59 PM UTC
hey ,
Keith,hot water!!works every time,softens it ,real quik,so be careful,and you don't have alot of working time ether,as soon as it cools,it hardens back up,I had a very expensive resin conversion for Italeri's Panzer I Ausf.A,to turn it into a Panzerjager I,and all! of the side armor was warped !worse than a banana,Dipped each piece into hot water(couple seconds) and then laid it out on a hard,flat surface
held it down for a very short time,when cooled,they where straight as a arrow.
Joe
endrju007
Wojewodztwo Podkarpackie, Poland
Joined: December 05, 2007
KitMaker: 2,435 posts
Armorama: 1,256 posts
Joined: December 05, 2007
KitMaker: 2,435 posts
Armorama: 1,256 posts
Posted: Wednesday, May 21, 2008 - 05:05 AM UTC
Hi all!
@ Martin - I really like the way your model is growing - very interesting conversion .
@ Per-Erik - man.... the details... man... I don't know what else can I say - you keep this build REALLY clean .
@ Keith - I've never tried resin conversions but in your example they really look worth trying .
Here are my two cents:
I had some significant trouble with paint and decals (it went all bubbly ), partially solved but few marks remained...
My progress is extremally slow right now, so I can't say when I post next pics.
Andrzej
Martinnnn
Zuid-Holland, Netherlands
Joined: April 26, 2004
KitMaker: 5,435 posts
Armorama: 2,762 posts
Joined: April 26, 2004
KitMaker: 5,435 posts
Armorama: 2,762 posts
Posted: Wednesday, May 21, 2008 - 07:54 PM UTC
Nice work Andrzej!
beefy66
England - North East, United Kingdom
Joined: October 22, 2007
KitMaker: 971 posts
Armorama: 280 posts
Joined: October 22, 2007
KitMaker: 971 posts
Armorama: 280 posts
Posted: Thursday, May 22, 2008 - 03:08 AM UTC
Thanks for the hot water tip guys worked much better for the large pices hair dryer for the small ones nice one.Andrezi if my painting goes as bubbly as that I would be happy looks like a good weathering tech for faded an washed out O/D looking good to me.Martin is the M32 kit as complicated as it looks or do you just make it look easy.
endrju007
Wojewodztwo Podkarpackie, Poland
Joined: December 05, 2007
KitMaker: 2,435 posts
Armorama: 1,256 posts
Joined: December 05, 2007
KitMaker: 2,435 posts
Armorama: 1,256 posts
Posted: Thursday, May 22, 2008 - 04:03 AM UTC
@ Martin & Keith - thanks guys! I'm happy you like it so far. Keith, washed out effect has nothing to do with marks left by paint problem, though it seems I've managed to cover the marks (partially with this weathering) enough to keep them not noticed .
Honestly - this is my first Sherman so if anyone find anything I've done wrong - please let me know.
Andrzej
Honestly - this is my first Sherman so if anyone find anything I've done wrong - please let me know.
Andrzej
muttley
Ontario, Canada
Joined: January 10, 2005
KitMaker: 251 posts
Armorama: 202 posts
Joined: January 10, 2005
KitMaker: 251 posts
Armorama: 202 posts
Posted: Saturday, May 24, 2008 - 07:38 AM UTC
Well finally I finished my Sherman for the Campaign (whew!) pics here are fresh from the camera. This is the old Tamiya M4A3 Sherman built straight OOB with very little addition of scratchbuilt tarps made out of tissue and gauze bandage.
The model was weathered with the usual oil washing and drybrushing techniques, coated with future gloss then fished with Testors dull coat. This old kit still comes out as a decent looking model and there wasn't much fit problems during the build.
I enjoyed working on this model and I'm very glad to have been a part of this fun campaign
Posted: Saturday, May 24, 2008 - 08:02 AM UTC
As a break from my normal wingy things I build, I have entered this campaign and intend to build the Academy M-51 Super Sherman in 1/35th. the kit will be OOB and possibly on a base.
I must admit to that I am not a great lover of the Sherman, but the Israeli Sherman rocks as it looks like it has taken steroid's .
Andy
I must admit to that I am not a great lover of the Sherman, but the Israeli Sherman rocks as it looks like it has taken steroid's .
Andy
pjmooney
Virginia, United States
Joined: October 22, 2007
KitMaker: 107 posts
Armorama: 102 posts
Joined: October 22, 2007
KitMaker: 107 posts
Armorama: 102 posts
Posted: Saturday, May 24, 2008 - 09:18 AM UTC
pjmooney
Virginia, United States
Joined: October 22, 2007
KitMaker: 107 posts
Armorama: 102 posts
Joined: October 22, 2007
KitMaker: 107 posts
Armorama: 102 posts
Posted: Saturday, May 24, 2008 - 09:28 AM UTC
Ok - let's try this again...
It's hard to have a computer that's smarter than you are!!
S/F
Pat
It's hard to have a computer that's smarter than you are!!
S/F
Pat
pjmooney
Virginia, United States
Joined: October 22, 2007
KitMaker: 107 posts
Armorama: 102 posts
Joined: October 22, 2007
KitMaker: 107 posts
Armorama: 102 posts
Posted: Saturday, May 24, 2008 - 09:36 AM UTC
Now this is getting silly...they say third time's a charm...WE'LL SEE!!!
[img][url=http://gallery.kitmaker.net/showphoto.php/photo/243939][img]
S/F
Pat
[img][url=http://gallery.kitmaker.net/showphoto.php/photo/243939][img]
S/F
Pat
pjmooney
Virginia, United States
Joined: October 22, 2007
KitMaker: 107 posts
Armorama: 102 posts
Joined: October 22, 2007
KitMaker: 107 posts
Armorama: 102 posts
Posted: Saturday, May 24, 2008 - 09:39 AM UTC
I surrender... IT wins...
S/F
Pat
Removed by original poster on 05/24/08 - 20:49:33 (GMT).
Posted: Saturday, May 24, 2008 - 09:49 AM UTC
Is this one of them?
pjmooney
Virginia, United States
Joined: October 22, 2007
KitMaker: 107 posts
Armorama: 102 posts
Joined: October 22, 2007
KitMaker: 107 posts
Armorama: 102 posts
Posted: Saturday, May 24, 2008 - 05:21 PM UTC
Andy - OK....not that is SAD...you knocked it outta the park!!!
YES - that's my baby...NOW, what'd I do wrong?
S/F
Pat - who feels like a fool
YES - that's my baby...NOW, what'd I do wrong?
S/F
Pat - who feels like a fool
Posted: Saturday, May 24, 2008 - 06:49 PM UTC
Well, I've slowly been starting my Tamiya M4A3 105mm for this group build. I am building this kit out-of-box with the addition of a set of Fruil tracks. This will be first Sherman that I've ever built which is part of the reason I'm doing it mostly out-of-box. I have two Dragon Shermans in my stash for a later time.
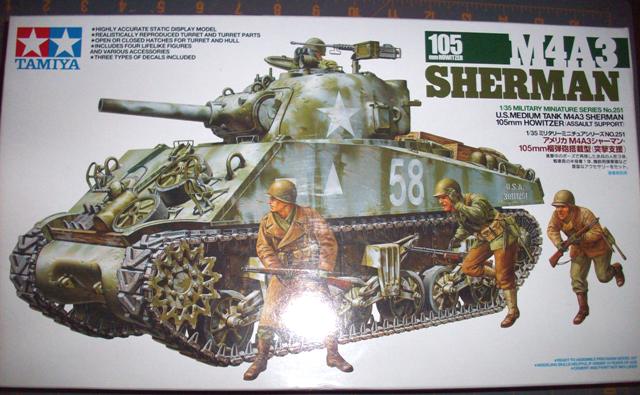
Building this kit will accomplish two fthings for me.
1. Completion of a group build
2. It will be the load on my future dragon wagon build.
My initial impression of the kit is good. Although this kit is old (instructions are copy righted 2001 and the lower hull has 1981 stamped in it), it is a quality kit. The lack of detail in this kit as compared to some of the newer kits is overwhelmingly obvious.
The instructions have 17 steps (plus an additional step for decal application).
Here is what I have got done so far:
Step 1 (Lower hull assembly)- Completed.....There is a gap where the front transmission cover does not rest flush on the hull. This gap is also shown on the kit instructions. I don't understand why it is there. Hopefully, it won't be visible when construction is completed.
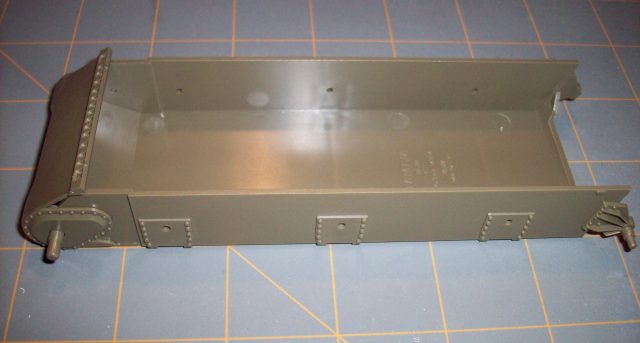
Step 2 (Assembly of suspension)-Skipped till later
Step 3 (Assembly of Drive Sprockets)-Skipped till later
Step 4 (Lower hull assembly continuted)- Here I have completed the rear hull bulkhead but I have left off parts B22 and B23 (exhausts pipes) until later.
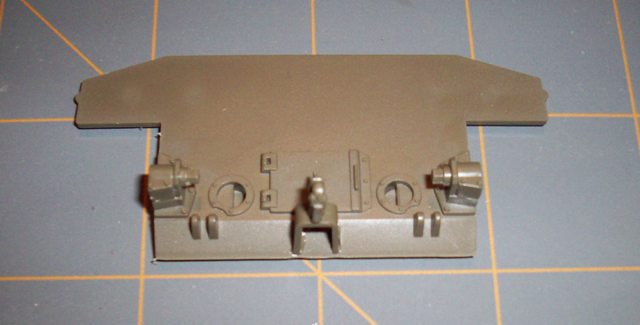
Step 5 (Assembly of the underside of upper hull)- Skipped till later
Step 6 (Assembly of spare track block storage racks and assembly of rear bulkhead storage shelf)- In this step, I have completed the assembly of two rear bulkhead spare track block storage racks and the rear bulkhead storage shelf. I have left off the gun cleaning rods that are supposed to go on the underside of the storage shelf. The detail of the track blocks and storage racks are very disappointing and is a point of the kit that someone could really fix up with a little scratchbuilding.
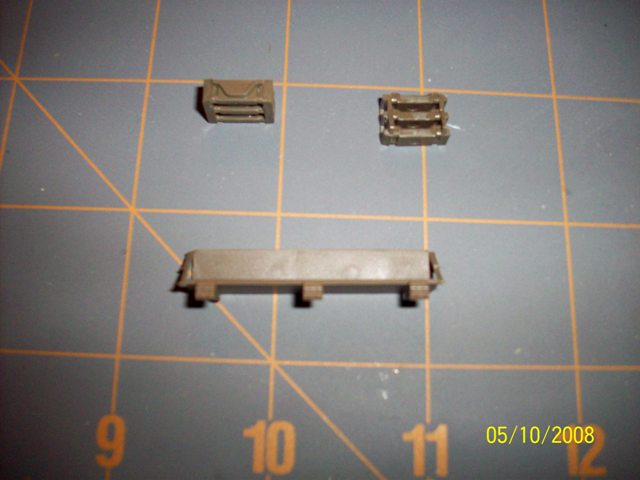
More to come later.........
gamodelmaker
Georgia, United States
Joined: May 07, 2008
KitMaker: 186 posts
Armorama: 129 posts
Joined: May 07, 2008
KitMaker: 186 posts
Armorama: 129 posts
Posted: Sunday, May 25, 2008 - 07:11 AM UTC
hi guys great looking builds. i am new to the site and i have enlisted my self in this gb because i like the shermans too. i have a priest-kanagroo on the bench that is about 40% done is this one to far gone to add i to the gb. if it is i do have a m36b1 90mm tank destoryer i can build for this one if its all ok with you guys.
Posted: Sunday, May 25, 2008 - 08:12 PM UTC
Quoted Text
Well, I've slowly been starting my Tamiya M4A3 105mm for this group build. I am building this kit out-of-box with the addition of a set of Fruil tracks.
More to come later.........
Looks good, Brent. This will also be my build for this campaign, actually my second build. I will follow your progress and steal any insights I can get The kit looks okay, but I have not started on it yet.
What colour scheme will you be doing?
Looking forward to see more
Posted: Monday, May 26, 2008 - 04:05 PM UTC
Quoted Text
Quoted TextWell, I've slowly been starting my Tamiya M4A3 105mm for this group build. I am building this kit out-of-box with the addition of a set of Fruil tracks.
More to come later.........
Looks good, Brent. This will also be my build for this campaign, actually my second build. I will follow your progress and steal any insights I can get The kit looks okay, but I have not started on it yet.
What colour scheme will you be doing?
Looking forward to see more
I know absolutely nothing about Shermans so my color will be based strictly on the recommendation of the instructions. The instructions call for Tamiya color XF-62 (Olive Drab). However, I will use Model Master enamels instead.
I don't know if you have noticed on the instructions yet, but you must choose "early" or "late" parts dependent on which version you are building. There are three versions (A, B or C). I am building version "C" 48th Tank Battalion, 14th Armored Division, 7th Army, January 1945 France. This version can have either the "early" or "late" drive sprockets. I chose the "late" drive sprockets.
I will be posting a few photographs here in this thread as I proceed. I will also be doing a more detailed build log where I will discuss kit issues in detail.
gamodelmaker
Georgia, United States
Joined: May 07, 2008
KitMaker: 186 posts
Armorama: 129 posts
Joined: May 07, 2008
KitMaker: 186 posts
Armorama: 129 posts
Posted: Wednesday, May 28, 2008 - 05:00 AM UTC
hi guys im still waiting for an answer to the priest kanagrro for the gb if that ones to far gone for it the i would like to build the m36b1 tank destroy for this gb thanks rob.
paulchatfield
England - South West, United Kingdom
Joined: May 27, 2008
KitMaker: 144 posts
Armorama: 136 posts
Joined: May 27, 2008
KitMaker: 144 posts
Armorama: 136 posts
Posted: Wednesday, May 28, 2008 - 05:09 AM UTC
Well having a Sherman III ready to go I'd be in it!
jointhepit
Oost-Vlaanderen, Belgium
Joined: May 14, 2006
KitMaker: 3,829 posts
Armorama: 881 posts
Joined: May 14, 2006
KitMaker: 3,829 posts
Armorama: 881 posts
Posted: Thursday, May 29, 2008 - 08:51 AM UTC
hello everyone , bit late to enter, broke my knee in 8 places so I'm building some kits I had laying around
, and yup, another M32 entry
I'm making a M32B1 ish LOL
mating a Tasca M4A1 mid hull, with the old M32 from italeri, italeri's kit is quit a bit of cleaning, but the only plastic variant so
I won't be going for historical or other accurate stuff, I stumbled onto this campaign while looking for some tips, and decided to enter
added some welds on the top, and fitted the Tasca "commanders lid"
had to make a ring to fill the gap,Italeri's hatch was a 1.4mm to big
well hope you like it
jointhepit
Oost-Vlaanderen, Belgium
Joined: May 14, 2006
KitMaker: 3,829 posts
Armorama: 881 posts
Joined: May 14, 2006
KitMaker: 3,829 posts
Armorama: 881 posts
Posted: Friday, May 30, 2008 - 08:23 AM UTC
having toooo much time now, I went ahaed and made some extra's from the Italerikit (lots of clean up )
and fitted the suspension (witch are a jem! )
and I managed to keep'm working, great when I'm gonna put a load on the beam
enough said, pics...
greetz
and fitted the suspension (witch are a jem! )
and I managed to keep'm working, great when I'm gonna put a load on the beam
enough said, pics...
greetz