
#041
Kobenhavn, Denmark
Joined: July 20, 2006
KitMaker: 10,069 posts
Armorama: 4,677 posts
Posted: Monday, April 28, 2008 - 10:20 AM UTC
Looks good, Jan. Interesting to see these "new" 1/72 kits. I also build an old 1/72 Italeri/ESCI M4A1 - a very nice kit despite its age. None the less, it was actually also quite trying and 1/35 is definitely more my scale.

Thanks for sharing - looking forward to see more

Campaign'oholic - 252+ campaigns completed
Illinois, United States
Joined: January 19, 2006
KitMaker: 657 posts
Armorama: 456 posts
Posted: Monday, April 28, 2008 - 10:19 PM UTC
hey,
on going progress with my M32B3,going together pretty good,however,the boom does not line up just quite right with the width of the M4A3 hull.So I'am stumped right now ,on what to do,after spending a month building the RSO w/Pak40,I real didnt want to work on a big project,the right way,would have me ,widening the boom,about 1/4",and moving the large grab handle,in alittle.I'll figure something out ,by the weekend.


Joe
Indiana, United States
Joined: June 10, 2005
KitMaker: 6,188 posts
Armorama: 5,960 posts
Posted: Tuesday, April 29, 2008 - 01:20 AM UTC
I was able to squeeze in a few hours on this past Sunday to start on my Campaign. Not much done but at least it's a start. I never realized how many sprues this kit had! A lot of storage items and parts not needed for this build. Even gives you a choice of which wheels and transmission cover to use.


Zuid-Holland, Netherlands
Joined: April 26, 2004
KitMaker: 5,435 posts
Armorama: 2,762 posts
Posted: Tuesday, April 29, 2008 - 01:34 AM UTC
@ Joe: Nice, another welded-hull M32

My M32 project is on a hold now as well. Only little time and I've got some problems with the hull interior for which I need a bit more time to work 'em out. Hopefully some time for it this evening.
When you have more on the boom issue I'd like to hear. Have to fit mine as well..
Martin
1/16th radio-controlled
1/35th static
Illinois, United States
Joined: January 19, 2006
KitMaker: 657 posts
Armorama: 456 posts
Posted: Tuesday, April 29, 2008 - 04:31 AM UTC
hey Martin,
I will let you know what I come up with,main problem is that Ive noticed 2 different ways the boom was mounted to the M32,like what Italeri offer with their M4A1 hull,and then the M4A3's,where the mounting brackets are different style,I could attach the boom using the brackets from the Italeri model,but would like to attach it with brackets that where found on the M4A3 hull,thats where a width problem and the large grab handles,interfere,I'll figure something out.and take some photo's.
I also have the large tool box attached to the rear deck which was common on all M32's,the side boxes work for the M4A1 hulls,but as you can see the wont work with this M4A3 hull,and Ive found a couple of pics recently,of M4A3 hulls,where only the rear tool box was used,side boxes omitted ,unless the boxes where laid on top of the grills? on some A3's
Joe
Removed by original poster on 04/30/08 - 06:26:21 (GMT).
Texas, United States
Joined: February 22, 2008
KitMaker: 5,026 posts
Armorama: 1,604 posts
Posted: Thursday, May 01, 2008 - 06:19 PM UTC


Jan I was looking at your post for the second time and just now noticed that the Sherman was in 1/72. 1. You have done a great job and 2. You have done a really great job with it being 1/72. I have a hard enough time with 1/35, bad eyes, and numb fingers. Keep up the great work it will give me something to aspire for and teach me some techniques.
Cheers
Bob

If it aint broke dont fix it.
Zuid-Holland, Netherlands
Joined: April 26, 2004
KitMaker: 5,435 posts
Armorama: 2,762 posts
Posted: Friday, May 02, 2008 - 04:43 AM UTC
Hi guys,
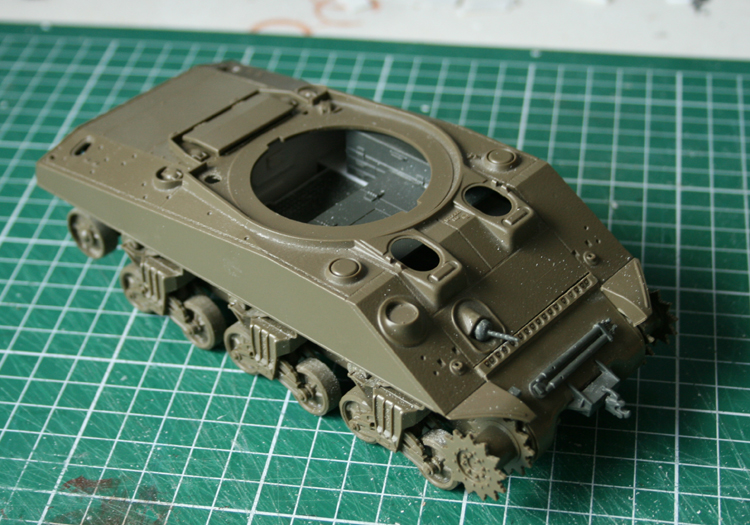
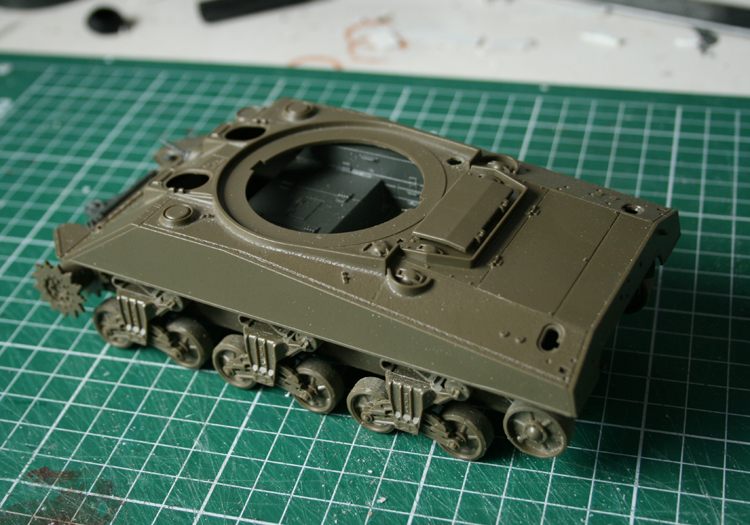
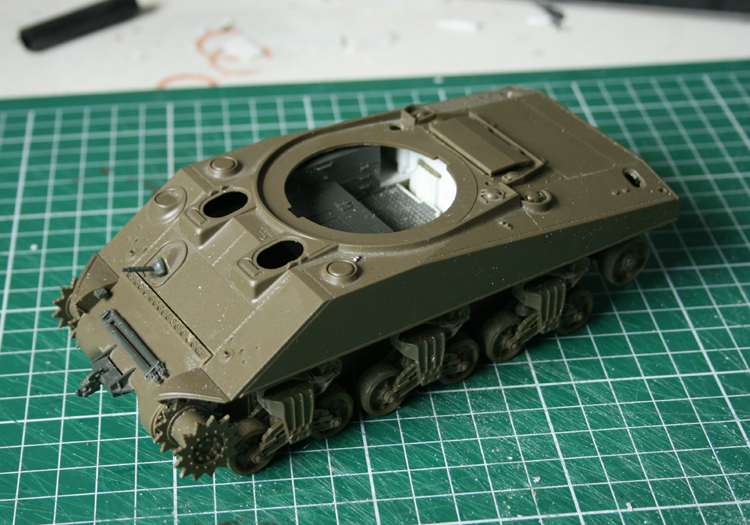
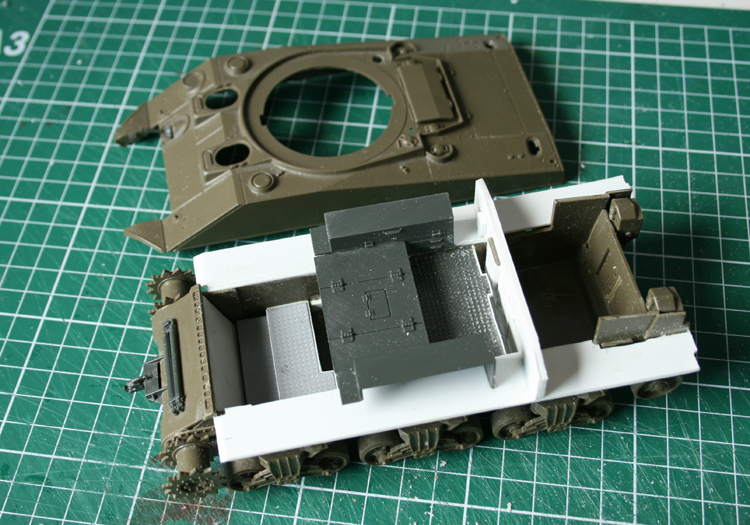
Well here are some first pics of my M32 ARV project. As said it's a kit bash with the Tamiya M4 and the Italeri M32B1.
I'm working on a simple interior, which is not meant to be 100% accurate but more for fun and something to see when looking through the open hatches. Transmission and driver + co driver / radio operator station still need to be done. Not really sure how I will do the transmission but we'll see. Also of course the turret interior needs to be done, although some parts are provided by Italeri for this.
Enough talking, here are the pics. Comments welcome!

1/16th radio-controlled
1/35th static
Texas, United States
Joined: February 22, 2008
KitMaker: 5,026 posts
Armorama: 1,604 posts
Posted: Friday, May 02, 2008 - 05:13 AM UTC
Martin your M4/M32 is looking very nice especially since it is a kit bash, but I would not have known. From the pictures everything is crisp as if it was meant to fit with out any conversion. SO A VERY NICE BUILD MARTIN, KEEP UP THE GOOD WORK, CANT WAIT TO SEE IT PAINTED.
Bob

If it aint broke dont fix it.
Ontario, Canada
Joined: March 23, 2008
KitMaker: 2,847 posts
Armorama: 2,667 posts
Posted: Friday, May 02, 2008 - 06:29 AM UTC
Quoted Text
Jan I was looking at your post for the second time and just now noticed that the Sherman was in 1/72. 1. You have done a great job and 2. You have done a really great job with it being 1/72. I have a hard enough time with 1/35, bad eyes, and numb fingers. Keep up the great work it will give me something to aspire for and teach me some techniques.
Cheers
Bob 
Bob, I'd like to thank you and Jesper for the kind words and encouragement. This is only my second build after an almost nine year absence from the hobby (still in progress is a Bradley M2 in 1/72). This site has done a lot to inspire my return and to be honest, intimidate me.

I am having to relearn lost or dormant techniques/skills. My SWMBO who is a skilled decorative painter has encouraged me when I felt I was over my head and also has me practising painting techniques that could be applied to the build. Compared to me, her skills are almost/are intimidating.
I've run into a rather frustrating problem. The Sherman is pretty much 90+% finished and I started doing some pre-shading on the hull and turret. While the paint was drying I started to assemble the M2 .50 cal machine gun. While cutting the handles off the sprue I noticed that somehow they were broken in two.

I've made three attempts to glue them together and even tried forming new handles from brass wire. No luck so far.
Here's progress since the last pictures. I've placed a calliper with Imperial and metric measurements on it for scale.


Cheers!


Jan
Texas, United States
Joined: February 22, 2008
KitMaker: 5,026 posts
Armorama: 1,604 posts
Posted: Friday, May 02, 2008 - 06:36 AM UTC
Jan did you paint your bogies before assembly or on the tank?
Bob

If it aint broke dont fix it.
Ontario, Canada
Joined: March 23, 2008
KitMaker: 2,847 posts
Armorama: 2,667 posts
Posted: Friday, May 02, 2008 - 07:03 AM UTC
Quoted Text
Jan did you paint your bogies before assembly or on the tank?
Bob 
Heeh, hee!

All of the above and then some! I was searching for the best technique so I tried some parts while on the sprue expecting to touch them up after I cut them off. The parts were so small that it was hard to keep the paint from going where it shouldn't (gluing surfaces). These bogies were not very sturdy and I ended up reassembling these after scraping off paint and glue.
Next up was attaching a completed bogie to the hull and starting to hand paint it after it dried. This was tedious and wasn't giving the look that I desired. In the end I assembled the entire suspension on the hull, used an airbrush with various shades of OD and weathered the lower hull and suspension. The base black colour for the rubber area was applied using a small brush. It didn't turn out too well as the black kept getting on the metal rim. In stepped the SWMBO and told me I was using too large a brush. She handed me one of her 5/0 width brushes to try that was less than half the width of the brush I had been using. It worked superbly and the paint stayed off the rims. The right tool for the right job!

Jan

Ontario, Canada
Joined: January 09, 2005
KitMaker: 577 posts
Armorama: 446 posts
Posted: Friday, May 02, 2008 - 07:17 AM UTC
Just like to compliment those 1/72, 76 scale builders. Truly amazing stuff. Built that scale many years ago (Dresser drawer full


) now would probably go cross-eyed!
Also Martin your M32 looks excellent. Got one partly started. Very nice work.


Doug
Wojewodztwo Podkarpackie, Poland
Joined: December 05, 2007
KitMaker: 2,435 posts
Armorama: 1,256 posts
Posted: Saturday, May 03, 2008 - 12:53 AM UTC
Hi everybody!
A lot of great builds appeared here already, and I thought that maybe it is time to start working with my model. I know that we have some Sherman'oholics here so if you see any mistake with my model - let me know! This is first Sherman I'm building now and I'm not as familiar with this vehicle as I am with German tanks.
So, here's chassis:

I hope to post more soon.
Andrzej

Zuid-Holland, Netherlands
Joined: April 26, 2004
KitMaker: 5,435 posts
Armorama: 2,762 posts
Posted: Sunday, May 04, 2008 - 03:52 AM UTC
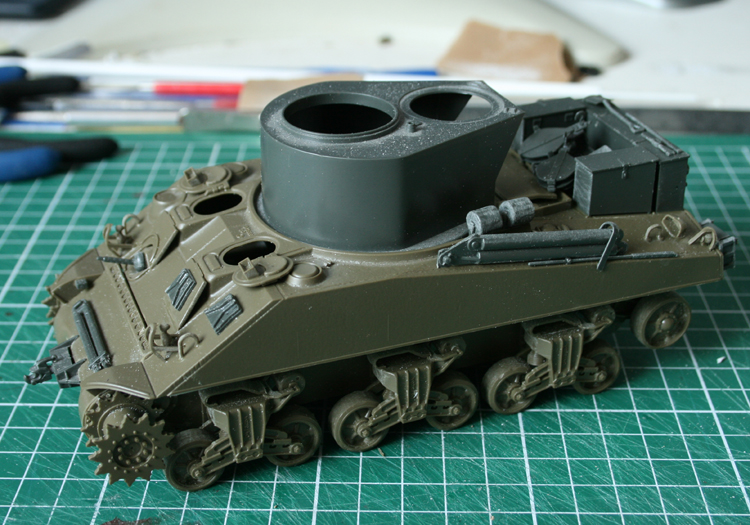
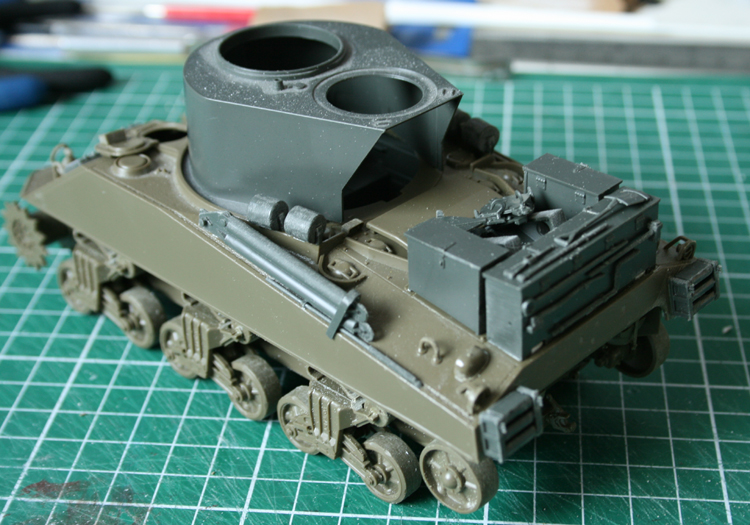
Again some progress on the M32. So far all goes well, no major problems. Italeri's parts sometimes have sink holes which are difficult to remove but no problems with fit etc.
I'll try to build the exterior as far as possible for now. For some parts the hull sides need to be assembled so I can only do that after finishing the interior.
Pics:

1/16th radio-controlled
1/35th static
Texas, United States
Joined: February 22, 2008
KitMaker: 5,026 posts
Armorama: 1,604 posts
Posted: Sunday, May 04, 2008 - 05:51 AM UTC
Andrzej what kit is this, what is pictured looks like resin?
Martin your M32 is looking nice, I need to practice on making my projects as clean (no glue marks from the applicator) as yours.
Bob

If it aint broke dont fix it.
Zuid-Holland, Netherlands
Joined: April 26, 2004
KitMaker: 5,435 posts
Armorama: 2,762 posts
Posted: Sunday, May 04, 2008 - 07:51 AM UTC
Quoted Text
Andrzej what kit is this, what is pictured looks like resin?
Martin your M32 is looking nice, I need to practice on making my projects as clean (no glue marks from the applicator) as yours.
Bob 
Haha well trust me, mine isn't as clean as you think it is. I normally make quite a mess of building the model which I try to cover up with heavy weathering


1/16th radio-controlled
1/35th static
Wojewodztwo Podkarpackie, Poland
Joined: December 05, 2007
KitMaker: 2,435 posts
Armorama: 1,256 posts
Posted: Sunday, May 04, 2008 - 10:06 AM UTC
Quoted Text
Andrzej what kit is this, what is pictured looks like resin?
Bob 
Bob, it's not resin - it's standard Dragon's grey plastic. This is kit no. 6062: M4A2 Tarawa Sherman.
Concerning glue marks... Right now I'm fighing with PE parts and Technicol glue... there will be A LOT of marks I'll have to cover somehow

.
Andrzej


#041
Kobenhavn, Denmark
Joined: July 20, 2006
KitMaker: 10,069 posts
Armorama: 4,677 posts
Posted: Sunday, May 04, 2008 - 01:04 PM UTC
Great Sherman, Martin. You are really getting a really nice M32 from using different kits. I also think your build looks clean, but maybe you succeeded in hiding the glue marks

Looking forward to see more of this build.

Campaign'oholic - 252+ campaigns completed
WARLORD
 Associate Editor
Warszawa, Poland
Joined: April 23, 2003
KitMaker: 1,923 posts
Armorama: 868 posts
Posted: Sunday, May 04, 2008 - 11:35 PM UTC
As for my progress report, I'm about to apply automotive primer to my Sherman Firefly Ic Hybrid Hull.
Ontario, Canada
Joined: March 23, 2008
KitMaker: 2,847 posts
Armorama: 2,667 posts
Posted: Monday, May 05, 2008 - 09:20 AM UTC
Illinois, United States
Joined: January 19, 2006
KitMaker: 657 posts
Armorama: 456 posts
Posted: Tuesday, May 06, 2008 - 08:54 AM UTC
hey,
more on going progress of my M32B3 (late).


Italeri's M32 parts,mated to a late M4A3 hull,using the complete suspension system,from a DML left overs/solid boogie wheels,including those
d@# indy tracks,I didn't have a spare set of drive sprockets,so I was able to use the Italeri one,but had to sand down the inside of both rings,making them a bit thinner .most of the rigging is in place,I'll run the winch cable,when I'am closer to finishing,and I'll be using DML pioneer tools,and misc. spare wheels,tracks,fuel cans,chains,homemade cables,in the next few weeks.
Joe
Texas, United States
Joined: February 22, 2008
KitMaker: 5,026 posts
Armorama: 1,604 posts
Posted: Tuesday, May 06, 2008 - 11:02 AM UTC
Ok flakgunner I thought that you said that there would be glue marks every where. This is nice especially the crane with the scratched cable, this is a great build and gives me much ammunition for my future builds. Thanks for the photos you are doing a good job, I cannot wait to see it in color.
Bob

If it aint broke dont fix it.
Ontario, Canada
Joined: March 23, 2008
KitMaker: 2,847 posts
Armorama: 2,667 posts
Posted: Tuesday, May 06, 2008 - 11:07 AM UTC
Extremely nice job, Joe. Are the brackets on the hull to hold the gantry scratch built? Scratch-building and kitbashing have always appealed to me (even though it's quite difficult in 1/72

). As much success on the rest of the build.

Jan
Illinois, United States
Joined: January 19, 2006
KitMaker: 657 posts
Armorama: 456 posts
Posted: Tuesday, May 06, 2008 - 10:09 PM UTC
hey,
Thanks guys,progress has slowed to a crawl,due to the indy tracks.I prefer indy tracks,and don't mind spending the extra time,but I don't like the tracks for the M4's !!

,but it's getting their.I wish I had picked up a AFV Club set.
Jan,the brackets for the crane are scratch built,using the photo in my one book,the first pic is sitting on,the brackets supplied with the Italeri M32,are for a M4A1 hull,squadron green putty was used for the heavy weld bead,also scratch built the door on the front of the turret where the winch cable runs threw.hoping to finish this up ,within the next few weeks.
Joe


I almost wish that I had entered with a somewhat simpler to get my building skills back. The 1/72 Dragon M4 is a fantastically detailed kit but is trying my eyesight, hand co-ordination and skills.
Now without further adieu, the progress shots.


 I am having to relearn lost or dormant techniques/skills. My SWMBO who is a skilled decorative painter has encouraged me when I felt I was over my head and also has me practising painting techniques that could be applied to the build. Compared to me, her skills are almost/are intimidating.
 I've made three attempts to glue them together and even tried forming new handles from brass wire. No luck so far.


 All of the above and then some! I was searching for the best technique so I tried some parts while on the sprue expecting to touch them up after I cut them off. The parts were so small that it was hard to keep the paint from going where it shouldn't (gluing surfaces). These bogies were not very sturdy and I ended up reassembling these after scraping off paint and glue.


 ) now would probably go cross-eyed!


 .
.


 ). As much success on the rest of the build.


 ,but it's getting their.I wish I had picked up a AFV Club set.