Hey Mat, Scott's solved the sag problem and I'll solve the OT problem. Get a Tamiya 251 D, put some sheet plastic on top with hatches, a couple other minor tweaks and you're done. Not a major project and I've seen them on ebay for $10-15 US. Pretty soon, If you listen to us, we'll have you hopelessly overcommited building 15 or so kits. See how that works?!
Darren, Thanks. I'll have to poke around one of our home improvement stores and see what may compare.
Charlie
Campaigns
Where Armorama group builds can be discussed, organized, and updates posted.
Where Armorama group builds can be discussed, organized, and updates posted.
Hosted by Darren Baker, Richard S.
Military Engineering

Wolfsangel

Joined: January 15, 2010
KitMaker: 221 posts
Armorama: 91 posts

Posted: Wednesday, August 18, 2010 - 12:30 PM UTC
Posted: Thursday, August 19, 2010 - 12:52 AM UTC
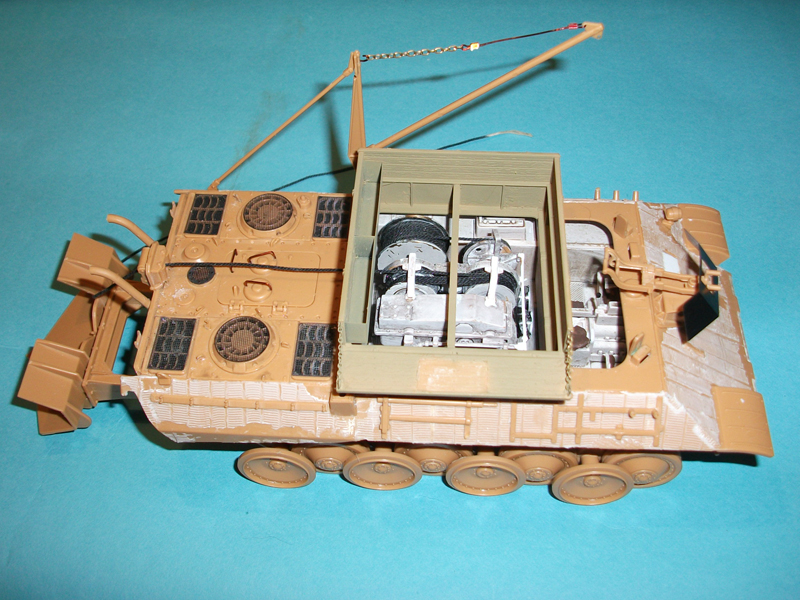
I have made a little more progress on my Borgward. The construction is now finished. Next is a base coat and some paint. I think I will go for overall sand with light green mottling.
More to follow...


More to follow...


mat

Joined: November 18, 2003
KitMaker: 894 posts
Armorama: 643 posts

Posted: Thursday, August 19, 2010 - 04:36 AM UTC
Quoted Text
Quoted TextQuoted TextVery nice mat i agree with Darren, you could hang a power pack or something similar from the crane?
You guys have good ideas. The Ot-810 sounds tempting, and it was used until somewhere in the 80's so it could be possible. The problem with the OT-810 or any other vehicle is that i would have to buy another kit and at the moment I am kind of, uh, brokeI bought a new house which is being build as we speak but I have not sold my appartment yet so I have double expenses. However, I do have some kind of loose engine block somewhere in my stash so I could use that one. I have to find out which kit it came from....
The crane maximum is 19 tons (in reality), however the scale version is made of resin and that tends to bend over time, even under it's own weight so any heavy load would be a trouble
Could you perhaps drill threw the centre of the crane and insert a metal rod to reinforce it? then just fill the end where you drilled, just an idea?
the tought had crossed my mind, but the upper part of the crane arm is 15 cm solid resin, which means drilling a 7,5 cm drill from both ends in a piece of resin less than a centimeter thick. It could work, but I don't have the right tools for it, only a big heavy drill I have to hold in my hand, not one that is fixed on a column. Perhaps I can try it on the Bergepanzer Buffel i intend to buy one day, when I can afford it

Posted: Thursday, August 19, 2010 - 05:47 AM UTC
Quoted Text
Harv, Clean work.
Thank you Charlie. The kits always look so nice with the base coat applied. Too bad we have to rust and dirty them up!!
I plan on finishing up the detail painting this weekend and getting it sealed and then grabbing the pastels. I am still trying to decide what to add for extra storage. Probably some tools, rags and things like that. I would like to at least add a German helmet hanging somewhere. I might do the "Kelly's Heroes" thing and put a German helmet on both of the headlights.
Anyway thanks again.
Harv

seb43

Joined: August 30, 2005
KitMaker: 2,315 posts
Armorama: 2,158 posts

Posted: Thursday, August 19, 2010 - 06:45 PM UTC
DEar All
i would like to know If my ESV can be good for the campaign. ??
i am good with the date right?
Please advice
Cheers
Seb
i would like to know If my ESV can be good for the campaign. ??
i am good with the date right?
Please advice
Cheers
Seb
Posted: Thursday, August 19, 2010 - 08:11 PM UTC
Seb, welcome on board. 
You are good with the date, but I am not sure what an ESV is, so cannot comment on that

You are good with the date, but I am not sure what an ESV is, so cannot comment on that

mat

Joined: November 18, 2003
KitMaker: 894 posts
Armorama: 643 posts

Posted: Saturday, August 21, 2010 - 01:06 AM UTC
some more progress, only thing visible is the lifting hook and the start of the base i'll be putting the vehicle on

this is the engine I found, it's big so it will fit nicely as a load under the hook

and something completely else, I found this picture in a newspaper of things heating up at Checkpoint Charlie. I think I''l put it in a frame in my new house

Some good news, I sold my flat and to celebrate I went to the LHS. Since I already decided to use the engine as a load and not to have VT-2B pull a vehicle from the mud, I decided to buy the new Trumpeter BMP-3 for 28 euros, I looked in the box and it is a beautiful kit, well worth the investment I think.
Cheers,
Matthijs

this is the engine I found, it's big so it will fit nicely as a load under the hook

and something completely else, I found this picture in a newspaper of things heating up at Checkpoint Charlie. I think I''l put it in a frame in my new house

Some good news, I sold my flat and to celebrate I went to the LHS. Since I already decided to use the engine as a load and not to have VT-2B pull a vehicle from the mud, I decided to buy the new Trumpeter BMP-3 for 28 euros, I looked in the box and it is a beautiful kit, well worth the investment I think.
Cheers,
Matthijs
seb43

Joined: August 30, 2005
KitMaker: 2,315 posts
Armorama: 2,158 posts

Posted: Saturday, August 21, 2010 - 02:37 AM UTC
Quoted Text
Seb, welcome on board.
You are good with the date, but I am not sure what an ESV is, so cannot comment on that
Well Jesper you didnot read my review on the ESV. Bad boy.
ESV = Engineer Support Vehicle.
So it is ok for me and for you ??
Cheers
Seb
Posted: Saturday, August 21, 2010 - 03:25 PM UTC
I am getting close to applying the paint on the BergePanther.


Posted: Sunday, August 22, 2010 - 08:55 AM UTC
Here is my in-progress post #3 of the M32 that I am building for this campaign.

I got the tracks added and I have been working on the detail painting. I have also added the .50 cal, the tow cable, a bucket and some tools scattered about. I also placed two German helmets on the headlights (thank you "Kelly's Heroes" for that idea). I have a few more extra items that I will add, such as a couple of dirty rags, and I hope to finish up the final detail painting today.
Thanks,
Harv


Sudzonic

Joined: December 07, 2007
KitMaker: 2,096 posts
Armorama: 1,983 posts

Posted: Sunday, August 22, 2010 - 09:02 AM UTC
Great work guys. The M32 is looking fantastic Randy and the Bergepanther is coming on very well Darren well done..
Posted: Sunday, August 22, 2010 - 09:08 AM UTC
Quoted Text
The M32 is looking fantastic Randy
Thank you Scott. I am hoping that final project will look good. Once I get the Dull-cote added and some pastel weathering done it won't look so shiny. I am hoping to make it looked "lived in" when it is complete.
Thanks again,
Harv

Posted: Monday, August 23, 2010 - 08:35 PM UTC
Quoted Text
Well Jesper you didnot read my review on the ESV. Bad boy.
ESV = Engineer Support Vehicle.
So it is ok for me and for you ??
Cheers
Seb
Hi Seb
Yes, that sounds good to me - and I am quite sure it will be ok for the campaign administrator as well.
I will go and read your review now

mat

Joined: November 18, 2003
KitMaker: 894 posts
Armorama: 643 posts

Posted: Wednesday, August 25, 2010 - 07:14 AM UTC
some more progress, I started the weathering. This is round 1. It always takes me a few attempts to get it right and subtle. The tracks developed a tension problem, they should be tight, I have to solve that in some way. How do you guys like the load?


Sudzonic

Joined: December 07, 2007
KitMaker: 2,096 posts
Armorama: 1,983 posts

Posted: Wednesday, August 25, 2010 - 08:13 AM UTC
WOW nice work Mat that looks really good with the engine hanging on the crane.
Well i have mad a bit of progress on the M1 Panther. i have added some of the parts from the Voyager PE set, been lacking the motivation to build lately so not much has been done..


Well i have mad a bit of progress on the M1 Panther. i have added some of the parts from the Voyager PE set, been lacking the motivation to build lately so not much has been done..


Posted: Friday, August 27, 2010 - 02:34 AM UTC
Beautiful buiild, Mat! Great entry in the campaign! 
It looks nice and the load seems in scale and very realistic. However, if you are going to place it in a diorama I think the load and crane should be inside the borders of the base. Just a small nickpick.
Nice M1 Panther so far, Scott. If you lack the motivation now, do not force it. Leave it for a couple of weeks and often I find the motivation returning.

Posted: Friday, August 27, 2010 - 02:43 AM UTC
I have made a little more progress on my Borgward. The camouflage is on and the initial weathering.
Next is a few details to be painted (exhaust, interior) then some more weathering and a couple of washes and then it is actually finished. A quick little build despite the clean up and building of the tracks.


Next is a few details to be painted (exhaust, interior) then some more weathering and a couple of washes and then it is actually finished. A quick little build despite the clean up and building of the tracks.


seb43

Joined: August 30, 2005
KitMaker: 2,315 posts
Armorama: 2,158 posts

Posted: Friday, August 27, 2010 - 04:04 PM UTC
Well
For the people that miss my thread on the ESV on the general forum
here is the beast for the campaign
Enjoy
Cheers
Seb


For the people that miss my thread on the ESV on the general forum
here is the beast for the campaign
Enjoy
Cheers
Seb


Sudzonic

Joined: December 07, 2007
KitMaker: 2,096 posts
Armorama: 1,983 posts

Posted: Saturday, August 28, 2010 - 03:29 AM UTC
Great work Seb and Jesper, well I found some motivation today and i think the panther is almost ready for paint?


Posted: Saturday, August 28, 2010 - 10:38 AM UTC
Here is in-progress post #4 of the M32 that I am building for this campaign.


I got everything added on including two pin-ups inside the turret. I thought the crew might be thirsty so I added a bottle of wine and a German canteen cup as well. I got a coat of dull-cote added this morning. I hope to work on the weathering tomorrow. Not counting all of the extra items I added I have built it straight out of the box. The only modification that I made was that I cut the cradle for the .50 caliber barrel off and re-glued it so that the barrel would actually rest in it.
Once I have the weathering done I will take more photos of everything showing the extra weapons, tools, pin-ups, etc.
Thanks,
Harv

Posted: Sunday, August 29, 2010 - 08:25 AM UTC
Well I am going to consider this project completed.


I added the pastels this morning as well as the newspaper and so I guess I am done.
Thanks,
Harv


I added the pastels this morning as well as the newspaper and so I guess I am done.
Thanks,
Harv


Sudzonic

Joined: December 07, 2007
KitMaker: 2,096 posts
Armorama: 1,983 posts

Posted: Sunday, August 29, 2010 - 08:33 AM UTC
Excellent work Randy good to see you finished well done.


Posted: Sunday, August 29, 2010 - 01:02 PM UTC
Quoted Text
Excellent work Randy good to see you finished well done.
Thank you Scott, I appreciate your comments. I just wish I was a better photographer. I have a lot of trouble getting the lighting and the flash right. It is always too bright or approaching being too dark. Oh well, something to keep practicing.
Thanks again,
Harv

ltb073

Joined: March 08, 2010
KitMaker: 3,662 posts
Armorama: 3,078 posts

Posted: Sunday, August 29, 2010 - 02:14 PM UTC
Quoted Text
Well I am going to consider this project completed.
Randy,
I think your build turned out really well nice and clean, but perhaps too clean
 It looks too much like it just came off the assembly line or out of the car wash, but with all the lived in accessorize added it should be a little dirtier. Also, would that Thompson be hanging there like that
  Just my $.02 but like I said its a nice clean build


Posted: Sunday, August 29, 2010 - 03:03 PM UTC
Hi Sal,
I appreciate the feedback on my project. One thing I always do lightly is my weathering. I usually add some dust, rust and dirt but not very much. Just a personal choice I guess. As for the Thompson, I just have it hanging off of the ...whatever that thing is, as if at the ready. If I had it in a diorama setting I would have the crew walking and standing around so I have the Thompson hanging there as if to have it ready, just like the M3 on the roof. That is why I have the tools and wine sitting out like they are. I figure the crew are ready to start a job or have just finished one.
Thanks again,
Harv

 |


