Hi Everyone,
It is late here in the UK (2am) and I have just finished weathering the Mirage Pz IVD. I intend to put the finished model in a mini-diorama at a later date, halted on a road somewhere past Sedan and with either refugees (first choice) or Heer marching past, but that is for later.
I have seen lots of photos of vehicles in the Fall Gelb campaign and they seem to have a moderate amount of accumilated mud and a lot of dust, I suppose it was quite warm and dry in May 1940. I used some Games Workshop Earth and mixed it with MIG European Dust to produce a slurry, which was carefully caked on the lower hull, along with the lower front/rear. I tried not to overdo this as I haven't read of excessively muddy conditions in this campaign. As the slurry was drying I dusted a small amount of pigment to represent dried mud, after this I liberally dusted the area with pigment to represent the hard travelling some of the Panzer units did. The tracks were given a light coat of this slurry and dusted with pigment as well. I tried to be as restrained as I could for the upper surfaces, concentrating on the edges of the hull and other areas to create a build up of 'road dust' in these areas. When I was satisfied with the hull I moved on to the exhaust, I again made a slurry of Tamyia Hull Red and MIG Rust. This was carefully applied to the main exhaust and then the rust effect built up using Vallejo reds, yellows and red-browns to get the effect I wanted. The finished result was then dusted with the European Earth to blend it in and harmonise it with the rest of the tank.
Quite an evenings work and I have a result I like, here are the pictures, hope you like them:
The pictures aren't the best I've ever taken, I will do some better ones to post in the gallery, anyway now it is onwards and upwards with the Stug IV, should be able to finish it in 6 weeks.
All the best,
Paul
Campaigns
Where Armorama group builds can be discussed, organized, and updates posted.
Hosted by Darren Baker, Richard S.
The Workhorse: Panzer IV
spacewolfdad
England - West Midlands, United Kingdom
Joined: May 23, 2010
KitMaker: 642 posts
Armorama: 593 posts
Joined: May 23, 2010
KitMaker: 642 posts
Armorama: 593 posts
Posted: Friday, January 14, 2011 - 02:33 PM UTC
spacewolfdad
England - West Midlands, United Kingdom
Joined: May 23, 2010
KitMaker: 642 posts
Armorama: 593 posts
Joined: May 23, 2010
KitMaker: 642 posts
Armorama: 593 posts
Posted: Saturday, January 15, 2011 - 04:09 AM UTC
After being baffled (easy to do at my age) I manged to submit images of the finished tank in the campaign gallery. It was a great sense of satisfaction and I can see why folks get hooked on doing these campaigns, the camaraderie and fun are wonderful.
All the best,
Paul
All the best,
Paul
Ruffus
Guatemala
Joined: April 12, 2005
KitMaker: 343 posts
Armorama: 223 posts
Joined: April 12, 2005
KitMaker: 343 posts
Armorama: 223 posts
Posted: Saturday, January 15, 2011 - 04:11 AM UTC
Paul, I really like the finish in the mufler, well done.
Regards
Byron
Regards
Byron
spacewolfdad
England - West Midlands, United Kingdom
Joined: May 23, 2010
KitMaker: 642 posts
Armorama: 593 posts
Joined: May 23, 2010
KitMaker: 642 posts
Armorama: 593 posts
Posted: Saturday, January 15, 2011 - 07:30 AM UTC
Quoted Text
Paul, I really like the finish in the mufler, well done.
Regards
Byron
Hi Byron,
Thanks for the kind comment, I have a copy of Cry Havoc! (the now defunct Rackham Miniatures magazine) with the best tutorial on rust effects I have seen. Mind you, I have to say, those guys at the Rackham studio were some of the best painters around.
All the best,
Paul
Posted: Saturday, January 15, 2011 - 11:26 AM UTC
@tread_geek - First, St. Nick was in fact very good to me this year! Thanks! How was he with you? Your almost at the finish line here with your tiny build. You've even managed to add an interior and some needed scratch built items. looking real good so far.
@barkingdigger - Great job on that Stug. Those old Tamiya kits are sure fun and look the part even if a little out of the standard and detail of today's kits.
@tutorca - Your scratch build Thoma shields with the three color camouflage on your Panzer IV Ausf. J came out super.
@roman - That a really clean build. I probably would have had my F2 done by now too. But NO . . . I had to go an aftermarket the whole build! Can't wait to see yours painted.
@LSP_Dave - Your Ausf. B/C? is coming along nicely. Keep it coming!
@spacewolfdad - Beautiful early war two color camouflage scheme. With the weathering now applied you could clearly see how the two color camouflage could be easily be overlooked in the black and white photographs. I like your figure too - gives scale and action to your build. Overall an outstanding tiny build.
@GregCloseCombat - Good progress on your 48th scale stug. Excellent effort on the Zimmerit. It was a lot of work I'm sure but well worth your time!
@Emeritus - Your build is very impressive. I really like the transparent look of your base coat . . . looks realistice. That's going to look so good when you apply the washes and weathering. Your Zimmerit job looks very true to scale under that base coat.
Well, I'm still working on my build and almost have it ready for paint. Only the return wheels and track to go! Will post pics before painting begins as promised earlier.
Hope I didn't miss anyone? So much fun. Wish I had gotten involved with these campaigns before.
-Eddy
spacewolfdad
England - West Midlands, United Kingdom
Joined: May 23, 2010
KitMaker: 642 posts
Armorama: 593 posts
Joined: May 23, 2010
KitMaker: 642 posts
Armorama: 593 posts
Posted: Saturday, January 15, 2011 - 12:10 PM UTC
Braille
Hi Eddy,
Thanks for the nice comments. However, without your input it would have been a lesser build, so you can take some credit for how it turned out - many thanks.
As you say these campaigns are fun and certainly enhance your modelling experience seeing all these talented folks churning out little gems. I shall get the Stug IV done to round off the campaign.
All the best,
Paul
Quoted Text
@spacewolfdad - Beautiful early war two color camouflage scheme. With the weathering now applied you could clearly see how the two color camouflage could be easily be overlooked in the black and white photographs. I like your figure too - gives scale and action to your build. Overall an outstanding tiny build.
Hi Eddy,
Thanks for the nice comments. However, without your input it would have been a lesser build, so you can take some credit for how it turned out - many thanks.
As you say these campaigns are fun and certainly enhance your modelling experience seeing all these talented folks churning out little gems. I shall get the Stug IV done to round off the campaign.
All the best,
Paul
PadrePete
Ontario, Canada
Joined: May 18, 2010
KitMaker: 219 posts
Armorama: 213 posts
Joined: May 18, 2010
KitMaker: 219 posts
Armorama: 213 posts
Posted: Saturday, January 15, 2011 - 02:30 PM UTC
Hey Paul,
I love what you've done! I can never get the grey right. I bow to superior color intellect!
tutorca
British Columbia, Canada
Joined: November 29, 2010
KitMaker: 57 posts
Armorama: 54 posts
Joined: November 29, 2010
KitMaker: 57 posts
Armorama: 54 posts
Posted: Sunday, January 16, 2011 - 02:50 PM UTC
is the biuld still open, if I remember right till the end of Feb. correct?
Mark Giles
Mark Giles
GaryKato
California, United States
Joined: December 06, 2004
KitMaker: 3,694 posts
Armorama: 2,693 posts
Joined: December 06, 2004
KitMaker: 3,694 posts
Armorama: 2,693 posts
Posted: Sunday, January 16, 2011 - 06:08 PM UTC
Quoted Text
is the biuld still open, if I remember right till the end of Feb. correct?
Mark Giles
Not really. The campaign was extended to allow people time to complete their builds.
The problem with having people join up during extensions is that when they don't finish, the campaign might get extended again, during which someone else might join and continue the cycle. For Armorama, I decided to avoid that problem by having "unofficial" extensions. I don't change the end date on the campaign page so it doesn't show up as an active campaign and people can't join. "Official" extensions are where I change the end date which keeps the campaign page current allowing others to join.
spacewolfdad
England - West Midlands, United Kingdom
Joined: May 23, 2010
KitMaker: 642 posts
Armorama: 593 posts
Joined: May 23, 2010
KitMaker: 642 posts
Armorama: 593 posts
Posted: Sunday, January 16, 2011 - 08:27 PM UTC
Quoted Text
Hey Paul,
I love what you've done! I can never get the grey right. I bow to superior color intellect!
Hi Peter,
It is nothing to do with 'colour intellect', just Tamyia German Grey and I can't be that bright, as I forgot the mix for the brown ( ). I really must remember to write down these paint mixes. Seriously though, I tried out a new way (for me) of airbrushing the model, after the basecoat I added small amounts of Tamyia Deck Tan to the grey and sprayed the edges of the tank at an oblique angle (if that makes sense) so that the paint was barely misting the top edges and produced an instant highlight. It seemed to work ok and I shall be trying it again in future. Thanks for the comment.
All the best,
Paul
roman
Slovakia
Joined: July 20, 2004
KitMaker: 99 posts
Armorama: 95 posts
Joined: July 20, 2004
KitMaker: 99 posts
Armorama: 95 posts
Posted: Monday, January 17, 2011 - 06:09 AM UTC
wash, fading, chipping, details painting
Jedge3
Michigan, United States
Joined: July 17, 2010
KitMaker: 258 posts
Armorama: 208 posts
Joined: July 17, 2010
KitMaker: 258 posts
Armorama: 208 posts
Posted: Tuesday, January 18, 2011 - 02:27 PM UTC
In progress photos, getting closer. These are post wash semi-disaster. I have never really weathered before and I had one article in mind when I went and did an overall wash with a Mig wash which turned out to be too strong, so I have been trying to remove what I can. I think I might just leave it alone to dry, flat coat it and start with a filter and some other weathering and call it done. Getting close to finishing my first model in 10 years feels good.
PS I know there things wrong with the model, items not right etc...but need to learn to walk before you can fly or roll.
PadrePete
Ontario, Canada
Joined: May 18, 2010
KitMaker: 219 posts
Armorama: 213 posts
Joined: May 18, 2010
KitMaker: 219 posts
Armorama: 213 posts
Posted: Tuesday, January 18, 2011 - 03:26 PM UTC
Hey Jeff,
It's not a disaster. I used ModelMaster Acryl Sand color and their thinner (never use anyone elses thinner with ModelMaster) at 10 to 1 thinner to paint. A dusting over the whole tank and tracks will cut down the contrast and tone down the washes. Don't panic if you see no change for a few hours because you're almost spraying water with a drop of milk. It settles out and then you can try highlighting with the airbrush and the same mix. It is difficult to overdo this technique as North African armor quickly became almost white and grungy.
You've done well, so take pride in your achievement and write down what works AND what doesn't work for you.
PadrePete
Jedge3
Michigan, United States
Joined: July 17, 2010
KitMaker: 258 posts
Armorama: 208 posts
Joined: July 17, 2010
KitMaker: 258 posts
Armorama: 208 posts
Posted: Tuesday, January 18, 2011 - 05:36 PM UTC
I will give that a try, thanks.
Quoted Text
Hey Jeff,
It's not a disaster. I used ModelMaster Acryl Sand color and their thinner (never use anyone elses thinner with ModelMaster) at 10 to 1 thinner to paint. A dusting over the whole tank and tracks will cut down the contrast and tone down the washes. Don't panic if you see no change for a few hours because you're almost spraying water with a drop of milk. It settles out and then you can try highlighting with the airbrush and the same mix. It is difficult to overdo this technique as North African armor quickly became almost white and grungy.
You've done well, so take pride in your achievement and write down what works AND what doesn't work for you.
PadrePete
tread_geek
Ontario, Canada
Joined: March 23, 2008
KitMaker: 2,847 posts
Armorama: 2,667 posts
Joined: March 23, 2008
KitMaker: 2,847 posts
Armorama: 2,667 posts
Posted: Wednesday, January 19, 2011 - 06:55 AM UTC
Paul and Roman, very nice Pz IV's. Jeff, from the pictures I don't see why you think that your Pz IV isn't also a winner. Seems like there are lots of great memorials to The Workhorse arising from this campaign.
I am slowly gaining ground with my build. I had to come up with some reinforcing/attachment points for the side skirts. there isn't really anything created for the purpose and the attachment surfaces would have been too limited and therefore fragile. I've got the green sprayed on and am now cleaning up the details that got a bit of over-spray on them. Next will be the decals and then the weathering can begin.
Note: The side skirts are just dry fit for the pictures.
Cheers,
Jan
warreni
South Australia, Australia
Joined: August 14, 2007
KitMaker: 5,926 posts
Armorama: 712 posts
Joined: August 14, 2007
KitMaker: 5,926 posts
Armorama: 712 posts
Posted: Wednesday, January 19, 2011 - 07:04 AM UTC
Yep, you can't beat good ole XF-63 for perfect German Grey every time.
ltb073
New York, United States
Joined: March 08, 2010
KitMaker: 3,662 posts
Armorama: 3,078 posts
Joined: March 08, 2010
KitMaker: 3,662 posts
Armorama: 3,078 posts
Posted: Wednesday, January 19, 2011 - 10:39 AM UTC
Some nice looking work being produced here guys on these Workhorses keep on going at it to get a maximum of guy to finish
greywolf
Quebec, Canada
Joined: February 17, 2002
KitMaker: 20 posts
Armorama: 20 posts
Joined: February 17, 2002
KitMaker: 20 posts
Armorama: 20 posts
Posted: Thursday, January 20, 2011 - 02:14 PM UTC
spacewolfdad
England - West Midlands, United Kingdom
Joined: May 23, 2010
KitMaker: 642 posts
Armorama: 593 posts
Joined: May 23, 2010
KitMaker: 642 posts
Armorama: 593 posts
Posted: Friday, January 21, 2011 - 01:44 AM UTC
Quoted Text
Yep, you can't beat good ole XF-63 for perfect German Grey every time.
Hi Warren,
I have had no problems whatsoever since I switched to airbrushing with Tamyia and the colours seem just fine to me, as you say the grey is a really good colour.
All the best,
Paul
LSP_Dave
Texas, United States
Joined: July 30, 2010
KitMaker: 52 posts
Armorama: 45 posts
Joined: July 30, 2010
KitMaker: 52 posts
Armorama: 45 posts
Posted: Friday, January 21, 2011 - 02:00 PM UTC
Tracks, tracks, tracks. Seems I've had an almost phobic problem with tracks on armor kits since I started modeling again. All those tiny little parts!! The very few kits I've started in the past always stalled at the point of tracks.
I finally broke through thanks in no small measure to the Magic Tracks! Look intimidating, go together with relative ease. Now, I made things a LOT more difficult early-on due to my avoidance of tracks. By joining the upper and lower hulls I only made it more difficult to install the tracks later. If I had followed the directions and installed the tracks earlier it would've been much easier.
One side is finished now. It's less-than perfect due to the above mentioned issues, but hopefully not too bad? Let me know what you think!
Emeritus
Uusimaa, Finland
Joined: March 30, 2004
KitMaker: 2,845 posts
Armorama: 808 posts
Joined: March 30, 2004
KitMaker: 2,845 posts
Armorama: 808 posts
Posted: Sunday, January 23, 2011 - 04:47 AM UTC
Ready for the tracks.
Most of the tools and other stuff are about done as well.
The wood parts of the tools turned out quite dark, like teak or something. Note to self: aim for a lighter finish next time.
Most of the tools and other stuff are about done as well.
The wood parts of the tools turned out quite dark, like teak or something. Note to self: aim for a lighter finish next time.
spacewolfdad
England - West Midlands, United Kingdom
Joined: May 23, 2010
KitMaker: 642 posts
Armorama: 593 posts
Joined: May 23, 2010
KitMaker: 642 posts
Armorama: 593 posts
Posted: Sunday, January 23, 2011 - 11:09 AM UTC
Hi Folks,
Even with the run into the final month there is so much going on that I can't comment individually. What I can say is that the standard of modelling in this campaign is terrific and it has been a real pleasure taking part.
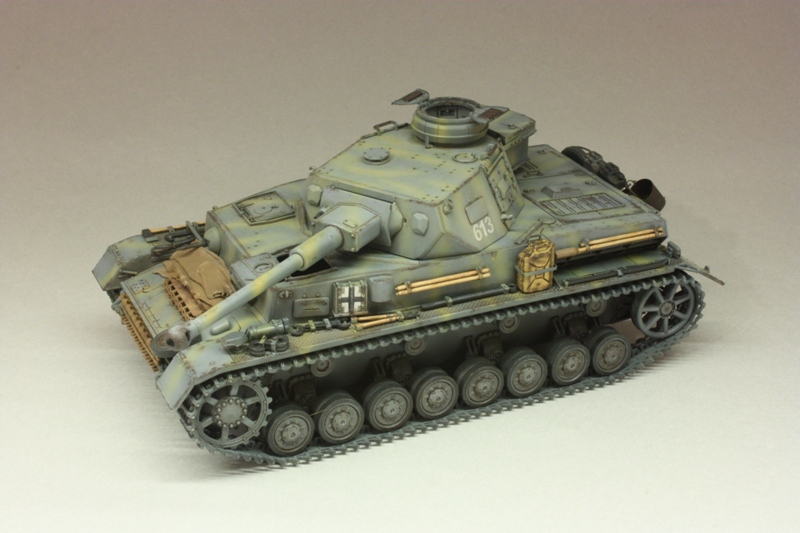
Anyway this is my final build for the campaign, I showed some shots of the chassis made up earlier, now I have added the Dragon DS tracks..
I then set about adding the towing brackes to the front plate. Unfortunately the sides are solid, which is unusual for Dragon even in 1/72.
I used a new, very sharp, scalpel blade to hollow out the sides of the brackets.
These were then glued to the front plate.
I then set about constructing the fighting compartment, which is where I left it for now.
All the best,
Paul
tread_geek
Ontario, Canada
Joined: March 23, 2008
KitMaker: 2,847 posts
Armorama: 2,667 posts
Joined: March 23, 2008
KitMaker: 2,847 posts
Armorama: 2,667 posts
Posted: Tuesday, January 25, 2011 - 09:33 AM UTC
Nice to see that there still some great build activity going on here. I made some more progress on the JPz. Mostly the rear storage and a bit more detail painting. The spare road wheels were a pain to position as there are no locating holes or tabs. The radio antenna base was conspicuously absent so I had to cobble one up. Then there were the rear spare tracks. They are too long and needed trimming. While I was at it and in a masochistic mood, I drilled out the guide horns as they were moulded solid.
Decals should be next and then the weathering.
Cheers,
Jan
Decals should be next and then the weathering.
Cheers,
Jan
Posted: Thursday, January 27, 2011 - 09:50 PM UTC
Well after a long battle with upgrading this old Tamiya kit I finally have it ready for paint. I've had this kit in my stash since forever and I finally have it built. Although I learned a great deal more from putting this one together I'll never spend this much time on an oldie kit again! There are a few things left to add like the towing rope and maybe a bucket. There are perhaps a lot of other small details that I could add but I'm going to leave it at that and start painting it as of tomorrow. Anyhow here are the photos as promised.
@roman - your Panzer IV Ausf F2 is looking excellent!
@Jedge3 - Yes I agree there are a lot of things wrong with this kit but it sure is a lot of fun to build these old Tamiya kits! Waiting to see yours weathered.
@graywolf - I'm one week behind you and also hoping to have mine done too before the extension runs out or I run out of beer!
@LSP_Dave - That's a really clean build. I like the look of these early panzer IV's. This is my first time using 'Magic Tracks' and I agree with what you've mentioned regarding assembling them. In my case I assembled my tracks in several sections at a time starting with the bottom run and allowed them to dry over night. I then placed some of the tracks around the idler and sprockets and also allowed them time to dry over night. Then I joined all of the bottom tracks to the drive sprockets, idler and road wheels. Finally I assembled the top track run and set that into place along with the return rollers. Everything was cemented together so that I could remove the tracks together with the wheel assemblies away from the chassis for painting. BTW you did a nice job on the track sag.
@Emeritus - That's looking super. I like the replacement primered new barrel.
@spacewolfdad - The track sag looks good on your vehicle too! You did a neat job of the towing eyes they now look the part.
@tread_geek - Great job on the camouflage and detail painting. The antenna looks true to scale. Can't wait to see this little killer weathered.
-Eddy
spacewolfdad
England - West Midlands, United Kingdom
Joined: May 23, 2010
KitMaker: 642 posts
Armorama: 593 posts
Joined: May 23, 2010
KitMaker: 642 posts
Armorama: 593 posts
Posted: Friday, January 28, 2011 - 12:57 AM UTC
Hi Eddy,
That is a superb piece of modelling, so much detail, very impressive. I look forward to the final push and seeing it in all its painted glory.
All the best,
Paul
That is a superb piece of modelling, so much detail, very impressive. I look forward to the final push and seeing it in all its painted glory.
All the best,
Paul