Campaigns
Where Armorama group builds can be discussed, organized, and updates posted.
1/48 Scale
Dangeroo
#023
Visit this Community
Zurich, Switzerland
Joined: March 13, 2009
KitMaker: 2,058 posts
Armorama: 1,656 posts
Posted: Tuesday, October 26, 2010 - 01:44 AM UTC
Sorry for my absence lately, life is taking over big time at the moment...

Chad: Nice looking A3. Why did you have to replace the upper hull, is the Hobby Boss one bad? You wouldn’t have a pre-start pic for us, would you?;)

Jason: Bring on those build pics!

Alvaro: That Humvee came out great! Now I’m looking forward to the painting stage!

tskross: Sorry to hear, your build would have certainly been a great addition to the campaign judging from your M10. I hope it’s nothing serious though!

Jose: Any progress yet? I’m sure this will be a huge beast even in this scale...

Greg: The new scene looks great. Who’s the building from? Are you still going with the German speis theme or is it now about Americans entering a surrendered town?

Jim: The camo turned out great with the weathering, looks spot on! The gun looks huge for such a small turret...

Konrad: Looking forward to the flail attachment!

So here should be some new pics of my build. Somehow the kitmaker gallery doesn't seem to want to upload them...

First the turret, no problems there, I decided I could live with any possible dimensional issues (I still think the turret looks OK when compared to photos).

Tracks: After getting all the pin marks filled they went on the moel smoothly and look pretty convincing I think.

I am now working on a base: started with Styrofoam to get the basic layout, now I’m filling it with wood filler that I color with Vallejo acryllics so as to not get white spots. This should be one smooth little hillside and I will fill in the gaps in the next step. Also started with wooden sides from balsa but the wood went out so I will have to buy some more.

Pics will follow as soon as the upload is back..

Cheers!
Stefan
Dangeroo
#023
Visit this Community
Zurich, Switzerland
Joined: March 13, 2009
KitMaker: 2,058 posts
Armorama: 1,656 posts
Posted: Tuesday, October 26, 2010 - 01:55 AM UTC
Okay seems to have been a problem with Safari... Firefox works well.


Cheers!
Stefan
vonHengest
Visit this Community
Texas, United States
Joined: June 29, 2010
KitMaker: 5,854 posts
Armorama: 4,817 posts
Posted: Tuesday, October 26, 2010 - 07:14 AM UTC
Looking good Stefan!
Railmen2000
Visit this Community
California, United States
Joined: February 17, 2007
KitMaker: 87 posts
Armorama: 65 posts
Posted: Tuesday, October 26, 2010 - 07:30 AM UTC
WOW - There are just way too many great builds going on here to comment on all of them, so if I miss yours, I apologize.
Anthony: For some reason, I always like those stowage brackets on stugs. Great work.
Stefan: Love the texture on the turret. Looking forward to seeing it completed.
Greg: Great dio going on. But what is the standing guy with his back to us doing?
Domingo: Your work always is inspiring.
Alvaro: Great work on one of the few modern subjects available in injection plastic. Looking forward to see how you finish this one.
Konrad: With all those loose parts, make it disabled with all the bits strewn araound. Just kidding, looking good. (Hope to see in in person at an upcoming AMPS meeting, when I can make it.)
Jim
Dangeroo
#023
Visit this Community
Zurich, Switzerland
Joined: March 13, 2009
KitMaker: 2,058 posts
Armorama: 1,656 posts
Posted: Tuesday, October 26, 2010 - 07:51 PM UTC

Quoted Text

But what is the standing guy with his back to us doing?


P-ing? I was thinking the same...

Thanks for the comments guys!
zontar
Visit this Community
Hawaii, United States
Joined: August 27, 2006
KitMaker: 1,646 posts
Armorama: 1,557 posts
Posted: Wednesday, October 27, 2010 - 03:26 PM UTC
Aloha All,

A small update on my Stug. Aaahh, that factory fresh feeling...


Next will be the white wash, although I might give it a wash to pre-shade the winter camo.

Stefan: the T-34 and base are coming along nicely.

Happy Modeling -zon
ScottS
Visit this Community
California, United States
Joined: March 28, 2007
KitMaker: 81 posts
Armorama: 57 posts
Posted: Wednesday, October 27, 2010 - 04:21 PM UTC
OK here is what I’m going to build.
Hobby Boss M4A3
Tank Workshop upper hull and turret
Fighting 48 T54E1 track
Hauler photo etch
And I’ll piece some crew together with the figures shown.
I'm taking a 4 day weekend with no chores so hope to make some good progress. Been awhile since I finished anything but I feel motivated.

Railmen2000
Visit this Community
California, United States
Joined: February 17, 2007
KitMaker: 87 posts
Armorama: 65 posts
Posted: Friday, October 29, 2010 - 06:27 AM UTC
Zon: Great looking build on the Stug. Can't wait to see it grimed up!
Scott - looking forward to your Sherman.

Here are some pics of my AB43 finished:


And a closeup showing I did add a driver:


And now to start on another one:

Jim
Andreas63
Visit this Community
Austria
Joined: August 13, 2010
KitMaker: 14 posts
Armorama: 13 posts
Posted: Friday, October 29, 2010 - 11:40 PM UTC
Hello

Now I can show you some pictures of my wip.
I paint the ground color, make some highlights and paint the tools.
Also some pigments on the lower hull, the tracks and the cutter.
@Stefan I don´t now, it´s a long time ago I by it in Mosonmagyarovar

Here now the pics


The next steps will be
coloring the wood, some chipping and rainmarks and the cal.50 must be paint
I hope you like it

with best regards
Andreas
www.modellbaurunde.at
SGTJKJ
#041
Visit this Community
Kobenhavn, Denmark
Joined: July 20, 2006
KitMaker: 10,069 posts
Armorama: 4,677 posts
Posted: Saturday, October 30, 2010 - 09:12 PM UTC
Zon, that is definitely factory fresh. Right of the production line. Looking forward to see more.

Scott, looks like you are up for a great build. Lots of AM stuff. Looking forward to see how it all goes together.

Looks very good, Andreas. Unless you are going to put figures in the hatches, you should cover the side sponsons of the hull. Now one can see the ground through the hatches. Also daylight will go through the hull to the top of the tracks. Just an idea.

Here is a little more progress on my small build. The Tamiya 1/48 Kubelwagen. It went together like a dream. Just add glue and shake the box - voila, a finished Kubelwagen

I added a cover for the wind screen by using a piece of paper from the instructions and some water diluted Gators glue.

Next is some painting - more to follow.


inkisi
Visit this Community
Vizcaya, Spain / España
Joined: July 31, 2005
KitMaker: 4 posts
Armorama: 3 posts
Posted: Sunday, October 31, 2010 - 08:54 AM UTC
Well, here is my unbuilt photo, sorry because it´s a bit blury...

As you can see it will be a Cargo Humvee, with Hauler wheels, and some bits from Hauler to fill the box.


Best,
Jose
GregCloseCombat
Visit this Community
California, United States
Joined: June 30, 2008
KitMaker: 2,408 posts
Armorama: 2,394 posts
Posted: Sunday, October 31, 2010 - 11:05 AM UTC

Quoted Text

But what is the standing guy with his back to us doing?


P-ing? I was thinking the same...


Ok,ok. to clarify my intent here, I'm now going with the M8 cruising through a surrendered area looking it over (Verlinden German Barn) and no more spy theme. The standing guy wasn't supposed to be writing his name in the snow
I think I'll remove him and add a driver to stick in that open hatch.

@steph - T-34 is moving nicely - wish it was easier to have the wheels articulated. maybe shrubs to hide some of that rough terrain.
@Jim - congrats on the finish. Great camo.
@Zon and Andreas you guys are progressing close to a finish

Dangeroo
#023
Visit this Community
Zurich, Switzerland
Joined: March 13, 2009
KitMaker: 2,058 posts
Armorama: 1,656 posts
Posted: Sunday, October 31, 2010 - 07:59 PM UTC
Zon: Factory fresh it is! I would also put on a wash before adding the white wash. It will probably give it some more depth.

Scott: Nice to have another Shermie. I’ve never seen one of those Hobby Bosss kits built up so I’m looking forward to it!

Jim: First finisher! Congrats! It came out really nice! I see you’ve moved your Fiat over to the Soft Skin Campaign...

Andreas: Nice and clean! Inspection passed. I agree with the sponsons, but it’s probably too late for that now. Sorry I didn’t notice any earlier. Looking forward to your next pictures.

Jesper: The Kübel looks nice, now I’m looking forward to the camo scheme!

Jose: Looks like you have your workbench full, looking forward to it!

Greg: So what prompted you to change the theme?

My base is coming along, it’s drying at the moment and I will take some pictures soon. It is more level now so the suspension is OK. It is a pity that the hulls are metal, makes it real hard to articulate the suspension... Pics to follow...

Cheers!
Stefan
Andreas63
Visit this Community
Austria
Joined: August 13, 2010
KitMaker: 14 posts
Armorama: 13 posts
Posted: Monday, November 01, 2010 - 05:38 AM UTC
@Jesper and Stefan

yes, your right. I must make some figures.
But figures are my personal waterloo, I can not paint it so well like somes here.

new pics follows in the next days

with best regards
Andreas
www.modellbaurunde.at
GregCloseCombat
Visit this Community
California, United States
Joined: June 30, 2008
KitMaker: 2,408 posts
Armorama: 2,394 posts
Posted: Monday, November 01, 2010 - 03:47 PM UTC
Hey Steph

I think what I've seen some people do with the metal hulls is to remove (saw) part of the wheel-connecting peg off, and then just glue the wheel in an up or down position. You must then get aftermarket tracks from Friul, WWII Productions, or elsewhere (Gasoline is coming out with some too) to float with the articulations. I haven't tried it but I'll add it to my future ideas too.

As for my scene - I just go with the flow, and the other idea I had I think there were too many figures scattered making it confusing to a central idea. I'm still narrowing down what surrendered Town war debris they be looking at.
SGTJKJ
#041
Visit this Community
Kobenhavn, Denmark
Joined: July 20, 2006
KitMaker: 10,069 posts
Armorama: 4,677 posts
Posted: Tuesday, November 02, 2010 - 12:18 AM UTC
Thanks for the comments on my Kubelwagen, guys.

I have given it a base coat and a coat of light sand. I used a lighter sand than normally as I think the green and brown camouflage will darken it due to the "misting" effect of the airbrush.

I am still a little unsure if I can airbraush fine enough on such a small vehicle. I will post some pictures no matter if it goes good or bad.
Dangeroo
#023
Visit this Community
Zurich, Switzerland
Joined: March 13, 2009
KitMaker: 2,058 posts
Armorama: 1,656 posts
Posted: Tuesday, November 02, 2010 - 08:57 AM UTC
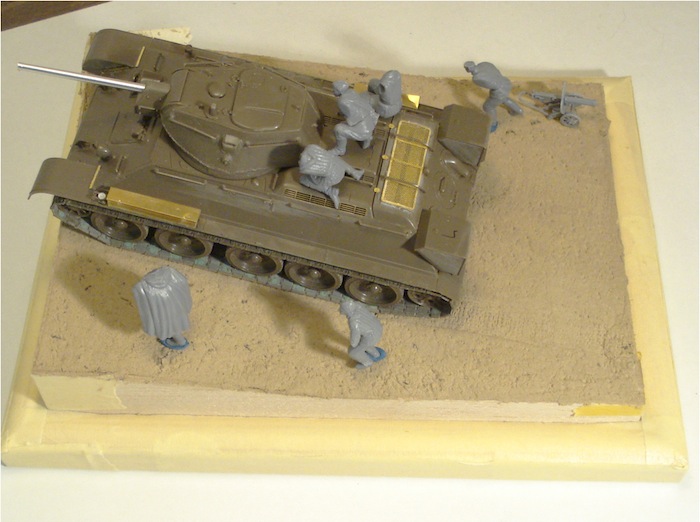
So, here are the pics I promised. Got some work on the figures done, basic forms so I can start planning the scene. Nothing grand though...


Cheers!
Stefan
SGTJKJ
#041
Visit this Community
Kobenhavn, Denmark
Joined: July 20, 2006
KitMaker: 10,069 posts
Armorama: 4,677 posts
Posted: Wednesday, November 03, 2010 - 02:36 AM UTC
Looks good, Stefan. The layout is great and I like the levels in the groundwork and the way the troops "tie in" the T-34 with the diorama.

Looking forward to see more
Andreas63
Visit this Community
Austria
Joined: August 13, 2010
KitMaker: 14 posts
Armorama: 13 posts
Posted: Wednesday, November 03, 2010 - 06:31 AM UTC
Hello

Dear Jesper, please don´t make a color overturn. For me a good build Kübelwagen like yours come better with only one color but this in color mod and some filters. And if you put some filters on it its been perfect, thats my opion.

@Stefan
Looks very good, some ideas what I have to you great work.
If you can please change the angle of the tank for more dramatical optic. And second, the barrel lookes at the sky, in your scene there will make a assault and its better then its shown down to the enemys.


So enough so many word here are my latest pics


You see that I have some problems because I lose the grill of the aircoler in backside and now I must repair/laminated it with some boxes of ammo. Also I make some rainmarks and oil marks

I hope you like it, the figs are not so good.
Feel free for comments or questions
Andreas
www.modellbaurunde.at
SGTJKJ
#041
Visit this Community
Kobenhavn, Denmark
Joined: July 20, 2006
KitMaker: 10,069 posts
Armorama: 4,677 posts
Posted: Wednesday, November 03, 2010 - 08:33 PM UTC
Thanks for the comments, Andreas. I only read your message now and sprayed the camouflage last night. In any case I wanted to see how sprayed camouflage would look in this scale on such a small vehicle. Hoep you like it anyway.

Great progress, Andreas. Have you glued the jerry cans to the deck on the back of the Sherman? It seems a little odd place to store them. They would fall of during movement.
Looks good now - looking forward to see it with more weathering.

I added green and brown camouflage to the Kubelwagen. Pretty satisfied with the result considering the scale. I think it will look good when the details are painted on. Comments welcome.

More to follow later.


Tomascastano
Visit this Community
Madrid, Spain / España
Joined: June 26, 2005
KitMaker: 143 posts
Armorama: 102 posts
Posted: Wednesday, November 03, 2010 - 09:24 PM UTC
Tomas: Welcome to the Campaign! What are you joining with?.

Hello Fellows.
Thanks Stefan for the welcome.
Well,I'm started the last week with the Tamiya Sd.Kfz.251/1.I wil try to make pics for share in the forum the next week.
Hold the line!.
Best,

Tom

koschrei
Visit this Community
California, United States
Joined: September 21, 2004
KitMaker: 147 posts
Armorama: 134 posts
Posted: Thursday, November 04, 2010 - 03:32 AM UTC
More and more great work in this GB - congratulations everybody !!

Jim: The AB41 looks great - can't wait to see what you do with the Fiat !

Stefan: Love the tank riders into action dio you are doing - I have wanted to see those figures posed in action on a T34 for a while - they are so dynamic!

Andreas: that is a really fine looking Sherman you have going - I think your figures look darn good too!

Jesper: wow, great chemo - I know how tiny that Kubel is. Bravo!

Since the last post I have been Crabbing along, and now have all the boom parts with the exception of the elevating pistons, flail chains and the fire extinguisher are in place (sorry Jim, no exploded view :-) ) . I have also gotten the turret together, including a Lion Roar early pattern 75mm tube and a Hauler cooling jacket on the Browning. The marker box brackes have also been added to the boxes, and bolt head detail added to the insides. The boxes need attachment, then it is on to smaller details.


Stay tuned - Konrad

Andreas63
Visit this Community
Austria
Joined: August 13, 2010
KitMaker: 14 posts
Armorama: 13 posts
Posted: Thursday, November 04, 2010 - 07:03 AM UTC
Hello

@Jesper
Great painting process, one word WOW
Only the green seems a little bit to dark for the following filter process, I mean a lighter tone will be better. If you can make it.

@Konrad
Your model is good, very good and an eyecatcher.
I hope you make a good paintjob for this rarity.

@All
Thanks for you positiv feedbacks, it is motivated and I hope I can get a good job for yous

best regards from vienna
Andreas
www.modellbaurunde.at
Railmen2000
Visit this Community
California, United States
Joined: February 17, 2007
KitMaker: 87 posts
Armorama: 65 posts
Posted: Thursday, November 04, 2010 - 09:28 AM UTC
Hi all:
I really like all the various builds going on here.

I have done a bit more work on my Wespe resin Fiat 508 (about the same size as Jesper's Kubelwagen.) I worked on the interior, including the dashboard and seats. I installed the gear shift (a kit provided straight pin which you have to cut down) and added hand brake from scratch. I got the base coloring and pin washes done for the most part (all hand brushed, since I do not have an airbrush.). You can see the windshield frame still needs attention when these were taken after a weekend of activity:


Two nights ago I cleaned up the windshield frame, cut the "glass" from the thin clear plastic provided, and carefully fit it into the frame using "Tacky" craft glue. I also added a windshield wiper and small motor box from scratch. As you can see, I made a rough stencil for the ram's head door markings. Last night I used a black permanent ink felt tip pen to get the basic stencil down, and then finished it up with thinned black acrylic craft paint using a 20/0 Windsor & Newton brush. Here it is with the door markings and windshield added:


Next step: adding the wheels, headlight lenses, canvas top and then give it a good dusting. Any comments welcome.
Jim


SGTJKJ
#041
Visit this Community
Kobenhavn, Denmark
Joined: July 20, 2006
KitMaker: 10,069 posts
Armorama: 4,677 posts
Posted: Thursday, November 04, 2010 - 11:41 PM UTC
Thanks for the comments, guys. I appreciate it. I am actually also quite satisfied with the result. Maybe a little drybrushing can lighten the green after filters and washes.

Konrad, nice progress on the Sherman. With all the details and AM stuff added you will have a very detailed and unique Sherman. Looking forward to see more.