Campaigns
Where Armorama group builds can be discussed, organized, and updates posted.
Where Armorama group builds can be discussed, organized, and updates posted.
Hosted by Darren Baker, Richard S.
1/48 Scale

mopnglo

Joined: January 07, 2006
KitMaker: 452 posts
Armorama: 271 posts

Posted: Friday, November 05, 2010 - 02:19 PM UTC
Well, I didn't get around to taking many in-progress shots. I had a hard time getting into this build for some reason. I ended up using the Verlinden base, but the quality was not good at all. My bad paint job doesn't really help it much either. I think I'm calling this finished, but I'll probably come back to it after a few days and see if there's anything I can improve or touch up.


GregCloseCombat

Joined: June 30, 2008
KitMaker: 2,408 posts
Armorama: 2,394 posts

Posted: Friday, November 05, 2010 - 03:50 PM UTC
@ michael - your sherman scene looks good. Maybe a little more dirt or rubble scattered on the bricks and tank would blend it all together more.
@ Stephan - the T-34 is climbing to a finish
Great job on spraying the Kubel camo
Shermans are all looking sound
Keep up the campaign!
@ Stephan - the T-34 is climbing to a finish
Great job on spraying the Kubel camo
Shermans are all looking sound
Keep up the campaign!
Andreas63

Joined: August 13, 2010
KitMaker: 14 posts
Armorama: 13 posts

Posted: Friday, November 05, 2010 - 06:01 PM UTC
Hello Michael
You say you do a bad paint job, I can not see what you mean.
Your figs are very good and fine painted.
Also the szene looks good, I like it and congrats you for this top work.
with best regards from vienna
Andreas
www.modellbaurunde.at
You say you do a bad paint job, I can not see what you mean.
Your figs are very good and fine painted.
Also the szene looks good, I like it and congrats you for this top work.
with best regards from vienna
Andreas
www.modellbaurunde.at
Railmen2000

Joined: February 17, 2007
KitMaker: 87 posts
Armorama: 65 posts

Posted: Friday, November 05, 2010 - 06:36 PM UTC
Michael, I agree with the others, your scene looks good, but maybe a little more dust all around.
Here is the result of last night's activity at the modeling bench. I added the wheels, license plates, headlight lenses, pennant and some stuff inside. I still need to do a little more work on the canvas top.


As always, any comments or suggestions are welcome.
Jim
Here is the result of last night's activity at the modeling bench. I added the wheels, license plates, headlight lenses, pennant and some stuff inside. I still need to do a little more work on the canvas top.


As always, any comments or suggestions are welcome.
Jim
Posted: Friday, November 05, 2010 - 10:15 PM UTC
Beautiful job, Michael. On both the figures and the Sherman.
Nice progress, Jim. A little bit of fine airbrush dusting of the wheels and lower chassis would look good followed by a very light and thin sand coloured wash. That would help "tie things together". Just my 5 cents.
A little more progress on my Kubelwagen. Next is the decals and the weathering.


Nice progress, Jim. A little bit of fine airbrush dusting of the wheels and lower chassis would look good followed by a very light and thin sand coloured wash. That would help "tie things together". Just my 5 cents.

A little more progress on my Kubelwagen. Next is the decals and the weathering.


Tojo72

Joined: June 06, 2006
KitMaker: 4,691 posts
Armorama: 3,509 posts

Posted: Saturday, November 06, 2010 - 12:44 AM UTC
very nice Michael,figures look great also.

mopnglo

Joined: January 07, 2006
KitMaker: 452 posts
Armorama: 271 posts

Posted: Saturday, November 06, 2010 - 05:22 AM UTC
Thanks everyone! I appreciate the comments and suggestions. This was my first urban base, and I don't really like my color choices. I sprayed the rubble with a grey that was too dark to begin with and I wasn't able to really tone it down very well.
I really need to work on nailing down my finishing process as well. Every time I start weathering a model, I have a bad habit of "wandering" to different steps instead of planning out a logical approach. All part of the learning curve, I guess. This is why like campaigns, because it definitely helps to see the other builds and processes. I should have been more proactive about posting in-progress shots this time, but I was doing well just to stay focused on the build. Not sure why I wasn't really into this one.
l'll continue to follow the campaign, so you'll still see me around.
Railmen2000

Joined: February 17, 2007
KitMaker: 87 posts
Armorama: 65 posts

Posted: Saturday, November 06, 2010 - 07:21 PM UTC
Jesper - thanks for the comments. Unfortuneately, I do not have an airbrush, so I use soft, wide flat brushes to apply my "filters" to get the effect you suggest. I know an airbrush would do the job nicely, and one of these days I am going to bitte the bullet and get one.
Also, thanks for the info on the limitation of builds being in only one campaign (I did not know that, since I beleive I have seen others participate in two campaings with one model.) I already have a finished build here, so this is not a problem. I have posted my finished Fiat in the softskinned campaign DG.
Next up here for me will be an old Bandai 75mm pak 40.
Jim

GregCloseCombat

Joined: June 30, 2008
KitMaker: 2,408 posts
Armorama: 2,394 posts

Posted: Sunday, November 07, 2010 - 04:06 AM UTC
Keep them coming Jim. 
Kinda got things sorted out now. A couple dead Germans to fill up the space and a broken fence. The nice figure by Manuel cut in half to fit in the driver's hatch. The painting has begun. The 250/9 will be 3 color camo with larger white wash splotches.


I used 2 different consistencies of white to drybrush the whitewash with a split old round brush.

Kinda got things sorted out now. A couple dead Germans to fill up the space and a broken fence. The nice figure by Manuel cut in half to fit in the driver's hatch. The painting has begun. The 250/9 will be 3 color camo with larger white wash splotches.


I used 2 different consistencies of white to drybrush the whitewash with a split old round brush.
Posted: Sunday, November 07, 2010 - 07:28 AM UTC
Thanks for the comments on my T34 guys, appreciate them. Not a lot of progress to report, trying to get some gaps filled in the figures, putty’s drying now…
Andreas: The Shermie’s looking better and better. Maybe give it a dark wash so the details will pop out more? Thanks for the tips on my little scene, I won’t change the direction of the tank though as the track marks are already set… The gun is still movable, so there’s still some time to adapt it…
Jesper: Great work on the camo! Looks convincing to me. In my experience camo usually only ties together once the rest is painted and that is definitely the case here.
Konrad: The flail is looking great! Bring on those chains!
Jim: That sure was a fast build on the Fiat. Great to see some Italian soft skins. I like your stencil work. I was just teasing you about the double campaign. You’re all set as this is your second entry already. And I can understand you wanting to get that other ribbon… You can bring in as many as you want here, the more the merrier (but only one ribbon of course…). On another note: Could you please put your pics in the campaign gallery? AFAIK it’s one of the necessities in campaigns to be able to give out the ribbon. The gallery is here:
http://gallery.kitmaker.net/showgallery.php/cat/25903
Michael: Your dio looks good, to me! What was wrong with the base? Just two comments: The commander’s helmet looks strange, more like Japanese… And the bottle seem a bit too bright for my taste, maybe tone it down a bit?
Greg: The M8 is coming along nicely. The white wash seems a bit timid to me though. I think it covered the base coat much more than what drybrushing would do.
Keep the progress coming guys! Unfortunately you can’t expect too much from me in the next few weeks as I’m on business trips a lot…
So, here’s the updated chart:


Cheers!
Stefan
Andreas: The Shermie’s looking better and better. Maybe give it a dark wash so the details will pop out more? Thanks for the tips on my little scene, I won’t change the direction of the tank though as the track marks are already set… The gun is still movable, so there’s still some time to adapt it…
Jesper: Great work on the camo! Looks convincing to me. In my experience camo usually only ties together once the rest is painted and that is definitely the case here.
Konrad: The flail is looking great! Bring on those chains!

Jim: That sure was a fast build on the Fiat. Great to see some Italian soft skins. I like your stencil work. I was just teasing you about the double campaign. You’re all set as this is your second entry already. And I can understand you wanting to get that other ribbon…
 You can bring in as many as you want here, the more the merrier (but only one ribbon of course…). On another note: Could you please put your pics in the campaign gallery? AFAIK it’s one of the necessities in campaigns to be able to give out the ribbon. The gallery is here:
http://gallery.kitmaker.net/showgallery.php/cat/25903
Michael: Your dio looks good, to me! What was wrong with the base? Just two comments: The commander’s helmet looks strange, more like Japanese… And the bottle seem a bit too bright for my taste, maybe tone it down a bit?
Greg: The M8 is coming along nicely. The white wash seems a bit timid to me though. I think it covered the base coat much more than what drybrushing would do.
Keep the progress coming guys! Unfortunately you can’t expect too much from me in the next few weeks as I’m on business trips a lot…
So, here’s the updated chart:
Cheers!
Stefan

Tojo72

Joined: June 06, 2006
KitMaker: 4,691 posts
Armorama: 3,509 posts

Posted: Monday, November 08, 2010 - 12:47 PM UTC
I got my Stug III done today.I added Legend Stowage and some Verlinden Figures.I used Tamiya and Vallejo Acrylics,and weathered with enamel washes and Mig Pigments.My question to everyone is should I leave the foilage or does it look bad ? It is just sitting there so I can take it off.It was a great campaign with lots of great builds,thanks for your work Stefan.


GregCloseCombat

Joined: June 30, 2008
KitMaker: 2,408 posts
Armorama: 2,394 posts

Posted: Monday, November 08, 2010 - 06:25 PM UTC
Anthony - nice finish! I think the shrubs add character to it and would leave them on. You're motivating me to get done 
Stefan - I'll add more whitewash but I'm going for a half-melted / muddy snow scene. Thanks for the feedback as it's easy to change.
Should the canvas on the front be whitewashed too?
I'll go for something worn like the M36 in this pic
http://www.flickr.com/photos/scdike/4544444013/

Stefan - I'll add more whitewash but I'm going for a half-melted / muddy snow scene. Thanks for the feedback as it's easy to change.
Should the canvas on the front be whitewashed too?
I'll go for something worn like the M36 in this pic
http://www.flickr.com/photos/scdike/4544444013/
Removed by original poster on 11/10/10 - 15:30:57 (GMT).
Removed by original poster on 11/10/10 - 15:45:05 (GMT).
Posted: Wednesday, November 10, 2010 - 04:25 AM UTC
To One and All,
I am sorry for the delay in posting any photos yet. Life has a way of getting in the way of fun.
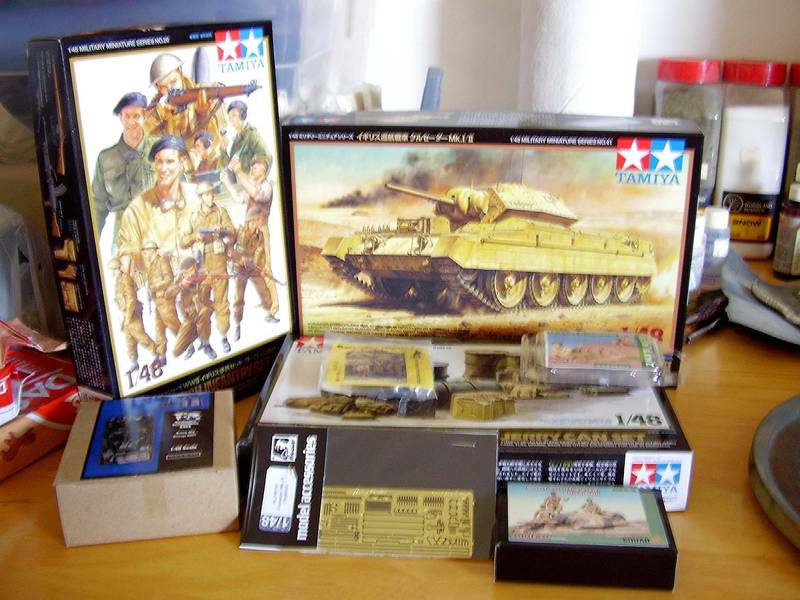
The first photo is the 'starting lineup' of possible parts. Roughly clockwise, the 1/48 Tamiya Crusader, Gaso-Line British Crewmen, Tamiya Jerrycan set, Squad48 Brit. Crew, Hauler photoetch , Verlinden British Stowage, Dartmoor Brit. Crew and finally the Tamiya 1/48 Brit. Infantry and crewman. Not shown is the Blackdog British stowage set.
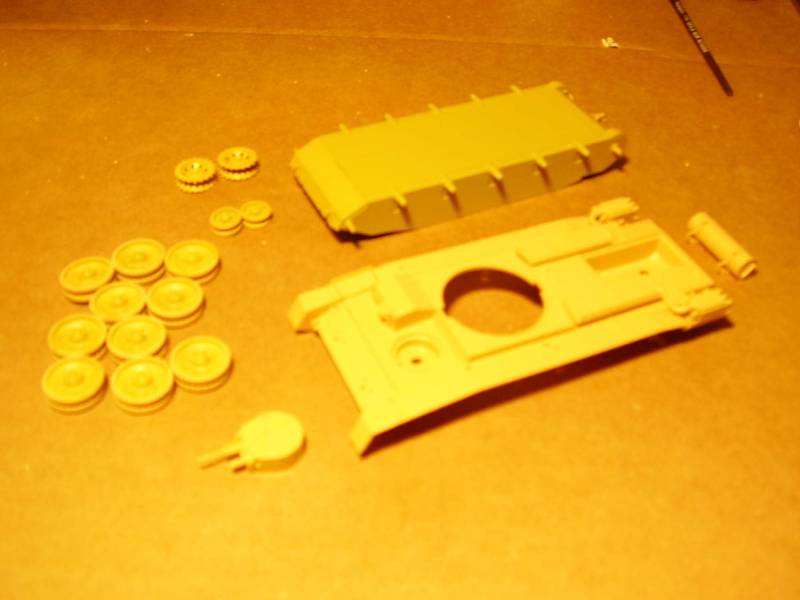
The next photo is the results of the first session, mainly roadwheels (always fun) and most of the hull bits.
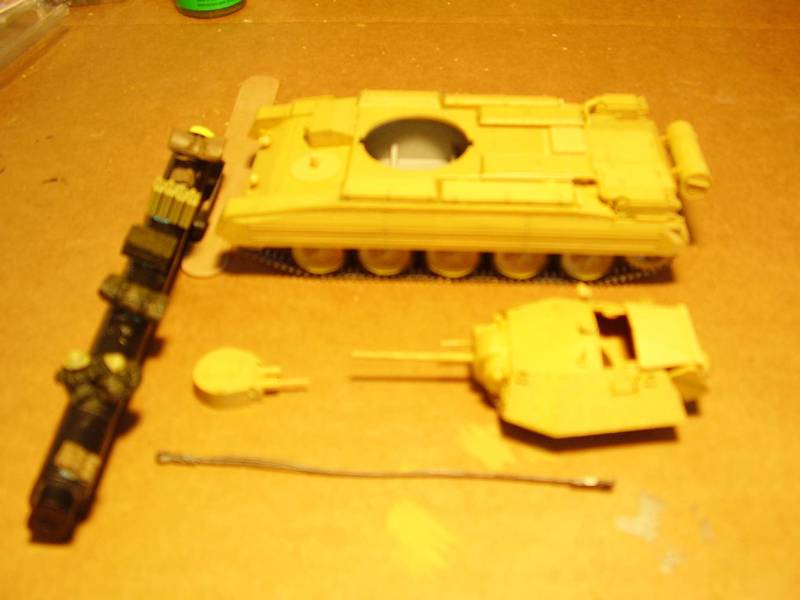
The last photo is the mostly completed model. The black highlighter on the left has bits of postertack to hold various stowage bits for painting.
Some thoughts on the model and extras. The Tamiya Crusader kit is excellent. Parts assemble very well. The tracks are a bit bothersome, but quite manageable.
The jerrycan set will yield some jerrycans and stowage - pretty nice variety, US, UK and German.
The figures were a mixed bag. The Dartmoor figures are excellent - both of them will be used in the final scene. The Gaso-line figures are also quite nice, one of them is being used for the final scene, as well. The squad48 and tamiya guys are a little soft on detail and the Tamiya set is mainly NW Europe, so they will provide parts, if necessary.
The Hauler photoetch is quite microscopic. A bit much for my aging eyes, so I only used the side stowage racks for the tank.
Stowage will be made up of elements mainly from Tamiya and from the most excellent Blackdog set. Their stowage pieces are excellent, they trim-up well and paint up very nicely. The Verlinden set has kind-of soft detail - a bit of a disappointment. A few of their parts are being used, but the bulk of the stowage is from the Blackdog set.
Hopefully some further updates soon.
BTW, there have been some awesome builds showing up in this campaign so far. I have been quite impressed. Please keep on sharing your opinions and techniques.
Thanks,
Stephen
PS - OOPS - After posting I see that my photos are kind of fuzzy. I will work on better resolution for my future ventures.
I am sorry for the delay in posting any photos yet. Life has a way of getting in the way of fun.
The first photo is the 'starting lineup' of possible parts. Roughly clockwise, the 1/48 Tamiya Crusader, Gaso-Line British Crewmen, Tamiya Jerrycan set, Squad48 Brit. Crew, Hauler photoetch , Verlinden British Stowage, Dartmoor Brit. Crew and finally the Tamiya 1/48 Brit. Infantry and crewman. Not shown is the Blackdog British stowage set.

The next photo is the results of the first session, mainly roadwheels (always fun) and most of the hull bits.

The last photo is the mostly completed model. The black highlighter on the left has bits of postertack to hold various stowage bits for painting.

Some thoughts on the model and extras. The Tamiya Crusader kit is excellent. Parts assemble very well. The tracks are a bit bothersome, but quite manageable.
The jerrycan set will yield some jerrycans and stowage - pretty nice variety, US, UK and German.
The figures were a mixed bag. The Dartmoor figures are excellent - both of them will be used in the final scene. The Gaso-line figures are also quite nice, one of them is being used for the final scene, as well. The squad48 and tamiya guys are a little soft on detail and the Tamiya set is mainly NW Europe, so they will provide parts, if necessary.
The Hauler photoetch is quite microscopic. A bit much for my aging eyes, so I only used the side stowage racks for the tank.
Stowage will be made up of elements mainly from Tamiya and from the most excellent Blackdog set. Their stowage pieces are excellent, they trim-up well and paint up very nicely. The Verlinden set has kind-of soft detail - a bit of a disappointment. A few of their parts are being used, but the bulk of the stowage is from the Blackdog set.
Hopefully some further updates soon.
BTW, there have been some awesome builds showing up in this campaign so far. I have been quite impressed. Please keep on sharing your opinions and techniques.
Thanks,
Stephen
PS - OOPS - After posting I see that my photos are kind of fuzzy. I will work on better resolution for my future ventures.

mopnglo

Joined: January 07, 2006
KitMaker: 452 posts
Armorama: 271 posts

Posted: Thursday, November 11, 2010 - 03:04 AM UTC
Stefan - Thanks for your comments. You're right about the bottle. It's so bright that I can pick it out from across the room! I'll try to tone it down a bit. There is an odd angle on the front of the commander's helmet as well, but it looks worse in the photos than it actually is. I didn't really notice it until you mentioned it.
Greg - I really like the M8, and I'm looking forward to seeing how you finish the scene.
Anthony - I like the foliage. It looks good and adds a nice bit of color. Nice job on the camo pattern too!
Greg - I really like the M8, and I'm looking forward to seeing how you finish the scene.
Anthony - I like the foliage. It looks good and adds a nice bit of color. Nice job on the camo pattern too!
Posted: Sunday, November 14, 2010 - 09:13 PM UTC
Nice progress, Stephen. Looking forward to see more.
A little more progress on my Kubelwagen. The decals are on and the first wash in place. Next is some dirtying up. Nice this is supposed to be an airfield vehicle and not frontline vehicle I will keep the wearthering, wear and tear light.
More to follow


A little more progress on my Kubelwagen. The decals are on and the first wash in place. Next is some dirtying up. Nice this is supposed to be an airfield vehicle and not frontline vehicle I will keep the wearthering, wear and tear light.
More to follow


JoseLuisLopez

Joined: August 21, 2010
KitMaker: 19 posts
Armorama: 18 posts

Posted: Sunday, November 14, 2010 - 10:20 PM UTC
Wooww!! ... I´m really happy to see so many nice 1/48 kits over here!
My Jagdtiger´s assemble is close to be finished. I´m adding to it some extra detailing for a very singular vehicle. I think that I´ll post it next weekend.
Keep on the good work!
My Jagdtiger´s assemble is close to be finished. I´m adding to it some extra detailing for a very singular vehicle. I think that I´ll post it next weekend.
Keep on the good work!
Posted: Monday, November 15, 2010 - 07:57 AM UTC
Anthony: The StuG looks great! If you ask me, I’d leave the foliage, looks great and gives it some color.
Stephen: Great to see more British stuff and nice start. Looking forward to what you will do with the figures.
Jesper: Coming along nicely!
I had an evening in the cave yesterday and managed to get some figure work done. Here are the pics:


By now they’re primed and ready for painting. Of course now that I mention it I remember that I forgot to prime the weapons… Oh well…
Cheers!
Stefan
Stephen: Great to see more British stuff and nice start. Looking forward to what you will do with the figures.
Jesper: Coming along nicely!
I had an evening in the cave yesterday and managed to get some figure work done. Here are the pics:
By now they’re primed and ready for painting. Of course now that I mention it I remember that I forgot to prime the weapons… Oh well…

Cheers!
Stefan
Posted: Tuesday, November 16, 2010 - 01:02 AM UTC
To One and All,
Here are some better photos of the Crusader, in progress.
Here are the pieces being used, as of now, including the figures. The two standing crewmen are from Dartmoor - excellent figures. The one perched on the turret is from Gaso-Line - also well sculpted.
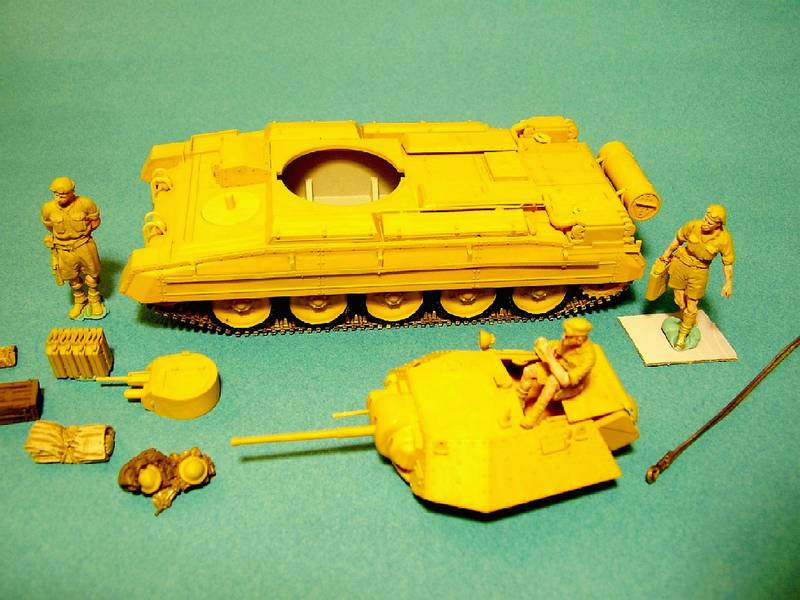
The following pictures are the front and side views along with a possible layout on the soon to be desert base.
Thanks,
Stephen
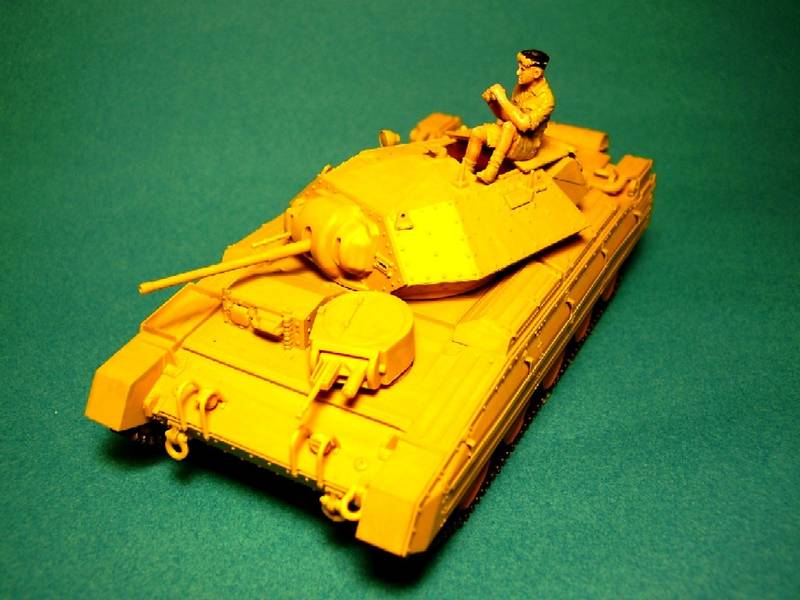
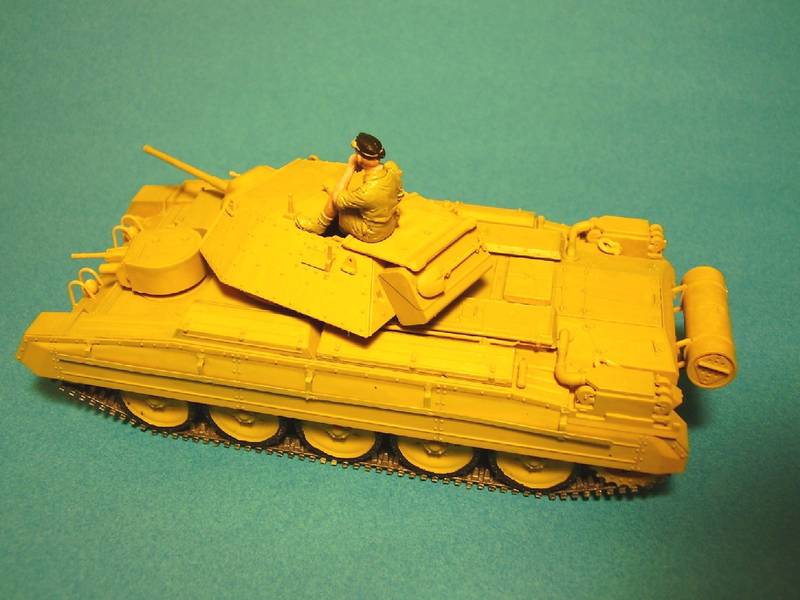

Here are some better photos of the Crusader, in progress.
Here are the pieces being used, as of now, including the figures. The two standing crewmen are from Dartmoor - excellent figures. The one perched on the turret is from Gaso-Line - also well sculpted.

The following pictures are the front and side views along with a possible layout on the soon to be desert base.
Thanks,
Stephen


Posted: Tuesday, November 16, 2010 - 01:42 AM UTC


Nice work so far everyone, done a bit more on my KV today will post some pics by the end of the week. Been making slow progree due to a couple of outside interferences namely work, decorating and last weekends Scale model world
 . I'll get some pics done and posted asap,
Jason
Posted: Wednesday, November 17, 2010 - 01:45 AM UTC
Looks good so far, Stephen. Nice choice of figures. They blend in well with the vehicle.
When it is finished shot the photos in daylight if possible to get the colours more natural. Should be no problem in Florida
Looking forward to see more.
When it is finished shot the photos in daylight if possible to get the colours more natural. Should be no problem in Florida

Looking forward to see more.

GregCloseCombat

Joined: June 30, 2008
KitMaker: 2,408 posts
Armorama: 2,394 posts

Posted: Wednesday, November 17, 2010 - 03:27 AM UTC
Stefan and Stephen (I was getting those mixed up sorry) - things are looking good.
Jesper - the Kubel is awesome!
Jesper - the Kubel is awesome!
JoseLuisLopez

Joined: August 21, 2010
KitMaker: 19 posts
Armorama: 18 posts

Posted: Thursday, November 18, 2010 - 09:27 AM UTC
Time for posting!
Jagdtiger finally assembled. As I´ll make a not finished Jagdtiger desesperatly put into action during the last days of the war, no tools, no schurzen ... just a big "red" (hull) beast put into action.
Just some wire for the handles, Friul tracks and some detailing here and there.


Thanks for looking. Any opinion or suggestion will be highly apreciated.
Jagdtiger finally assembled. As I´ll make a not finished Jagdtiger desesperatly put into action during the last days of the war, no tools, no schurzen ... just a big "red" (hull) beast put into action.
Just some wire for the handles, Friul tracks and some detailing here and there.


Thanks for looking. Any opinion or suggestion will be highly apreciated.

domingohm

Joined: November 23, 2005
KitMaker: 59 posts
Armorama: 58 posts

Posted: Thursday, November 18, 2010 - 08:09 PM UTC
OMG,
there are a lot of good models here and and a handful of good scenes in motion.
Congratulations for that.

there are a lot of good models here and and a handful of good scenes in motion.
Congratulations for that.

 |


