Campaigns
Where Armorama group builds can be discussed, organized, and updates posted.
Hosted by Darren Baker, Richard S.
Braille Battlefield
tread_geek
Ontario, Canada
Joined: March 23, 2008
KitMaker: 2,847 posts
Armorama: 2,667 posts
Joined: March 23, 2008
KitMaker: 2,847 posts
Armorama: 2,667 posts
Posted: Sunday, April 24, 2011 - 02:54 AM UTC
Here we go again! 41 pages and over 43,000 views. Are we getting dizzy yet?
@r2d2 - Thanks for all the great progress pictures and I know that I have mentioned it before but you are definitely certifiable. And I thought that I was bad at times with wire grab handles. I have an old Revell Challenger II in the stash. Thanks to you it with definitely remain there.
@Sudzonic - Nice to see you back, Scott. One more M1 will definitely show those Second World War types a thing or two. Look what we have so far, several M1's, LeClerc, T-54, T-55, Leopard 1, Challengers, Warrior, Fennek, M48 and on and on. :-)
@Braille - The NVA T-34 is looking great! I wonder how it would make out in action against Scoutmaster's M-48! I wish that I could have helped with your track gluing problem but it seems like you tried most options. The Plastic Weld by Plastruct *might* work as it's a solvent type that also contains a "bonding filler." It is the only one that works well with ABS and even those plastic Q-Tip stick material. I might have also tried a Gap Filling CA (I believe that you use the same as I do; Insta-Cure+). It is beginning to seem like Trumpeter vinyl tracks are quite the problem area with their kits. Quite a few in my local club have been dismayed by them being too short or too long. The most recent was a fellow that built an early short barreled StuG and the tracks were almost 1/4" (6mm?) too long.
@NWBrit - Excellent and speedy progress on your Warrior. I have the earlier Revell version in the stash and am curious about the track issue. When I get a chance I'll have to see about doing a build review of it.
As for me, no progress pictures at the moment but I'll try to get some up in a day or two. The StuH is getting very close to finish. I am just finalizing what and how the external storage will be arranged.
Cheers,
Jan
newfish
England - West Midlands, United Kingdom
Joined: June 23, 2008
KitMaker: 2,329 posts
Armorama: 2,110 posts
Joined: June 23, 2008
KitMaker: 2,329 posts
Armorama: 2,110 posts
Posted: Sunday, April 24, 2011 - 10:11 AM UTC
Right I've pulled something out and I will have something for this GB even if my original build has gone in the bin. Hasegawa's Churchill Mk 1. It's a new build and it's been build OOTB except for some work to the turret and sponsoons which were stippled with Mr Surfacer 1000. I've painted it but I've ran out of light to take a picture of the painted tank so I will wet your whistles with some pictures before primer..
Pictures of Paint tomorrow
NWBrit
England - North West, United Kingdom
Joined: October 30, 2003
KitMaker: 46 posts
Armorama: 41 posts
Joined: October 30, 2003
KitMaker: 46 posts
Armorama: 41 posts
Posted: Sunday, April 24, 2011 - 09:16 PM UTC
Hello all,
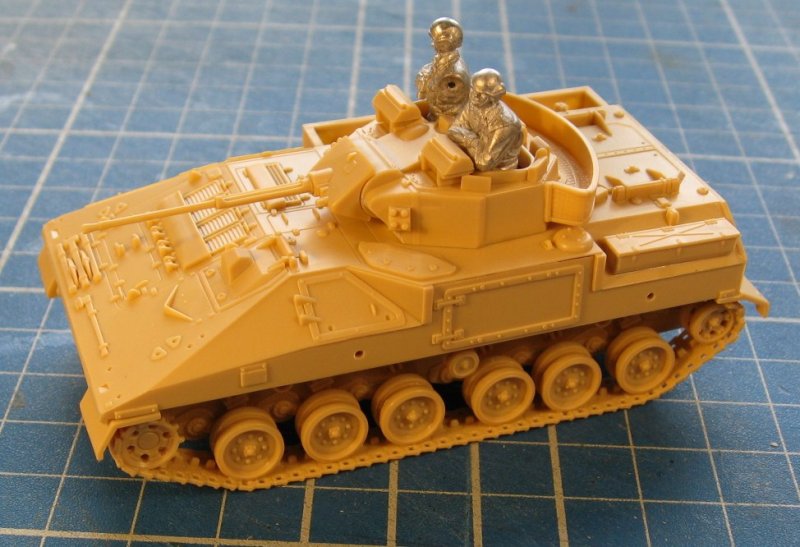
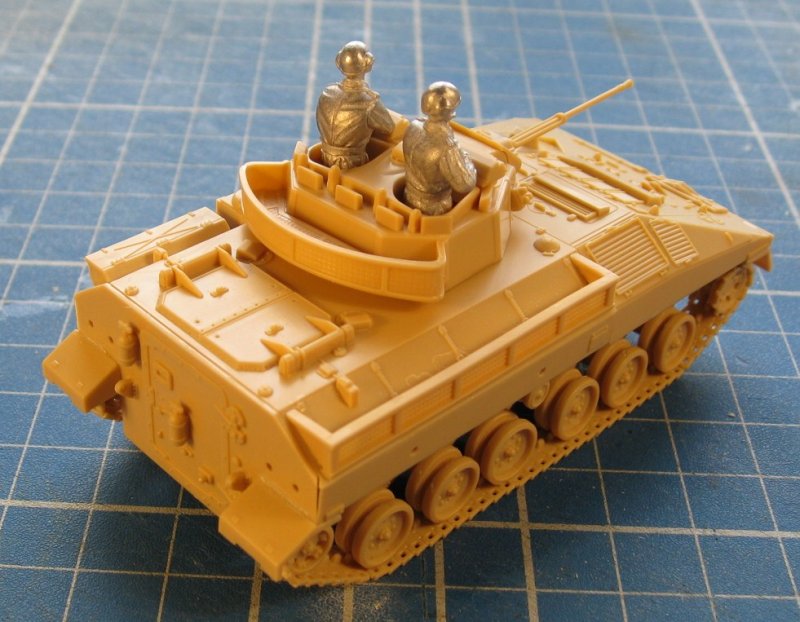
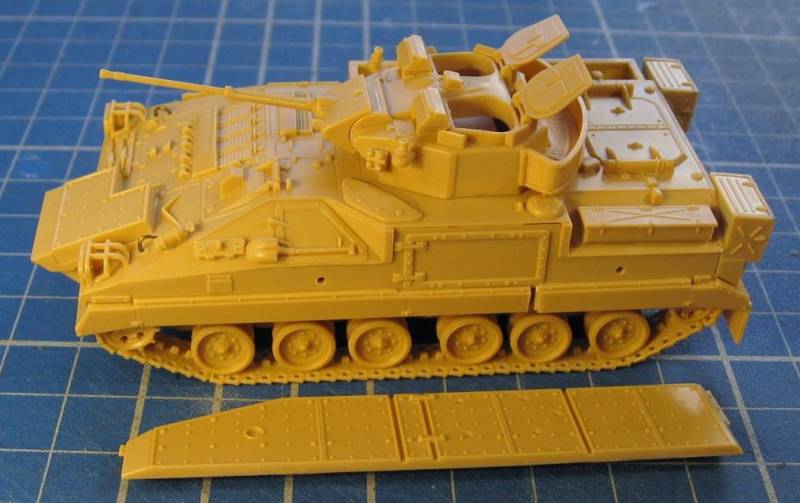
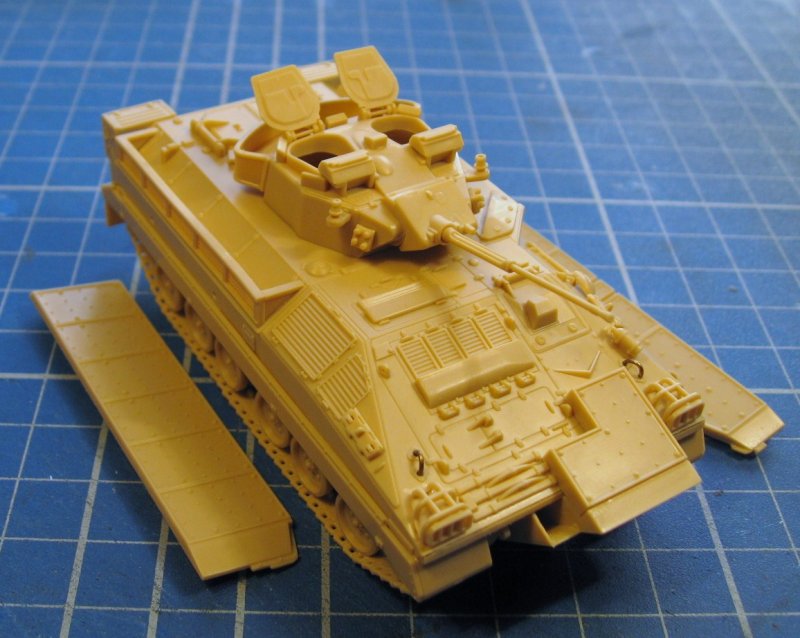
A bit more progress for me, I'm hoping to have construction more or less finished by this evening - fingers crossed.
As you can see there are a few joints that really need filling, but many do get hidden by later parts, especially the add on armour. The key for a last minute build is to try and figure out which ones get hidden and which ones don't
Also apparent is just how bad the turret basket is as a kit part. The one on the right hand side of the hull is only a bit better. Fortunately for this build the hull one is completely behind the extra armour, but will also be an issue with the earlier version. Similarly, the turret smoke dischargers are prime condidates for replacement.
The crew figures are from CMSC but they have only been in my cupboard for a couple of years At first sight they appear a little too big to me and I'm not sure how I will go on with the desert pattern camo, but I thought I might as well give them a go.
r2d2 : your Challenger is looking fabulous and very inspirational. I was wondering what all those whip antennas on the turret are made of ? The smallest brass rod I have been able to get is 0.5mm and just a bit too big for the Warrior antenna bases so now I'm contemplating fuze wire if I can get it straight enough.
Well, time to get back at it, more later.
Chris
naimbrain
United Kingdom
Joined: March 15, 2010
KitMaker: 123 posts
Armorama: 118 posts
Joined: March 15, 2010
KitMaker: 123 posts
Armorama: 118 posts
Posted: Monday, April 25, 2011 - 01:23 AM UTC
Quoted Text
r2d2 : your Challenger is looking fabulous and very inspirational. I was wondering what all those whip antennas on the turret are made of ? The smallest brass rod I have been able to get is 0.5mm and just a bit too big for the Warrior antenna bases so now I'm contemplating fuze wire if I can get it straight enough.
If you have a cat, they occasionally shed their whiskers. Keep an eye on the carpet, and collect the whiskers whenever you see them. They make fantastic looking whip antennas, and they're incredibly strong and resistant to kinking. They might need straightening, in which case use her hair straighteners when she's not looking.
Jan,
Thanks for the extension, I'd already decided I'd submit my current builds 'as is', there are still a few fragile parts to add to the Faun, but without a presentation case to put it in (a future DIY project) they get broken off again as fast as I can fix them so I'm calling it done for now. I'd also far rather spend time on finishing other builds than obsessing over tiny details on my current builds.
With the extra time I'm hoping to add a German 88 and tractor, a Mk1 Chally (OOB I hasten to add) and maybe an M60A1 Rise (they're all reasonably close to completion)... or maybe something else? As you know, I have plenty to chose from.
Cheers
John
r2d2
England - South East, United Kingdom
Joined: April 13, 2006
KitMaker: 424 posts
Armorama: 419 posts
Joined: April 13, 2006
KitMaker: 424 posts
Armorama: 419 posts
Posted: Monday, April 25, 2011 - 04:25 AM UTC
Thanks Jan, Chris!
As for the whip antennas, I used the sprue from the kit itself. Do the usual candle stretch technique. In order to get to this thin you have to use the right kind of plastic which can stand the stretching with out breaking. I found that the Dragon's sprue is the right one. You can stretch it thinner than a hair and would be the right size for this scale. You can see the atennas I've done.
eoinryan
Cork, Ireland
Joined: April 30, 2010
KitMaker: 232 posts
Armorama: 134 posts
Joined: April 30, 2010
KitMaker: 232 posts
Armorama: 134 posts
Posted: Monday, April 25, 2011 - 04:52 AM UTC
Hi folks,
@ Val- that build just knocks me for six every time a see you progress pics! I'd expect that amount of detail on a 1/35 build, nevermind 1/72! Can't wait to see it finished!
@ Braile: Take the Leclerc out of your stash and build it! I joined the campaign for a change and challenge away from 1/35. I picked the Leclerc kit because a) it wasn't Airfix and b) it was about the only 1/72 modern armour kit in the shop! I was very pleasantly suprised with the kit it (mostly) fitted together smoothly and the detail was great. I'll be looking out for more Revell 1/72 kits in the future!
@ Val good idea extending the deadline by a fortnight. There's nothing worse than trying to get a model finished under time pressure. When's the next Braile Campaign starting?
Eoin
tread_geek
Ontario, Canada
Joined: March 23, 2008
KitMaker: 2,847 posts
Armorama: 2,667 posts
Joined: March 23, 2008
KitMaker: 2,847 posts
Armorama: 2,667 posts
Posted: Monday, April 25, 2011 - 06:09 AM UTC
@newfish - Jaymes, I can hardly keep up with your builds. You are definitely having a streak of bad luck and I hope that it is now a thing of the past. did you happen to get any sprue shots of the Churchill prior to starting? a member of our club has just started building the very same kit. It looks quite nice considering its age.
@NWBrit - The Warrior seems to have come together quite nicely. Too bad about the smoke dischargers and the baskets. I had a look through my kit and the former are atrocious and the latter look more like heavy armour plates. Other than that, the detail on the kit is quite nice. I know that there were aftermarket PE replacements for the kit but they were quite expensive and very hard to near impossible to get in my area. Perhaps filling the bins with "stuff" or covering them with a judicious tarp might distract a bit.
@naimbrain - John, I can fully accept that your PzH and Faun are 98+% complete. Some of the smaller parts are prone to breakage even on the real thing. I checked out your pictures at Photobucket and grabbed five for the Feature. You can check out what I took in the offsite Campaign Gallery. Remember to put one picture of each in the official Kitmaker campaign gallery.
@eoinryan - There is still plenty of time for you to try one more small scale kit for this campaign. Even if the local shops have a limited supply you can always inquire here to see if a kit is worth purchasing. As for another small scale campaign, let's leave that for after this one concludes. Besides, with all the entrants in this campaign, any one of you could propose and lead one.
Antennas - I have pretty much tried it all. From stretched sprue to brass/copper wire to stretched vinyl sprue and cat whiskers. At this point I am most impressed with guitar string. The .009" (.23mm) is what I swear by at the moment. Firm, yet flexible and extremely difficult to kink or distort.
Cheers,
Jan
newfish
England - West Midlands, United Kingdom
Joined: June 23, 2008
KitMaker: 2,329 posts
Armorama: 2,110 posts
Joined: June 23, 2008
KitMaker: 2,329 posts
Armorama: 2,110 posts
Posted: Monday, April 25, 2011 - 06:16 AM UTC
Well no I kinda rushed into building and opening the box about a week ago
Sprue shots can be found here
I have got a picture of what it looks like with paint on though
It's easy to keep up with my builds jan this is all that's left the rest are in the bin
Sprue shots can be found here
I have got a picture of what it looks like with paint on though
It's easy to keep up with my builds jan this is all that's left the rest are in the bin
erhntly
Izmir, Turkey / Türkçe
Joined: June 11, 2004
KitMaker: 1,426 posts
Armorama: 464 posts
Joined: June 11, 2004
KitMaker: 1,426 posts
Armorama: 464 posts
Posted: Monday, April 25, 2011 - 06:27 AM UTC
Hi dear friends, Thank you for the beautiful critics for my M3 Lee... And last week a lot of successful models, a great campaign.
==========BB Campaign will be extended until MAY 30,2011=============
good idea
Can I start new project for this campaign or I must wait after campaign...
==========BB Campaign will be extended until MAY 30,2011=============
good idea
Can I start new project for this campaign or I must wait after campaign...
tread_geek
Ontario, Canada
Joined: March 23, 2008
KitMaker: 2,847 posts
Armorama: 2,667 posts
Joined: March 23, 2008
KitMaker: 2,847 posts
Armorama: 2,667 posts
Posted: Monday, April 25, 2011 - 06:51 AM UTC
Quoted Text
Well no I kinda rushed into building and opening the box about a week ago
Sprue shots can be found here
I have got a picture of what it looks like with paint on though
Jaymes, if no one has any objections, I will grant you a reprieve on the requirement for sprue shots. After all, you have fulfilled the requirements previously so you intentions were honourable until fate interjected itself. Besides, I did a bit of checking (the "geek" part ) and I am satisfied that it is a recent build.
Interesting too is that you are building the version with the 3" gun (didn't even know that the kit was like that). My friend is doing the Canadian version without it.
Quoted Text
Can I start new project for this campaign or I must wait after campaign..
Erhan - Please feel free to build or complete whatever you want in the time remaining. Any extra builds will appear in the eventual campaign feature.
Cheers,
Jan
P.S. - If you all recall from the previous page, I had commented about the disturbing discovery of people possibly using old photos for this campaign. During my further sleuthing, one individual has been cleared or absolved of any wrong doing. And yes, his VCR is still flashing "12:00."
erhntly
Izmir, Turkey / Türkçe
Joined: June 11, 2004
KitMaker: 1,426 posts
Armorama: 464 posts
Joined: June 11, 2004
KitMaker: 1,426 posts
Armorama: 464 posts
Posted: Monday, April 25, 2011 - 08:00 AM UTC
Thanks Jan,
I started a SU 76 last week . My first attempt at the UM model. İt has thin plastic and parts are compatible with each other. In some little parts of PE given, bud wrong PE parts in my box it's not important, I can made a scratchbuilding
And I think it was a bigger gun bud a small tank KV2 was like a giant in this photos ...
newfish
England - West Midlands, United Kingdom
Joined: June 23, 2008
KitMaker: 2,329 posts
Armorama: 2,110 posts
Joined: June 23, 2008
KitMaker: 2,329 posts
Armorama: 2,110 posts
Posted: Monday, April 25, 2011 - 10:41 AM UTC
Quoted Text
Quoted TextWell no I kinda rushed into building and opening the box about a week ago
Sprue shots can be found here
I have got a picture of what it looks like with paint on though
Jaymes, if no one has any objections, I will grant you a reprieve on the requirement for sprue shots. After all, you have fulfilled the requirements previously so you intentions were honourable until fate interjected itself. Besides, I did a bit of checking (the "geek" part ) and I am satisfied that it is a recent build.
Interesting too is that you are building the version with the 3" gun (didn't even know that the kit was like that). My friend is doing the Canadian version without it.
Quoted TextCan I start new project for this campaign or I must wait after campaign..
[b]Erhan{/b] - Please feel free to build or complete whatever you want in the time remaining. Any extra builds will appear in the eventual campaign feature.
Cheers,
Jan
P.S. - If you all recall from the previous page, I had commented about the disturbing discovery of people possibly using old photos for this campaign. During my further sleuthing, one individual has been cleared or absolved of any wrong doing. And yes, his VCR is still flashing "12:00."
LOL ! Well I can prove it's a new build I'll remember that next time mate! did you check when I uploaded it to photo bucket? I'm honest I'll bare that in mind for the next Braille scale group build
Posted: Tuesday, April 26, 2011 - 04:37 AM UTC
To One and All,
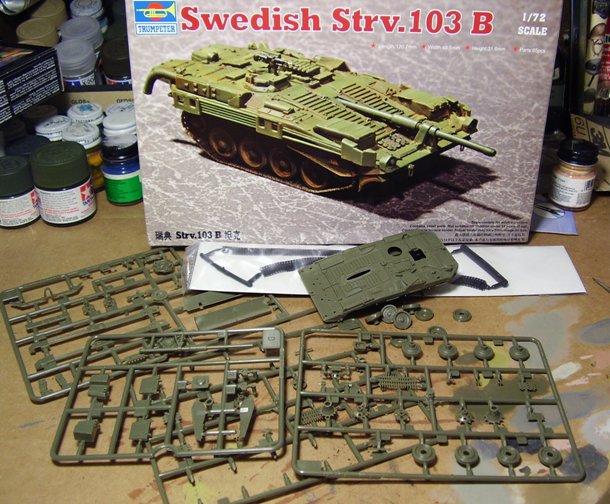
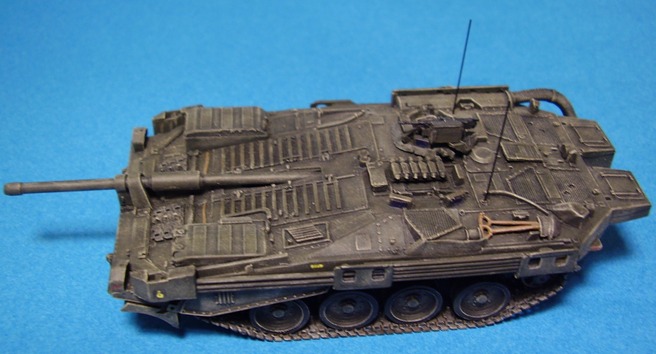
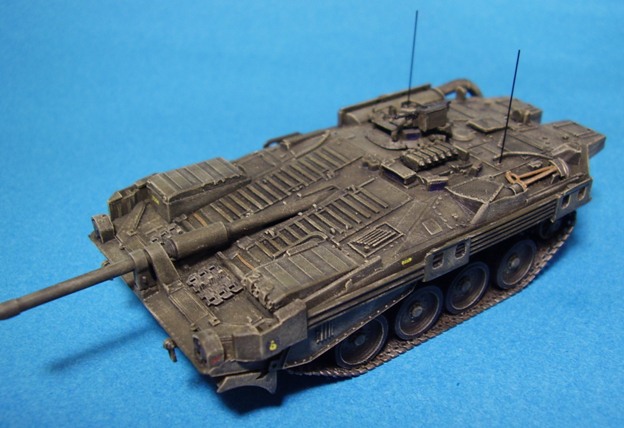
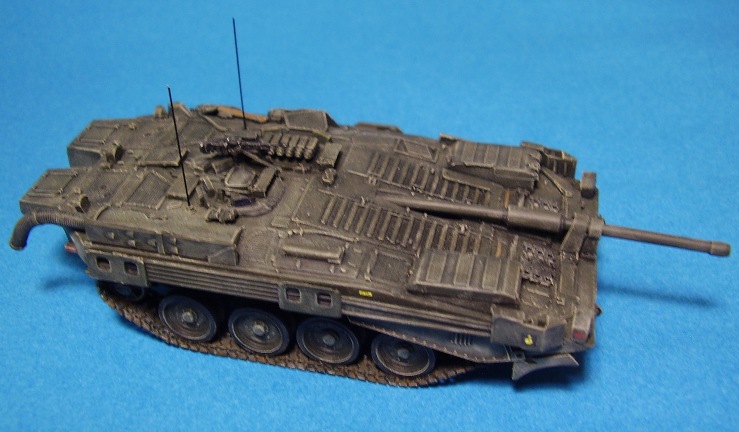
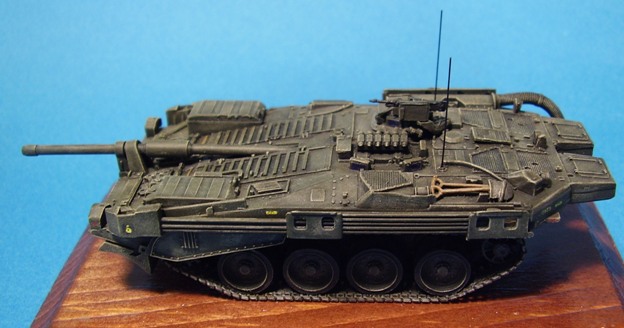
The second full build for the Braille Battlefield is finally completed! Yipee! At first I was leaning towards the Matchbox M24 Chaffee, but then I acquired the Trumpeter Strv 103b - a vehicle I have always liked. ( I built the old 1/48 Aurora version as a kid ) So it was love at first sight, but like life, there were a few thorns in the rose garden.
Here is the 'sprue shot' of the kit.
The kit built up well. The tracks were a bother - nothing would make them 'stick'. I finally used a glob of ZapaGap with accelerator. That finally did it and the glob could be hidden by the sprocket track plate.
A couple of fine parts disintegrated coming off of the sprue. The plastic in the kit is very soft and fragile. So I had to rebuild a few parts. One tailight was devoured by the Carpet Monster. All-in-all a not too bad building experience. Painting was accomplished using Tamiya dark green for the basecoat followed by Polly-s Pullman green for fading. the faded basecoat was sealed with Future - decals applied - more Future. Inks used to provide some depth. A wash of heavily thinned black and green Polly-s and finally a very light 'dusting', to help bring out the details. Final photos below. Comments are always welcome.
Thanks to all, especially Jan for running an excellent campaign. I have been amazed at the level of skill evident in this group of builders. These models blow me away - the level of detail on many of these is quite impressive. I appreciated the chance to complete one partial build, the Matchbox Firefly, and to complete something new, the Strv.103.
- Stephen (Minas-Ithil)
newfish
England - West Midlands, United Kingdom
Joined: June 23, 2008
KitMaker: 2,329 posts
Armorama: 2,110 posts
Joined: June 23, 2008
KitMaker: 2,329 posts
Armorama: 2,110 posts
Posted: Tuesday, April 26, 2011 - 06:33 AM UTC
Stephen Awesome build!
Jaymes
Jaymes
NWBrit
England - North West, United Kingdom
Joined: October 30, 2003
KitMaker: 46 posts
Armorama: 41 posts
Joined: October 30, 2003
KitMaker: 46 posts
Armorama: 41 posts
Posted: Tuesday, April 26, 2011 - 10:25 AM UTC
Hello,
tread_geek, r2d2 & naimbrain : Antennas : Thanks for all the feedback.
Without a cat of my own John I think that option is closed to me. (I did briefly consider trying to catch one of the local cats and snipping off a few, but decided it probably wasn’t the best idea!!)
I have never had too much luck with stretched sprue, mostly I couldn’t get it uniform enough for a long enough length. Maybe I need to try again with some different types and see how it goes. Though Jan’s guitar string sounds ideal to me as the other problem I had with the styrene ones is them breaking off.
For this build I’ve decided on a strand of copper wire from electrical cable. It’s 0.15mm thick which is ideal, but will deform very easily if touched. I’m not sure if that’s good or bad, at least it won’t snap like styrene and won’t cause damage to the model if you catch it as a rigid wire would. Time will tell I guess.
Many thanks for the suggestions though.
Chris
NWBrit
England - North West, United Kingdom
Joined: October 30, 2003
KitMaker: 46 posts
Armorama: 41 posts
Joined: October 30, 2003
KitMaker: 46 posts
Armorama: 41 posts
Posted: Tuesday, April 26, 2011 - 10:30 AM UTC
Hello all,
As you can see below, I got the basic kit construction all finished yesterday. The only additional problem I encountered was the small side skirt on the left hand side wouldn’t fit. This was because I had slightly miss positioned the front and rear mud guards on this side (pieces 19 & 20). The right hand side fitted perfectly. Once again the add on armour is going to come to my rescue and I just hacked a piece out of the middle for a quick fix. Something else to watch out for on the older version though.
I’ve got enough stowage to satisfy myself sorted out tonight but then managed to break the barrel on the 30mm I have to admit to having some unkind words about myself. Since it ‘only’ broke and didn’t snap off I’ve used a bit of liquid cement to stabilise it and it still looks pretty straight but there is a small bulge at the break point. Other than very careful scraping or sanding does anyone have any bright ideas to help rectify the problem ?
So an evening of highs and lows for me. I hope everyone else is just having the highs
All the best
Chris
naimbrain
United Kingdom
Joined: March 15, 2010
KitMaker: 123 posts
Armorama: 118 posts
Joined: March 15, 2010
KitMaker: 123 posts
Armorama: 118 posts
Posted: Tuesday, April 26, 2011 - 12:06 PM UTC
Quoted Text
@naimbrain - John, I can fully accept that your PzH and Faun are 98+% complete. Some of the smaller parts are prone to breakage even on the real thing. I checked out your pictures at Photobucket and grabbed five for the Feature. You can check out what I took in the offsite Campaign Gallery. Remember to put one picture of each in the official Kitmaker campaign gallery.
Jan,
Just a quick heads-up to say I couldn't see the photos you mentioned in the link, but you're welcome to use any photos that you deem worthy. Also, thanks for accepting my 98% completed entries.
My plan to use the Leopard as a potentially sacrificial test piece worked, in that it exposed a technical problem. I used Revell matte clear acrylic over Klear, which gave a white residue. I then tried to cover this whiteness with thinned dark filters, which partially worked, but also darkened the overall colours to a point where it's hard to see the camo in anything less than bright sunlight (or flash - the photos lift the colours far more than the naked eye does). The acrylic matte over Klear has also ended up more satin than matte, 'live and learn'....
Given the extra completion time I'm going to try to rush finish a few more subjects, so here are a few current 'in progress' shots of the contestants:
Revell Challenger 1:
I matte coated this last night with Humbrol clear matte, it's far flatter than the Revell acrylic matte over Klear, and there's no hint of white residue. One mistake I noticed too late, the ID number on the side of the turret should be on a removable board, but I've applied the decal direct to the turret - the price of working when over tired! (c'est la vie). As mentioned recently Revell storage bins can be an issue, this Chally is another case in point, I'll eventually cover them with tarps, but probably not during this campaign.
Revell 1/72 M60A1 with ERA
I've opted for the colour scheme for US Army V-2/1 1 Cavalry Regiment, Bad Kissingen, Germany 1970-1980, mainly because it looks like another fun scheme to develop my brush camo skills on. The outdoor photos show the state of play at 17:00 today with a fresh coat of Revell 82 Dark Earth, the indoor shots show initial paint coats on the tracks applied later this evening. I've already managed to break off and lose the cupola mounted MG (it was lose in the lower hull during the shoot, but is gone now (and the lawn monster is far hungrier than the carpet monster), I'll probably replace it with some hypodermic tube:
Those with sharp eyes and long memories may remember this M60 and the above Leopard have already appeared way back in this campaign in a photo comparing link and length track building techniques.
The M60 was built placing the lengths as per kit instructions, the Leopard built by creating the curved sections from bent lengths, and using the indy links as straight sections. Now the paint has gone on both, the M60 has very apparent gaps, but the Leopard looks far better. I'll be sticking with the bent lengths technique from now on.
Airfix 1/76 German 88mm and Tractor:
Initial beige coat and black on the wheels and tracks. Still needs glazing, some missing details parts (sadly something of a trade mark for me) and lots of weathering. Airfix didn't supply any decals, but I do have some white Africa Korp palm insignia decals left over. Can anyone advise whether white on beige is appropriate, or better still, give links to some reference photos. It's a few years since I put this kit together (the original rubber band tracks broke and it took me years to get around to ordering replacements from Airfix) but I do seem to remember that the 88 in particular needed a lot of clean up to get it looking less over-scale and clumsy.
And one more for the road if I still have time left after all the above (I suspect I won't have but I'll post a WIP photo now, just in case) If memory serves I think it's the Revell re-release of the old Matchbox 1/76 Comet...
As we draw towards the end of the campaign I'd like to voice my thanks to Jan, for creating such an excellent campaign, for the unstinting hard work he's put in to keeping the campaign pages updated, and also for his personal encouragement and humour. CHEERS JAN!!
I've learned a whole lot of new techniques through this campaign, and also seen some truly incredible and awe inspiring work, so much so that it's just become impossible to compliment everyone who deserves it (and everyone who has contributed does deserve it).
I think I've also learned a lot about my own modelling ethos. I admire and applaud those who have the time and patience for super-detailing kits to the n'th degree, mainly because I recognise that I just don't posess that level of patience. My modelling started as a young boy who couldn't wait to build the next kit, and the child inside me still craves quick results. More than a couple of weeks on one subject starts to feel stale, at which point my interest drifts off (hence my huge back catalogue of half-builds). This campaign has helped me rediscover the pleasure of seeing a kit completed (or at least very nearly completed). I've also learned to accept that my attention still drifts off, hence sometimes my definition of completion may not include finishing touches such as weathering or detail painting, but at the end of the day it's meant to be an enjoyable hobby, so if things slip sometimes I say 'so be it'. Chances are in a few weeks or a couple of months I'll get enthusiastic about the idea of adding those finishing touches, and I'd rather do it then when it's a pleasure, rather than sooner when it feels like a chore.
Oops, this post has turned in to 'War & Peace'.
I'll end by saying good luck to all, and I look forward to seeing more excellent work in the closing weeks.
Cheers
John
ChaosXVI
Metro Manila, Philippines
Joined: October 24, 2009
KitMaker: 128 posts
Armorama: 126 posts
Joined: October 24, 2009
KitMaker: 128 posts
Armorama: 126 posts
Posted: Tuesday, April 26, 2011 - 02:25 PM UTC
Almost done with my Fennek.
Too bad my Trump M113 with a 1m turret wont be done by the end of the campagn. I don't think it'll even be done by the end of the year
sabredog
Western Australia, Australia
Joined: July 22, 2007
KitMaker: 607 posts
Armorama: 599 posts
Joined: July 22, 2007
KitMaker: 607 posts
Armorama: 599 posts
Posted: Wednesday, April 27, 2011 - 12:23 AM UTC
Quoted Text
To One and All,
The second full build for the Braille Battlefield is finally completed! Yipee! At first I was leaning towards the Matchbox M24 Chaffee, but then I acquired the Trumpeter Strv 103b - a vehicle I have always liked. ( I built the old 1/48 Aurora version as a kid ) So it was love at first sight, but like life, there were a few thorns in the rose garden.
Here is the 'sprue shot' of the kit.
The kit built up well. The tracks were a bother - nothing would make them 'stick'. I finally used a glob of ZapaGap with accelerator. That finally did it and the glob could be hidden by the sprocket track plate.
A couple of fine parts disintegrated coming off of the sprue. The plastic in the kit is very soft and fragile. So I had to rebuild a few parts. One tailight was devoured by the Carpet Monster. All-in-all a not too bad building experience. Painting was accomplished using Tamiya dark green for the basecoat followed by Polly-s Pullman green for fading. the faded basecoat was sealed with Future - decals applied - more Future. Inks used to provide some depth. A wash of heavily thinned black and green Polly-s and finally a very light 'dusting', to help bring out the details. Final photos below. Comments are always welcome.
Thanks to all, especially Jan for running an excellent campaign. I have been amazed at the level of skill evident in this group of builders. These models blow me away - the level of detail on many of these is quite impressive. I appreciated the chance to complete one partial build, the Matchbox Firefly, and to complete something new, the Strv.103.
- Stephen (Minas-Ithil)
Very nice build!
tread_geek
Ontario, Canada
Joined: March 23, 2008
KitMaker: 2,847 posts
Armorama: 2,667 posts
Joined: March 23, 2008
KitMaker: 2,847 posts
Armorama: 2,667 posts
Posted: Wednesday, April 27, 2011 - 04:57 AM UTC
@newfish - Jaymes, guard that Churchill with you life! Don't take it for any long "joy rides." I've never particularly liked that particular vehicle but your pictures of the kit have definitely piqued my interest.
@erhntly - Another unique subject for this campaign that has already seen quite a few of them. Not sure what you meant by which had a bigger gun (KV-2 = 152 mm, SU-76 = 76.2 mm) but the size comparison is most telling. A 50+ ton KV against a barely 11 ton SU!
@minas-ithil - Very nicely done Strv.103B. I have changed your standing in the charts to complete. I also noticed that I hadn't added your Firefly to the feature gallery so that omission has been corrected.
@NWBrit - As I have mentioned earlier, the guitar wire is very nice as it is not overly prone to deforming yet quite flexible and "bounces" right back to its shape.
The Warrior looks fine and should look even better with paint on it. I have noted the issues with the kit that you have presented so far.
@naimbrain - Thanks for the compliments on the campaign. I am just trying to not do what I have seen done in other campaigns that I have participated in. The success is in no small part a direct result of the enthusiasm and participation of the membership.
For a flat dull coat you also have the option of using your Klear (Future equivalent) mixed with Tamiya Flat Base X-21. You can find the mixing proportions at http://www.swannysmodels.com/TheCompleteFuture.html
Please remember to add a picture of each of your "finished" builds to the Kitmaker campaign gallery. I have also corrected a minor coding problem with the Feature Gallery and it should be viewable to all now. Just go to the offsite campaign Web site and click on the "Gallery" tab at the top. As of this writing there are now 124 images in it.
The Revell Challenger I is nice to see as I have one waiting in the stash to be reviewed (once I get a spare moment that isn't devoted to this campaign).
@ChaosXVI - The Fennek looks excellent, Toby. It looks pretty well done and I have changed your build and status in the Master Chart. When I see some completions pictures and one in the Kitmaker Gallery, I'll change your status in the chart to "Complete."
-----------------------------------------------------------------
IMPORTANT TO ALL - We still have a few people that are complete but have not added a picture to the official Kitmaker Campaign Gallery. Would all participants check their status in the chart and take appropriate action. This IS one of the "Core" campaign rule requirements to achieve a "Complete" status.
Cheers,
Jan
firstcircle
England - South East, United Kingdom
Joined: November 19, 2008
KitMaker: 2,249 posts
Armorama: 2,007 posts
Joined: November 19, 2008
KitMaker: 2,249 posts
Armorama: 2,007 posts
Posted: Wednesday, April 27, 2011 - 05:47 AM UTC
Lots of wonderful builds that I will peruse and comment on at more leisure later, but before I forget, I would like to echo Eddy's comment on Michael's groundwork for his BA-6:
Although I have seen one or two examples of your groundwork before and admired them, I must say that I think this one is exceptionally good, particularly the execution of that crumbling earthen slope, a most realistic feature, well imagined and depicted.
Quoted Text
UM BA-6 effectively out of the box and based finished with my usual methods....
@sabredog My second suggestion would be to have you do a step by step on your groundwork. Your bases always look the part and natural.
-Eddy
Although I have seen one or two examples of your groundwork before and admired them, I must say that I think this one is exceptionally good, particularly the execution of that crumbling earthen slope, a most realistic feature, well imagined and depicted.
ChaosXVI
Metro Manila, Philippines
Joined: October 24, 2009
KitMaker: 128 posts
Armorama: 126 posts
Joined: October 24, 2009
KitMaker: 128 posts
Armorama: 126 posts
Posted: Wednesday, April 27, 2011 - 05:54 AM UTC
Thank you Jan. I've added a fee more details on my Fennek. The completed photos will be uploaded on Kitmaker Gallery.
eremzet
Katowice, Poland
Joined: September 10, 2010
KitMaker: 89 posts
Armorama: 87 posts
Joined: September 10, 2010
KitMaker: 89 posts
Armorama: 87 posts
Posted: Wednesday, April 27, 2011 - 07:39 AM UTC
I've started the small vignette. It is still not finished. Now it looks like below:
naimbrain
United Kingdom
Joined: March 15, 2010
KitMaker: 123 posts
Armorama: 118 posts
Joined: March 15, 2010
KitMaker: 123 posts
Armorama: 118 posts
Posted: Wednesday, April 27, 2011 - 11:00 PM UTC
Quoted Text
Revell 1/72 M60A1 with ERA
I've opted for the colour scheme for US Army V-2/1 1 Cavalry Regiment, Bad Kissingen, Germany 1970-1980, mainly because it looks like another fun scheme to develop my brush camo skills on.
D'ohh!! It was only when I started applying the second colour that I noticed the paint chart didn't show the ERA. Why?... Bonus points for anyone who can tell me when ERA was introduced, my money is on 'post 1970-1980'. So I've canned that idea and I'll reapply the overall sand yellow scheme that I've just painted over.
One of our favourite acronyms in the IT support/development industry, is RTFM (read the ####### manual). I should know better!!
The Revell A1 Comet instructions include a green and brown camo scheme, but initial research on the web suggests that this may be a fictitious scheme. Does anyone know otherwise?
Given the campaign deadline, and the number of builds that I'm trying to get finished it's probably just as well that none require camo schemes. The hand-brushed sprayed camo technique that I'm using can give pleasing results, but it's soooo slooow! (and even if the Comet really did wear that camo scheme I'm guessing it's unlikely that it was sprayed).
My wife has suggested a new definition for a finished build. "It's finished when you throw the box away." I think you can guess where she's coming from on this.
John
PS. Radek, you say the vignette isn't finished yet? Wow, it already looks superb!!
eremzet
Katowice, Poland
Joined: September 10, 2010
KitMaker: 89 posts
Armorama: 87 posts
Joined: September 10, 2010
KitMaker: 89 posts
Armorama: 87 posts
Posted: Thursday, April 28, 2011 - 05:03 AM UTC
Thanks John!!!
I completly forgot of this little fellow It is ready since February