Campaigns
Where Armorama group builds can be discussed, organized, and updates posted.
Braille Battlefield
naimbrain
Visit this Community
United Kingdom
Joined: March 15, 2010
KitMaker: 123 posts
Armorama: 118 posts
Posted: Thursday, April 28, 2011 - 08:37 AM UTC

Quoted Text

...Remember to put one picture of each in the official Kitmaker campaign gallery...
Cheers,
Jan


Hi Jan,
Job done! (oops, I obviously had problems counting to one - there is no hope for me!!)
Cheers
John
erhntly
Visit this Community
Izmir, Turkey / Türkçe
Joined: June 11, 2004
KitMaker: 1,426 posts
Armorama: 464 posts
Posted: Thursday, April 28, 2011 - 11:35 AM UTC
Hi dear friends,

Radek your little fellow is very good.

SU-76 is going so fast fot my standart. Due to the wrong PE set . it became undetailed but i think nobody can understand because the vehicle is unknown for many people.
Main colour is Vallejo Russian Green, after the paint dries, i will think turning it winter camo or not.


eremzet
Visit this Community
Katowice, Poland
Joined: September 10, 2010
KitMaker: 89 posts
Armorama: 87 posts
Posted: Thursday, April 28, 2011 - 09:27 PM UTC

Quoted Text

...because the vehicle is unknown for many people.
[/IMG]


It was very popular in Polish arny during offensive on Eastern Front and just after war Only difference is that we have used "cabrio" version
NWBrit
Visit this Community
England - North West, United Kingdom
Joined: October 30, 2003
KitMaker: 46 posts
Armorama: 41 posts
Posted: Thursday, April 28, 2011 - 10:47 PM UTC
Hello everyone,

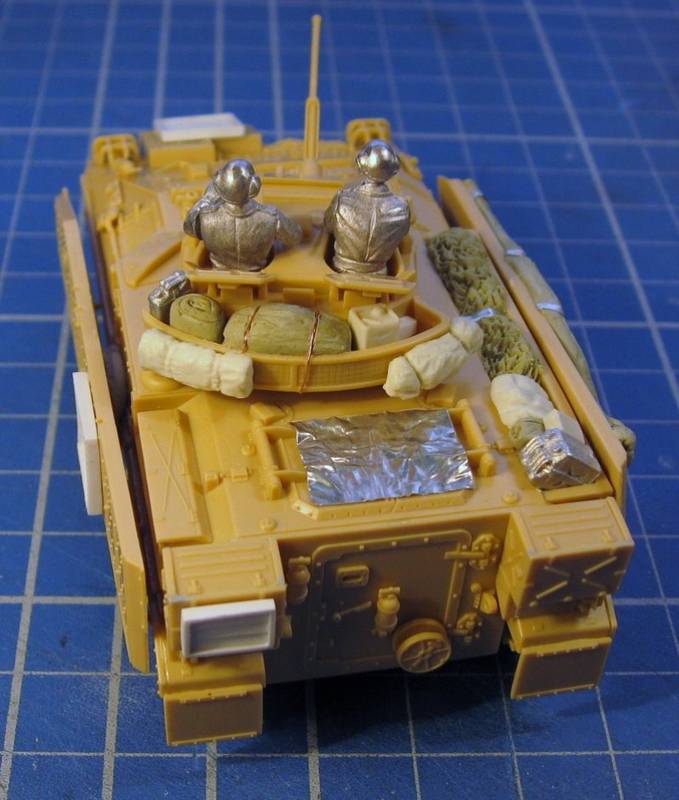
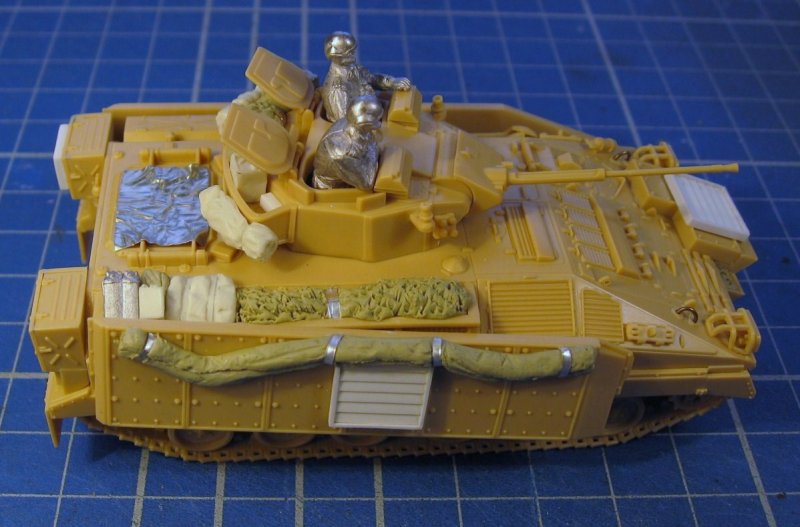
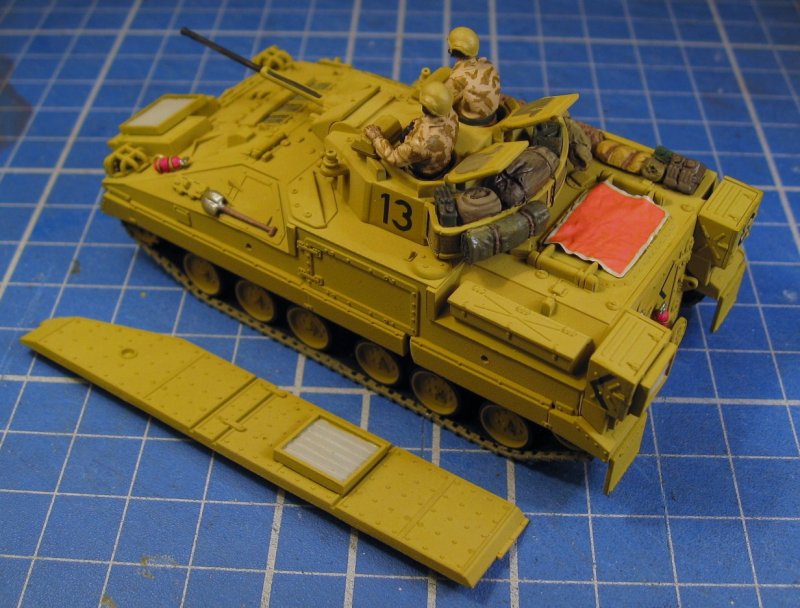
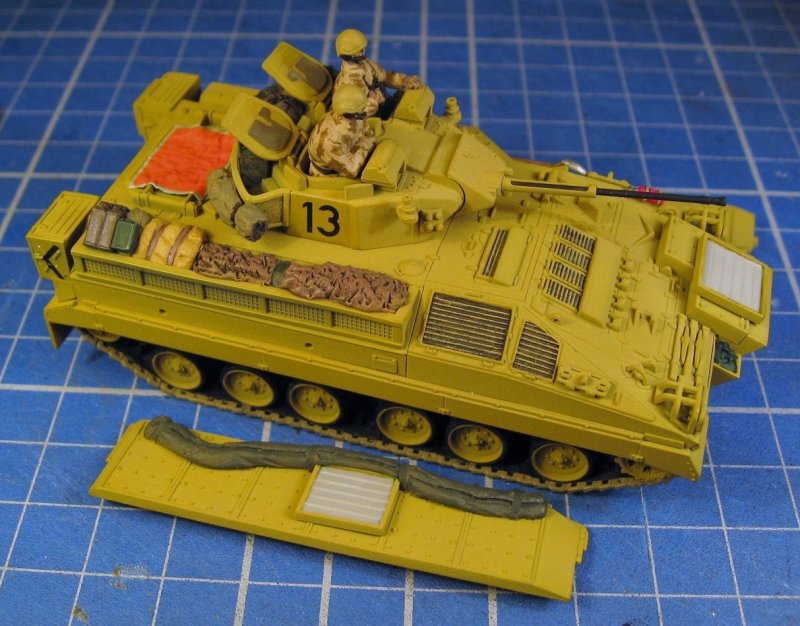
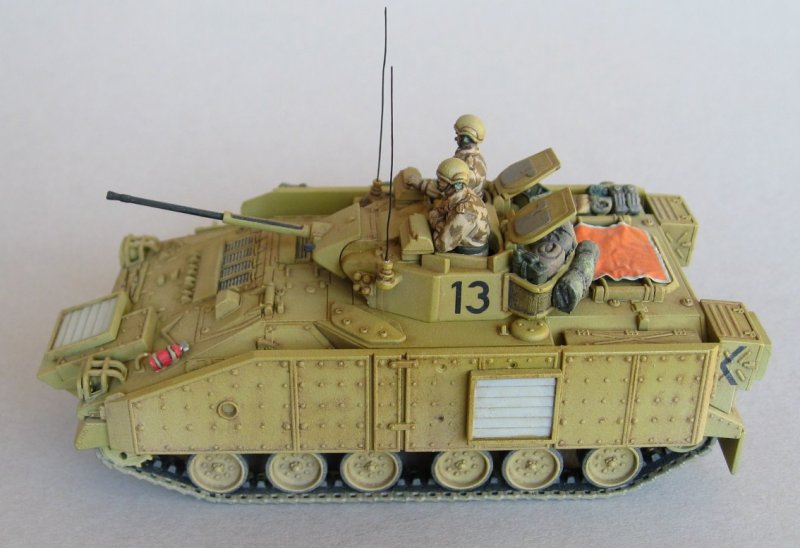
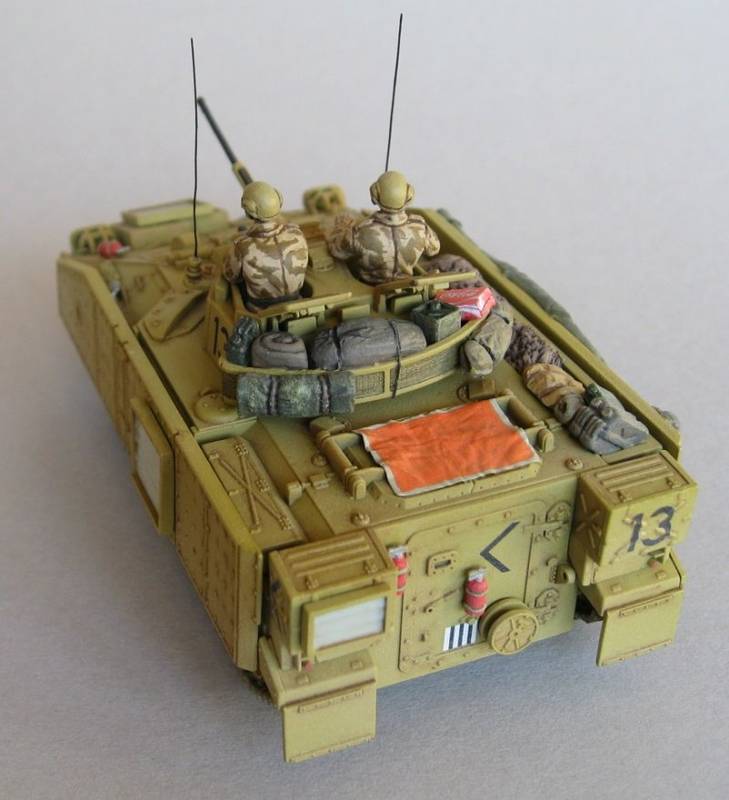
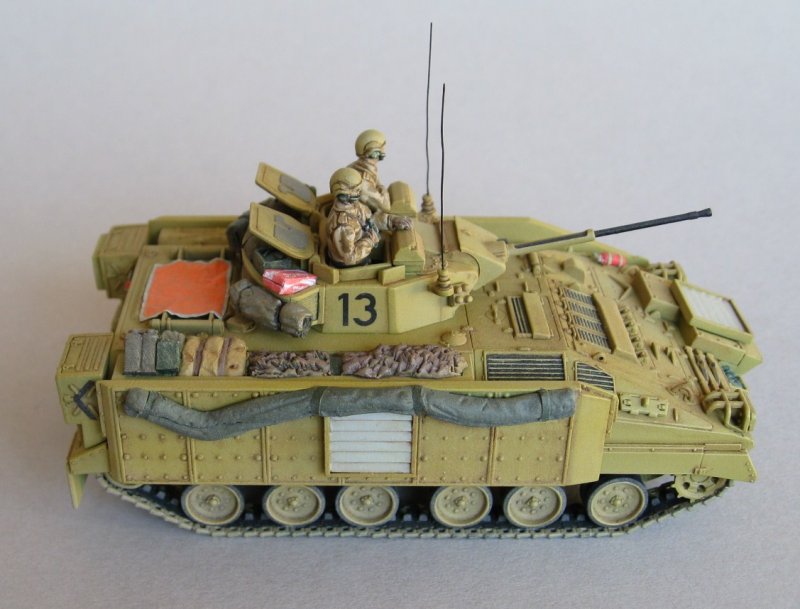
Royal wedding day here, not that I'm too interested personally, but it does mean an enforced day off for me and hopefully a chance to get my Warrior finished off. Progress was a bit slower than I'd hoped this week, but the stowage was finished Tuesday, the primer went on Wednesday and the basecoat yesterday evening.

I know model colour matches are somewhat arbitrary, especially when you are relying mainly images from the web via a monitor, but I always find it useful to have some starting point to work from. I use mainly Tamiya paints and the only Op Telic suggestions seemed to be XF-59 (Desert Yellow) or 3xXF-60 (Dark Yellow) and 1xXF-4 (Flat Yellow). To me, XF-59 seemed to be the closest match to start with, but when I started to spray it, it came out very badly and there appear to be black particles that separate out of the paint. Not sure what was going on there, but it is quite an old bottle. So, I was forced to resort to the 3xXF-60 & 1xXF-4, which is apparently recommended in the Osprey book on modelling the Challenger.

You can see the result below, it doesn’t look too bad in the photos, but in real life and this mornings daylight it looks to have a green tinge to me. I think I’m going to try a light overspray of mostly Flat Yellow to try and suppress that a bit before doing some detail painting. But if anyone else has any thoughts on Op Telic colours, especially with Tamiya paints I'd be very interested.

The final stretch for me I hope, more tomorrow.

All the best.

Chris


tread_geek
Visit this Community
Ontario, Canada
Joined: March 23, 2008
KitMaker: 2,847 posts
Armorama: 2,667 posts
Posted: Friday, April 29, 2011 - 02:50 AM UTC
Just a quick note to say that I managed to see all your progress and will try to keep on top of things.

Unfortunately, almost the entire eastern section of North America got hit by a once in a century "Mother of All Windstorms" yesterday and my area was not excluded. Wind was continuous with wind speeds of 70 mph (120 km/h) gusting to 85 mph (136 mn/hr). Over eight hours without power and trees uprooted all around my area. We sustained roof damage and it's expected to rain today. Some people have lost half or more of their roofs as have schools and other buildings. This will keep me rather distracted until we can make at least temporary repairs.

I'll try to post further comments on builds as the situation permits.

Cheers,
Jan
tread_geek
Visit this Community
Ontario, Canada
Joined: March 23, 2008
KitMaker: 2,847 posts
Armorama: 2,667 posts
Posted: Friday, April 29, 2011 - 02:51 AM UTC

Barely five days since the last page change and here we have another. In that tine we have broken 44,000 views and on our way to 45,000!!!! Great job everyone.

Cheers,
Jan
ChaosXVI
Visit this Community
Metro Manila, Philippines
Joined: October 24, 2009
KitMaker: 128 posts
Armorama: 126 posts
Posted: Friday, April 29, 2011 - 04:01 AM UTC
Ei Jan hope and pray things normalize soon where you live. Be safe man.
r2d2
Visit this Community
England - South East, United Kingdom
Joined: April 13, 2006
KitMaker: 424 posts
Armorama: 419 posts
Posted: Friday, April 29, 2011 - 11:17 AM UTC
Great job everybody! So much talent here, man I enjoyed looking at all of the works here!
firstcircle
Visit this Community
England - South East, United Kingdom
Joined: November 19, 2008
KitMaker: 2,249 posts
Armorama: 2,007 posts
Posted: Friday, April 29, 2011 - 09:47 PM UTC
Jan, I hope you're managing to get the place fixed up OK and there's no serious loss of any of your stuff; you mention the rain coming, I see on the forecast map that the same band stretches all the way down to the southern US states that were seriously hit...

I'm going to confine myself to comments on page 41 only!

*minas-ithil - congrats on completion, and even on (original) schedule . Very cool vehicle and a very nice finish.

*Chris - not sure about any greenish tinge, in the photos it looks very yellow; these "yellow" camo colours do tend to have a greeny tinge however. A straight Tamiya colour with a very pale and less greenish tinge is Buff, which if you take into account the often suggested principle of lightening up for scale, might be an option. The Tamiya Desert Yellow is a bit too orangey for smal scale I always think. Build and detailing look great, hope you sort out the colours to your satisfaction. The bulge on the barrel isn't really visible in the photos so I couldn't work out exactly where it was - as it didn't break entirely I'd suggest that very careful and patient sanding is the only way, moving from very fine to superfine. Looking forward to the completion with those figures especially.

*Radek - super finish, almost a shame to have wethered over that beautifully rendered camouflage, and I know that the coin in the photo is a special giant Polish coin about 10cm diameter, right?

*John - I don't have a lot of experience in the issues you mention, but I think I would resist applying an overall varnish on top of Klear. There is quite a bit of differing opinion over whether vehicles like these should have satin or matt finishes, and I must admit I have tended towards slightly satin rather than completely flat, mainly because real vehicles tend to never be finished completely matt, though there is an argument for scaling down the finish to be less glossy as it were. An alternative might be dry brushing (if you do that kind of thing...) with matt enamels which tend to be very matt (e.g. Humbrol Dark Earth) and would tone down the Klear in themselves, as would using pastel chalks (or pigment powders if you are a purchaser of such things). I have found that weathering so often tends to darken finishes down more than I want, one reason I guess for trying to keep the original base colour exaggeratedly light.
The Challenger looks great by the way. White Afrika Korps symbol on beige is OK, I think. An alternative is putting it on a small dark grey oblong patch, seems that some vehicles shipped to N Africa had the new DAK insignia painted on the original grey and were then repainted in the yellow. You could contrive to make it look hand painted I guess - if you were looking for additional work See photo below; note the other marking on the left mudguard was painted after the yellow.


*Toby, like the Fennek, even though you say it's only "almost" finished. With the extension, are you sure you can't get the M113 done??

Right, the "Royal Wedding" was very handy for the additional day off work, enabling a big garden clear up and some rapid paint progress on the Maultier. Was re-reading Tony Greenland's Panzer Modelling Masterclass (excellent, if slightly loopy, though I don't mean that in a bad way...) and was inspired twice:
1. I masked off markings with tape on the white primer, then applied the base coat of Tamiya Dark Yellow. Chose letter A as it was easiest to do in tape.
2. Having seen a similar finish on a wrecked Maultier ammo carrier in Doyle and Chamberlain's Encyclopedia of GTofWW2 tome I tried out the "hard edge one side, soft edge the other" as TG does on his Ostwind, using a torn piece of card as a mask for the airbrush. Slightly folded it in various places to go around the shape of the hull side. Thought about doing it in green and red/brown, but having got the green reasonably OK decided not to mess it up. Managed to knock off one of the foot steps though - in the garage, not a good place, but not as bad as the lawn...

With markings exposed - not perfect, especially obvious flaws in these photos, but when touched up a little and weathered, they'll be OK I think:

Sign for tracked rocket launcher... the bottom bit masked with an old Letraset zero, so not quite right, but still.


Removed by original poster on 04/30/11 - 13:46:00 (GMT).
ChaosXVI
Visit this Community
Metro Manila, Philippines
Joined: October 24, 2009
KitMaker: 128 posts
Armorama: 126 posts
Posted: Saturday, April 30, 2011 - 02:45 AM UTC
Mathew: How did you do that camo pattern??! Hwow! I'd appreciate it if you shared to us how its done

About the M113, okay. I'll see if I can squeeze more time to finish painting it. I just need to control myself from playing too much World of Tanks


Here's the Revel Fennek! Complete with antennas made from a $1 guitar string with home made flags:


Thanks for looking

Mabuhay kayong lahat!!!*

*May you all live long!
vonHengest
Visit this Community
Texas, United States
Joined: June 29, 2010
KitMaker: 5,854 posts
Armorama: 4,817 posts
Posted: Saturday, April 30, 2011 - 04:57 AM UTC
I almost can't keep up with all the great work that continues to go on here, I hope everyone feels proud of their accomplishments in this campaign so far and look to be joining your ranks with my own build once it's finished

Jan: Best wishes to you with the repairs, we live far enough south that the Gulf moisture pushed back most of that weather so we have lucked out so far by not having to endure the heavy winds or tornados.

The bad news is that I can't access my laptop anymore as it gives me a black screen during powerup. Unfortunately all of my files are still on there, including any campaign related photos and charts. I'm not sure what the last photo I posted was, but I'll be taking some new ones once I can get my software loaded on this computer.
Sudzonic
Visit this Community
Scotland, United Kingdom
Joined: December 07, 2007
KitMaker: 2,096 posts
Armorama: 1,983 posts
Posted: Saturday, April 30, 2011 - 06:08 AM UTC
Jan: sorry to hear about your house, I feel your pain though! I live on the Orkney Islands just of the north tip of Scotland. WE get sustained gale/storm force winds right through the winter months, with gust's well over 100mph!! Thankfully we know how to build strong houses here . On the up side it is a good excuse to stay in and build .

Just a little taster of Orkney winter..

http://www.youtube.com/watch?v=MMwghzYmpOc&feature=related

http://www.youtube.com/watch?v=vhsBfNxWILg&NR=1

Toby: your Fennek looks excellent, what paint did you use for the desert colors? I have two awaiting paint I am going to do one in German ISAF markings like yours and one in Dutch markings.
naimbrain
Visit this Community
United Kingdom
Joined: March 15, 2010
KitMaker: 123 posts
Armorama: 118 posts
Posted: Saturday, April 30, 2011 - 08:11 AM UTC
Jan: Hope the damage to your home isn't too bad, and that you can get it fixed without any further problems.

Toby: The Fennek looks great, I may have to add one to my pile of future projects. Nice paint job and the guitar strings work well.

Matthew: Thanks for the advice re matte finishes and the info on Afrika Korps insignia, both will be very useful! The stripey paint job looks great, and the hard-masking looks like a real success.

The extra day off for the Royal Wedding didn't pan out quite like I'd hoped. A fairly minor job stripping back some blown plaster exposed collapsing brickwork, woodworm and a UPVC window that's in danger of falling out. Not good!!

Therefore only minor braille progress, but as the sun was shining I took a few more outdoor shots which came out really well:
IMG_0587.JPG
IMG_0586.JPG
IMG_0584.JPG

Amazingly I found the lost MG barrel for the M60, it was in the caring hands of the carpet monster.

Cheers all,
John
madmax5510
Visit this Community
Hunedoara, Romania
Joined: May 06, 2008
KitMaker: 354 posts
Armorama: 343 posts
Posted: Saturday, April 30, 2011 - 08:13 AM UTC
Hi to all!
Thanks to all for feedbacks!
Jan,my friend, i'm sorry to hear about your house...but ,if you and your family are ok,nothing else matter.I wish all the best and God be with you!

I almost finish the second Tiger...Another Wittman vehicles from 13./SS-Panzerregiment 1 LAH,a heavily damage tank from Battle for Kursk.


Now i must go to work!

Cheers to all!
NWBrit
Visit this Community
England - North West, United Kingdom
Joined: October 30, 2003
KitMaker: 46 posts
Armorama: 41 posts
Posted: Saturday, April 30, 2011 - 11:09 AM UTC
Hello all,

Jan, I hope sorting out your damage is going well for you and your community.

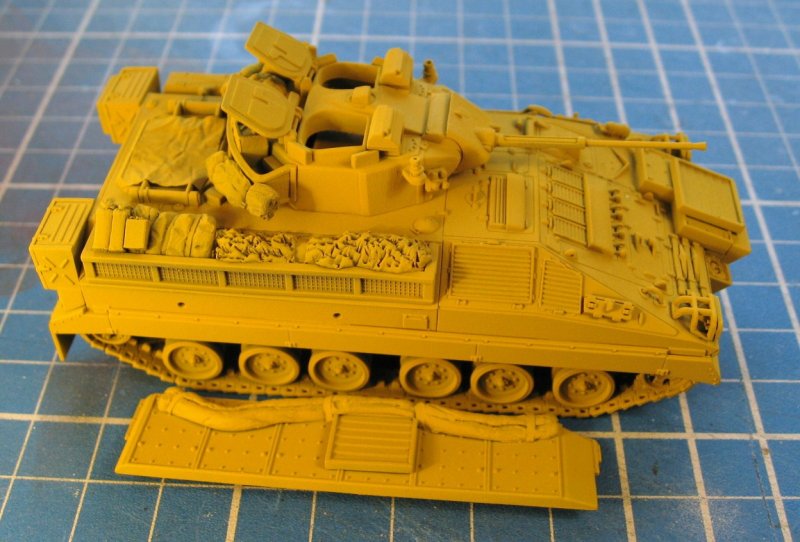
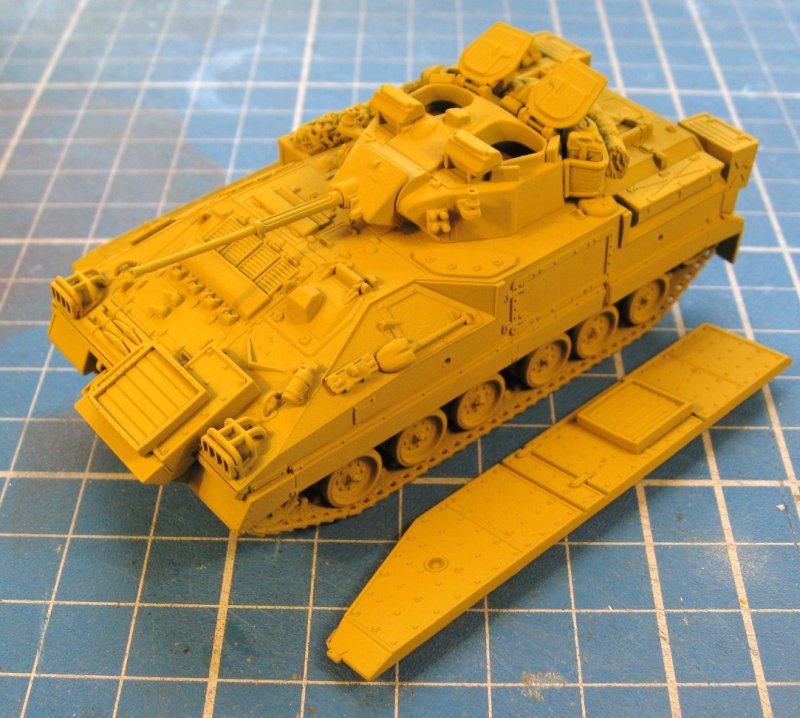
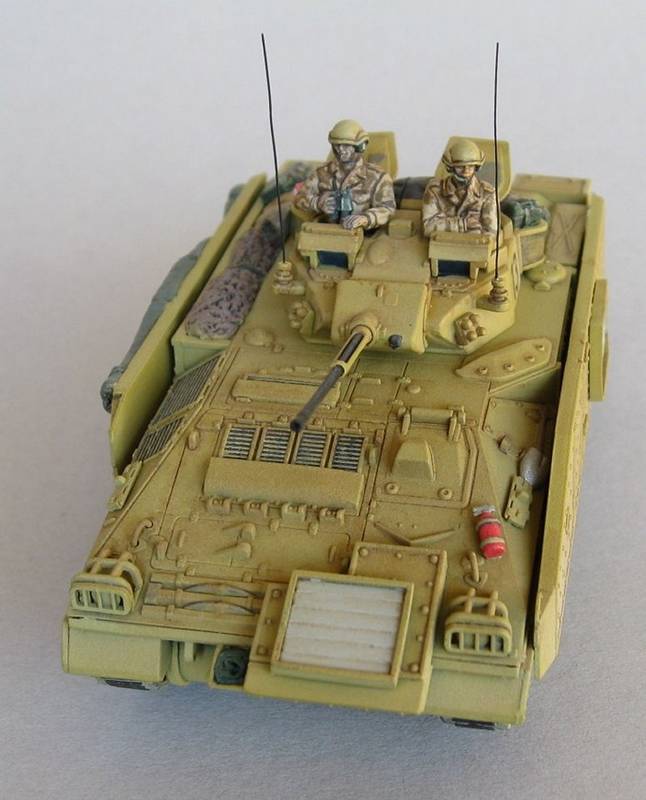
firstcircle : many thanks for your thoughts and advice. I guess the photos do look pretty yellow, with the greenish tint only being visible in daylight. I do have Tamiya’s Buff (XF-57) and I think it is quite a good match for Op Granby (1991) but the Op Telic (2003) colour has a very distinct yellow to it, especially for the armoured units. (The none armoured painting being a much more haphazard affair I believe.) Anyway, though its still not quite right I found that a light overspray of Dark Yellow (XF-60) produced a more acceptable colour, at least to my eye.

When I looked closely the bulge from the broken barrel is only really visible from a certain angle with a light behind it. As such I decided to leave it alone rather than risk further damage and just try and be a bit more careful

Today I got a lot of the detail painting done and the half dozen decals on. The results of which you can see below. Hopefully tomorrow will see it mostly finished, fingers crossed. More tomorrow

Chris


Braille
#135
Visit this Community
California, United States
Joined: August 05, 2007
KitMaker: 1,501 posts
Armorama: 1,485 posts
Posted: Saturday, April 30, 2011 - 01:46 PM UTC
Here’s were I’m presently at as of today. I’ve now added some stowage, towing cable, log and crew figures. Couldn’t come up with a water pale and can’t find enough time to scratch build one. So, I’m calling the building part finished and its now on to the paint shop.


The Russian crew figures are from CMK. They are very nicely detailed and free of casting bubbles. The Vietnamese used the same attire and helmets as the Russians so it was an easy choice for crew figures.

@spacewolfdad, Thanks for the comment it is much appreciated.

@NWBrit, Your build is rapidly coming along just as you mentioned and it looks so interesting with the figures and stowage. Been keeping notes on the build issues you’ve encountered with this kit, thanks! From the photographs you can see that there is so much molded on detail on the upper hull. That’s going to look even better after the painting and washes! With the stowage, decals, new oversprayed dark yellow and painted and camouflaged crew figures your build is really kicking butt!

@r2d2, The modifications to your build just keep on growing. Looks terrific and so unusual. I think you may actually have more added detail than on any of the 35th scale builds of the same vehicle that I’ve seen here on Armorama? Keep it coming! And thanks for the tip in using the Dragon sprue styrene for making very thin to scale antennas.

@newfish, Your Churchill MkI is coming along fine. I like the Mr. Surfacer texture you’ve added to the turret and upper hull sides, looks good with the paint applied over it.

@eoinryan, Yes, I’m going to unearth my copy of Revell’s Leclerc hopfully near the end of this year and build it! I’ll be using yours for referance.

@erhntly, Nice start on your SU-76. The tracks are very nicely detailed for such a small vehicle in this scale.

@minas-ithil, Very good build and finish on your Strv.103B.

@naimbrain, You have quite a number of builds on your hands to finish! I look forward to seeing all of them completed especially the 88 and its tractor. Happy to hear you located the MG barrel to your M60. Now your tank commander can once again train his weapon on those pesky and unruly protesting mobs.

@ChaosXVI, I agree with Jan, the Fennek looks excellent and complete! The homemade flags add a lot of interest to your build. Is someone having too much fun with World of Tanks?

@eremzet, That little beauty looks right at home on that small patch of ground! Now you can easily see how effective that camouflage really is! And your Carro Veloce CV33 is also excellent too! I imagine that the only thing that won’t penetrate the light armor on the CV33 would be small arms fire? It’s really not something you would bring to a tank battle . . . maybe?

@firstcircle, Most interesting scratch built vehicle and even more interesting camouflage painting technique / job. I’m sure after the touch up and weathering its going to look awesome! I can’t wait to see it finished. I’ve noted the tip to produce a similar camouflage result.

@madmax5510, You’re a model building monster of plastic. What combination of beer and cement brand are you drinking and sniffing to have you be so motivated? Give up the secret! The wavy camouflage pattern and weathering on your second Tiger looks really nice.

Hope to make the best of the little time that I am getting to model so I can complete this vehicle and my first two entries before the extension date runs out? Wish me luck!
-Eddy
tread_geek
Visit this Community
Ontario, Canada
Joined: March 23, 2008
KitMaker: 2,847 posts
Armorama: 2,667 posts
Posted: Sunday, May 01, 2011 - 09:15 AM UTC
I have been dropping by briefly during the last few days and am still very impressed with the quality of work that is being showcased here.

Firstly, I'd like to thank all those that have offered their best hopes and wishes regarding the storm damage to our roof. We have managed to cover the couple of open areas with plywood and the entire affected side of the roof with a heavy tarpaulin. With so much damage in our city, finding the supplies for the temporary repairs turned into an odyssey (sold out...sold out...). As of this writing several streets are still closed and it has started raining. So far things are holding and we are keeping our fingers crossed.

As for me, I managed to find an hour or two to pretty much put paid to the StuH. One has to know when to stop and this unfortunately the few other enhancements and the base will have to wait until things become more normal.

This has been the most time consuming build that I have experienced since my return to the hobby. IIRC, I originally disassembled the darn thing three times. I may be able to add a bit more thanks to the extension that was requested but as campaign leader I felt that I had a duty in presenting a "completed" rebuild within the original campaign time frame. So without further ado, here's the pictures.


For those that appreciate them, here's a couple of pictures with an attempt to age them.


At my next opportunity I'll comment on everyone's progress and update the campaign master chart.

Cheers,
Jan
madmax5510
Visit this Community
Hunedoara, Romania
Joined: May 06, 2008
KitMaker: 354 posts
Armorama: 343 posts
Posted: Monday, May 02, 2011 - 04:07 AM UTC
So,my second Tiger[Just snap,nothing glue] finished and prepared for Prohorovka Battle:


My next build for this great campaign will be a Revell Panther A,[she need only the wheathering],and maybe few russian oponnents.I have 4 days free...enough time to finish something...
Eddy,no beer,just romanian TZUICA,something better and stronger like russian vodka. :
r2d2
Visit this Community
England - South East, United Kingdom
Joined: April 13, 2006
KitMaker: 424 posts
Armorama: 419 posts
Posted: Monday, May 02, 2011 - 07:38 AM UTC
Matthew: Your camo paint job looks superb!

Toby: Fantastic finish! I love it man!

John: great to see your tanks especially the M60.

Dani: Great job weathering your Tiger! Looks mean!

Chris: Is that a Priesler figure? Nice stowage, Warrior looks awesome! Can't wait for the weathering to be done!

Eddy: Man that is a beauty! Workmanship is very professional! Figure is stunning too! Can't wait for this to be done!

Jan: Your tank is stunning! I love the weathering man! Sorry to hear about what happened there, stay safe!

Well done everyone!!!!!!!!!

NWBrit
Visit this Community
England - North West, United Kingdom
Joined: October 30, 2003
KitMaker: 46 posts
Armorama: 41 posts
Posted: Monday, May 02, 2011 - 07:47 AM UTC
Hello all,

Well the finishing touches took a bit longer than anticipated, but I got to a state where I'm declaring myself finished earlier today. As usual looking at the photographs of a finished model is a bad move as you quickly spot things your not happy with But thats what the next model is for.

Huge thanks to Jan who has once again run an excellent campaign.

All the best.

Chris


r2d2
Visit this Community
England - South East, United Kingdom
Joined: April 13, 2006
KitMaker: 424 posts
Armorama: 419 posts
Posted: Monday, May 02, 2011 - 07:48 AM UTC
As for me, the long weekend (royal wedding and monday bank holiday) added two days on my working time. Didn't went out today despite of the May day here in Hastings....bit cold outside despite the sun.

Anyway I'm done with all the construction/scratchbuilding. The last bit of my detailing was spent on the Enforcer RWS, here you can see the scratchbuilt grill to guard the optics/sensor.....size as compared to a toothpick.


Next is the 2 electric motors that controls the rotation/elevation of the RWS.


Added wires to further detail it.


The complete assembly.....fully scratchbuilt.


Now painting can commence.

Thanks guys!
Val
ChaosXVI
Visit this Community
Metro Manila, Philippines
Joined: October 24, 2009
KitMaker: 128 posts
Armorama: 126 posts
Posted: Monday, May 02, 2011 - 12:50 PM UTC
For all those who commented on my Fennek, thank you!


I am sorry I don't comment too often on everybody's work. I am just overwhelmed most of the time I don't know what to say...I am speechless most of the time. I wish we had a "LIKE" button for every post. But I'd like to comment on Val's work:

@Val: dude, get help! There's still hope man. LOL


Seriously, that's one mean death machine you're putting together.
Braille
#135
Visit this Community
California, United States
Joined: August 05, 2007
KitMaker: 1,501 posts
Armorama: 1,485 posts
Posted: Monday, May 02, 2011 - 06:48 PM UTC
@tread_geek, You’ve done an outstanding job of renovating this old kit. These old kits can be a lot more trouble to put together especially if you’re attempting to add better detail and upgrade parts to bring it up to today’s current available kit standards. It’s kits like the one you’ve rebuilt here that either make you or brake you in this hobby.

You should be very proud and pleased with this little beauty. So many modelers from around the world have seen it come together here and now it will be displayed at home on your self for you to see and remember the good times you’ve enjoyed with everyone while sharing your build here in this awesome campaign. That little StuH has been through so much already, it even encountered some battle damage during the build . . . LOL! It surely deserves front row and center space on the self with that very cool and proud looking commander! BTW nice set of photographs I especially like the two of black and white photos.

@madmax5510, There was an obvious planned attempt to ambush and stop that Tiger when it came around the corner and it didn’t work! That’s some mean battle damage. Great job!

@NWBrit, You didn’t disappoint, as promised a quick build! Excellent finish and light weathering complimented by your two camouflaged crew figures. Thanks for pointing out the difficulties that you encountered with this kit, much appreciated.

@r2d2, The detail is way over the top! Amazing, just amazing.

-Eddy
naimbrain
Visit this Community
United Kingdom
Joined: March 15, 2010
KitMaker: 123 posts
Armorama: 118 posts
Posted: Tuesday, May 03, 2011 - 03:13 AM UTC
@r2d2, WOW!!!! The delicacy of your work makes my best efforts look like a flat-pack assembled by a punch drunk boxer still wearing his gloves. At the risk of seeming pedantic, can I just point out that you've failed to add the engraved lettering to the bottom of the individual cartridges on the ammo belt (or are you planning to do that next?).

I'm buying into the theory that you've mocked up a four foot tall Tamiya paint pot for the photo. Now I just hope you get the build finished before the men in white coats arrive to fit your straight jacket!

Joking aside, I'm truly, truly impressed!!

Cheers
John