Campaigns
Where Armorama group builds can be discussed, organized, and updates posted.
Where Armorama group builds can be discussed, organized, and updates posted.
Hosted by Darren Baker, Richard S.
The Desert Fox

warreni

Joined: August 14, 2007
KitMaker: 5,926 posts
Armorama: 712 posts

Posted: Wednesday, April 27, 2011 - 05:54 AM UTC
I don't think the concentration of solvents would ever get high enough to cause a problem. I have an electrical engineer background and it would take a hell of a lot of paint to produce enough solvent fumes to be a problem. You would have problems breathing before a spark would cause any problems. I use acrylics so it is not a problem for me, but you could always vent it outside if you don't feel safe.
zontar

Joined: August 27, 2006
KitMaker: 1,646 posts
Armorama: 1,557 posts

Posted: Wednesday, April 27, 2011 - 08:16 AM UTC
Erich: Thanks for the info. Also, I look forward to seeing how your panzer comes together. I have the same base kit waiting for the Railroad campaign, although I'll be OOB.
Neal: welcome aboard and like Jeremy said, the bug never leaves...
Jeremy: here's a poor mans spray booth...
https://armorama.kitmaker.net/forums/174962&page=1
Happy Modelling, -zon
Neal: welcome aboard and like Jeremy said, the bug never leaves...
Jeremy: here's a poor mans spray booth...
https://armorama.kitmaker.net/forums/174962&page=1
Happy Modelling, -zon

Posted: Wednesday, April 27, 2011 - 10:32 AM UTC
Warren,
Thanks for the info - I thought they were supposed to be ok with solvents until the merchant said no, so I'll keep an open mind as I spray my acrylics!
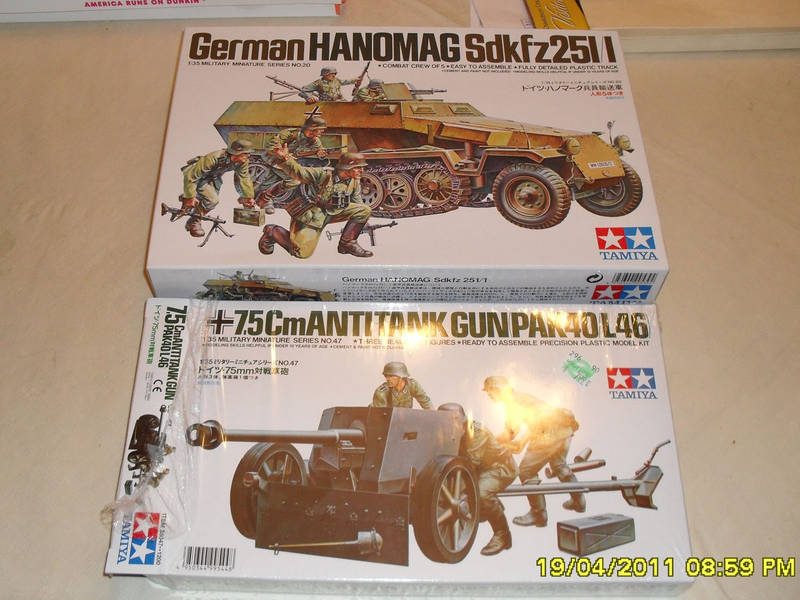
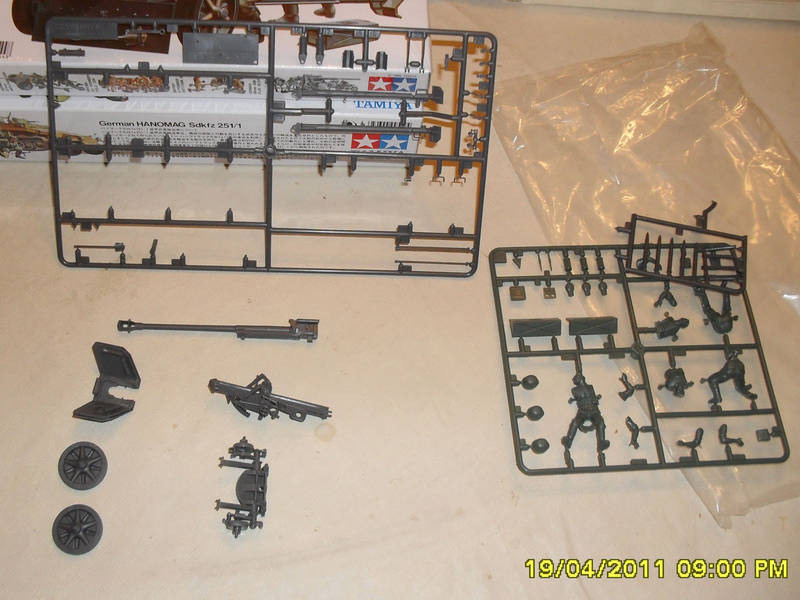
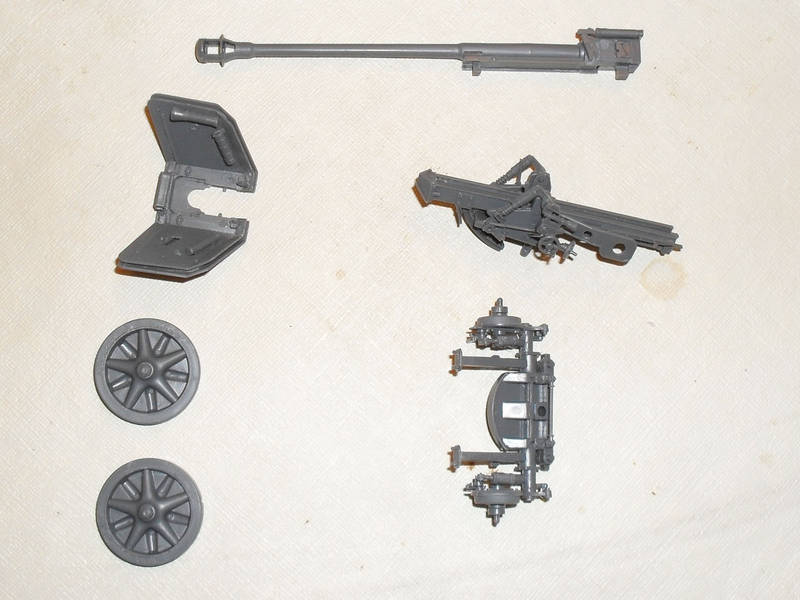
Jeremy, as promised here are my "pre-build" pics. It was only after I started on the gun that I thought of this campaign! At least the 251 is still in box untouched...
I'm thinking of modelling a unit "upgunned" to the 75mm as they arrived in Dec 42, so the gun will be rather clean in factory grey, while the 251 will be a weather-beaten vet in grey oversprayed in a worn & chipped coat of yellow. It'll be a chance to play with chipping techniques.
Tom


vonHengest

Joined: June 29, 2010
KitMaker: 5,854 posts
Armorama: 4,817 posts

Posted: Wednesday, April 27, 2011 - 04:10 PM UTC
I must not have realized that you had another kit for the campaign as well. You can take a photo of the untouched contents for the 251/1, the Pak40 will be a nice extra. Looking good so far 

Posted: Thursday, April 28, 2011 - 02:24 AM UTC
Yes, I passed up on the 251 at first because at $18 it was a bit much for a vacation toy, but that 40% discount coupon made all the difference! I'll grab a pic when I get the chance. (I still need to unpack it...)
The one thing I did miss while in NC (other than the twister that hit further east...) was a decent hobby shop anywhere near the Triad area. Hobby Lobby just doesn't pass muster...
Tom
The one thing I did miss while in NC (other than the twister that hit further east...) was a decent hobby shop anywhere near the Triad area. Hobby Lobby just doesn't pass muster...
Tom

HipKitty

Joined: February 14, 2011
KitMaker: 390 posts
Armorama: 387 posts

Posted: Thursday, April 28, 2011 - 02:33 PM UTC
Here's some update shots as to where I'm at


HipKitty

Joined: February 14, 2011
KitMaker: 390 posts
Armorama: 387 posts

Posted: Friday, April 29, 2011 - 02:43 AM UTC
Does anyone have inside pictures of the SdKfz 232? I'd love to build a partial interior, but can't seem to track down any shots of the inside.
My son used a Verlinden resin kit for the inside of his Tiger 1 and I'd love to do the same if possible.
My son used a Verlinden resin kit for the inside of his Tiger 1 and I'd love to do the same if possible.
Firefly74

Joined: April 15, 2010
KitMaker: 224 posts
Armorama: 205 posts

Posted: Sunday, May 01, 2011 - 11:15 PM UTC
Hi all, lots of great builds been done here.
Finally made some progress on the 1:72 Italeri AB41 over the easter break, hope everyone had a few days off to relax!
Erich: Nice looking kit, and nice choice,i like the early panzer III's.
Neal: Welcome back to modelling! If you go to Google images you might find some shots of the inside of the 232. It surprising what you can find in there sometimes!
Tom: Nice combo, looking forward to seeing them finished.
I decided to use Vallejo green ochre. It's the first time I've ever painted a whole AFV with Vallejo, it brushed on real nice but then kept rubbing off back to the primer everytime i handled it after it had dried. Anyone else had this problem?
Anyway heres a shot after doing some shading and adding a little wear and tear. I'm happy with the way the wheels sit in their arches after the relocation work i did, but i'll have to say this build has been testing my patience
Started weathering today, nearly finished!
Cheers,
Tim

Finally made some progress on the 1:72 Italeri AB41 over the easter break, hope everyone had a few days off to relax!
Erich: Nice looking kit, and nice choice,i like the early panzer III's.
Neal: Welcome back to modelling! If you go to Google images you might find some shots of the inside of the 232. It surprising what you can find in there sometimes!
Tom: Nice combo, looking forward to seeing them finished.
I decided to use Vallejo green ochre. It's the first time I've ever painted a whole AFV with Vallejo, it brushed on real nice but then kept rubbing off back to the primer everytime i handled it after it had dried. Anyone else had this problem?
Anyway heres a shot after doing some shading and adding a little wear and tear. I'm happy with the way the wheels sit in their arches after the relocation work i did, but i'll have to say this build has been testing my patience

Started weathering today, nearly finished!
Cheers,
Tim


vonHengest

Joined: June 29, 2010
KitMaker: 5,854 posts
Armorama: 4,817 posts

Posted: Monday, May 02, 2011 - 01:26 AM UTC
Vallejo's need about 24hrs to dry if I understand correctly. I've been experiencing the same problem myself, and thought that I only needed to wait 6hrs for it to cure, but this wasn't enough to prevent the paint from being rubbed off. A trick I learned from a fellow figure modeler is to wrap whatever part you are handling in saran wrap, it works like a charm.
Neal: I don't remember there being an AM interior for the 232, but that doesn't mean there isn't one.
Tom: No, Hobby Lobby is not a substitute for a decent hobby shop at all. I go through withdrawl every time I go to Montana because that and Michael's are all that they have up in Billings
Neal: I don't remember there being an AM interior for the 232, but that doesn't mean there isn't one.
Tom: No, Hobby Lobby is not a substitute for a decent hobby shop at all. I go through withdrawl every time I go to Montana because that and Michael's are all that they have up in Billings


vonHengest

Joined: June 29, 2010
KitMaker: 5,854 posts
Armorama: 4,817 posts

Posted: Tuesday, May 03, 2011 - 04:53 PM UTC
Quick recap on our early finishers:
AgentG
spearhead21pz
Tojo72
ltb073
warreni
Lot's of great work going on here, and some very awesome dioramas as well
Great work gents, you are definitely doing justice to Noel's campaign here!

AgentG
spearhead21pz
Tojo72
ltb073
warreni
Lot's of great work going on here, and some very awesome dioramas as well

Great work gents, you are definitely doing justice to Noel's campaign here!


HipKitty

Joined: February 14, 2011
KitMaker: 390 posts
Armorama: 387 posts

Posted: Wednesday, May 04, 2011 - 01:02 AM UTC
An update....started to attempt some kind of interior work as I move along


Kiwi_Modeller

Joined: August 13, 2010
KitMaker: 188 posts
Armorama: 121 posts

Posted: Wednesday, May 04, 2011 - 10:19 PM UTC
well i finally got a time to do a quick one, like Rommels command halftrack.

got some of it started tonight.

cheers,
Graham

got some of it started tonight.

cheers,
Graham
ltb073

Joined: March 08, 2010
KitMaker: 3,662 posts
Armorama: 3,078 posts

Posted: Thursday, May 05, 2011 - 01:46 AM UTC
Graham, I have been eyeballing that kit for some time now but the place I buy from has had it on backorder for over a 2 months 
 Can you give us a little insight to what that kit is like? Looking forward to watching your progress

 Can you give us a little insight to what that kit is like? Looking forward to watching your progress

edoardo

Joined: November 30, 2007
KitMaker: 642 posts
Armorama: 234 posts

Posted: Thursday, May 05, 2011 - 03:03 AM UTC
Hi all!
I did some progress on my PkW III...
particularely I experimented with China Ink, and I am so satisfied with the results I obtained that I did a small tutorial to show the technique.
As always, any comment is highly appreciated.
So here it goes:
first the instruments: china sepia toned ink, and a couple of paintbrushes, a pointed one and a flat one


Then the subject you wanto to paint (in my case the turret of the Panzer III)

Select a small area at the time and wet it with water using the flat paintbrush

then, using the pointed brush, apply a pin wash using sepia ink. You can redo it in order to darken it or delute it with more water to lighten it.

after the wash is dry (hust a couple of minutes) you can highlight the rised spots by dry brushing using your favourite medium and / or dumpen a cloth and whipe it over the washed area in order to remove some of the wash.
Consider that the drying time is very short so proceede with little areas at the time, but your progresses will be fast.
In case you don't like the results, more water will completely remove the ink.
Here is the almost finished turret.

I still want to practice on this technique, maybe using even black ink, but I think it is very easy to master and that the risults are incouraging.
What do you think?
ciao
Edo
I did some progress on my PkW III...
particularely I experimented with China Ink, and I am so satisfied with the results I obtained that I did a small tutorial to show the technique.
As always, any comment is highly appreciated.

So here it goes:
first the instruments: china sepia toned ink, and a couple of paintbrushes, a pointed one and a flat one


Then the subject you wanto to paint (in my case the turret of the Panzer III)

Select a small area at the time and wet it with water using the flat paintbrush

then, using the pointed brush, apply a pin wash using sepia ink. You can redo it in order to darken it or delute it with more water to lighten it.

after the wash is dry (hust a couple of minutes) you can highlight the rised spots by dry brushing using your favourite medium and / or dumpen a cloth and whipe it over the washed area in order to remove some of the wash.
Consider that the drying time is very short so proceede with little areas at the time, but your progresses will be fast.
In case you don't like the results, more water will completely remove the ink.
Here is the almost finished turret.

I still want to practice on this technique, maybe using even black ink, but I think it is very easy to master and that the risults are incouraging.
What do you think?
ciao
Edo

vonHengest

Joined: June 29, 2010
KitMaker: 5,854 posts
Armorama: 4,817 posts

Posted: Thursday, May 05, 2011 - 03:36 AM UTC
Graham and Neal: Go Go Go guys!!
Edo: Thanks for the mini tutorial! Make sure that anybody who tries this out uses the water-soluable inks
Edo: Thanks for the mini tutorial! Make sure that anybody who tries this out uses the water-soluable inks


HipKitty

Joined: February 14, 2011
KitMaker: 390 posts
Armorama: 387 posts

Posted: Thursday, May 05, 2011 - 04:27 AM UTC
Ok, without aftermarket Interior resin kits for the 8 RAD to go with, I started scratch building from what pics I could track down. I'm going to try to hand-twist (and solder) copper wire to make the steering wheels....not sure I'm good enough to do the two-in-one wheel, but am going to give it a shot.
Here's where I'm at right now:


Here's where I'm at right now:


Kiwi_Modeller

Joined: August 13, 2010
KitMaker: 188 posts
Armorama: 121 posts

Posted: Thursday, May 05, 2011 - 02:49 PM UTC
hey Sal so far ir looks not bad bud, only thing i hate is those really small link tracks  why they couldnt use DS is beyond me.
detail isnt bad tho the interior could probably do with tarting up if had the time or could be bothered LOL.
will let ya know more tonight it should be nearly built by then
cheers,
Graham
 why they couldnt use DS is beyond me.
detail isnt bad tho the interior could probably do with tarting up if had the time or could be bothered LOL.
will let ya know more tonight it should be nearly built by then

cheers,
Graham

HipKitty

Joined: February 14, 2011
KitMaker: 390 posts
Armorama: 387 posts

Posted: Friday, May 06, 2011 - 12:58 PM UTC
moving forward with the SdKfz 2328-RAD...


zontar

Joined: August 27, 2006
KitMaker: 1,646 posts
Armorama: 1,557 posts

Posted: Friday, May 06, 2011 - 01:29 PM UTC
Graham: your grief has a lot more detail than my 1/48th for Getter Done. Nice Job.
Edo: thanks for the tutorial and the effect came out great!!
Neal: Good looking interior.
I've put my PE back on after paint stripping, so hopefully I can get the 222 back in the paint shop.
Happy Modelling, -zon
Edo: thanks for the tutorial and the effect came out great!!
Neal: Good looking interior.
I've put my PE back on after paint stripping, so hopefully I can get the 222 back in the paint shop.
Happy Modelling, -zon


vonHengest

Joined: June 29, 2010
KitMaker: 5,854 posts
Armorama: 4,817 posts

Posted: Friday, May 06, 2011 - 05:19 PM UTC
Neal: Looking good! Good luck on the wheels, it may take a couple of tries but I think you'll pull it off. What primer are you using?
Graham: I was looking at some of the German halftracks from Dragon and wondering the same thing myself...
Zon: Excellent! Get some photos up ASAP, it will be great to see how you are recovering your 222
Graham: I was looking at some of the German halftracks from Dragon and wondering the same thing myself...
Zon: Excellent! Get some photos up ASAP, it will be great to see how you are recovering your 222

Kiwi_Modeller

Joined: August 13, 2010
KitMaker: 188 posts
Armorama: 121 posts

Posted: Friday, May 06, 2011 - 10:41 PM UTC
yeh Jeremy this is only the second German halftrack i have done mostly because of those tracks there a real pain unlike the US ones there all moulded in two pieces which i think looks just as good and tons easier to handle in the small scale.
the interior isnt too bad ive got it nearly built (pics tomorrow) and since its only 35th scale i dont really see the point in adding too much more as the space is fairly confined anyway.
no major issues to date only minor trimming which is na big deal, only thing i may have to tweak slightly is the top hull piece but till i fit tomorrow wont really know, dry fitted it and looks not bad , i think it might just need a tweak here and there.
cheers,
Graham

Firefly74

Joined: April 15, 2010
KitMaker: 224 posts
Armorama: 205 posts

Posted: Friday, May 06, 2011 - 11:24 PM UTC
Neal: Your interior is coming along nicely.
Edo: Panzer III turret is looking great.
Here's the finished 1:72 Italeri AB41.
The decal instructions just gave the unit as Regio Esercito (Royal Army), Libya 1942, not very informative really...
The weathering didn't turn out as well as i'd hoped, particularly on the tires which had no tread whatsoever to work with.
I've just recently started playing around with pigments, i think they would be the key to improving my weathering on the next desert vehicle i do.
I'm fairly happy with it after all the fit issues with the kit during construction.
Any comments welcome.
Cheers,
Tim


vonHengest

Joined: June 29, 2010
KitMaker: 5,854 posts
Armorama: 4,817 posts

Posted: Saturday, May 07, 2011 - 12:40 AM UTC
Graham: For sure..
Look forward to seeing those photos!
Tim: Your AB41 looks so good that I keep forgetting it's 1/72! It's a pity they didn't cast any treads into those or the 1/48 version.
Well done on being our sixth finisher!
Look forward to seeing those photos!
Tim: Your AB41 looks so good that I keep forgetting it's 1/72! It's a pity they didn't cast any treads into those or the 1/48 version.
Well done on being our sixth finisher!
spearhead21pz

Joined: May 11, 2009
KitMaker: 128 posts
Armorama: 127 posts

Posted: Saturday, May 07, 2011 - 08:38 AM UTC
Wow! A lot has been done while I was away.
Neal; Nice work on the scratch interior.
EDO; The Pz III is looking good, interesting tutorial on the ink. method.
Graham: Nice progress on the Grief.
Tim; You finished AB41, I keep forgetting that it is 1/72.
Sal; Lets see some picutres of your revived 222.
I have managed to make some progress on the Pz IV, pictures below.


Camo is done, pin wash, and decals. It's time to start the tracks. Keep up the good workf
Neal; Nice work on the scratch interior.
EDO; The Pz III is looking good, interesting tutorial on the ink. method.
Graham: Nice progress on the Grief.
Tim; You finished AB41, I keep forgetting that it is 1/72.
Sal; Lets see some picutres of your revived 222.
I have managed to make some progress on the Pz IV, pictures below.


Camo is done, pin wash, and decals. It's time to start the tracks. Keep up the good workf

vonHengest

Joined: June 29, 2010
KitMaker: 5,854 posts
Armorama: 4,817 posts

Posted: Saturday, May 07, 2011 - 10:07 AM UTC
Looking good Ralph!
 |


