Campaigns
Where Armorama group builds can be discussed, organized, and updates posted.
Dragon OOB Campaign
ltb073
Visit this Community
New York, United States
Joined: March 08, 2010
KitMaker: 3,662 posts
Armorama: 3,078 posts
Posted: Sunday, March 25, 2012 - 05:30 AM UTC
Thing are looking good here guys
@ Rob, making good progress on those tracks, glad you were able to fix the sprocket problem
@ Kevin, Welcome to the fun that Zimm is looking real good, I'm looking forward to seeing more
@ Jasper, knew it was just a matter of time before you chimed in here, what type of coloring are you gonna do on the Stug
JediWookie
Visit this Community
South Australia, Australia
Joined: November 26, 2011
KitMaker: 113 posts
Armorama: 79 posts
Posted: Sunday, March 25, 2012 - 12:15 PM UTC
Hi Guys

I hope its not to late to join in, I am fairly new to moddeling and having a great time.

I am going to build the Dragon Panther G Late production Tank.

Gary

HeyLoad
Visit this Community
Illinois, United States
Joined: December 06, 2005
KitMaker: 64 posts
Armorama: 14 posts
Posted: Sunday, March 25, 2012 - 12:55 PM UTC
Hello all. Enjoying everyone's progress. The major sub-assemblies of the SAS Jeep are ready for paint.

Tom

SgtRam
Staff MemberContributing Writer
AEROSCALE
#197
Visit this Community
Ontario, Canada
Joined: March 06, 2011
KitMaker: 3,971 posts
Armorama: 2,859 posts
Posted: Sunday, March 25, 2012 - 01:08 PM UTC
Gary - Nice choice in the Panther. I am jealous, too late to change me mind??....

Tom - SAS Jeep coming along nice.
Dragon164
#226
Visit this Community
British Columbia, Canada
Joined: February 20, 2012
KitMaker: 1,909 posts
Armorama: 1,066 posts
Posted: Sunday, March 25, 2012 - 01:59 PM UTC
Hi All,

Got the tracks done on one side. they are glued together at all but three places.

Cheers Rob.

ltb073
Visit this Community
New York, United States
Joined: March 08, 2010
KitMaker: 3,662 posts
Armorama: 3,078 posts
Posted: Monday, March 26, 2012 - 01:44 AM UTC

Quoted Text


I hope its not to late to join in, I am fairly new to moddeling and having a great time.

Gary


@ Gary welcome to the fun Campaign runs till the end of September
@ Tom the SAS jeep is looking good great job with the PE
@Rob, 1st side of tracks look great good luck with the other side can't wait to see that with some paint

I am contemplating doing a 2nd build here but cant decide if I should or not
MikeM670
#020
Visit this Community
Illinois, United States
Joined: December 28, 2006
KitMaker: 278 posts
Armorama: 231 posts
Posted: Monday, March 26, 2012 - 04:24 AM UTC
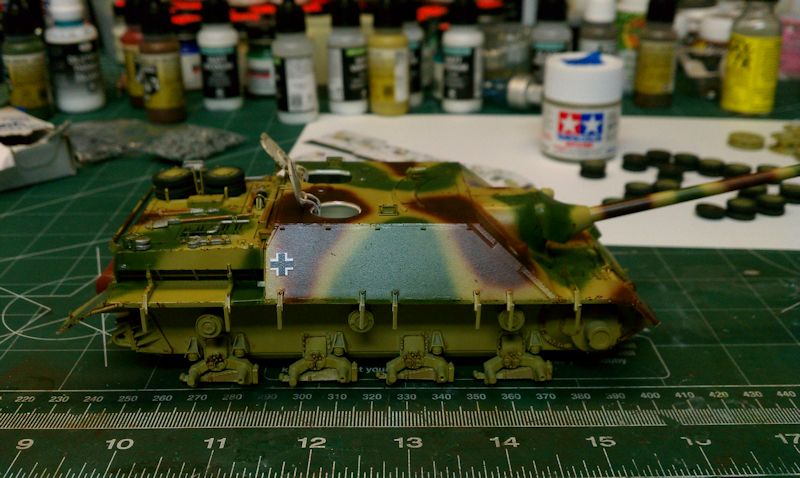
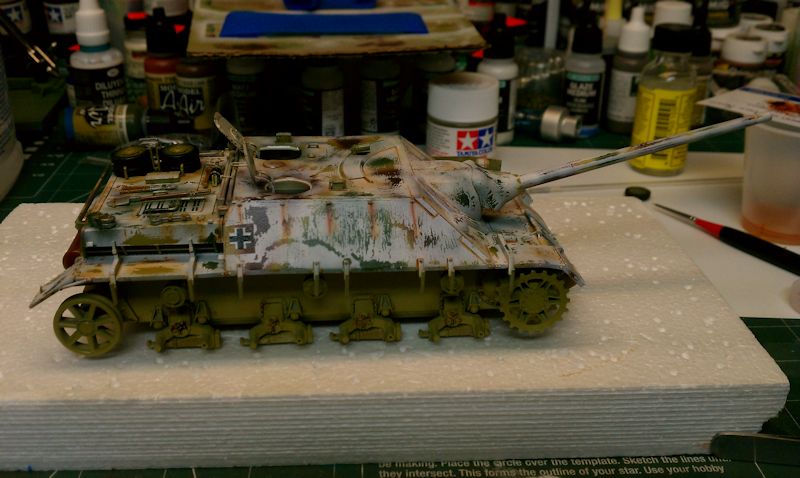
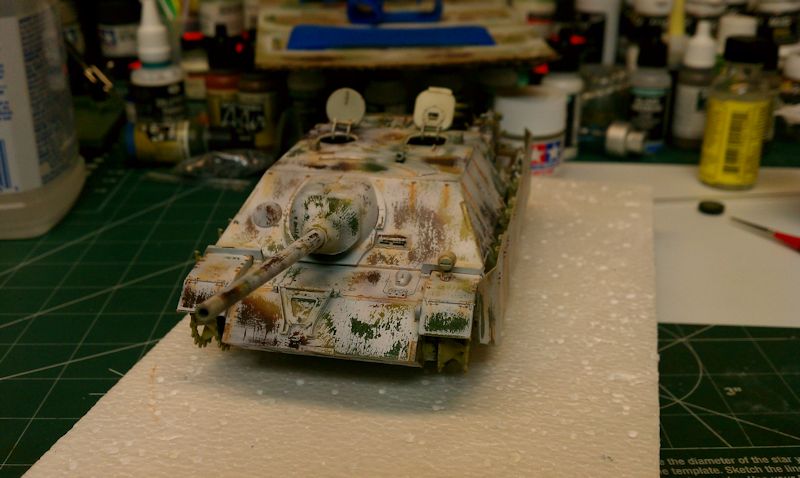
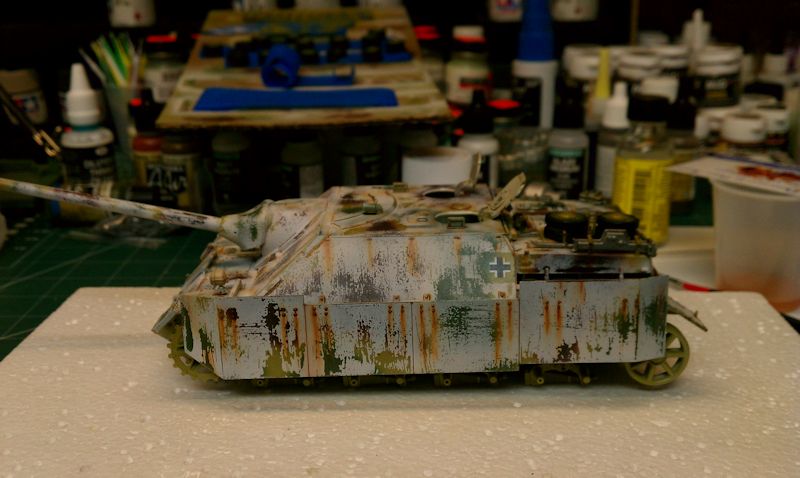
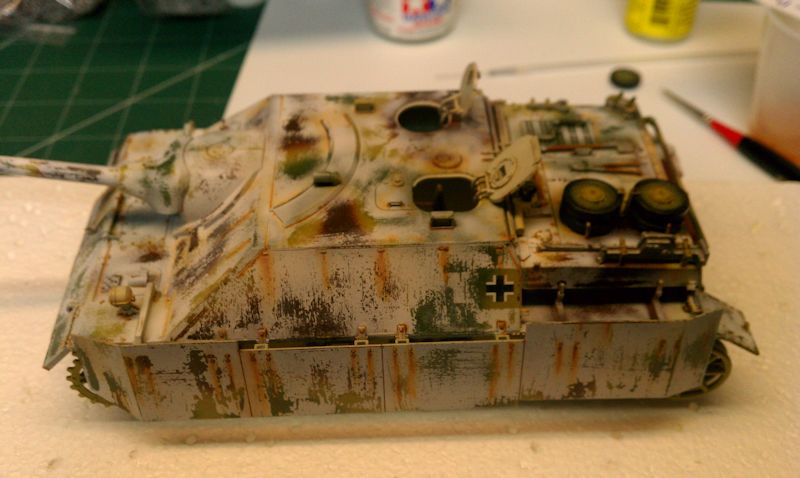
I wanted to throw up a few images of the Jagpanzer IV build at the paint and weathering stage. This is my first attempt at doing a winter white wash scheme. So far I'm pleased with the results. Most of the images show the finished rust effects on the white wash I just finished working on. I'm going to muddy up the lower section so it is still very clean. I still need to add a few small parts and build, weather the tracks and place it on a diorama base before she is completed. Comments are very welcome on what you see at this point.


ltb073
Visit this Community
New York, United States
Joined: March 08, 2010
KitMaker: 3,662 posts
Armorama: 3,078 posts
Posted: Monday, March 26, 2012 - 05:20 AM UTC

Quoted Text

This is my first attempt at doing a winter white wash scheme. So far I'm pleased with the results. Most of the images show the finished rust effects on the white wash I just finished working on.


Mike the white wash and the rust looks great can you describe what method you used for both process, for us all here
steph2102
Visit this Community
Isere, France
Joined: April 23, 2011
KitMaker: 735 posts
Armorama: 606 posts
Posted: Monday, March 26, 2012 - 06:43 AM UTC
Michael ,the paint is really well done. I look forward to see more
steph

Muzzer
Visit this Community
England - East Anglia, United Kingdom
Joined: March 09, 2012
KitMaker: 10 posts
Armorama: 6 posts
Posted: Monday, March 26, 2012 - 07:05 AM UTC
Hello everyone, I saw this campaign and thought I'd give it a go as it sounds like good fun, plus entering a campaign will ensure I actually finish a kit!
Just wanted to check something, I'm planning on dragons 1:72 Sdkfz 251 with 28cm rockets and crates, this comes with PE parts, is this allowed?
I also fancied putting some preiser figs with it too, in a mini diorama, again is this allowed?
Cheers, Murray
ltb073
Visit this Community
New York, United States
Joined: March 08, 2010
KitMaker: 3,662 posts
Armorama: 3,078 posts
Posted: Monday, March 26, 2012 - 07:34 AM UTC

Quoted Text

Hello everyone, I saw this campaign and thought I'd give it a go as it sounds like good fun, plus entering a campaign will ensure I actually finish a kit!
Just wanted to check something, I'm planning on dragons 1:72 Sdkfz 251 with 28cm rockets and crates, this comes with PE parts, is this allowed?
I also fancied putting some preiser figs with it too, in a mini diorama, again is this allowed?
Cheers, Murray


Hello Murry and welcome to the fun Your Kit will be fine and your mission is approved
MikeM670
#020
Visit this Community
Illinois, United States
Joined: December 28, 2006
KitMaker: 278 posts
Armorama: 231 posts
Posted: Monday, March 26, 2012 - 08:19 AM UTC

Quoted Text


Quoted Text

This is my first attempt at doing a winter white wash scheme. So far I'm pleased with the results. Most of the images show the finished rust effects on the white wash I just finished working on.


Mike the white wash and the rust looks great can you describe what method you used for both process, for us all here


I'd be glad to! I finished the model in a three tone camo scheme. Then I sprayed a light coat of Future on it. Let that dry for a few hours. Then applied basic chipping to the appropriate areas using a small piece's of Scotch Brite pad. Several light coats of Future were then applied. I let this dry for several days.

The winter white wash was done using the hairspray method. I decanted the hairspray into my airbrush cup and applied a nice heavy coat. I set the model aside to dry. I mixed up the first coat of white wash using Tamyia Flat White XF-2 and a single drop of Flat Brown XT-10. This I applied to the lower sections of the side shields and tank body. I then mix up another batch of Flat White and a drop of Light Blue XF-23. This I applied to the top half and lightly on the bottom. I set the model aside while I cleaned the airbrush. I then applied water to the surface where I would be working to help loosen the paint and hairspray. I picked at the paint in specific locations with a toothpick and using a stencil brush which I shortened the bristles on I rubbed the various areas to remove or damage the white wash. When I was satisfied I set the model aside to dry for several days.

I then sprayed the model surface again with a light coat or two of Future and set it aside to dry for a few hours. To represent rust I used Windsor & Newton Oils, Burt Sienna for older rust and Indian Red for newer looking rust. Using a very small brush I applied Burnt Sienna to the spot I wanted and pulled down a bit. I then took a cue tip and pulled down to remove excess paint and spread it further down. This had the effect of staining the paint. I would repeat this as necessary to achieve the look I wanted. I then went back and applied a very small amount of Indian Red over various locations using the same method of pulling the paint down while trying to stay inside the the previous paint coverage.

Using much thinner paint I applied the Burnt Sienna to the bolt heads, weld lines ect.

That really is about it for the moment. To finish the painting I'll fine tune it a bit before sealing it again and applying a flat coat and then some weathering powders. I also have to work on the lower half and tread area where I will apply some mud effect.
Muzzer
Visit this Community
England - East Anglia, United Kingdom
Joined: March 09, 2012
KitMaker: 10 posts
Armorama: 6 posts
Posted: Monday, March 26, 2012 - 08:59 AM UTC
Thanks for the green light Sal
I shall get started first thing tomorrow! Just need to choose a colour scheme and come up with a dio scene, loving the stuff I'm seeing so far, great stuff guys!
As soon as I start I'll get some pics posted
panzerbob01
Visit this Community
Louisiana, United States
Joined: March 06, 2010
KitMaker: 3,128 posts
Armorama: 2,959 posts
Posted: Tuesday, March 27, 2012 - 09:04 AM UTC
All:

It's update time on the Dragon Aufklarungspanzer 38(t) w/ 2cm KwK 38 OOTB project!

I have completed almost all assembly - hull, road gear and wheels cleaned and trimmed, upper-hull assembly, interior units, rear engine cover assembly, exhaust system, turret and gun mount stuff, most fender bits and boxes. The stuff goes into black Floquil enamel primer tonite! Here's the crowd!


After some fits and starts, it has turned out to be a very cool kit and build. A couple of major kit errors were addressed along the way: 1) the Dragon kit has the front plate of the crew compartment standing way "proud" - it should actually nestle down and be substantially without distinct relief from the upper-hull front plate. I think some other kits of this vehicle have got that feature correct - the D somehow wanted to go different, I suppose. For those who build this kit... I found that this problem can be easily corrected by simply cutting away the little "seating ledge" inside the upper-hull piece and setting the plate inside, rather than on the face of that upper-hull bit. (Alas, I did the cut-away, but was a little too conservative about pushing that plate in - so I did reduce its "stand-out", but not as much as ideal! But it does look a lot better than had it stayed out where the original placement put it.)

And 2) The original was equipped with a turret-mounted radio set (included in the kit and mounted per instructions) but the instructions neglect to tell you to mount the rod antenna onto that provided mount at the back side of the turret over that radio... The antenna parts are included in the kit - you just have to go for it! I did. Of course, this just SCREAMS for a little added-on bit or 2 to show the cables, and phones for that radio, etc. (oh and likewise for the other radios mounted down on the hull-side) . But, as this is OOTB, I'll cover my ears!

There were some fitting gaps around the upper hull side plates. Easily fixed with a little putty. And in a few other places - but mostly stuff fits well.


The kit supplies some very neat little PE fender brackets that fit on the front angles of the upper hull piece. Noting as we Pz 38(t) fans do that the fenders on the real thing were generally bent around (and I've done a little twisting for this aspect), one needs to reconcile the fender-warping with these little brackets. Hint! Bend fenders? Bend brackets! Also, there are some styrene fender brackets further back along the sides on that same hull piece... clunky little puppies, these. These need to be thinned (as do all the kit styrene fender brackets), as the real deal were sheet metal. Looking at this photo - I NEED to thin mine a little more before painting tonite

The turret and its KwK 38 gun mount are pretty nice - the kit supplies a PE gun-sight (really neat!) and a PE shield (OK) to dress the mount up a little. I found that the gun itself is pretty nice, and as this is OOTB, no metal barrel ( ) - the styrene barrel needs some very careful trimming... it's small and easy to bungle - like when I gouged the darned thing while cutting away the sprue - point . I need to fill that boo-boo in before I prime tonite (photos reveal too much!). The flash-hider wants to be thinned (easy with the #11 knife) - and if one is really good, I suppose that one could drill out those tiny holes... not me. Overall, this mount is way cool and should look really sharp once painted .


I'll black prime the whole thing tonite, and start the interior painting and final assembly - "elfinbein" on the lower sides, dark green floor, wood duckies, satin-black tranny and... etc.

Progress is, finally, being MADE!

Bob
JediWookie
Visit this Community
South Australia, Australia
Joined: November 26, 2011
KitMaker: 113 posts
Armorama: 79 posts
Posted: Tuesday, March 27, 2012 - 09:50 PM UTC

Really enjoying watching everyone's builds, learning heaps.

I got a start on my Panther tank. Took forever to sand and clean up the wheels, anyone know what tank in WW2 era had the most wheels just so i know to stay away from it

Nito74
Visit this Community
Lisboa, Portugal
Joined: March 04, 2008
KitMaker: 5,386 posts
Armorama: 4,727 posts
Posted: Tuesday, March 27, 2012 - 10:17 PM UTC
Hi guys,
I haven't started my build yet.
I wanted to pick the panther F, still not sure about this one.
Maybe an Orange box kit, fewer parts, quicker build (maybe).

I'm still trying to finish another Campaign build, I might start this week while the paint is drying...

There are some really cool builds so far. One thing in common, those instruction's sheet artists really suck, I bet they haven't build a single kit following their instructions
Muzzer
Visit this Community
England - East Anglia, United Kingdom
Joined: March 09, 2012
KitMaker: 10 posts
Armorama: 6 posts
Posted: Tuesday, March 27, 2012 - 11:14 PM UTC
Fantastic builds so far guys!
I'm now currently without a computer and only an iPhone so I'm unable to post pictures up which is really frustrating as Ive got the kit sorted but can't start as I need to put up the dated pic before I begin!
Internet cafes won't let you upload pics due to possible virus issues.

ltb073
Visit this Community
New York, United States
Joined: March 08, 2010
KitMaker: 3,662 posts
Armorama: 3,078 posts
Posted: Wednesday, March 28, 2012 - 12:38 AM UTC

Quoted Text

Fantastic builds so far guys!
I'm now currently without a computer and only an iPhone so I'm unable to post pictures up which is really frustrating as Ive got the kit sorted but can't start as I need to put up the dated pic before I begin!


@ Murry, you can take your dated photo and then start your build just make sure you posted the dated photo when you do a follow up update

@Bob and Gary nice start there keep at it

@Michael, Thanks for the quick lesson hopefully some of your techniques will work for me
Nito74
Visit this Community
Lisboa, Portugal
Joined: March 04, 2008
KitMaker: 5,386 posts
Armorama: 4,727 posts
Posted: Wednesday, March 28, 2012 - 02:46 AM UTC
Here it is I will start today then..

ltb073
Visit this Community
New York, United States
Joined: March 08, 2010
KitMaker: 3,662 posts
Armorama: 3,078 posts
Posted: Wednesday, March 28, 2012 - 04:37 AM UTC

Quoted Text

Here it is I will start today then..


@ John, do we have the same stash I built that for the Panther Campaign
Photobucket
It was pointed out to me too late that the front periscope on the turret is in the wrong place and that it should be on the commanders cupola. The directions have you put it where mine is
Looking forward to seeing your build
Nito74
Visit this Community
Lisboa, Portugal
Joined: March 04, 2008
KitMaker: 5,386 posts
Armorama: 4,727 posts
Posted: Wednesday, March 28, 2012 - 01:24 PM UTC
Sal, I bet we have many more kits in both our stashes...
on the top of the commander's cupola ?

What were the main problems with that kit ? (besides the confusing instruction sheet)

Great work there Sal !!
I might seek your help during the building process, is that ok?
tread_geek
Visit this Community
Ontario, Canada
Joined: March 23, 2008
KitMaker: 2,847 posts
Armorama: 2,667 posts
Posted: Thursday, March 29, 2012 - 04:33 AM UTC
Greetings fellow campaigners.

I've been dropping in from time to time and am impressed with what I'm seeing. My build has languished a bit but I managed to get a bit of work done yesterday. Mostly it was finishing the first part of painting the rubber portions on the suspension components and a tiny bit of pin washes here and there. Still a ways to go but some progress is better than none.


I just got the parts to repair my older Paasche airbrush and opted to modify it to accept their finest needle/point (from .3 mm to a .1 mm). I've been practising with it and will use it to revamp the upper camo a bit.

Cheers,
Jan
ltb073
Visit this Community
New York, United States
Joined: March 08, 2010
KitMaker: 3,662 posts
Armorama: 3,078 posts
Posted: Thursday, March 29, 2012 - 05:26 AM UTC

Quoted Text

on the top of the commander's cupola ?

What were the main problems with that kit ? (besides the confusing instruction sheet)

Great work there Sal !!
I might seek your help during the building process, is that ok?


John, thanks and yes here is what Eddy Nevarez stated in his comments to me but to late for me to change it:
"the T.S.R.1 observation periscope (optional part B39) from the Pilzen (socket) just forward of the commander’s cupola. This item is seen on the first prototype Panther F vehicle in the extended position, if you must have it on your vehicle it should be placed on the commander’s cupola, on the post with the hole in it, just to the left of the forward periscope hood (the instructions are incorrect and have you place it where you now have it)"

Also while I was just looking through my old post at the Panther Campaign I found that I ran into these problems,
1, I mounted the tail lamp bracket in the wrong place but that was corrected.
2. the top part of the jack was numbered K1 but should be K11. K1 is the base of an antenna.
3. Dragon says to use 81 links on each side, I only used 79 and 80 on the 2 sides
If I can help in any other ways just give me a shout I was a real nice kit and I had a lot of fun building that 1
spacewolfdad
Visit this Community
England - West Midlands, United Kingdom
Joined: May 23, 2010
KitMaker: 642 posts
Armorama: 593 posts
Posted: Thursday, March 29, 2012 - 10:19 AM UTC
Hi Folks,

I am posting my progress so far, I haven't posted before as I have been involved in other campaigns and had a few health issues to deal with. Anyway I have managed to make a start on two of the builds and the one has thrown up a few queries. I am doing the figure set of the Florian Geyer Cavalry Division and have finished assembling the horses. This is the cause of my querying the meaning of OOB. In the box there are no bits or reins, in fact no tack at all. Am I allowed to make these pieces from scratch as they are important for the whole thing to look right.

I have also started the Panzerjaeger IV at the same time and am presently making the lower hull. These are lovely kits by Dragon and this is my second one of this type.

Here are the progress shots of the builds:


Those are the horses...


The Panzerjaeger IV with the parts I am adding next...

I will post when I have more stuff done, I look forward to hear your opnions about making all the tack.

All the best,

Paul
ltb073
Visit this Community
New York, United States
Joined: March 08, 2010
KitMaker: 3,662 posts
Armorama: 3,078 posts
Posted: Thursday, March 29, 2012 - 11:26 AM UTC

Quoted Text

This is the cause of my querying the meaning of OOB. In the box there are no bits or reins, in fact no tack at all. Am I allowed to make these pieces from scratch as they are important for the whole thing to look right.


Paul, You cant ride a horse without reins, and being that you are also building the panzerjager as well they will be allowed. by the way they are looking good, I'm waiting to see what this whole scene will look like