Campaigns
Where Armorama group builds can be discussed, organized, and updates posted.
Where Armorama group builds can be discussed, organized, and updates posted.
Hosted by Darren Baker, Richard S.
King Campaign
wrenchy

Joined: April 23, 2006
KitMaker: 140 posts
Armorama: 46 posts

Posted: Thursday, November 08, 2012 - 03:22 PM UTC
I'm going to do Tamiya's Henschel turreted KT. I've got an Elefant detail set and some R&J radiator inserts to add. I'm thinking of doing 332 with the kit markings as I'm too lazy for zimmerit!


woltersk

Joined: May 27, 2003
KitMaker: 1,026 posts
Armorama: 654 posts

Posted: Thursday, November 08, 2012 - 05:13 PM UTC
@Rob and @Darren,
The issue looks to be a slightly warped rear panel. The fit is square and snug where the rear is glued against the horizontal parts of the lower chassis. The left and center portions are flush with the upper hull, but the right side protrudes slightly. Nothing that can't be remedied with a small length of tape after gluing. Likewise, the center of the glacis rises just a bit. Again, fixable with a bit of tape.
Nice work everyone. I'm both excited about, and yet dreading, all those road wheels and tracks.
@Jeff H. -- very nice job on your first airbrushing! Experience is your best teacher. Practice, practice, practice.
Keith

jkb_sprint

Joined: April 23, 2012
KitMaker: 402 posts
Armorama: 394 posts

Posted: Friday, November 09, 2012 - 08:37 AM UTC
Hi everyone. I see people are working full speed already! Nice start on all the projects i saw gentlemen!
Started my King Tiger too. The Tamiya Porsche turret. No surprises here i guess.... It will be OOB with the exception of Millput in an effort to make a zimmeritt coat. Darren i hope the fact that i post the first pics with the zimmeritt on is not a problem. It is the first time i try to do this and while trying to see how to do it, i forgot to take a pic with the kit unstarted. Sorry.

And here is the progress. I hope all the effort wasn't pointless. What do you think guys?


Started my King Tiger too. The Tamiya Porsche turret. No surprises here i guess.... It will be OOB with the exception of Millput in an effort to make a zimmeritt coat. Darren i hope the fact that i post the first pics with the zimmeritt on is not a problem. It is the first time i try to do this and while trying to see how to do it, i forgot to take a pic with the kit unstarted. Sorry.

And here is the progress. I hope all the effort wasn't pointless. What do you think guys?


Nito74

Joined: March 04, 2008
KitMaker: 5,386 posts
Armorama: 4,727 posts

Posted: Friday, November 09, 2012 - 09:12 AM UTC
I think it looks great john !!
imatanker

Joined: February 11, 2011
KitMaker: 1,654 posts
Armorama: 1,565 posts

Posted: Friday, November 09, 2012 - 10:27 AM UTC
I agree,great job.Jeff T.
Nito74

Joined: March 04, 2008
KitMaker: 5,386 posts
Armorama: 4,727 posts

Posted: Friday, November 09, 2012 - 10:56 AM UTC
I've just worked on the wheels today.
Still have to finish the engine mesh grills this weekend.
This baby is almost ready for painting...
Still have to finish the engine mesh grills this weekend.
This baby is almost ready for painting...


jkb_sprint

Joined: April 23, 2012
KitMaker: 402 posts
Armorama: 394 posts

Posted: Friday, November 09, 2012 - 10:01 PM UTC
Quoted Text
I think it looks great john !!
Quoted Text
I agree,great job.Jeff T.
Thanks a lot guys. I guess for first attempt it will do. It seems the coating is a bit thick on some areas. I must admitt using millput is a good method if u get used to it and doesn't cost as some ready AM products, but it takes a lot of time and is a bit messy. But i kind of liked it since the pealed off parts and damage are not look alike and someone can preety much do anything he wants.
Quoted Text
I've just worked on the wheels today.
Still have to finish the engine mesh grills this weekend.
This baby is almost ready for painting...
John fast as always i see. Waiting to see it painted.
Nito74

Joined: March 04, 2008
KitMaker: 5,386 posts
Armorama: 4,727 posts

Posted: Saturday, November 10, 2012 - 03:14 AM UTC
Thanks John !!
Here's the progress before getting back to the bench:
Wheels

Lower Hull

I'm going to work on the engine cover mesh now..
Here's the progress before getting back to the bench:
Wheels

Lower Hull

I'm going to work on the engine cover mesh now..
imatanker

Joined: February 11, 2011
KitMaker: 1,654 posts
Armorama: 1,565 posts

Posted: Saturday, November 10, 2012 - 12:28 PM UTC
Great work everybody 
jkb...I said it before,and I'll say it again.The zimm looks good.From what I understand,it was a hasty process,so some of it falling off in the field is to be expected.
Nito...What,there where only 5 roadwheels in the kit?I think you got shortchanged Looks like you are making good progress.
My build has slowed down a lot.I keep thinking of things I can change or make better and I get all flustered I have gotten the engine deck done though so here are some pics.
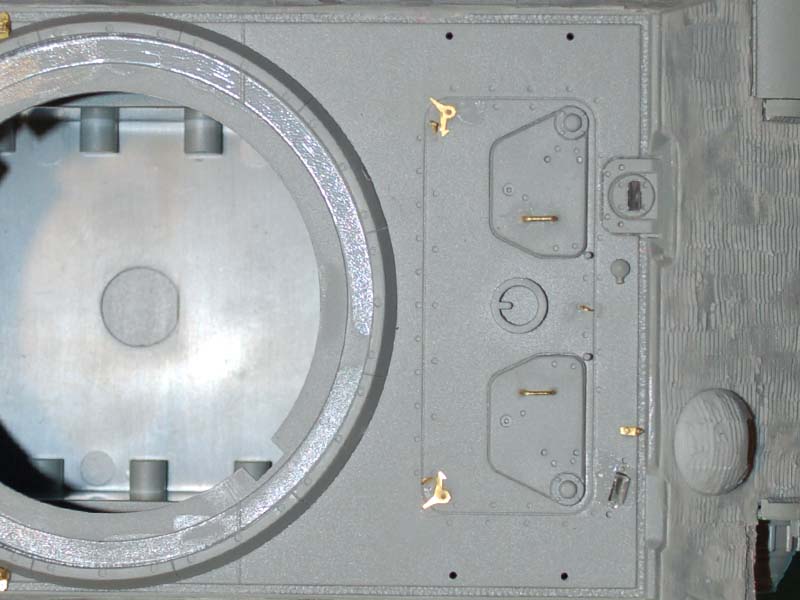
We started with the primed deck
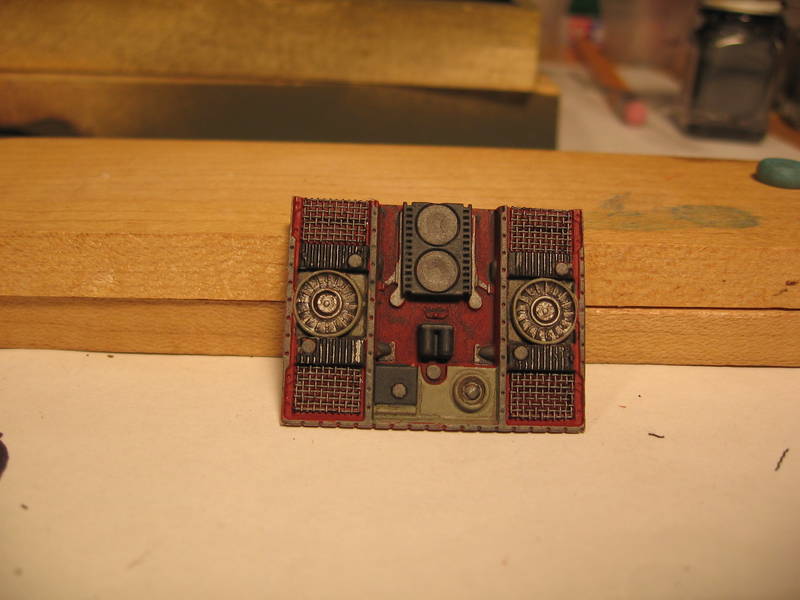
Got everything painted,I looked at a lot of photo's and came up with this
And here's one of the ideas that slowed me down.Made some screens for the air inlets
Painted and weathered
And last but not least, a test fit.
Will be starting the outer rear deck tomorrow and maybe more handles.That's it for now.Jeff T.

jkb...I said it before,and I'll say it again.The zimm looks good.From what I understand,it was a hasty process,so some of it falling off in the field is to be expected.

Nito...What,there where only 5 roadwheels in the kit?I think you got shortchanged
 Looks like you are making good progress.
My build has slowed down a lot.I keep thinking of things I can change or make better and I get all flustered
 I have gotten the engine deck done though so here are some pics.
We started with the primed deck
Got everything painted,I looked at a lot of photo's and came up with this
And here's one of the ideas that slowed me down.Made some screens for the air inlets
Painted and weathered
And last but not least, a test fit.
Will be starting the outer rear deck tomorrow and maybe more handles.That's it for now.Jeff T.
thebear

Joined: November 15, 2002
KitMaker: 3,960 posts
Armorama: 3,579 posts

Posted: Saturday, November 10, 2012 - 04:14 PM UTC
Wow guys !! Some really nice work going on here ..I just started on page one and read the whole thing...I would really love to join in on this build but I've got a PanzerIV and a StugIV on the table for two group build right now...If I get them finished fast enough I'll join in . I will be following along...
Darren I agree that it is a Jerry can so I'd figure a way to use the brackets for the wood block as a base for the holder. Also id you are doing Anelisse(spelling) ,notice the whitewashed spare tracks behind the exhaust pipes.
Rick
Darren I agree that it is a Jerry can so I'd figure a way to use the brackets for the wood block as a base for the holder. Also id you are doing Anelisse(spelling) ,notice the whitewashed spare tracks behind the exhaust pipes.

Rick
Posted: Sunday, November 11, 2012 - 08:07 AM UTC
I have been looking at a lot of completed models of Annellise and all of them depict this tank minus its side skirts. Now I noted that the pictures of Annellise show the tank I believe during a track change which I also believe means the skirt would be removed and replaced after the track change; am I right? The only thing I can see against using the skirts is that I do not believe they would be removed for the application of the white wash which looks solid.

woltersk

Joined: May 27, 2003
KitMaker: 1,026 posts
Armorama: 654 posts

Posted: Tuesday, November 13, 2012 - 02:59 AM UTC
@John, yours is coming along. Looks good.
@Jeff, nice looking engine compartment. How much is visible with the deck on? I suppose you are going to have the hatches and covers open to show off your handiwork?
Here is part of my progress over the weekend. My first aluminum gun barrel:

Keith
@Jeff, nice looking engine compartment. How much is visible with the deck on? I suppose you are going to have the hatches and covers open to show off your handiwork?
Here is part of my progress over the weekend. My first aluminum gun barrel:

Keith
imatanker

Joined: February 11, 2011
KitMaker: 1,654 posts
Armorama: 1,565 posts

Posted: Tuesday, November 13, 2012 - 12:05 PM UTC
Keith...Your barrel looks sweet.I wish there where more made for 1/72.
I was going to try and split the three sections of the engine deck,and have the crane hoisting one of them,but the part was too small and I didn't have an extra to bash.The fit of the deck to the hull is good enough so I think I will leave it loose so it can be removed and the engine bay displayed.
I had a very busy week end and was not able to get a lot done,but did take some small steps in the right direction,so here we go
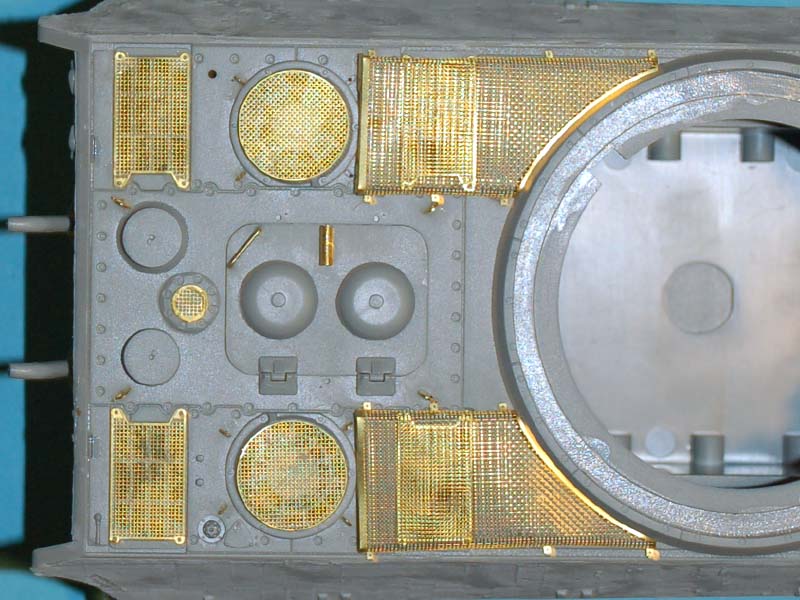
I was dredding the rear deck's PE as it was so small, I thought the carpet monster would be very well fed The other set of hooks for the outer decks where even smaller than these

4 for 4
The streak continues
And it's a Homerun

If you look close you can see that the front screens are not quite big enough to cover the openings and needed to be a little bit wider.
Also got some handles and headlight wire/conduit? made.
That's it for now,look forward to seeing every ones progress.
Darren... I'm sure you'll solve your sideskirt issue.Both your ideas make sense to me,so I think that either way will work.Model on.Jeff T.
I was going to try and split the three sections of the engine deck,and have the crane hoisting one of them,but the part was too small and I didn't have an extra to bash.The fit of the deck to the hull is good enough so I think I will leave it loose so it can be removed and the engine bay displayed.
I had a very busy week end and was not able to get a lot done,but did take some small steps in the right direction,so here we go

I was dredding the rear deck's PE as it was so small, I thought the carpet monster would be very well fed
 The other set of hooks for the outer decks where even smaller than these
4 for 4
The streak continues
And it's a Homerun

If you look close you can see that the front screens are not quite big enough to cover the openings and needed to be a little bit wider.
Also got some handles and headlight wire/conduit? made.
That's it for now,look forward to seeing every ones progress.
Darren... I'm sure you'll solve your sideskirt issue.Both your ideas make sense to me,so I think that either way will work.Model on.Jeff T.

Snorri23

Joined: March 25, 2010
KitMaker: 514 posts
Armorama: 261 posts

Posted: Tuesday, November 13, 2012 - 01:18 PM UTC
Scrolling through the photos I am piqued with the dedication and quality of the started projects. I added the small and large lifting hooks. Had them laying around from a previous build. Eduard tow clevises and the two small eyes by the barrel support. Wire grab handles, not perfectly straight though.


woltersk

Joined: May 27, 2003
KitMaker: 1,026 posts
Armorama: 654 posts

Posted: Wednesday, November 14, 2012 - 02:22 AM UTC
@Jeff T. It's coming along nicely. That pic with the X-Acto blade is amazing, and insane! Next you'll be carving figures in grains of rice. (Don't laugh folks, there are artisans out there who do that.--Google it). Can't wait to see what you do next.
@Trevor. Another nice one. You're metal tow shackles gave me an idea: instead of simply snapping on my plastic ones just to have them fall off later, I may try to drill them out and insert a 'bolt'.
Keith
@Trevor. Another nice one. You're metal tow shackles gave me an idea: instead of simply snapping on my plastic ones just to have them fall off later, I may try to drill them out and insert a 'bolt'.
Keith
imatanker

Joined: February 11, 2011
KitMaker: 1,654 posts
Armorama: 1,565 posts

Posted: Wednesday, November 14, 2012 - 10:16 AM UTC
Keith... I would have replied sooner,but I'm just starting to be able to see again after doing that PE 
I'm sorry, but I won't be carving any rice grains,I draw the line at dried tomato seeds
Trevor... Nice work Bub,looks like the old "same tank,different scale"thing.Looking at your pics has given me some ideas for my Tiny Tiger Jeff T.

I'm sorry, but I won't be carving any rice grains,I draw the line at dried tomato seeds

Trevor... Nice work Bub,looks like the old "same tank,different scale"thing.Looking at your pics has given me some ideas for my Tiny Tiger
 Jeff T.
 Posted: Wednesday, November 14, 2012 - 04:10 PM UTC
Quick update for you as my eyes hurt from looking at brass.


woltersk

Joined: May 27, 2003
KitMaker: 1,026 posts
Armorama: 654 posts

Posted: Wednesday, November 14, 2012 - 05:18 PM UTC
@Jeff T. So that's what my dad meant when he would come in my room and say "Careful son, keep doing that and you'll go blind!" 
Got the PE screens installed. That was easier than I had imagined.

Keith

Got the PE screens installed. That was easier than I had imagined.

Keith
imatanker

Joined: February 11, 2011
KitMaker: 1,654 posts
Armorama: 1,565 posts

Posted: Thursday, November 15, 2012 - 02:18 PM UTC
Gents... Looks like PE is the order of the week 
Now that every ones eyes are back to normal,it's time for a one pic update.I was not happy with the weld seams so we will try to fix them
Filled and sanded

Took me awhile to find the photo tab,but I got it Jeff T.

Now that every ones eyes are back to normal,it's time for a one pic update.I was not happy with the weld seams so we will try to fix them
Filled and sanded
Took me awhile to find the photo tab,but I got it
 Jeff T.
 imatanker

Joined: February 11, 2011
KitMaker: 1,654 posts
Armorama: 1,565 posts

Posted: Saturday, November 17, 2012 - 02:30 PM UTC
Quoted Text
@Jeff T. So that's what my dad meant when he would come in my room and say "Careful son, keep doing that and you'll go blind!"
Got the PE screens installed. That was easier than I had imagined.
Keith
Keith... So that's why my glasses are so thick

 Dude,your PE looks x-cell-ent.
Here's what I've been up to.I was going to make some weld beads out of stretched sprue,but in the process of gluing them on,I noticed that the glue I was using was softening the filler I put in.So I took the point of my hobby knife and made some indents in the soft putty.Looks O.K. I guess
They need to be dressed up a little but it will work.
Next will be some lifting loops for the top hull plate.You can see in the photo that they are just lumps of plastic.
The kit had a whole bunch of extra loops so I thought I would put them to good use.More tomorrow.Jeff T.

jkb_sprint

Joined: April 23, 2012
KitMaker: 402 posts
Armorama: 394 posts

Posted: Sunday, November 18, 2012 - 04:20 AM UTC
Jeff. T thanks a lot. I see you have a 20/20 vision there.... Working with such small PE is worth a medal! Nice work on the engine bay and the armor joining points too. 
Keith thanks man. Clean work on those PE. I always have a hard time with them.
Darren nice details. Some people do that in Braille and can still see... I think these chaps are possessed.
Trevor your JT looks great.

Keith thanks man. Clean work on those PE. I always have a hard time with them.
Darren nice details. Some people do that in Braille and can still see... I think these chaps are possessed.

Trevor your JT looks great.
imatanker

Joined: February 11, 2011
KitMaker: 1,654 posts
Armorama: 1,565 posts

Posted: Sunday, November 18, 2012 - 10:45 AM UTC
Final post of the Week end.Got all the lifting loops in place,I know they are supossed to be hooks,but what the heck 

Put some grab handles on the rear hatchs
I need to do a little work on the engine deck hatch cover and the upper hull add-ons will be done I think
Next up,I need to figure out how I'm going to deal with this... Anybody got any ideas
  Thanks,Jeff T.
Put some grab handles on the rear hatchs
I need to do a little work on the engine deck hatch cover and the upper hull add-ons will be done I think

Next up,I need to figure out how I'm going to deal with this...
 Thanks,Jeff T.
Posted: Sunday, November 18, 2012 - 04:52 PM UTC
I'm going to build the Dragon King Tiger from Pz.Abt.505, The only additions will be Friulmodel tracks (some research shows that I need the ATL-16 set not the late set that is pictured) and some R&J radiator inserts


Nito74

Joined: March 04, 2008
KitMaker: 5,386 posts
Armorama: 4,727 posts

Posted: Wednesday, November 21, 2012 - 08:03 AM UTC
I decided to get a dark green base with dark yellow ambush spots
I put the primer on. And the dark green base too.
I will get some photos soon.
I put the primer on. And the dark green base too.
I will get some photos soon.

Snorri23

Joined: March 25, 2010
KitMaker: 514 posts
Armorama: 261 posts

Posted: Wednesday, November 21, 2012 - 08:52 AM UTC
I just received my Hobby Boss tracks for the Jagd. Tiger.Very fast turn around from Hobby Easy. Under 10 days. While placing the base coat on them I noticed two small triangles on each sprue. Are they ice sprags? Since there are no instructions, are they used and where do they go? Looked at my other K.Ts. and they do not have them. Any suggestions? Thanks.
 |


