Lisboa, Portugal
Joined: March 04, 2008
KitMaker: 5,386 posts
Armorama: 4,727 posts
Posted: Wednesday, January 16, 2013 - 01:40 AM UTC
Small update:

Gun shield panels.
Gary it's these sponges I use, I cut them in several sizes to have a different pattern and to work on different areas of the kit, I sometimes add a copper wire or toothpick so I can acess interiors or small areas.


Active Builds: 0
Active Campaigns: 0
Lisboa, Portugal
Joined: March 04, 2008
KitMaker: 5,386 posts
Armorama: 4,727 posts
Posted: Wednesday, January 16, 2013 - 04:09 AM UTC
Active Builds: 0
Active Campaigns: 0
Lisboa, Portugal
Joined: March 04, 2008
KitMaker: 5,386 posts
Armorama: 4,727 posts
Posted: Thursday, January 17, 2013 - 05:20 AM UTC
Small update ... again.
Tracks, gun plates.
Some small hatches just fell into the interior of the tank..

There's always something

.. well...
I added some dust / sand to the wheels, tracks , armour plates.
Some streaking on some plates, not much.
Still want to add a tarp and some personal gear


Active Builds: 0
Active Campaigns: 0
Texas, United States
Joined: March 08, 2010
KitMaker: 2,465 posts
Armorama: 2,383 posts
Posted: Thursday, January 17, 2013 - 04:13 PM UTC
Hey John, I think it looks great my friend!

RUH-ROW....you dropped a hatch inside?

Break out tha plastic saw!!!

Small update, but time consuming progress....
I really have great references courtesy of Bob Wiber. But some of it im gonna have to guess at and hope it looks like i knew what i was doin' the whole time.


More tomorrow.

Gary
Hawaii, United States
Joined: August 27, 2006
KitMaker: 1,646 posts
Armorama: 1,557 posts
Posted: Thursday, January 17, 2013 - 05:14 PM UTC
John: looks great! Too bad about the hatch. Probably too difficult to cut a hole in the bottom without busting something else. Maybe scratch it back?
Gary: your radios are awesome!
Happy Modeling, -Zon

"Certainty of death.
Small chance of sucess.
What are we waiting for?"
-Gimli, Return of the King.
Texas, United States
Joined: March 08, 2010
KitMaker: 2,465 posts
Armorama: 2,383 posts
Posted: Friday, January 18, 2013 - 08:04 AM UTC
Thanks a bunch Zon!

More progress on the radios. Im gonna try and scratch up a speaker next and then ill scratch up the head set and throat mic later on. Gonna start the tools or maybe the gun soon.


Thanks fellas.

Gary
Washington, United States
Joined: August 03, 2008
KitMaker: 436 posts
Armorama: 320 posts
Posted: Friday, January 18, 2013 - 08:37 AM UTC
Gary,
Looks busy enough.... Will be interested in how you make the headphones, etc. as I might have to make some for my Marder. Am wondering where they would have stuck the morse key when they weren't using it....
Should be interesting to paint also...
Bob
Indiana, United States
Joined: June 10, 2005
KitMaker: 6,188 posts
Armorama: 5,960 posts
Posted: Friday, January 18, 2013 - 09:16 AM UTC
OVER the top Mr Boggs, always over the top with your work.

Nice.

~ Jeff
Lisboa, Portugal
Joined: March 04, 2008
KitMaker: 5,386 posts
Armorama: 4,727 posts
Posted: Friday, January 18, 2013 - 09:25 AM UTC
Great work Gary !
That food poisoning bug didn't worked out for the elf's, Mr.Boggs work is still 5 star's quality

Active Builds: 0
Active Campaigns: 0
Texas, United States
Joined: March 08, 2010
KitMaker: 2,465 posts
Armorama: 2,383 posts
Posted: Saturday, January 19, 2013 - 04:50 AM UTC
Thanks a bunch you guys!

Ya know...ive slowed alot since the elves are away...but im happy with my work. Maybe i should just fire-em and do it all myself...naw...ill keep-em.

Gary

Indiana, United States
Joined: June 10, 2005
KitMaker: 6,188 posts
Armorama: 5,960 posts
Posted: Saturday, January 19, 2013 - 08:10 AM UTC
At least keep them around to clean up for the Landlord!

Again, nice work!
~ Jeff
Texas, United States
Joined: March 08, 2010
KitMaker: 2,465 posts
Armorama: 2,383 posts
Posted: Wednesday, January 23, 2013 - 06:47 AM UTC
Quoted Text
At least keep them around to clean up for the Landlord! 
Again, nice work!
~ Jeff
Hey Jeff, I keep-em...their on latrine duty!

I have an update fellas. I base coated then upper interior and breech area of the gun. The gun was a BEEEEOTCH to put together...parts fit was awful and the usuall vague instructions didnt help.

Anyways, ill paint the radios and other interior details next.


Thanks for lookin fellas...more soon.

Gary

Hawaii, United States
Joined: August 27, 2006
KitMaker: 1,646 posts
Armorama: 1,557 posts
Posted: Wednesday, January 23, 2013 - 06:51 AM UTC
Gary: Super nice. I bow to your mastery.
Happy Modeling, -zon

"Certainty of death.
Small chance of sucess.
What are we waiting for?"
-Gimli, Return of the King.
Quebec, Canada
Joined: November 19, 2011
KitMaker: 1,389 posts
Armorama: 1,388 posts
Posted: Thursday, January 24, 2013 - 02:07 AM UTC
Hey brother Mace!

Very nice indeed, I like the scratched speaker and your sweet cables. As soon as I get in the new place I`ll send you some pics of my new man cave...Gonna be awesome!!!!

John, very good looking piece you got there. I like the beated up look.

keep it up people.
Phil.

Modeling...
I rest my case.
Lisboa, Portugal
Joined: March 04, 2008
KitMaker: 5,386 posts
Armorama: 4,727 posts
Posted: Thursday, January 24, 2013 - 04:00 AM UTC
@Philippe
Thanks !!!
@Gary
Nice work there ! Keep up the good work !
Final shots, some more weathering and added some camo nets too.


Active Builds: 0
Active Campaigns: 0
Indiana, United States
Joined: June 10, 2005
KitMaker: 6,188 posts
Armorama: 5,960 posts
Posted: Thursday, January 24, 2013 - 04:04 AM UTC
SWEET work John! I love it!

~ Jeff
Lisboa, Portugal
Joined: March 04, 2008
KitMaker: 5,386 posts
Armorama: 4,727 posts
Posted: Thursday, January 24, 2013 - 04:08 AM UTC
Quoted Text
SWEET work John! I love it! 
~ Jeff
Thanks Jeff !! I posted one photo on the Campaign Gallery too.
It was a really fun build !
I still have a lot of work on my Workbench but I'll keep coming here to see other Marder's progress !!
Active Builds: 0
Active Campaigns: 0
Texas, United States
Joined: March 08, 2010
KitMaker: 2,465 posts
Armorama: 2,383 posts
Posted: Thursday, January 24, 2013 - 04:14 PM UTC
Hey John, Great build brother! Love the chipping and the added netting looks right at home. Well done sir!

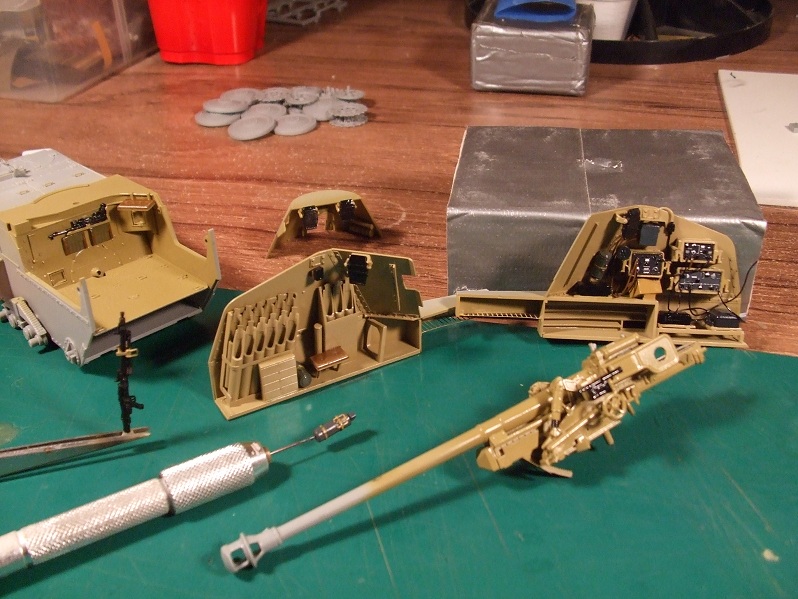
I have completed paint and detail on the radios. Just need to finish the mask canister and then ill detail paint the other side and the gun detail.


More tomorrow!

Gary
Indiana, United States
Joined: June 10, 2005
KitMaker: 6,188 posts
Armorama: 5,960 posts
Posted: Thursday, January 24, 2013 - 10:41 PM UTC
No surprises here Gary. Very nice.

~ Jeff

#003
Donegal, Ireland
Joined: May 14, 2002
KitMaker: 9,763 posts
Armorama: 7,444 posts
Posted: Thursday, January 24, 2013 - 11:16 PM UTC
Some very nice WIPs guys. Gary your fighting room is looking fantastic.

IPMS Stockholm
"The problem with common sense, is that it is not that common"
Washington, United States
Joined: August 03, 2008
KitMaker: 436 posts
Armorama: 320 posts
Posted: Friday, January 25, 2013 - 12:23 AM UTC
Gary,
Very nice looking paint on the radios.... I have base coated mine and have the dark grey on the various electrical boxes. The radios come next and then I get to rig them. Am definitely using yours as a guide...
Bob
Lisboa, Portugal
Joined: March 04, 2008
KitMaker: 5,386 posts
Armorama: 4,727 posts
Posted: Friday, January 25, 2013 - 12:41 AM UTC
Great work Gary !
I see another masterpiece from Gary & Stoned Elf's !

Thanks for the kind words !

Active Builds: 0
Active Campaigns: 0
Quebec, Canada
Joined: November 19, 2011
KitMaker: 1,389 posts
Armorama: 1,388 posts
Posted: Friday, January 25, 2013 - 01:55 AM UTC
He did it again

Gary your work is mighty fine bro!!!
Phil.

Modeling...
I rest my case.
Texas, United States
Joined: March 08, 2010
KitMaker: 2,465 posts
Armorama: 2,383 posts
Posted: Sunday, January 27, 2013 - 04:33 PM UTC
Hey fellas,
Thanks a bunch for the kind words my friends.

Im still slowly chippin' away at this rascal!

Ive Future coated what you see and im going to apply washes and ill seal it up with flat clear when dry.


Hopefully ill be able to start piecing it all together soon. Alot tougher kit than i though it would be!

Gary

Quebec, Canada
Joined: November 19, 2011
KitMaker: 1,389 posts
Armorama: 1,388 posts
Posted: Monday, January 28, 2013 - 02:11 AM UTC
Keep this up Gary! A very clean and crisp build yet. Just a thing, do you think you could have drilled the ammo rack a little to thin them? They seem rather thick...But you know it looks awesome the way it is also man! I love your work bro, can't wait to get back on the bench.
Phil.

Modeling...
I rest my case.


 .. well...


 RUH-ROW....you dropped a hatch inside?
  Break out tha plastic saw!!!


 Anyways, ill paint the radios and other interior details next.


 Very nice indeed, I like the scratched speaker and your sweet cables. As soon as I get in the new place I`ll send you some pics of my new man cave...Gonna be awesome!!!!


 Gary your work is mighty fine bro!!!


 Ive Future coated what you see and im going to apply washes and ill seal it up with flat clear when dry.


