Campaigns
Where Armorama group builds can be discussed, organized, and updates posted.
Waste not want not, Unter falscher Flagge
1721Lancers
Visit this Community
England - East Anglia, United Kingdom
Joined: March 21, 2012
KitMaker: 1,673 posts
Armorama: 1,640 posts
Posted: Friday, December 06, 2013 - 03:01 AM UTC
Sal, don't worry about the decals dude, it is the same with everything new, nobody was born a master at anything. Just go for it again and you'll get the better of them . She's looking good all the same

John, what a beauty she has turned out. I hope you're not all KV burned out now , remember the KV campaign next year

Mike, it doesn't matter if join the party late or early just get that bird built dude . This is one build I really wish to see completed


Paul
Nito74
Visit this Community
Lisboa, Portugal
Joined: March 04, 2008
KitMaker: 5,386 posts
Armorama: 4,727 posts
Posted: Friday, December 06, 2013 - 03:59 AM UTC

Quoted Text


John, what a beauty she has turned out. I hope you're not all KV burned out now , remember the KV campaign next year


Paul


Thanks Paul !
No not all, I still have a KV-1 waiting for that one !
ltb073
Visit this Community
New York, United States
Joined: March 08, 2010
KitMaker: 3,662 posts
Armorama: 3,078 posts
Posted: Tuesday, December 10, 2013 - 03:38 PM UTC

Quoted Text

Sal, don't worry about the decals dude, it is the same with everything new, nobody was born a master at anything. Just go for it again and you'll get the better of them . She's looking good all the same


Paul


Thanks Paul,
My 2nd attempt at making the decal was just a big a disaster as the 1st
Apparently Micro Sol decal setting solution is the the bonding solution that Testors was talking about in the instructions
So more research for the 3rd attempt If that don't work it's on to plan "B"
1721Lancers
Visit this Community
England - East Anglia, United Kingdom
Joined: March 21, 2012
KitMaker: 1,673 posts
Armorama: 1,640 posts
Posted: Wednesday, December 11, 2013 - 03:28 AM UTC
Hi Sal, have you thought about applying a coat of gloss or matte
varnish over them?
This could work as a protective sandwich seal. Your decal colours would be trapped between the varnish and the carrier film .
Be sure to use something that is the opposite of your decal colours, like if the colour is acrylic based then use a solvent based varnish, and vice versa.

It's just a thought, of course it's your decision in the end, whatever I hope they turn out for you


Paul
SHAKY962
Visit this Community
Buenos Aires, Argentina
Joined: May 21, 2012
KitMaker: 765 posts
Armorama: 438 posts
Posted: Wednesday, December 25, 2013 - 01:05 PM UTC
@John,
Nice!!!!!!!
Beautiful KV-2!!!!!!!!!
Nito74
Visit this Community
Lisboa, Portugal
Joined: March 04, 2008
KitMaker: 5,386 posts
Armorama: 4,727 posts
Posted: Thursday, December 26, 2013 - 03:53 AM UTC

Quoted Text

@John,
Nice!!!!!!!
Beautiful KV-2!!!!!!!!!


Gracias Jose !!!

I really enjoyed building it.
1721Lancers
Visit this Community
England - East Anglia, United Kingdom
Joined: March 21, 2012
KitMaker: 1,673 posts
Armorama: 1,640 posts
Posted: Friday, December 27, 2013 - 08:41 PM UTC
Hi there everyone, here's a little more inspiration that has just shown up on the "/news" page:

https://armorama.kitmaker.net/news/15912

@ Steph, you are doing the 222 aren't you, what decals do you have for it?


C[ ]


Paul
steph2102
Visit this Community
Isere, France
Joined: April 23, 2011
KitMaker: 735 posts
Armorama: 606 posts
Posted: Saturday, December 28, 2013 - 02:20 PM UTC
hello, @ paul thank you for the link. I had to put modeling between parenthesis (very very heavy workload load at the end year) but I should go back on my bench Current January.
steph
c4willy
#305
Visit this Community
Christchurch, New Zealand
Joined: February 01, 2006
KitMaker: 1,673 posts
Armorama: 120 posts
Posted: Monday, December 30, 2013 - 11:15 AM UTC
Okay gentlemen here we have the end of build number two! A captured I16 type 10 from 1940 at the Tachikawa IJAAF test department in Japan. Build was very simple and very easy as the fit of the Academy kit was outstanding virtually no putty! And the parts count is quite low.


1721Lancers
Visit this Community
England - East Anglia, United Kingdom
Joined: March 21, 2012
KitMaker: 1,673 posts
Armorama: 1,640 posts
Posted: Monday, December 30, 2013 - 09:35 PM UTC
Hi Chris, nice build and it's good to see someone doing multiple builds


Paul
1721Lancers
Visit this Community
England - East Anglia, United Kingdom
Joined: March 21, 2012
KitMaker: 1,673 posts
Armorama: 1,640 posts
Posted: Saturday, January 11, 2014 - 07:14 AM UTC
Hello everyone,
well we have 49 days left to get a build started or completed . Up till now we have all of 6 finished and 5 started projects, and there are still 35 players in the game.
Come on people, I know the holidays can put the brakes on a campaign but they're behind us now and we all should be full of new energy to get building again


Paul
Lakota
#123
Visit this Community
New Mexico, United States
Joined: November 17, 2008
KitMaker: 1,202 posts
Armorama: 635 posts
Posted: Saturday, January 18, 2014 - 04:16 PM UTC
Howdy Y'all
The builds are looking great! I haven't started my captured KV-II yet. With regret, I will un-enlist from the campaign as I have too many irons in the fire right now.
Keep up the good work.
Take Care,
Don "Lakota"
1721Lancers
Visit this Community
England - East Anglia, United Kingdom
Joined: March 21, 2012
KitMaker: 1,673 posts
Armorama: 1,640 posts
Posted: Saturday, January 18, 2014 - 08:50 PM UTC
O.k. Don, it's a shame you can't continue but that's the way
things go I suppose.

See you hopefully next time round.


Paul
panzerbob01
Visit this Community
Louisiana, United States
Joined: March 06, 2010
KitMaker: 3,128 posts
Armorama: 2,959 posts
Posted: Sunday, January 19, 2014 - 05:53 PM UTC
OK...

Finally! I've got myself organized around my build for this campaign!

I'm jumping in with Tamiya's Finnish BT-42 kit. I'll be doing it up as vehicle number 717 at the Battle of Vyborg, in 1944. Number 717 was painted in the Finnish later-war tricolor scheme (the scheme is actually mapped-out in the Tamiya kit instructions).

The build will include the very cool LionMarc alum & brass gun-barrel (the kit styrene bit is OK, but after "spending" 4 tiny drill-bits trying to open all those holes in that muzzle-brake, I decided I would just get the metal item!), and a small amount of scratch-work to add a few details Tamiya missed on.

The BT-42 was a ex-Russian BT-7 tank rebuilt by the Finns to create a sort of turreted "assault gun" - perhaps 18 or so were built in 1942 from Russian BT tanks captured during the "Winter War" in 1940. The Finns installed an elderly British 4.48inch (114mm) howitzer in a huge, boxy turret to create what they hoped would be something useful for beating back hordes of Russian T-34 tanks... Didin't work, as the Finns discovered one bloody day at Vyborg in 1944, where all but one of 12 BT-42 were quickly lost - without a known kill to their credit.

Kinda big, really ugly, definitely a captured tank being put to use against it's original owners. Unter Falsche Flagge!

The kit looks great in the box, and has some good reviews, so I have great expectations that this will be fun!

I Actually rounded up the kit and took my start pic (below) in early Dec 2013... But aside from taking that start pic, nothing happened, as I was waiting for a metal gun-barrel to arrive, and did other builds "to keep me busy"

Here's my Dec 2013 kit start pic:


And the gun-barrel (which actually arrived on Thursday last! :


And I immediately launched into cutting and cementing!


Things went well and pretty fast (hey, it's a modern Tamiya kit!) and the hull went together nicely. There were a few small gaps and what I believe to be some missing weld-seams, so those got fixed up. The kit actually does an OK job of showing the steering links for the front wheel pair, which were set up to allow this thing to be driven down a paved road like a (rather clumsy, I'm sure! ) truck, by simply removing the tracks and engaging the chain-drive to the rear-most pair of wheels. Pretty cool! Pretty silly, if you ask me!

I built the turret up, added some welds there, too, and made a wire hatch-spring to replace the molded-on spring on the commander's hatch. Easy pop addition, here!


OK. I'm in and this thing is rushing to get done! More tomorrow, with a couple hull details and fixes and my gripes... and on to the paint-shop! (I'm really hoping to get this one ready for a local model show next weekend ).

Bob
1721Lancers
Visit this Community
England - East Anglia, United Kingdom
Joined: March 21, 2012
KitMaker: 1,673 posts
Armorama: 1,640 posts
Posted: Monday, January 20, 2014 - 03:35 AM UTC
Hi Bob, cool choice and well within the spirit of this campaign . The brass and alu gun look fantastic, is it RB?
I can also imagine what the crews were thinking when going down a road, without the tracks at 40 mph in that top heavy ugly duckling
Looking forward to seeing her done, specially the tri colour camo.
I'll keep my fingers crossed that nothing gets in your way
for the show


Paul
panzerbob01
Visit this Community
Louisiana, United States
Joined: March 06, 2010
KitMaker: 3,128 posts
Armorama: 2,959 posts
Posted: Tuesday, January 21, 2014 - 04:39 AM UTC
BT 42 WIP update:

OK. The cutting and gluing all done as of Sunday noonish hour!

I applied the base-coat "number 1" (using Testor's ModelMaster "Russian Armor Green" lightened with some neutral gray)... The idea here is to paint the tank all base green and then add on appropriate brown and grey blotches. This base-coat came out very nice, and the color looks good -for a vehicle which "wants to be" all "field gray" or greenish - gray That's a paint-scheme (monochrome grayish green) I've seen on some BT-42 builds posted on the web, and looks good - if it's monochrome one wants. But it did not look the right "greenness" (new word! ) for the desired tri-color scheme (which the Tamiya instructions indicate as including their "NATO Green"), so I re-did that base-coat with some MM Medium Green lightened a bit with neutral gray. Much greener


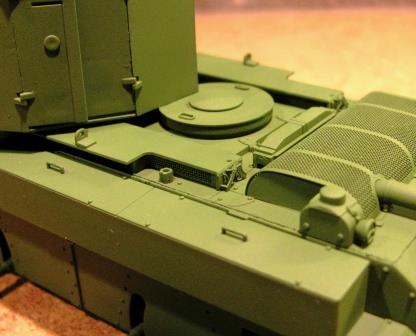
Right before painting, I fixed up a couple of detail "gripes" - added some styrene square-channel braces under the fenders (matching those channel braces seen on most BT-42 photos), and added some vague scratch (styrene and brass wire) representation of those small (but very visible) control-sets of operating the internal air-flow dampers in those radiator-boxes. The real thing - well-shown in the photos Tamiya provides of the BT-42 - consists of a curved metal plate with a slot holding a bent rod handle with a lock-nut. VERY visible and characteristic detail of BT radiator-boxes. Missing from this kit - something I think Tamiya could and should have done. Same fix for any BT kit, I think.

Another GRIPE - maybe my largest, with this kit, is that Tamiya supplies PE screens for those radiator boxes, but they are too long. Tamiya seems to indicate that those screens go on the outside of the frames - and the parts are sized to fit there. But actually, as seen in the helpful photos Tamiya provides of the real thing, they fit inside those frames. Argh! They fit in with some cutting and fuss. Otherwise, as I found, they will make it difficult to assemble the hull-top to the hull if attached where the original parts "fit" (i.e., outside the frames). Once cut and fiddled, they look great.


If luck smiles upon me tonite, I'll get some masking done (cheap tacky clay) and spray on one of the camo colors!

Bob
Hangelafette
Visit this Community
Pennsylvania, United States
Joined: April 22, 2012
KitMaker: 344 posts
Armorama: 315 posts
Posted: Tuesday, January 21, 2014 - 06:51 AM UTC
Hi all,

I decided to join this party a long time ago but never got around to posting a photo or building. I'm doing the B1 bis under german management.


Nate
panzerbob01
Visit this Community
Louisiana, United States
Joined: March 06, 2010
KitMaker: 3,128 posts
Armorama: 2,959 posts
Posted: Tuesday, January 21, 2014 - 07:16 AM UTC
BT-42 WIP...

I forgot to mention another little fix going here... The Finns apparently found that the BT-42, with it's heavier gun and heavier turret, increasingly over-taxed that suspension. Some BT-42 had, by 1944, been "upgraded" by addition of a reinforcement plate or brace welded onto that front axle assembly. Shows up in some pictures taken at the Battle-scene at Vyborg, so I added one to this build - it can be seen as that "shovel-nose" on the previous painted pic. As the one surviving BT-42 does not have this modification, I will assume that only some, but not all, were so fitted.

@Nate: Good Choice, that! I keep meaning to get one of those B1-bis in German service kits, but they usually come along at a price higher than I'll generally go for a kit... Some day! I have the French (original) version - looks mighty good in the box. I did get the metal barrels kit, however, as those kit barrels look OK but would enjoy an upgrade. I'm sure the same parts in your kit, so...

Planning any add-ons, AM, PE?

The "advertised" tricolor paint-job really calls me - I'll suppose that you may be planning such (I am, IF I ever get this one)... although records show that other schemes, including "classic all-gray" applied to this beastie.

@Paul;

Sorry I skipped past your question! The gun barrel is a LionMarc item. It may well be made by the gent who does the RB barrels (I've heard that RB is "his own brand" for barrels he also mills for some other folks... and generally available at a nicer price), but I cannot say for sure. There is also an Aber barrel out - looks like a one-piece all-aluminum mill item. Both cost about the same with shipping, so... This LM one looked, well, a bit cooler, and as I'm older-school about these things, being made 2-piece with a brass muzzle-brake called me louder. The real gun had a very distinct muzzle-brake which apparently the Finns added - the original Brit howitzer had no separate brake. This LM barrel captures that look extremely well, IMHO.

Cheers!

Bob
1721Lancers
Visit this Community
England - East Anglia, United Kingdom
Joined: March 21, 2012
KitMaker: 1,673 posts
Armorama: 1,640 posts
Posted: Wednesday, January 22, 2014 - 04:45 AM UTC
Hi Nathan and welcome to the "pirating campaign". Cool choice
there but as Bob said it's a tad on the expensive side for a plain plastic kit .
Still, looking forward to to seeing her built and you never know, you may talk Bob and me into getting one

Hi Bob, no problem. After all you're going flat out on getting the beast done for weekend . Hope they don't take points off for damp paint


Paul
panzerbob01
Visit this Community
Louisiana, United States
Joined: March 06, 2010
KitMaker: 3,128 posts
Armorama: 2,959 posts
Posted: Wednesday, January 22, 2014 - 12:55 PM UTC

Quoted Text

Hi Nathan and welcome to the "pirating campaign". Cool choice
there but as Bob said it's a tad on the expensive side for a plain plastic kit .
Still, looking forward to to seeing her built and you never know, you may talk Bob and me into getting one

Hi Bob, no problem. After all you're going flat out on getting the beast done for weekend . Hope they don't take points off for damp paint


Paul


I'll just post a sign on it saying "DEATH to anyone who adds another fingerprint to this! I KNOW which fresh prints are MINE!" Or maybe hang some of that yellow and black tape around it and a sign saying "Caution! Wet paint! Motorists please keep full left when passing!"

Of course, I welcome fair consideration in shows! "I'll gladly accept a boost in score in exchange for a chance to be the first to add YOUR MARK to this new build!"

I did the first masking for camo painting last nite... FIRST EVER that I've done! Came out pretty OK! I'll post later.

Bob
Hangelafette
Visit this Community
Pennsylvania, United States
Joined: April 22, 2012
KitMaker: 344 posts
Armorama: 315 posts
Posted: Friday, January 24, 2014 - 12:55 PM UTC
Bob,

Your BT-42 is a beaut, looking forward to your masking results. I'm working on an A13 for the Fall Gelb campaign so your beast's suspension looks strangely familiar

Ironically, I've been eying the BT-42 for awhile and have yet to find it at the right price point. I got a reasonable deal on the bis by haunting eBay.

My plan is to try the tri-color camo, I do have the RB barrel set, but otherwise she will be OOB. There are some nice looking PE sets and the Blast model update, but the price and my skill level makes both prohibitively expensive.

Paul - Thanks! This kit does come with a nice set of individual track links, pretty generous considering it's a Tamiya kit.

Cheers
1721Lancers
Visit this Community
England - East Anglia, United Kingdom
Joined: March 21, 2012
KitMaker: 1,673 posts
Armorama: 1,640 posts
Posted: Sunday, January 26, 2014 - 04:58 AM UTC
Hi Bob, how did it go?


Paul
panzerbob01
Visit this Community
Louisiana, United States
Joined: March 06, 2010
KitMaker: 3,128 posts
Armorama: 2,959 posts
Posted: Sunday, January 26, 2014 - 10:55 AM UTC
BT-42 WIP...

Well... NO. Short answer is I did not get it all done in time to make the show yesterday. But I did try mightily for that ring!


I made my way to masking and spraying the first camo color (the gray) on TUES late night... came out pretty neat-looking, albeit somewhat more contrasty and garish than I had anticipated

Thurs turned out to be a loooonger day "in the field" than planned for - spent 15 hours out freezing in east Texas doing hemispherical photography of forest canopies... cool, but mighty chilly! I rushed back and got into town just in time for the onset of freezing rain across the state (indeed across much of the lower SE and Gulf Coast part of the US... ). However, I "manfully" tackled the next camo layer late into the evening...


I stayed up into the wee hours (to my other half's disgust... ) trying to sort the colors. It was slower than I had hoped for, as this second go needed masking around the first color swaths... and a bit of fix-up and detailing to catch missed patches and a bit of over-spray. It was still a bit more contrasty and garish than I had hoped for... hmmm. Maybe some filters will be needed.

Friday I cut out of work right on time...! (sad to admit that I am one of those feds who somehow cannot meet the oft-stated "late to office, early-to-leave lazy shirkers" model... my bad! ) I rushed home, ate a hasty supper, checked the clock and realized... "It's FRIDAY evening! I have to head out for the show in 12 hours! " And I still need to detail the thing, add tools and cables, paint those, do decals, weather and dirt the puppy, etc.

I jumped into things. I did a couple of gray washes to tone down the colors some. That worked OK. I next moved to the decals... Argh! These Tamiya things are NOT very matt. And those Finnish crosses need to fit right over pairs of little bumps (a bolt-head and a small pistol-port either side of that turret - smack-dap center to those crosses!) The decals were a BOTHER. Took a while, and ended up messing up the paint-job, so needed to get the AB out and do some touch-ups after decals went on.

Next, I applied my basic "dirt layer" to the hull, and assembled the wheels onto the hull. I painted up and part-weathered the tracks, and mounted them onto the wheels. I followed this by doing another "dirt pass" to blend the wheels in.

It was now 1230 AM. I STILL haven't got the tow-ropes assembled and painted, and the tools are still on the sprues. So I downed tools and accepted that it wasn't getting done today!

Off to the show I went - somewhat lighter than planned, but OK. This one will go another time.

So here we are right now: the hull and turret and running-gear all assembled and basic-weathered. Tools and cables and maybe some odd add-on bits yet to go, followed by final dusting with chalks for the end product.
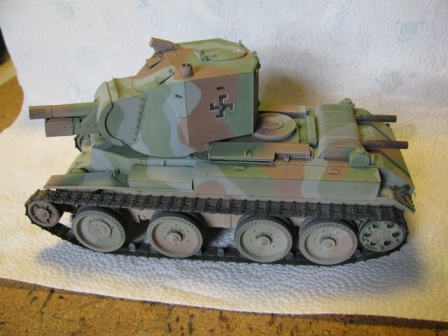


All's well that ends well, folks say - I'll get this one done pretty soon, and it's looking OK. For about a minute, there, I thought I was on-track to pull another "speed and power build" out of my hat (usually, I'm into a build for a mere 4 - 8 months!)- having kicked this off last weekend 19 JAN... but hey, win some, lose some!


I expect to get tools and cables on and finished this week

Bob
Bluestab
Visit this Community
South Carolina, United States
Joined: December 03, 2009
KitMaker: 2,160 posts
Armorama: 1,906 posts
Posted: Sunday, January 26, 2014 - 01:45 PM UTC
Nice piece of work Bob.
1721Lancers
Visit this Community
England - East Anglia, United Kingdom
Joined: March 21, 2012
KitMaker: 1,673 posts
Armorama: 1,640 posts
Posted: Monday, January 27, 2014 - 04:36 AM UTC
Hey Bob that has to suck dude. You put a sack full of energy in there and still pulled the losing straw

But she looks good from what you have completed and will look even better when done.

Stick in there dude, all will be well


Paul