Jeff - that antennae and chain look great! I should try that star on my Puma
Pete - I hope the kit gives you no more trouble
Campaigns
Where Armorama group builds can be discussed, organized, and updates posted.
Where Armorama group builds can be discussed, organized, and updates posted.
Hosted by Darren Baker, Richard S.
1/48 scale campaign #3

GregCloseCombat

Joined: June 30, 2008
KitMaker: 2,408 posts
Armorama: 2,394 posts

Posted: Sunday, January 06, 2013 - 03:48 PM UTC

Tojo72

Joined: June 06, 2006
KitMaker: 4,691 posts
Armorama: 3,509 posts

Posted: Monday, January 07, 2013 - 06:15 AM UTC
Here is what I will be doing for this campaign.Just arrived on friday.I still want to finish my "Big Cats" Tiger 1st,but here is my start picture.


GregCloseCombat

Joined: June 30, 2008
KitMaker: 2,408 posts
Armorama: 2,394 posts

Posted: Monday, January 07, 2013 - 11:25 AM UTC
OOOOOOoooooo That's a nice kit Anthony! Even comes with a good looking figure. Have fun on it 

miniflea

Joined: October 17, 2011
KitMaker: 237 posts
Armorama: 235 posts

Posted: Monday, January 07, 2013 - 03:53 PM UTC
Hello! Well, I've finally made some progress on my base. It is, other than a few small test runs, my first attempt at making a base for a tank, and my first use of celluclay.
I picked up a cheap picture frame at Target, five bucks or so. The selection was pretty bad, with most frames being metal, unsuitable for what I wanted, or badly chipped/scratched. This one was nice looking though, and just the right size. I removed the glass and backing, and taped the glass to the back to hold the celluclay in. I've also masked the edges of the frame.


First dab of celluclay. I've read people have lots of problems with warping, so I tried to use as little water as possible, plus I put it down in two main layers, letting the one dry (or so I thought) before putting down the second.

On the top layer, I added some gravel and a bit of sandy soil I collected outside.

Despite my best efforts at packing the stuff close in to the edges and using the bare minimum amount of water to make the stuff workable, there is a bit of shrinkage when it is dry.

I tried to fill the gap using Mr. Surfacer 500 (which is what I generally use to fill gaps and ejector pin marks) but after a few applications I succeed mostly in just making a mess, I think.

Ah well. Perhaps a different putty would have worked better. Time for paint!

If you are more observant than I, you have noticed that I am lacking a primary color. I belatedly remembered that my tube of yellow burst all over my tube of white and was thrown out. A quick trip to the store and I had some yellow, and for good measure, a tube of yellow ochre.
After some mixing, I got what I decided was a good base color. In painting, I did knock off a fair amount of the smaller gravel and struggled to not leave obvious brush marks, but I'm pretty happy with how it has turned out so far.

Not bad for a base coat I don't think. As always, comments and suggestions are most welcome!
I picked up a cheap picture frame at Target, five bucks or so. The selection was pretty bad, with most frames being metal, unsuitable for what I wanted, or badly chipped/scratched. This one was nice looking though, and just the right size. I removed the glass and backing, and taped the glass to the back to hold the celluclay in. I've also masked the edges of the frame.


First dab of celluclay. I've read people have lots of problems with warping, so I tried to use as little water as possible, plus I put it down in two main layers, letting the one dry (or so I thought) before putting down the second.

On the top layer, I added some gravel and a bit of sandy soil I collected outside.

Despite my best efforts at packing the stuff close in to the edges and using the bare minimum amount of water to make the stuff workable, there is a bit of shrinkage when it is dry.

I tried to fill the gap using Mr. Surfacer 500 (which is what I generally use to fill gaps and ejector pin marks) but after a few applications I succeed mostly in just making a mess, I think.

Ah well. Perhaps a different putty would have worked better. Time for paint!

If you are more observant than I, you have noticed that I am lacking a primary color. I belatedly remembered that my tube of yellow burst all over my tube of white and was thrown out. A quick trip to the store and I had some yellow, and for good measure, a tube of yellow ochre.
After some mixing, I got what I decided was a good base color. In painting, I did knock off a fair amount of the smaller gravel and struggled to not leave obvious brush marks, but I'm pretty happy with how it has turned out so far.

Not bad for a base coat I don't think. As always, comments and suggestions are most welcome!
miniflea

Joined: October 17, 2011
KitMaker: 237 posts
Armorama: 235 posts

Posted: Monday, January 07, 2013 - 03:59 PM UTC
Just wanted to add, when I removed the glass bottom, the celluclay was still damp and ever so slightly pliable. Keep in mind, this first layer has had almost two weeks to dry.

Anthony, looking forward to seeing that kit built up. I bought one at the same time as the Matilda.

Anthony, looking forward to seeing that kit built up. I bought one at the same time as the Matilda.

GregCloseCombat

Joined: June 30, 2008
KitMaker: 2,408 posts
Armorama: 2,394 posts

Posted: Monday, January 07, 2013 - 04:12 PM UTC
Miniflea - nice base! I've never been successful using celluclay because it always shrinks or cracks. So I tend to stay with just sand and glue, DAS Clay, or magic sculpt. The picture frame edges that are chipped I usually just paint over anyways, so look for those bargains at the store too. Keep up the good work on it - your base color looks right on. 
Be sure to check out pics of this finished Jackal on M-L website
http://www.network54.com/Forum/527528/message/1357573431/HMT400+Jackal


Be sure to check out pics of this finished Jackal on M-L website
http://www.network54.com/Forum/527528/message/1357573431/HMT400+Jackal

miniflea

Joined: October 17, 2011
KitMaker: 237 posts
Armorama: 235 posts

Posted: Monday, January 07, 2013 - 05:18 PM UTC
What I'd really like is a place to buy cheap wooden plaques and a few different shades of wood varnish. Not sure about the former other than "online somewhere" although I'm sure the latter would be pretty easy to come by.
That jackal looks fantastic, now if only Tamiya would put out some 1/48 modern stuff other than the Humvee.
That jackal looks fantastic, now if only Tamiya would put out some 1/48 modern stuff other than the Humvee.
zontar

Joined: August 27, 2006
KitMaker: 1,646 posts
Armorama: 1,557 posts

Posted: Tuesday, January 08, 2013 - 06:39 AM UTC
Anthony: nice kit. Looking forward to the build.
Miniflea: non-shirnk spackling compound can also work well filling gaps with the celluclay. For plaques you could try a trophy shop. Sometimes craft stores like Hobby Lobby or Michaels have some too.
Greg: That is a nice jackal build. I think one of those has just been added to my wish list.
Happy Modeling, -zon

Posted: Wednesday, January 09, 2013 - 12:03 AM UTC
Some progress on my KV-1. This kit is very easy to put together and detail is quite nice for the scale. All should be ready for undercoat soon.


GregCloseCombat

Joined: June 30, 2008
KitMaker: 2,408 posts
Armorama: 2,394 posts

Posted: Wednesday, January 09, 2013 - 01:14 PM UTC
John - I've built that one before and couldn't agree more with you. It's looking great. I like the Hobby Boss kits are ready to go straight out of the box 

35th-scale

Joined: November 21, 2007
KitMaker: 3,212 posts
Armorama: 2,807 posts

Posted: Thursday, January 10, 2013 - 04:37 AM UTC
Some more slow progress....
Just to show the level of engineering on this kit I was easily able to get all moving parts (doors & stowage bins along the side of the rear) to actually move. Considering the scale that's quite incredable....for me anyway! The front is still off until after painting.


Still quite a few small bits to be added.
Just to show the level of engineering on this kit I was easily able to get all moving parts (doors & stowage bins along the side of the rear) to actually move. Considering the scale that's quite incredable....for me anyway! The front is still off until after painting.


Still quite a few small bits to be added.

Tojo72

Joined: June 06, 2006
KitMaker: 4,691 posts
Armorama: 3,509 posts

Posted: Thursday, January 10, 2013 - 05:23 AM UTC
Very nice work Greg,thats one you don't see everyday

GregCloseCombat

Joined: June 30, 2008
KitMaker: 2,408 posts
Armorama: 2,394 posts

Posted: Thursday, January 10, 2013 - 02:56 PM UTC
Sean - I agree, your build is coming along great! 

35th-scale

Joined: November 21, 2007
KitMaker: 3,212 posts
Armorama: 2,807 posts

Posted: Thursday, January 10, 2013 - 08:56 PM UTC
Thansk Greg...it's the finishing will be the problem. You've set a very high standard for these! Really fantastic Jackal....
zontar

Joined: August 27, 2006
KitMaker: 1,646 posts
Armorama: 1,557 posts

Posted: Friday, January 11, 2013 - 09:30 AM UTC
John: Nice work on the KV
Sean: looking great. I'm really liking this one more and more, and I already love it.
Happy Modeling, -zon
Sean: looking great. I'm really liking this one more and more, and I already love it.
Happy Modeling, -zon

Posted: Friday, January 11, 2013 - 03:44 PM UTC
Here are my Starter Photos


Tom
Tom
imatanker

Joined: February 11, 2011
KitMaker: 1,654 posts
Armorama: 1,565 posts

Posted: Saturday, January 12, 2013 - 03:30 AM UTC
Hey Tom,that kit looks pretty nice,I don't know much about Skybow kits,Where did you get it? Jeff T.

Tojo72

Joined: June 06, 2006
KitMaker: 4,691 posts
Armorama: 3,509 posts

Posted: Saturday, January 12, 2013 - 03:51 AM UTC
Quoted Text
Here are my Starter Photos
Tom
That Skybow Tiger is a great kit,details and zimm are good,seperate tools,miles ahead of the 1/48 Tamiya tigers,only weakness I thought were the tracks.Have fun with it.
Posted: Saturday, January 12, 2013 - 03:55 AM UTC
Quoted Text
Hey Tom,that kit looks pretty nice,I don't know much about Skybow kits,Where did you get it? Jeff T.
Jeff,
A friend in my local armor club has a good relationship with a "vendor" that came across a pallet of these kits. My friend purchased around 30 of these and was reselling them to the club members. Skybow was purchased by AFV Club many years ago and repackaged some of their kits under the AFV CLub Name, however, I have not seen AFV Club rebox of this kit.
Tom
imatanker

Joined: February 11, 2011
KitMaker: 1,654 posts
Armorama: 1,565 posts

Posted: Saturday, January 12, 2013 - 01:55 PM UTC
Hey Gentlemen,I was cruising the net and noticed that Squadron has both the Jackal and the Coyote in stock.Don't now why the Coyote is 6 bucks more though.
Tom,thanks for the info.I look forward to seeing it built.Jeff T.
Tom,thanks for the info.I look forward to seeing it built.Jeff T.

GregCloseCombat

Joined: June 30, 2008
KitMaker: 2,408 posts
Armorama: 2,394 posts

Posted: Saturday, January 12, 2013 - 02:59 PM UTC
Tom - that's a very good kit. The AFV club version is around still and comes with the same pe, decals, etc.

the Perth Military Modelling site did some great reviews of the early 1/48 kits and this one is among them.
http://www.perthmilitarymodelling.com/reviews/48/skybow/tp4833.htm

the Perth Military Modelling site did some great reviews of the early 1/48 kits and this one is among them.
http://www.perthmilitarymodelling.com/reviews/48/skybow/tp4833.htm
Posted: Saturday, January 12, 2013 - 09:47 PM UTC
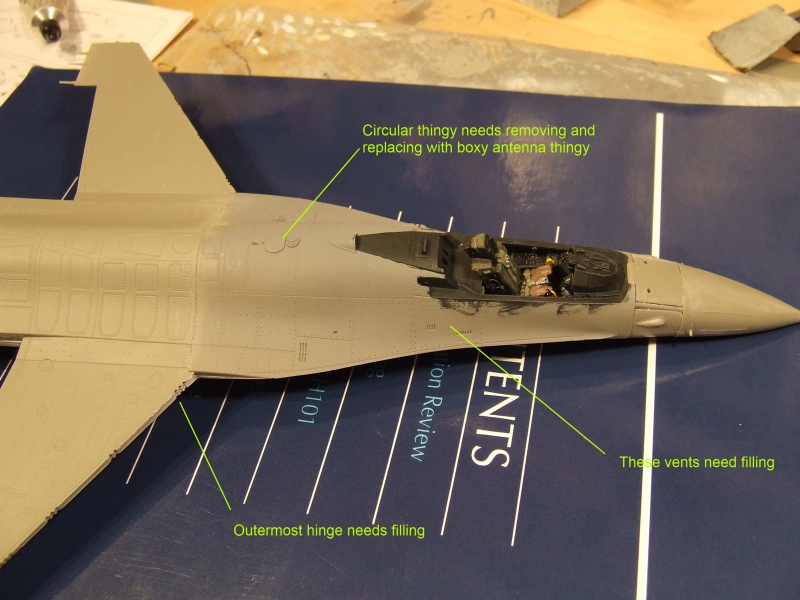
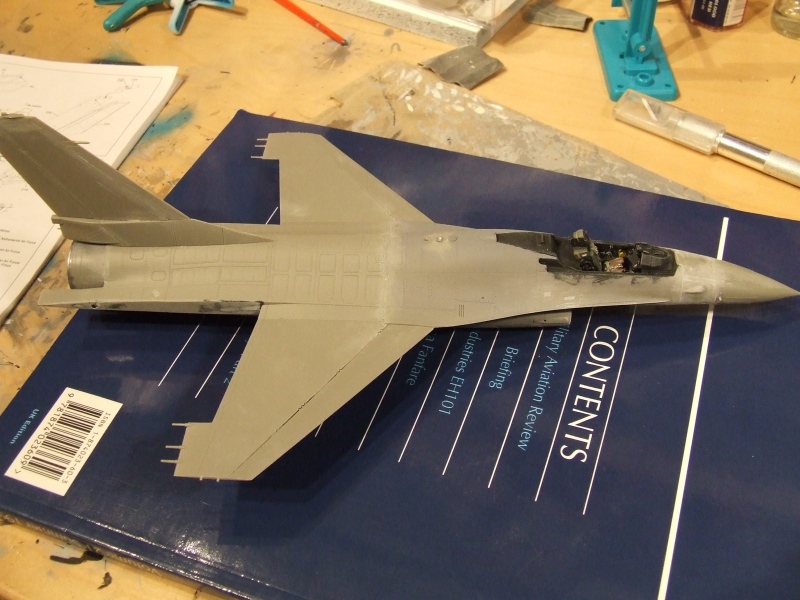
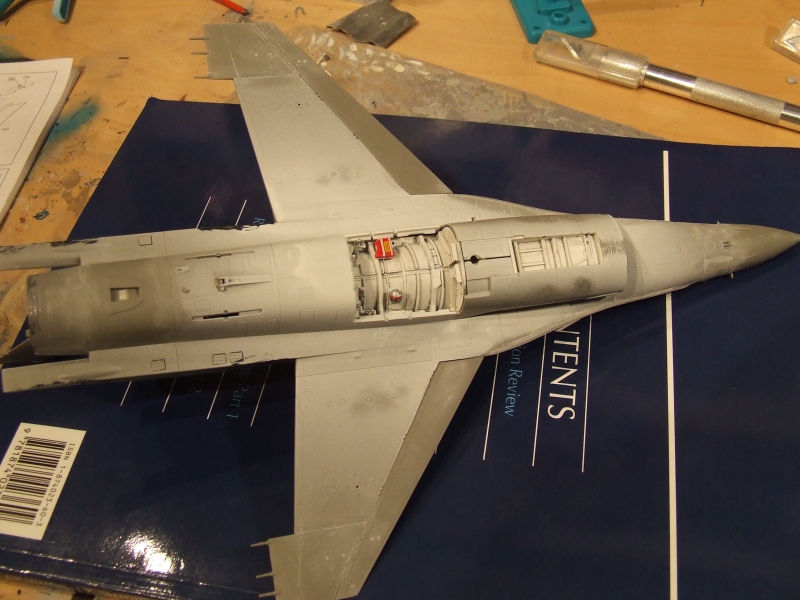
F-16 progressing.
Ever get the impression a kit doesn't want to stay stuck together?

Corrections required

Et voila!

Underneath. Taking a fair bit of PSR this kit....

Ever get the impression a kit doesn't want to stay stuck together?

Corrections required

Et voila!

Underneath. Taking a fair bit of PSR this kit....

35th-scale

Joined: November 21, 2007
KitMaker: 3,212 posts
Armorama: 2,807 posts

Posted: Sunday, January 13, 2013 - 08:57 AM UTC
Quoted Text
Hey Gentlemen,I was cruising the net and noticed that Squadron has both the Jackal and the Coyote in stock.Don't now why the Coyote is 6 bucks more though.
For the sprue with the extra wheels, axle, stowage bins and extended bed. Having said that any shop I've seen them in here had both at same price.
imatanker

Joined: February 11, 2011
KitMaker: 1,654 posts
Armorama: 1,565 posts

Posted: Sunday, January 13, 2013 - 09:40 AM UTC
Quoted Text
Quoted TextHey Gentlemen,I was cruising the net and noticed that Squadron has both the Jackal and the Coyote in stock.Don't now why the Coyote is 6 bucks more though.
For the sprue with the extra wheels, axle, stowage bins and extended bed. Having said that any shop I've seen them in here had both at same price.
Sean,More money for more parts makes sense.Are you saying that both the kits are the same price over there? If so,I find that interesting.Jeff T.
Hangelafette

Joined: April 22, 2012
KitMaker: 344 posts
Armorama: 315 posts

Posted: Sunday, January 13, 2013 - 10:40 AM UTC
Speaking of 1-48 scale Tigers... I presume the late version is another reboxed Skybow kit?

At any rate, this is my stab at 1-48 armor and my first Tiger. I started back in December and finally got around to posting some pictures.
After a days work I am here:

I usually paint the stowage off the model, but I'm going to try painting with everything on.
 Nate
Nate

At any rate, this is my stab at 1-48 armor and my first Tiger. I started back in December and finally got around to posting some pictures.
After a days work I am here:

I usually paint the stowage off the model, but I'm going to try painting with everything on.
 Nate
Nate |


