Campaigns
Where Armorama group builds can be discussed, organized, and updates posted.
Where Armorama group builds can be discussed, organized, and updates posted.
Hosted by Darren Baker, Richard S.
1/48 scale campaign #3
35th-scale

Joined: November 21, 2007
KitMaker: 3,212 posts
Armorama: 2,807 posts

Posted: Wednesday, January 30, 2013 - 01:07 AM UTC
Hi Greg, it's just short of 6 inches....


PeteDoc

Joined: April 10, 2012
KitMaker: 164 posts
Armorama: 130 posts

Posted: Wednesday, January 30, 2013 - 09:05 AM UTC
I'm still here folks, and have made some progress, however this really has been a cursed build from the start. I've managed to fix previous errors and faults, but now having problems with the decals!
Anyway, story so far -

Anyway, story so far -

steph2102

Joined: April 23, 2011
KitMaker: 735 posts
Armorama: 606 posts

Posted: Saturday, February 02, 2013 - 03:05 AM UTC
hello, here is my progress before painting.
steph


steph


35th-scale

Joined: November 21, 2007
KitMaker: 3,212 posts
Armorama: 2,807 posts

Posted: Saturday, February 02, 2013 - 07:34 AM UTC
Wheels on and started weathering:


pclark442

Joined: January 17, 2012
KitMaker: 42 posts
Armorama: 41 posts

Posted: Saturday, February 02, 2013 - 10:22 AM UTC
Almost done with this thing.
Still have the Headlights, machine guns, and the general final clean up, then its into Black primer and Russian green.
The periscope on the turret, the taillight, and the Spare tire holders were all useless lumps. I scratched something that looked good to me (apologies to the purists). From photos, the roofline has a weld seam and very faint rivets. I decided not to mess with adding them at this point. In the end I think it will look nice sitting on the shelf or perhaps a small base.


zontar

Joined: August 27, 2006
KitMaker: 1,646 posts
Armorama: 1,557 posts

Posted: Saturday, February 02, 2013 - 02:32 PM UTC
Pete: the fw is looking nice.
Stephen: great progress. I look forward to some paint.
Sean: coming along very well. I picked one up last month and am looking forward to building it.
Patrick: the scratching on the armored car came out really well. I will be happy to see some paint on it as when I look at the photos I keep seeing the rivets as holes
Happy Modeling, -zon
Stephen: great progress. I look forward to some paint.
Sean: coming along very well. I picked one up last month and am looking forward to building it.
Patrick: the scratching on the armored car came out really well. I will be happy to see some paint on it as when I look at the photos I keep seeing the rivets as holes

Happy Modeling, -zon


GregCloseCombat

Joined: June 30, 2008
KitMaker: 2,408 posts
Armorama: 2,394 posts

Posted: Sunday, February 03, 2013 - 01:02 PM UTC
Pete. It looks good. Bad decals are as frustrating as anything.
Steph. I like the plasric strip you did. I'm going to borrow that idea for the Jumbo im doing in the Sherman campaign. I'm happy to see a bandai being built
Patrick. Nice details you've added and I think you've done everything possible to improve that kit. It looks like fun to paint now.
I'm going to get back into this campaign the next chance I get. Carry on


Tojo72

Joined: June 06, 2006
KitMaker: 4,691 posts
Armorama: 3,509 posts

Posted: Sunday, February 03, 2013 - 01:25 PM UTC
I got my JS-2 assembled,primed and ready for paint


markchis

Joined: February 09, 2009
KitMaker: 467 posts
Armorama: 392 posts

Posted: Tuesday, February 05, 2013 - 09:40 AM UTC
ok im starting - and i feel i have missed so much allready. There is just so much great work taking place all over the forums.
Well im still with Plan A - OOH RAA !! Marine Corps A-4 super mike to support the leatherneck brothers in arms on the ground- go FLY CORP !
qualification pics -


just a few touches of AM -

one of San Hasegawas finest kits - it really does go together very well - so I had best crack on !
best
Mark
Well im still with Plan A - OOH RAA !! Marine Corps A-4 super mike to support the leatherneck brothers in arms on the ground- go FLY CORP !
qualification pics -


just a few touches of AM -

one of San Hasegawas finest kits - it really does go together very well - so I had best crack on !
best
Mark
Removed by original poster on 02/05/13 - 21:50:56 (GMT).

markchis

Joined: February 09, 2009
KitMaker: 467 posts
Armorama: 392 posts

Posted: Tuesday, February 05, 2013 - 09:52 AM UTC
Quoted Text
Hi Greg, it's just short of 6 inches....
Hi Sean thanks for letting us know


GregCloseCombat

Joined: June 30, 2008
KitMaker: 2,408 posts
Armorama: 2,394 posts

Posted: Tuesday, February 05, 2013 - 04:43 PM UTC
Anthony. Looks very hungry and thirsty for paint
Mark. . That statement doesn't sound right out of context. Im sure your kit will be a another winner. Do you have a paint scheme in mind?
I started painting my figures last night.
Mark.
 . That statement doesn't sound right out of context. Im sure your kit will be a another winner. Do you have a paint scheme in mind?
I started painting my figures last night.
35th-scale

Joined: November 21, 2007
KitMaker: 3,212 posts
Armorama: 2,807 posts

Posted: Wednesday, February 06, 2013 - 10:58 AM UTC
Quoted Text
Quoted TextHi Greg, it's just short of 6 inches....
Hi Sean thanks for letting us know
Just so no-one gets confused and takes it out of context: I was referring to the Airfix 1/48 Coyote.....

imatanker

Joined: February 11, 2011
KitMaker: 1,654 posts
Armorama: 1,565 posts

Posted: Wednesday, February 06, 2013 - 11:33 AM UTC
Boy,am I glad you guys got THAT cleared up 
 Jeff T.

 Jeff T.
ThomasB

Joined: May 17, 2002
KitMaker: 762 posts
Armorama: 323 posts

Posted: Wednesday, February 06, 2013 - 02:29 PM UTC
Just signed up, haven't done a campaign in a long while (or any building at all for that matter...)
Still haven't decided what to build, have Airfix Jackal and their new Spitfire XIX in the mail, so we'll se what I decide when they show up...
Still haven't decided what to build, have Airfix Jackal and their new Spitfire XIX in the mail, so we'll se what I decide when they show up...

markchis

Joined: February 09, 2009
KitMaker: 467 posts
Armorama: 392 posts

Posted: Wednesday, February 06, 2013 - 07:30 PM UTC
Greg, Sean and Jeff - apologies gents lowest form of wit my innuendoes
serious note - great work with the Coyote Sean - looks really good
Jeff - im going for the 70`s Grey and White scheme - in the markings of VMA-311 - without doubt my favourite unit logo and markings -

best
Mark
serious note - great work with the Coyote Sean - looks really good
Jeff - im going for the 70`s Grey and White scheme - in the markings of VMA-311 - without doubt my favourite unit logo and markings -

best
Mark
35th-scale

Joined: November 21, 2007
KitMaker: 3,212 posts
Armorama: 2,807 posts

Posted: Saturday, February 09, 2013 - 06:02 AM UTC
Thanks for the comments Gents. I've left the side netting: ye've seen my scratch-building skills or lack of!
Anyway, got the decals onto the dash and started weathering...nearly there: just lights & tools to do. Should have done both at an earlier stage. The belts & buckels on Value Gear stuff were just too big for this scale so used one of Steves covered crate blocks for the rear....it needed something to fill it up....


Hope you like it. As always, comments welcomed!
Cheers
Sean
Anyway, got the decals onto the dash and started weathering...nearly there: just lights & tools to do. Should have done both at an earlier stage. The belts & buckels on Value Gear stuff were just too big for this scale so used one of Steves covered crate blocks for the rear....it needed something to fill it up....


Hope you like it. As always, comments welcomed!
Cheers
Sean
Posted: Sunday, February 10, 2013 - 10:54 AM UTC
Howdy Y'all:  An
An
@Sean: Thanks for sharing. I would've never known it was just short of your 6 inches. It looks nice.
I finally got some build time in today. It snowed too much to go out of the house. I'm a kitchen table builder and got this far for now. I'm not too sure if I want to use Vallejo's acrylic surface primer on the metal barrel or not. I've had good luck with the stuff on styrene. Any thoughts or suggestions?
Y'all take care,
Don "Lakota"

 An
An@Sean: Thanks for sharing. I would've never known it was just short of your 6 inches. It looks nice.
I finally got some build time in today. It snowed too much to go out of the house. I'm a kitchen table builder and got this far for now. I'm not too sure if I want to use Vallejo's acrylic surface primer on the metal barrel or not. I've had good luck with the stuff on styrene. Any thoughts or suggestions?
Y'all take care,
Don "Lakota"

Tojo72

Joined: June 06, 2006
KitMaker: 4,691 posts
Armorama: 3,509 posts

Posted: Monday, February 11, 2013 - 03:03 AM UTC
Here is an update.Still need final assembly and weathering.


steph2102

Joined: April 23, 2011
KitMaker: 735 posts
Armorama: 606 posts

Posted: Monday, February 11, 2013 - 09:23 AM UTC
hello,
SEAN superb editing. Following my progress. first layer OD pending weather.
steph


SEAN superb editing. Following my progress. first layer OD pending weather.
steph


GregCloseCombat

Joined: June 30, 2008
KitMaker: 2,408 posts
Armorama: 2,394 posts

Posted: Monday, February 11, 2013 - 07:31 PM UTC
Sean - looks real good!! It has the desert feel
Don - I would always prime metal parts.
Anthony - almost there. very nice tank!
Steph - looking forward to seeing the weathering on your Sherman.
I've done zero modelling but the 3 day weekend approaches, so we'll see if there's some model time
Don - I would always prime metal parts.
Anthony - almost there. very nice tank!
Steph - looking forward to seeing the weathering on your Sherman.
I've done zero modelling but the 3 day weekend approaches, so we'll see if there's some model time

35th-scale

Joined: November 21, 2007
KitMaker: 3,212 posts
Armorama: 2,807 posts

Posted: Tuesday, February 12, 2013 - 08:38 PM UTC
Thanks Greg & Don.
I may have been slow to start but it's all done now in a last mad dash:


Some tips I can give from my experiece with this one for anyone considering it:
Leave the sand channel off until after painting & decaling. There's a reg-plate decal goes behind it.
Do the decals on the dash-board before attaching the front portion to the chassis
Paint the tools, on the face of the step up to the gunners platform, while you can still get easy access to them
The wheels are a tight fit over the hubs. As I left them off until after painting so I could do the hubs black and the wheel rims sand, they were an even tighter fit....the axels are fragile: be careful!
But despite those bits, which are more my fault than anything, I really enjoyed the build and am pleased with the result. Now to get the Jackal!
I may have been slow to start but it's all done now in a last mad dash:


Some tips I can give from my experiece with this one for anyone considering it:
Leave the sand channel off until after painting & decaling. There's a reg-plate decal goes behind it.
Do the decals on the dash-board before attaching the front portion to the chassis
Paint the tools, on the face of the step up to the gunners platform, while you can still get easy access to them
The wheels are a tight fit over the hubs. As I left them off until after painting so I could do the hubs black and the wheel rims sand, they were an even tighter fit....the axels are fragile: be careful!
But despite those bits, which are more my fault than anything, I really enjoyed the build and am pleased with the result. Now to get the Jackal!
klimmer

Joined: May 16, 2003
KitMaker: 250 posts
Armorama: 36 posts

Posted: Wednesday, February 13, 2013 - 11:11 PM UTC
Wow, what a great bunch of builds going on here.
I made a start on my Thunderchief, not much but the cockpit I am calling complete,


I hope work slows down so I can actually get some work done on this
 Ted
Ted
I made a start on my Thunderchief, not much but the cockpit I am calling complete,


I hope work slows down so I can actually get some work done on this

 Ted
Ted
Tojo72

Joined: June 06, 2006
KitMaker: 4,691 posts
Armorama: 3,509 posts

Posted: Thursday, February 14, 2013 - 03:54 AM UTC
I finished up my JS-2 yesterday.I only lightly weathered it with Mig Pigments and Washes.To be different,I dressed it up in Polish markings.Nice campaign so far Greg,I look forward to the feature.


Posted: Thursday, February 14, 2013 - 09:34 AM UTC
As always great work in this campaign!
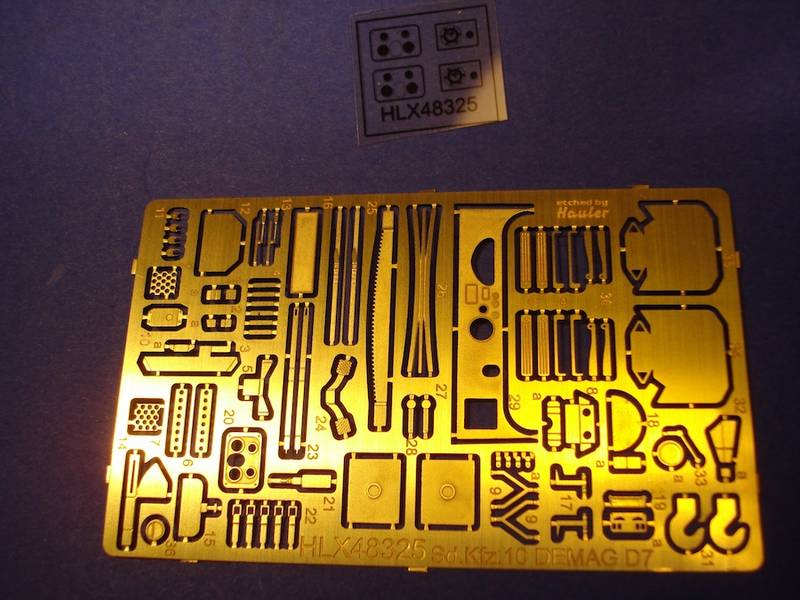
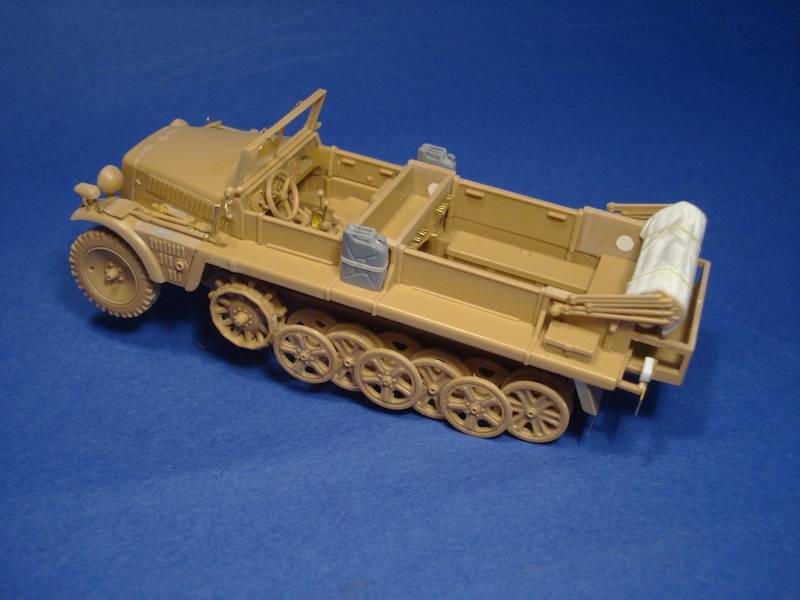
Thought I'd give you a sneek peak at the Bluecat Demag and Hauler PE. I will write up a full build review of the Hauler set, but I can tell you that it surely helps to bring the Bluecat kit up to speed. Which itself is an easy to build kits. I'm especially impressed with how the tracks work.


Cheers!
Stefan
Thought I'd give you a sneek peak at the Bluecat Demag and Hauler PE. I will write up a full build review of the Hauler set, but I can tell you that it surely helps to bring the Bluecat kit up to speed. Which itself is an easy to build kits. I'm especially impressed with how the tracks work.


Cheers!
Stefan
 |


