Campaigns
Where Armorama group builds can be discussed, organized, and updates posted.
1/48 scale campaign #3
shavebeard
Visit this Community
Oregon, United States
Joined: October 10, 2012
KitMaker: 151 posts
Armorama: 115 posts
Posted: Thursday, March 28, 2013 - 04:23 AM UTC
after a couple of setbacks heres my 105 nearly complete.
i still have to do my infantry support and priest figure plus finish my ground work.
critique is always welcome.
thanks
chris


 photo SAM_2616_zps8339b728.jpg


 photo SAM_2615_zps87a84596.jpg


 photo SAM_2612_zps53547e00.jpg


 photo SAM_2611_zps09af1c4e.jpg


 photo SAM_2610_zpsf844ccbf.jpg


 photo SAM_2612_zps53547e00.jpg


 photo SAM_2613_zpsdfc3f8a0.jpg

 photo SAM_2621_zpsc3e62ee3.jpg
waikong
Visit this Community
New York, United States
Joined: February 01, 2005
KitMaker: 25 posts
Armorama: 23 posts
Posted: Thursday, March 28, 2013 - 04:56 AM UTC
Excellent dio! Great looking finish on that tank and the figure painting is good too - something I've been trying to get better at.
shavebeard
Visit this Community
Oregon, United States
Joined: October 10, 2012
KitMaker: 151 posts
Armorama: 115 posts
Posted: Thursday, March 28, 2013 - 05:11 AM UTC
thanks ,its been a labor but its coming together.
figures are hard for me as well not only the painting but usually they have to be modified to fit the scene.
happy modeling
chris
pxpxpx
Visit this Community
Stockholm, Sweden
Joined: March 21, 2012
KitMaker: 26 posts
Armorama: 24 posts
Posted: Thursday, March 28, 2013 - 02:03 PM UTC

Quoted Text

Sandell. Good to see you back here. I remember your 222. I've been itching to do one of those 251s too to see how it compares to the long build of the AFV Club one. They both look good finished from what I've seen.


I just opened it and took a peak and got all giddy. I dont know what it is these 251s are doing to me... but I wouldn't be surprised if I have built more of them after this one.

Started on the panzer first though. How it turns out will decide what kind of bases/diorama they end up on. Woul'd be cool with a combined base with the two models interacting.

Time will tell. Now it's back to cutting my fingers and putting glue up my nose!
RedwingNev
Visit this Community
England - East Midlands, United Kingdom
Joined: February 07, 2004
KitMaker: 911 posts
Armorama: 348 posts
Posted: Friday, March 29, 2013 - 08:58 PM UTC
That's some nice work on those figures Chris.

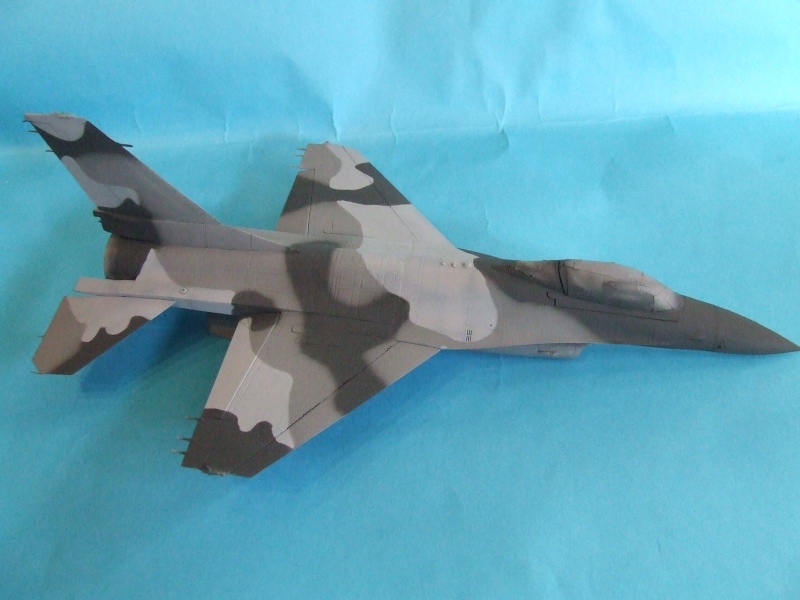
My Viper has had its camo completed, however rather stupidly I decided to spray the dark grey freehand and did a terrible job. So now I'm going to have to re-mask it and re-spray the medium grey to correct all my overspray and too-soft edges

GregCloseCombat
Visit this Community
California, United States
Joined: June 30, 2008
KitMaker: 2,408 posts
Armorama: 2,394 posts
Posted: Saturday, March 30, 2013 - 02:19 AM UTC
Chris. Really great job on the figures and stowage!!! One minor thing would be to give the turret loader a little bit longer neck as he looks to be shrugging his shoulders uncomfortably. Otherwise excellent all around. That tree is wonderful how did you do it?


Neil. Hope the taping is minor. The camo pattern does look good otherwise
shavebeard
Visit this Community
Oregon, United States
Joined: October 10, 2012
KitMaker: 151 posts
Armorama: 115 posts
Posted: Saturday, March 30, 2013 - 03:42 AM UTC
Thanks Neil ,i like making figures but they are a challenge to me.
i agree with your plan to sharpen up the green camo. when you do that it's gonna look excellent!
great job so far look forward to seeing her done.
chris.
shavebeard
Visit this Community
Oregon, United States
Joined: October 10, 2012
KitMaker: 151 posts
Armorama: 115 posts
Posted: Saturday, March 30, 2013 - 04:04 AM UTC
Hi Greg. the trees are made from tree roots.the front one has two box's of plus model maple leaves
the rear tree leaves are homemade using white glue and a toothpick on a pain of glass once dry just peal and glue.
I agree about the gunner his neck is to scrunched ! off with his head! i just hope that's all that comes off when i do it.
thanks for the critique and good word.
chris.
Murdo
Visit this Community
Scotland, United Kingdom
Joined: May 25, 2005
KitMaker: 2,218 posts
Armorama: 1,050 posts
Posted: Sunday, March 31, 2013 - 01:15 AM UTC
Can I join with this 1/48 Vacform Fairey Barracuda beastie?


I have already cut a couple of bits out of the Vacform sheet though (I didn't read the campaign requirements properly) but it is barely started, just the fuselage cut out (and VERY badly sanded - that's going to be a big problem needing LOTS of filler). It will hopefully be the first Vacform kit I've ever completed.

GregCloseCombat
Visit this Community
California, United States
Joined: June 30, 2008
KitMaker: 2,408 posts
Armorama: 2,394 posts
Posted: Sunday, March 31, 2013 - 03:11 AM UTC
Welcome Murdo!
I say go ahead and build. It looks like a neat plane in the picture. Hope you get it air worthy


and Chris - thanks for the tip!
velotrain
Visit this Community
Massachusetts, United States
Joined: December 23, 2010
KitMaker: 384 posts
Armorama: 320 posts
Posted: Sunday, March 31, 2013 - 08:08 PM UTC
I had no idea that "too-soft edges" was an issue for camo - I would have thought that would just make it more effective?

Or, is that only from a modeling perspective?
RedwingNev
Visit this Community
England - East Midlands, United Kingdom
Joined: February 07, 2004
KitMaker: 911 posts
Armorama: 348 posts
Posted: Monday, April 01, 2013 - 05:54 AM UTC
Hi Charles, its mainly because I've got a mixture of "tight" camo demarcations, and very soft demarcations, with a bit of overspray too. Look how fuzzy the edges on the dark grey/medium grey are on the fin and starboard wing. Then how tight they are on the dark grey/light grey (which I had masked).


I use blu-tac sausages usually, gives a tight but softly feathered edge.
velotrain
Visit this Community
Massachusetts, United States
Joined: December 23, 2010
KitMaker: 384 posts
Armorama: 320 posts
Posted: Monday, April 01, 2013 - 09:42 AM UTC
Plan B?

Although I still like the proto German RR bridging scene I thought I would do, I'm having doubts about completing it, especially as I haven't tried painting figures yet. I’d like to change horses mid-stream, although it is much more the rider's than the horse's fault. No guarantees for completion of this either, but I think it's a bit closer to my comfort zone - although, I've never built a plane.

The new thought is a what-if scenario, with a B-25 split over three railroad cars for shipment. The story line is that strong storms during the winter of 1943 (or 1944) caused reconsideration of using ferry flights, and transportation by train to Maritime (or other) final assembly points was tried. Or perhaps the rail cars / components could be loaded on ships, as was done with short-range planes.


As you can see, I have opened the box to start considering component positioning. The fuselage halves are tacked together and temporarily mounted. The photo shows a 52' flat car actually built in the 50's, but as is clear a more prototypical 40' car just won't work for the fuselage - which may be shipped sans nose, or perhaps with slight overhang at the rear.

I am hoping to use one or two 40' cars, based on how much space it takes to stowe all the component sections; I do have two more 52' cars on hand if it turns out that I need to use all of them. I still haven't decided if the engines and nacelles will be fitted to the wings, or moved separately.

I have no idea if it was ever done or not, but I found a drawing for loading a Messerschmitt (admittedly much smaller) on a flat car.


Also, much later in time but even more massive, Boeing ships assembled 727 fuselages from it's Wichita plant by rail to the Renton, WA facility for completion. You can easily find many youtube videos of this operation.


I have a couple of painting questions. I found a build log for a HK 1:32 Mitchell, and the fellow building it used several layers of aluminum before olive drab. I got the sense that this was to create a more metal-like appearance, but maybe that is more critical on the 1:32 model with all the rivet detail. Any suggestions for a primer color?

Also, he used an Edourd mask set for painting the clear pieces - which this plane has a lot of. I haven't checked if they make a 1:48 set, but was wondering if a thin marker would work for this? Does anybody make olive drab markers?

Charles
GregCloseCombat
Visit this Community
California, United States
Joined: June 30, 2008
KitMaker: 2,408 posts
Armorama: 2,394 posts
Posted: Monday, April 01, 2013 - 03:19 PM UTC
Hey Charles - Another cool idea. I switch projects all the time to avoid getting stuck or boredom on a long build. I would hit up an art supply store for the markers and compare acrylic brands.
velotrain
Visit this Community
Massachusetts, United States
Joined: December 23, 2010
KitMaker: 384 posts
Armorama: 320 posts
Posted: Monday, April 01, 2013 - 04:31 PM UTC
Thanks for the flexibility Greg.

I do realize that the flat cars are RTR items and not previously assembled kits (well - I guess they might have been considered kits before they were assembled in China ;-)

Also, it's been pointed out to me that there were no government-military RR cars on American rails in WW2, apparently partially related to the mess excessive governmental interference created in WW1. However, I have decided to leave them in the Army markings, partly for post-build potential sale value. I hadn't realized that all the Army cars were the result of a marketing manager's brilliant idea, but apparently collecters eat them up, especially if it has a tank, scraper, etc. on it - whether properly secured or not.

I see the biggest challenge as building and "finishing" the plane in transportable sections, and the most fun will be designing and building the various supports, covers for section joints (to protect them from the elements - and, exposure as a plastic kit), crates for the props, etc.

I might also do a low-relief "factory" exterior behind the track.

Charles
North4003
Visit this Community
England - West Midlands, United Kingdom
Joined: August 01, 2012
KitMaker: 960 posts
Armorama: 95 posts
Posted: Tuesday, April 02, 2013 - 09:46 AM UTC
Well, here is my starting picture of my civilian CJ "huntin" jeep which I'm actually doing for my late 1970's era model railroad, The kit came out of the Revell CH53 kit, but all I have is the jeep and parts of the cannon.


I started on it today and added pins for the gear shift lever. I need to source figures of a hunter, Labrador Retriever, shotgun and Mallard Ducks for the load.
pxpxpx
Visit this Community
Stockholm, Sweden
Joined: March 21, 2012
KitMaker: 26 posts
Armorama: 24 posts
Posted: Wednesday, April 03, 2013 - 04:23 PM UTC
Got some work on the PzIII during the week.

I was originally planning to use the Hauler PE kit for it. But after trying to do triple-bends on 2x1mm pieces I scrapped it. Put the larger things on and called it a day.


Now she's all primed up and ready to get some basecoats. Just waiting for the primer to cure (I like to let Vallejo PE Primer set for about 24hrs) and then it's time to go modulation crazy!

shavebeard
Visit this Community
Oregon, United States
Joined: October 10, 2012
KitMaker: 151 posts
Armorama: 115 posts
Posted: Thursday, April 04, 2013 - 05:07 AM UTC
Brent really cool little jeep!
with a little scratch work i think a soldier could be made into a hunter.
the lab might be the hardest as i can't recall seeing any small toy or model ones.
as for ducks they have been made in many sizes for years.[super sculpey some maybe?]
e-bay under model-diorama or or toys-plastic farm animals might yield something.
looking forward to seeing the huntin rig!
chris

markchis
Visit this Community
Kuwait / لعربية
Joined: February 09, 2009
KitMaker: 467 posts
Armorama: 392 posts
Posted: Saturday, April 06, 2013 - 07:27 AM UTC
what a rake of new projects !! very very nice everybody - really like b-25 on a train very cool !!

I have been busy painting for the last 2 weeks - quite a lot done

base coats and some post shading, lightening using grey and white


and endless masking first the white then the red and then the yellow


some of the 50 odd sub-parts that required painting and masking


if you ever have to paint 70s Navy or Marine jets the edging of the gear doors is PITA --- try using a red sharpie to take away the pain


favourite part coming up real soon now

best
Mark
North4003
Visit this Community
England - West Midlands, United Kingdom
Joined: August 01, 2012
KitMaker: 960 posts
Armorama: 95 posts
Posted: Sunday, April 07, 2013 - 02:14 PM UTC
Lesson learned. I should have planned out my painting sequence more carefully.
Here is the result of two hours of masking and ten minutes of painting on the civilian CJ Jeep, color, Testors Guards Red.

GregCloseCombat
Visit this Community
California, United States
Joined: June 30, 2008
KitMaker: 2,408 posts
Armorama: 2,394 posts
Posted: Sunday, April 07, 2013 - 05:10 PM UTC
Nice spraying going on. And a lot of taping! Good progress everyone
Cam
#275
Visit this Community
Alberta, Canada
Joined: March 01, 2006
KitMaker: 174 posts
Armorama: 141 posts
Posted: Thursday, April 11, 2013 - 05:29 AM UTC
Started building this kit on Feb 18 so its time to post some pics. I wanted a relatively simple kit to build at a club demo at a local hobby shop and picked the Hasegawa Seafire 1b.
I finished the interior and seam filling a while ago and just sprayed some paint on it.
Hopefully some pics of it painted tomorrow.
SaxonTheShiba
Visit this Community
United States
Joined: February 01, 2009
KitMaker: 1,233 posts
Armorama: 557 posts
Posted: Sunday, April 14, 2013 - 04:29 AM UTC
Wow......awesome looking projects going on here!!!! I had originally jumped in the campaign with a 1/48th scale F/A-18F but I am actually doing a Super Hornet, as well, for the Looney Toons Campaign, since that was the only one I had with a cartoon on it. So, for this campaign I will diversify a little bit and switch gears and do a Revell 1/48th scale AV-8B Night Attack Harrier with Black Box Cockpit, resin nose(which came with the Revell kit) and Two Bobs decals for the new Gunship Gray scheme. Hope the switch won't be a problem. Starter photo below.


Best wishes, Ian


URL=http://s1189.photobucket.com/user/Hornetluvr/media/AV-8B/AV-8B1.jpg.html][/URL]
SaxonTheShiba
Visit this Community
United States
Joined: February 01, 2009
KitMaker: 1,233 posts
Armorama: 557 posts
Posted: Sunday, April 14, 2013 - 08:02 AM UTC
Well, I started the AV-8B. It got it's Kardashian nose job and I began work on the Black Box cockpit parts. Surprisingly, the Black Box parts fit very well with this kit.


Best wishes, Ian


Cam
#275
Visit this Community
Alberta, Canada
Joined: March 01, 2006
KitMaker: 174 posts
Armorama: 141 posts
Posted: Monday, April 15, 2013 - 03:02 PM UTC
Got a coat of paint on my Seafire but had trouble with the roundels on the bottom wing so will have to paint part of the wing again.