thanks Ian, it's the most figs I've ever done for one scene, about drove me batty!
nice looking harrier ,glad you got your canopy ,what's her colors?
Thanks again for the compliment and advice Greg. take it easy.
chris
Campaigns
Where Armorama group builds can be discussed, organized, and updates posted.
Where Armorama group builds can be discussed, organized, and updates posted.
Hosted by Darren Baker, Richard S.
1/48 scale campaign #3
shavebeard

Joined: October 10, 2012
KitMaker: 151 posts
Armorama: 115 posts

Posted: Tuesday, July 02, 2013 - 09:03 AM UTC

SaxonTheShiba

Joined: February 01, 2009
KitMaker: 1,233 posts
Armorama: 557 posts

Posted: Tuesday, July 02, 2013 - 09:14 AM UTC
Thanks Chris. The scheme will be the new USMC Harrier scheme featured on Two Bobs Gunship Harriers sheet, 48-223. It is Gunship Grey top and sides and Medium Grey, FS35237, underneath. Pretty cool scheme. I sprayed the Medium Grey first to use as a primer coat.
Best wishes,
Ian
Best wishes,
Ian

SaxonTheShiba

Joined: February 01, 2009
KitMaker: 1,233 posts
Armorama: 557 posts

Posted: Sunday, July 07, 2013 - 05:07 AM UTC

PantherF

Joined: June 10, 2005
KitMaker: 6,188 posts
Armorama: 5,960 posts

Posted: Sunday, July 07, 2013 - 05:37 AM UTC
GLAD you were able to save that beast Ian!
I always wanted to do a build like this picture for my AC section:

~ Jeff
I always wanted to do a build like this picture for my AC section:

~ Jeff

ThomasB

Joined: May 17, 2002
KitMaker: 762 posts
Armorama: 323 posts

Posted: Sunday, July 07, 2013 - 06:23 AM UTC
No chance I will get my Jackal finished before the 15th... But great work by everyone else!

SaxonTheShiba

Joined: February 01, 2009
KitMaker: 1,233 posts
Armorama: 557 posts

Posted: Sunday, July 07, 2013 - 07:15 AM UTC
Thanks Jeff! In regards to your photo, Two Bobs sheet 48-223 actually features about four birds with the "WP" tail code, like in your post. Believe that is VMA-223 "Bulldogs". Mine will be from the "Black Sheep", VMA-214.
Best wishes,
Ian
Best wishes,
Ian
Quoted Text
GLAD you were able to save that beast Ian!
I always wanted to do a build like this picture for my AC section:
~ Jeff

velotrain

Joined: December 23, 2010
KitMaker: 384 posts
Armorama: 320 posts

Posted: Monday, July 08, 2013 - 09:14 PM UTC
Well . . . as is my custom, I procrastinated until late in the third week of June. Then it took a few days to find the B-25J kit, and when found I discovered that I had removed the instructions and didn’t know where they were. The only thing to do was order another kit - but realized that I wouldn’t get it done in time, although planned to build it anyway in anger at myself for waiting so long. However, checking the site for the first time in months I found a miracle in the form of a two-week extension. I won’t get full benefit, as I’m leading a group bicycle tour next week, so need to transition priorities Thursday or Friday.
After giving up on locating any kind of reference material months ago, I suddenly discovered a book that certainly had a promising title - and an intriguing photo on the cover. So what if it’s a C-47 fuselage destined for storage or scrap in 1970. I’m hoping there is a more secure connection on the flatcar deck, but I like the visual effect of the wood framing, so will likely use that along with something else.


Most of the WW2 chapter covers the specialized high-roof boxcars and custom shipping rigs used to move plane components around the country for final assembly. I did find some more visually interesting stuff, such as a German WW1 airplane prototype mounted on a 40’ steel tower, built on a flatcar, for aerodynamic testing “under steam”. Despite no real info, that’s currently under consideration for the WW1 campaign, although I do like the London double-decker busses fitted as mobile pigeon coops. I also discovered this drawing of the bracing used to secure a propeller inside a car – or crate, and I plan on using it for my build.

Although my scenario is fictitious, one of the design goals is to make the component mounting plausible, if not necessarily realistic. However, I also want “maximum exposure”, as it wouldn’t be very interesting with everything hidden in boxcars; I’m interested in using a variety of mounting techniques and hardware – I plan to use some chain, and I bought 1/16” black architectural tape to represent steel banding.
I have the components assembled, and more or less painted, although my technique can’t even be termed primitive. There are two tarps drying/forming on the fuselage – partly to cover the unattached nose and tail sections, but also because I decided to leave the turrets off. I’m using fabric instead of tissue as I wanted some texture to the tarps. I put cardboard fillers in the wing sockets for painting, and also cut matching styrene pieces with the thought of simulating the wing attachment structure, but all the photos I’ve found show the inner wing and engine mounts being “part” of the fuselage. I do have some side clearance on the flatcar to create some wing mounting structure there, if anyone has photos of a fuselage “wing socket” to give me ideas. The primary support for the wings will be vertical steel L-beams mounted on the deck, which will handily hide the inner wing-end, with cushioning under the nacelle front.
I didn’t want to buy template masks for painting the turrets, and I wasn’t even sure if I could do it successfully with them. I further realized that none of the guns would be mounted for transit, and am hoping to build wooden (not pretend resin ones) crates for the turret bubbles and perhaps the armament, although it’s possible that it might have been shipped separately – under guard. I’ll add the large star decals (although it’s likely been four decades since I’ve tried any), but am going with the scenario that specific unit markings won’t be determined until the plane gets to Europe.


I may still be able to build a factory flat as a photo backdrop, with a couple of tracks in front of it. I say that so it will only be ~30” long, vs. 40” +, as each flatcar is 13”. However, that may be a post-campaign activity. Since I now have a second plane kit, I may do that one in silver, and get more prototypical flatcars to carry it – with different mounting techniques. I’m also tempted to get a cheap kit of the Skytrain, and perhaps could even locate a photo of the rest of the plane being shipped.
Part of my motivation for this project was the belief that it wouldn’t take much to surpass all the toy planes on model flat cars that many consumers seem to find acceptable.

After giving up on locating any kind of reference material months ago, I suddenly discovered a book that certainly had a promising title - and an intriguing photo on the cover. So what if it’s a C-47 fuselage destined for storage or scrap in 1970. I’m hoping there is a more secure connection on the flatcar deck, but I like the visual effect of the wood framing, so will likely use that along with something else.


Most of the WW2 chapter covers the specialized high-roof boxcars and custom shipping rigs used to move plane components around the country for final assembly. I did find some more visually interesting stuff, such as a German WW1 airplane prototype mounted on a 40’ steel tower, built on a flatcar, for aerodynamic testing “under steam”. Despite no real info, that’s currently under consideration for the WW1 campaign, although I do like the London double-decker busses fitted as mobile pigeon coops. I also discovered this drawing of the bracing used to secure a propeller inside a car – or crate, and I plan on using it for my build.

Although my scenario is fictitious, one of the design goals is to make the component mounting plausible, if not necessarily realistic. However, I also want “maximum exposure”, as it wouldn’t be very interesting with everything hidden in boxcars; I’m interested in using a variety of mounting techniques and hardware – I plan to use some chain, and I bought 1/16” black architectural tape to represent steel banding.
I have the components assembled, and more or less painted, although my technique can’t even be termed primitive. There are two tarps drying/forming on the fuselage – partly to cover the unattached nose and tail sections, but also because I decided to leave the turrets off. I’m using fabric instead of tissue as I wanted some texture to the tarps. I put cardboard fillers in the wing sockets for painting, and also cut matching styrene pieces with the thought of simulating the wing attachment structure, but all the photos I’ve found show the inner wing and engine mounts being “part” of the fuselage. I do have some side clearance on the flatcar to create some wing mounting structure there, if anyone has photos of a fuselage “wing socket” to give me ideas. The primary support for the wings will be vertical steel L-beams mounted on the deck, which will handily hide the inner wing-end, with cushioning under the nacelle front.
I didn’t want to buy template masks for painting the turrets, and I wasn’t even sure if I could do it successfully with them. I further realized that none of the guns would be mounted for transit, and am hoping to build wooden (not pretend resin ones) crates for the turret bubbles and perhaps the armament, although it’s possible that it might have been shipped separately – under guard. I’ll add the large star decals (although it’s likely been four decades since I’ve tried any), but am going with the scenario that specific unit markings won’t be determined until the plane gets to Europe.


I may still be able to build a factory flat as a photo backdrop, with a couple of tracks in front of it. I say that so it will only be ~30” long, vs. 40” +, as each flatcar is 13”. However, that may be a post-campaign activity. Since I now have a second plane kit, I may do that one in silver, and get more prototypical flatcars to carry it – with different mounting techniques. I’m also tempted to get a cheap kit of the Skytrain, and perhaps could even locate a photo of the rest of the plane being shipped.
Part of my motivation for this project was the belief that it wouldn’t take much to surpass all the toy planes on model flat cars that many consumers seem to find acceptable.


PantherF

Joined: June 10, 2005
KitMaker: 6,188 posts
Armorama: 5,960 posts

Posted: Monday, July 08, 2013 - 11:22 PM UTC
Very interesting subject and especially anything involving the B-25 Mitchell.
~ Jeff
~ Jeff

velotrain

Joined: December 23, 2010
KitMaker: 384 posts
Armorama: 320 posts

Posted: Saturday, July 13, 2013 - 09:57 AM UTC
OK – I got my loads on, and consider this project done so far as the campaign is concerned. Obviously, assembly of the kit was secondary to all the scratchbuilding to mount the plane components on the flatcars. I do plan to work on this some more over the summer, and eventually build the second kit and create a diorama display base; probably static, but it may become what’s known as a shelf-switching layout.
I had intended to use some Verlinden washers to represent the grommets on the tarps, and then rope them down. However, I decided they were much too miniscule and fiddly for my tastes, so have ordered some 1/16” eyelets – which hopefully will be easier to work with. Reading indicates that WW2 tarps were treated cotton, so these are proto in that regard. I had a hard time deciding how to mount the wings and fuselage, and I’m not sure this arrangement is final. They’re just tacked down for now and if I don’t change this one, will likely experiment with other mountings for the second B-25, which will be silver on non-Army flatcars.


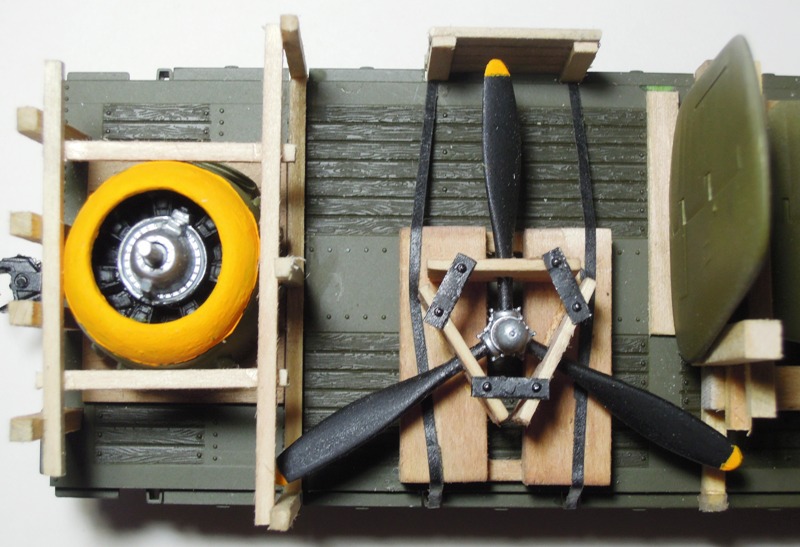

I had intended to use some Verlinden washers to represent the grommets on the tarps, and then rope them down. However, I decided they were much too miniscule and fiddly for my tastes, so have ordered some 1/16” eyelets – which hopefully will be easier to work with. Reading indicates that WW2 tarps were treated cotton, so these are proto in that regard. I had a hard time deciding how to mount the wings and fuselage, and I’m not sure this arrangement is final. They’re just tacked down for now and if I don’t change this one, will likely experiment with other mountings for the second B-25, which will be silver on non-Army flatcars.


GregCloseCombat

Joined: June 30, 2008
KitMaker: 2,408 posts
Armorama: 2,394 posts

Posted: Sunday, July 14, 2013 - 02:28 AM UTC
Hi Charles. I'm so glad you got that put together for the campaign!! I think it looks really cool and interesting to see the railroad at work. The shipping straps and supports look the part. Hope to see more of it in the future. Congrats

PantherF

Joined: June 10, 2005
KitMaker: 6,188 posts
Armorama: 5,960 posts

Posted: Sunday, July 14, 2013 - 09:17 AM UTC
Finished... for now.


Never got around to doing a launch sequence but, the cotton would be a pain to have to clean so a dedicated display case is needed.
~ Jeff


Never got around to doing a launch sequence but, the cotton would be a pain to have to clean so a dedicated display case is needed.

~ Jeff

GregCloseCombat

Joined: June 30, 2008
KitMaker: 2,408 posts
Armorama: 2,394 posts

Posted: Sunday, July 14, 2013 - 10:50 AM UTC
Cool Jeff!!! Congrats. 


GregCloseCombat

Joined: June 30, 2008
KitMaker: 2,408 posts
Armorama: 2,394 posts

Posted: Sunday, July 14, 2013 - 10:52 AM UTC
Mark. I don't think your pic is in the gallery
iakarch

Joined: May 19, 2007
KitMaker: 459 posts
Armorama: 421 posts

Posted: Sunday, July 14, 2013 - 10:12 PM UTC
Finished!


PantherF

Joined: June 10, 2005
KitMaker: 6,188 posts
Armorama: 5,960 posts

Posted: Sunday, July 14, 2013 - 10:25 PM UTC
THAT is beautiful Irvin!  So sleek looking, the camo is nicely done and love the choice of colors overall and NO silvering of the decals either.
The plane is just awesome!
~ Jeff
 So sleek looking, the camo is nicely done and love the choice of colors overall and NO silvering of the decals either.
The plane is just awesome!

~ Jeff

iakarch

Joined: May 19, 2007
KitMaker: 459 posts
Armorama: 421 posts

Posted: Sunday, July 14, 2013 - 10:41 PM UTC
Thanks Jeff! Its the first plane i have done in about 8 years.

Tojo72

Joined: June 06, 2006
KitMaker: 4,691 posts
Armorama: 3,509 posts

Posted: Sunday, July 14, 2013 - 10:53 PM UTC
Great concept Charles and great execution.
Great campaign eveyone
Thanks again Greg
Great campaign eveyone
Thanks again Greg

Posted: Monday, July 15, 2013 - 12:37 AM UTC
To One and All,
Excellent campaign. A bunch of truly great models were produced. I especially like the fact that with this scale you get all kinds of folks, armor, O-gauge RR (love the 'diy B-25')and those wingy-thingys!
Here is my Jagdpanther. Completed, except for stowage and final markings/weathering. These will de determined by a diorama I am working on for a model club group build.
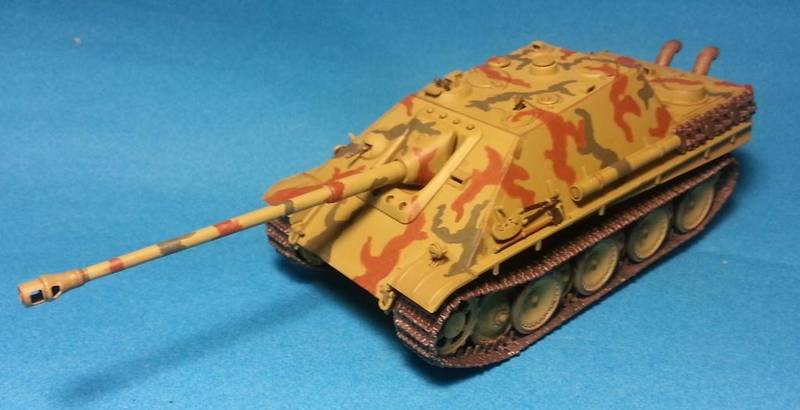
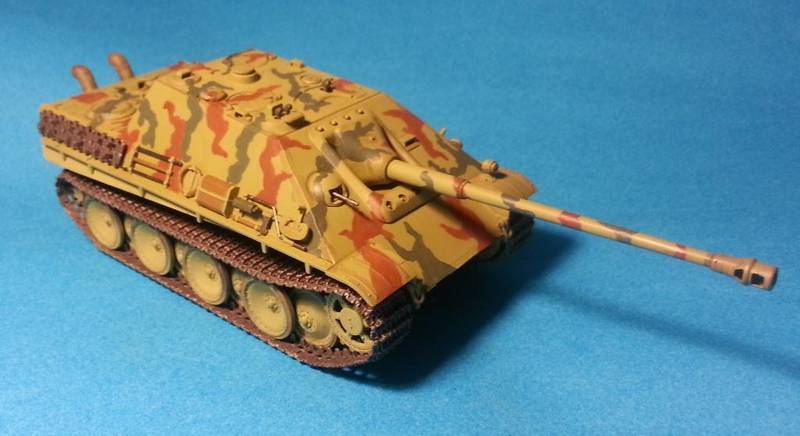
Once again I am impressed with the engineering of these Tamiya kits. I look forward to another one soon.
Greg, Thanks for a well run campaign.
Stephen (Minas-Ithil)
Excellent campaign. A bunch of truly great models were produced. I especially like the fact that with this scale you get all kinds of folks, armor, O-gauge RR (love the 'diy B-25')and those wingy-thingys!
Here is my Jagdpanther. Completed, except for stowage and final markings/weathering. These will de determined by a diorama I am working on for a model club group build.


Once again I am impressed with the engineering of these Tamiya kits. I look forward to another one soon.
Greg, Thanks for a well run campaign.
Stephen (Minas-Ithil)

GregCloseCombat

Joined: June 30, 2008
KitMaker: 2,408 posts
Armorama: 2,394 posts

Posted: Monday, July 15, 2013 - 07:24 AM UTC
Wow good work getting those models done under the wire. I think there may have been a few people who did a model but didn't put it in the campaign gallery. I gave out 21 ribbons for 24 completed kits out of 55 participants. If I missed you just let me know.
Thank you everyone and who is going to host the next one?????


Thank you everyone and who is going to host the next one?????


imatanker

Joined: February 11, 2011
KitMaker: 1,654 posts
Armorama: 1,565 posts

Posted: Monday, July 15, 2013 - 08:37 AM UTC
It's been a while since I checked in. Seems like a long time ago that I finished the Autoblinda.
Thank you for the ribbon Greg, and for running a great campaign. If there is another you can count on me to enlist Thanks again, Jeff T.
Thank you for the ribbon Greg, and for running a great campaign. If there is another you can count on me to enlist
 Thanks again, Jeff T.
GregCloseCombat

Joined: June 30, 2008
KitMaker: 2,408 posts
Armorama: 2,394 posts

Posted: Tuesday, July 16, 2013 - 11:19 AM UTC
Hi Jeff and thank you too for sharing your model.. I think a year was too long for a campaign. Everything always gets done at the end because of the deadline anyways. See you at the next one 

imatanker

Joined: February 11, 2011
KitMaker: 1,654 posts
Armorama: 1,565 posts

Posted: Tuesday, July 16, 2013 - 12:28 PM UTC
I agree. Six months is more than enough in my humble opinion. 

shavebeard

Joined: October 10, 2012
KitMaker: 151 posts
Armorama: 115 posts

Posted: Wednesday, July 17, 2013 - 05:31 AM UTC
Thanks for the campaign and ribbon Greg!
just a whole lot of talented modelers at this site.
chris
just a whole lot of talented modelers at this site.
chris

velotrain

Joined: December 23, 2010
KitMaker: 384 posts
Armorama: 320 posts

Posted: Saturday, July 20, 2013 - 06:50 AM UTC
Thanks for running the campaign Greg. I have misgivings on a couple of the cars, as described with the photos in the campaign album, but it was a good experience for me. I'll likely redo the wing and fuselage cars - the latter perhaps similar to the C-47 in the photo.
Charles
Charles
 |


