John,That's cool that you are going to build with your Daughter.Just be ready,She might want to paint it pink How ever it turns out,I'm sure it will be a great time and time well spent.Looks like that kit has been around for awhile,how old is it?
Patrick,Those wheels and tires look outstanding.If you don't mind,what was the shipping cost,and how long did it take to get them?I'm thinking about getting some for My build.
With all the comments about how the AB41's hull goes together,I thought I would look at the instructions and see what I was up against
Here are some pics
Should be interesting Any thoughts on assembly sequence? Jeff T.
P.S. Jeff H.,Welcome to the party.How long will it be till you get your kit?
Campaigns
Where Armorama group builds can be discussed, organized, and updates posted.
Hosted by Darren Baker, Richard S.
1/48 scale campaign #3
imatanker
Maine, United States
Joined: February 11, 2011
KitMaker: 1,654 posts
Armorama: 1,565 posts
Joined: February 11, 2011
KitMaker: 1,654 posts
Armorama: 1,565 posts
Posted: Friday, December 14, 2012 - 11:12 AM UTC
jrybak
Alberta, Canada
Joined: January 18, 2012
KitMaker: 55 posts
Armorama: 40 posts
Joined: January 18, 2012
KitMaker: 55 posts
Armorama: 40 posts
Posted: Friday, December 14, 2012 - 11:31 AM UTC
Jeff: Actually I tried to get her to want to paint it pink, but she wants blue and purple. The kit is old and has raised pannel lines, but hopefully it will build ok.
imatanker
Maine, United States
Joined: February 11, 2011
KitMaker: 1,654 posts
Armorama: 1,565 posts
Joined: February 11, 2011
KitMaker: 1,654 posts
Armorama: 1,565 posts
Posted: Friday, December 14, 2012 - 12:43 PM UTC
Quoted Text
Jeff: Actually I tried to get her to want to paint it pink, but she wants blue and purple. The kit is old and has raised pannel lines, but hopefully it will build ok.
John,That's classic Blue and purple it is then Jeff T.
zontar
Hawaii, United States
Joined: August 27, 2006
KitMaker: 1,646 posts
Armorama: 1,557 posts
Joined: August 27, 2006
KitMaker: 1,646 posts
Armorama: 1,557 posts
Posted: Friday, December 14, 2012 - 02:00 PM UTC
John: Great idea with your daughter. I need to do that with mine.
Jeff: Wow, that looks complex. Maybe tape the whole thing together then glue it? Or do either D8 or D10 right away after the sides to square them up. Hopefully there is someone here who's built it before that can help you out.
Happy Modeling, -zon
Jeff: Wow, that looks complex. Maybe tape the whole thing together then glue it? Or do either D8 or D10 right away after the sides to square them up. Hopefully there is someone here who's built it before that can help you out.
Happy Modeling, -zon
miniflea
Virginia, United States
Joined: October 17, 2011
KitMaker: 237 posts
Armorama: 235 posts
Joined: October 17, 2011
KitMaker: 237 posts
Armorama: 235 posts
Posted: Friday, December 14, 2012 - 03:39 PM UTC
Jeff, what I would do is have all of the sub-assemblies in step six ready to go before you glue together step four. Then, before the glue has set in step four, dry fit the step six parts to make sure everything is lined up properly.
A small update on my Matilda. Everything is painted and decals are applied. I've also brushed on a coat of future.
Up to this point in the game I'm relatively confident in my skills. Weathering though is where I am trying to improve. Here is what I have so far.
What I need to work on now I think are the tracks. What I typically do is paint them flat black, then apply a rusty wash, then try to drybrush to give a bare metal look to the edges. I'm not sure though if a rusty color would be appropriate for a desert vehicle. Maybe a dusty color? I'm planning on building a small base, so maybe a dusty desert pigment to use on both? I've also never used any pigment powders and figured this would would be a good vehicle to try them out on. Any advice on brands/colors would be greatly appreciated!
I also realized, just now looking at that photo, that I forgot to paint the upper run underneath the side skirts. Seems you always notice something new when looking at pictures that you can't see in real life.
zontar
Hawaii, United States
Joined: August 27, 2006
KitMaker: 1,646 posts
Armorama: 1,557 posts
Joined: August 27, 2006
KitMaker: 1,646 posts
Armorama: 1,557 posts
Posted: Friday, December 14, 2012 - 04:28 PM UTC
Miniflea: I researched this a little last year with an Iraqi SAM-6 and the tracks were essentially sand colored with a little black/grey steel color showing from underneath. As I recall, the tracks were almost indistinguishable from the camo and from the ground.
Your tank looks great by the way. Nicely weathered.
Happy Modeling, - zon
Your tank looks great by the way. Nicely weathered.
Happy Modeling, - zon
velotrain
Massachusetts, United States
Joined: December 23, 2010
KitMaker: 384 posts
Armorama: 320 posts
Joined: December 23, 2010
KitMaker: 384 posts
Armorama: 320 posts
Posted: Friday, December 14, 2012 - 04:57 PM UTC
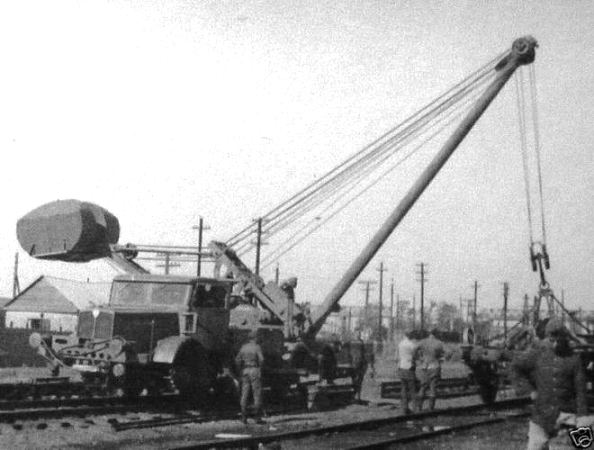
I’m not sure which kit I’m building for the campaign, but I’ve ordered the Wespe Faun LK5 rail-crane and the Bailey Bridge. I’m brand new to military modeling, and discovered each of these while looking at hundreds of photos on the net and deciding what I was interested in on that basis; I’ll include a few proto photos of each with the kit covers.
While looking into the Faun rail-crane, I became a bit confused as I saw it referenced as either (occasionally both) the L900 or LK5, with the crane capacity sometimes listed after this.
I found the answer in an article by Jorge Lopez, who amazingly (at least to me) scratchbuilt one of these over a decade ago. He's obviously a man with strong opinions, as he starts by stating, "As a truck lover, and when I built this model some time ago, my main goal was to build the most impressive truck of the Second World War." If interested, the full article on the build (and many photos) is at:
http://www.militarymodelling.com/news/article/faun-lk5-crane-truck/3427/
While realizing that it was intended to be modular, I think what impressed me most about the Bailey Bridge was finding photos of a single unit crossing not much more than a stream, but also examples where hundreds of units were employed to span major rivers, or other times replacing only the central bombed-out portions of existing bridges – sometimes on jury-rigged piers, such as in one of the attached photos.
Charles
BlackWidow
European Union
Joined: August 09, 2009
KitMaker: 1,732 posts
Armorama: 326 posts
Joined: August 09, 2009
KitMaker: 1,732 posts
Armorama: 326 posts
Posted: Saturday, December 15, 2012 - 09:13 AM UTC
Miniflea, that's a great looking Mathilda you have! Congrats on that!
Well guys, I call my Me 262 clear for Take Off. These are just some "teaser" pictures taken this morning on my workbench. Better photos follow next month in my "Assembly Line" thread on Aeroscale (and of course here in the campaign gallery) ....
.... as there is still some time until I can start my F7F Tigercat for the "Nightfighter Campaign" over on Aeroscale I thought I'll continue here with this little build ....
.... and have already the first question. Was the interior on the M 20 Olive Drab or White as on tanks? I would prefer White but am not sure if that's right.
And for all you tanker guys out there, listen to this roaring sound! As a former gunner and loader on these nice little cars in the 1980's the video makes me jump in joy and I remember we loved to do this especially during night time ..... And play it L O U D!
Happy modelling
Torsten
SlapFight
Texas, United States
Joined: July 03, 2009
KitMaker: 17 posts
Armorama: 14 posts
Joined: July 03, 2009
KitMaker: 17 posts
Armorama: 14 posts
Posted: Saturday, December 15, 2012 - 12:54 PM UTC
Alright, here we go!
Starter image.
My camera battery and charger seemed to have grown a pair of legs, sorry for the cell phone pic.
The turned barrel and etch set are still on their way from Canada, so I'll add them as they arrive.
Starter image.
My camera battery and charger seemed to have grown a pair of legs, sorry for the cell phone pic.
The turned barrel and etch set are still on their way from Canada, so I'll add them as they arrive.
imatanker
Maine, United States
Joined: February 11, 2011
KitMaker: 1,654 posts
Armorama: 1,565 posts
Joined: February 11, 2011
KitMaker: 1,654 posts
Armorama: 1,565 posts
Posted: Saturday, December 15, 2012 - 01:06 PM UTC
Zon and Mini,Thanks for the ideas,thats pretty much what I was thinking Mini,your Matty is looking good Bub.I'm going to try to get some time in on the 41 tomorrow,maybe post some pics.
Charles, That is a sweet truck.At first I was wondering what the heck the big bulbie things over the cab where,but I see from later pics it's the counterweights.I assume they could be filled and emptied to suit the load?
Torsten And then it got very quiet.....What a great video,that was cool I lost track of how many tanks there where.Excelent work on your jet build it came out really well.I am glad to see that you will be doing a second build,and will be getting your head out of the clouds,so to speak,and will be coming back down to earth with the rest of us ground pounders Jeff T.
imatanker
Maine, United States
Joined: February 11, 2011
KitMaker: 1,654 posts
Armorama: 1,565 posts
Joined: February 11, 2011
KitMaker: 1,654 posts
Armorama: 1,565 posts
Posted: Saturday, December 15, 2012 - 01:11 PM UTC
Quoted Text
Alright, here we go!
Starter image.
My camera battery and charger seemed to have grown a pair of legs, sorry for the cell phone pic.
The turned barrel and etch set are still on their way from Canada, so I'll add them as they arrive.
Looks like things just got a little hotter in Texas Dive in Man,Jeff T.
BlackWidow
European Union
Joined: August 09, 2009
KitMaker: 1,732 posts
Armorama: 326 posts
Joined: August 09, 2009
KitMaker: 1,732 posts
Armorama: 326 posts
Posted: Saturday, December 15, 2012 - 10:51 PM UTC
Quoted Text
.... Torsten And then it got very quiet.....What a great video,that was cool I lost track of how many tanks there where.... Jeff T.
Jeff, if I'm not mistaken that were 19 Leopard 2A5, 2 M113 and 1 Leopard 2 Recovery Tank. During my army time I was the first 15 months on a Leopard 2A4 in 1985/86 and then I switched to become a truck driver on a MAN 5 to, transporting ammo and gas until the end of my 4 years service. I was a volunteer in the army.
Torsten
pclark442
United States
Joined: January 17, 2012
KitMaker: 42 posts
Armorama: 41 posts
Joined: January 17, 2012
KitMaker: 42 posts
Armorama: 41 posts
Posted: Sunday, December 16, 2012 - 03:12 AM UTC
Patrick,Those wheels and tires look outstanding.If you don't mind,what was the shipping cost,and how long did it take to get them?I'm thinking about getting some for My build.
Parts cost from HobbyEasy was $11.15 USD with $3.09 USD to ship. Took about 2-2.5 weeks to get here. I just picked the cheapest way. They have faster options if needed.
BTW, the body fit on the BA-10 is "problematic" to say the least.
I'll snap a few picks of the trouble areas in the next few days.
PeteDoc
Northern Ireland, United Kingdom
Joined: April 10, 2012
KitMaker: 164 posts
Armorama: 130 posts
Joined: April 10, 2012
KitMaker: 164 posts
Armorama: 130 posts
Posted: Sunday, December 16, 2012 - 03:27 AM UTC
Well, I'm back at the 190. I think part of my problemn has been that I can't see properly! I got one of those cheapo Optivisor clones off ebay and it's helped greatly. Anyway .. thats all the filling and sanding I'm gonna do on this beast. I've had enough, it's not perfect but it's gonna have to do.
Got a coat of enamel primer on. I'll give that a coupla days to cure then time for paint
GaryKato
California, United States
Joined: December 06, 2004
KitMaker: 3,694 posts
Armorama: 2,693 posts
Joined: December 06, 2004
KitMaker: 3,694 posts
Armorama: 2,693 posts
Posted: Sunday, December 16, 2012 - 06:50 AM UTC
Quoted Text
.... and have already the first question. Was the interior on the M 20 Olive Drab or White as on tanks? I would prefer White but am not sure if that's right.
The cab was painted white but the main compartment was painted the same as the outside. Since it's open to aircraft/observers, you don't want to flash that white interior around.
SaxonTheShiba
United States
Joined: February 01, 2009
KitMaker: 1,233 posts
Armorama: 557 posts
Joined: February 01, 2009
KitMaker: 1,233 posts
Armorama: 557 posts
Posted: Sunday, December 16, 2012 - 08:47 AM UTC
Miniflea-----The Matilda looks really great.
Torsten-----Great looking -262 and I love your presentation on the base. The -262 is such an intimidating looking airplane. I just watched the YouTube link you posted with the Leopard convoy. IMPRESSIVE!!!!! The Leopard really is quite a beast! I have a -2A6 in the works for the Get-R-Done campaign and that video was really inspiring. Thanks for sharing!!!
Best wishes, Ian
GregCloseCombat
California, United States
Joined: June 30, 2008
KitMaker: 2,408 posts
Armorama: 2,394 posts
Joined: June 30, 2008
KitMaker: 2,408 posts
Armorama: 2,394 posts
Posted: Sunday, December 16, 2012 - 11:37 AM UTC
Miniflea - looking good. I just started using the AK Streaking products and they double as washes. I think they are pretty easy to use. I'm still using the old MIG pigments and the AK stuff you can mix with plaster/sand to get thicker mud.
Torsten - congrats on the finish! and first at that. Great looking Me.
Here's an M20 interior shot
. I believe the interiors around the MG compartment upper walls are all Olive drab as well.
Pete - glad to see you back at it.
I'm back from my 9.5 hour x2 Las Vegas drive today, so putting some work on the panzer III today
BlackWidow
European Union
Joined: August 09, 2009
KitMaker: 1,732 posts
Armorama: 326 posts
Joined: August 09, 2009
KitMaker: 1,732 posts
Armorama: 326 posts
Posted: Monday, December 17, 2012 - 07:17 AM UTC
Thanks guys for the help on the interior of the M20 So I will paint everything in OD. In my paint box I have Revell 46 Nato Olive, that should fit quite well. Some process pics follow soon ....
Ian, that's the base I will take some better pictures of the Me 262 after the christmas break from modelling next week. So photos come in early January. And yes, I also need to build my Hobbyboss Leopard 2A4 I have in my stash since last year. It's the only 1/35 kit I have so far, all others are 1/48 and a tiny little bit 1/32. Would love to build the whole Leo family If I only had time ....
Happy modelling!
Torsten
imatanker
Maine, United States
Joined: February 11, 2011
KitMaker: 1,654 posts
Armorama: 1,565 posts
Joined: February 11, 2011
KitMaker: 1,654 posts
Armorama: 1,565 posts
Posted: Monday, December 17, 2012 - 01:21 PM UTC
Zon, How do you like me now
That was taken this morning.I sure wish I had some heat from your volcano
Pete, My Daughter gave me a set last year for Christmas.They do make a big difference.
While waiting for the snow to stop I got the hull figured out on the AB41.Should have some pics tomorrow.Since there was some interest in how this kit goes together,and some comments on the fit,I could do a SBS if you Guys want,cause it really wasn't that bad.
I like the Leos too,and must build one in the future.Jeff T.
zontar
Hawaii, United States
Joined: August 27, 2006
KitMaker: 1,646 posts
Armorama: 1,557 posts
Joined: August 27, 2006
KitMaker: 1,646 posts
Armorama: 1,557 posts
Posted: Monday, December 17, 2012 - 02:49 PM UTC
JT: And here I was worried that you wouldn't get a chance to use your snow shovel this year!! I won't send you a picture from here, as it's pretty bland with a blue ocean and a blue sky. However, we are in the lower 80's, so it must be getting close to winter here...
Please do post a SBS for the AB41. I think it will be informative. Maybe a dedicated build log in the WIP page?
Torsten: Nice finish on the Me. I like the tarmac scene. Also, nice choice on the M20.
Pete: The 190 is looking good. I also like your paint stand contraption.
Charles: Interesting topics either way. Looking forward to what you decide on.
Greg: great shot of the M20 interior. Is that your own, or did you get it off the web?
I ordered canopy masks from Sprue Brothers and they shipped, so I plan to lay down some zinc chromate after they get here. I've got all the pieces that receive it ready and I've got a few days off this holiday season. Should be good.
Happy Modeling, -zon
imatanker
Maine, United States
Joined: February 11, 2011
KitMaker: 1,654 posts
Armorama: 1,565 posts
Joined: February 11, 2011
KitMaker: 1,654 posts
Armorama: 1,565 posts
Posted: Tuesday, December 18, 2012 - 02:00 AM UTC
Zon, Thank you for not sending a pic.I get depressed when I see too much sand and sky
I will see what I can up with for the SBS.As far as it being a build log,I don't think I'm ready for "PRIME TIME" yet Should be able to get pic's up by tonight.Jeff T.
BlackWidow
European Union
Joined: August 09, 2009
KitMaker: 1,732 posts
Armorama: 326 posts
Joined: August 09, 2009
KitMaker: 1,732 posts
Armorama: 326 posts
Posted: Tuesday, December 18, 2012 - 08:03 AM UTC
Jeff, Zon, today we had here 6°C which are about 43°F and a little rain. Last Friday was dreadfull, as we had rain fallen on frozen soil. That day I needed a little more time to go to work ....
Well folks, here are the first progress pics of my M20. This is how it looks after 2 evenings work ....
.... just test fitting. Now I'll throw some paint on it ....
More to follow ....
Torsten
Well folks, here are the first progress pics of my M20. This is how it looks after 2 evenings work ....
.... just test fitting. Now I'll throw some paint on it ....
More to follow ....
Torsten
imatanker
Maine, United States
Joined: February 11, 2011
KitMaker: 1,654 posts
Armorama: 1,565 posts
Joined: February 11, 2011
KitMaker: 1,654 posts
Armorama: 1,565 posts
Posted: Tuesday, December 18, 2012 - 10:03 AM UTC
Torsten, Two nights? Really? Holy spit Man,do you have a chapter of the Wee Workers Guild come in and keep working after you go to bed? That's fast.Jeff T.
imatanker
Maine, United States
Joined: February 11, 2011
KitMaker: 1,654 posts
Armorama: 1,565 posts
Joined: February 11, 2011
KitMaker: 1,654 posts
Armorama: 1,565 posts
Posted: Wednesday, December 19, 2012 - 01:28 PM UTC
O.K.,so here it is.A few things to mention before I start.
1.This is Tamiya's re-issue of Italeri's Autoblinda AB41.The Tamiya # is 89778
2.I was not really planning on doing an SBS on this,but with all the comments made about fit,I thought I would do it, so I didn't take a picture of each and every step.
3.This was a test fit as none of the parts have been glued together,just to see what I was up against.
All the parts are just held in place with tape or blue tac with the exception of the hull sides and cross braces,which were glued together to help hold things steady.I figured if things were really bad,I could take them apart with out much trouble.
4.It is very important NOT to glue the lower front and rear hull panels D4 and D14 in place until AFTER you have glued the chassis to the body
So here we go...
If you remember I put the chassis together last week,and had some fit issue's that required a lot of filing and fitting.
Mounted the backing plates,no problems
Got all the parts ready to go,trimmed and sanded.You can see that I marked some of the parts,but in hindsight I didn't really have to.
Trimmed the ends of the 4 cross braces pt#C1 to make sure that they fit into the hull sides with no wobble,and where the same lenght,sorry no pic
Glued pts# D5 and D6 to the hull sides per instructions step 3
Looking at the parts,I figured I could use the turret mounting plate pt# D10 as a guage for the upper width and fore and aft adjustment
Next,glued the braces and hull sides together shown in step 4,and taped D10 in place.I DID NOT place pt# D4 the lower hull plate
Moving along,I blue tacked the wheels to the chassis and slipped the body onto it to check the lower width and for tire clearence
Removed the chassis and placed D7,D8,D9 and blue tacked D4 in place
Put the chassis back in,placed D12,D13,and blue tacked D14 in place
TA-DA
There you have it
I forgot to mention that I also used the small piece of wood that the model is sitting on to set the hull on to make sure it was not twisted.
Once again I will tell you NOT TO GLUE D4 and D14 in place until after you have glued the chassis to the body.If you do you will not be able to fit the chassis into the body.
The instructions say to use CA,I would use a slow drying one so you can shift things around if you have to.
So,since all the panels are just set in place with no pressure on them,I don't see any gaps that can't be fixed with a little tape or rubber bands.
REMEMBER,DRY FIT FIRST
Your results may vary If you have any questions,just ask. Hope you like the blue wheel centers.Model on,Jeff T.
zontar
Hawaii, United States
Joined: August 27, 2006
KitMaker: 1,646 posts
Armorama: 1,557 posts
Joined: August 27, 2006
KitMaker: 1,646 posts
Armorama: 1,557 posts
Posted: Wednesday, December 19, 2012 - 03:53 PM UTC
Kirsten: Speed demon!! Looking Good.
IT: Nice step by step. The jagdtiger in the back looks good too.
Happy Modeling, - zon
IT: Nice step by step. The jagdtiger in the back looks good too.
Happy Modeling, - zon