European Union
Joined: August 09, 2009
KitMaker: 1,732 posts
Armorama: 326 posts
Posted: Saturday, November 24, 2012 - 11:23 PM UTC
Quoted Text
.....Hopefully no major objections to something from the quieter side of life  .
.
Roger, do you think this is quiet? I guess it can be pretty noisy, too ....

And it's really a change between all this "war toys".
Anyway, after finishing my Lockheed PV-1 Ventura, I started this week with the Me 262 A1/U4 from Hobbyboss and here are the first process pictures:
First I changed the kit canon with a really fine piece made of brass. The kit part is no comparison to that ....


This is how the completed canon looks like ....

And here you can see the position of it in the fuselage. The front wheel well is also a metal piece ....

And this is the completed cockpit. I can not use the flash as it would not light the whole scenery. Sorry ....

Happy modelling!
Torsten

My campaigns for 2020:
MiGs - Done !
The Big Three - Done !
65 years Bundeswehr - Done !
40 years Leopard 2 - Done !
Land Lease - Done !
Virginia, United States
Joined: October 17, 2011
KitMaker: 237 posts
Armorama: 235 posts
Posted: Sunday, November 25, 2012 - 10:27 AM UTC
Got some painting done. I don't own an airbrush, so all the overall painting is done with Tamiya spray cans. I ended up not using any of the recommended colors because of this. They called for a base coat of desert yellow (XF-59) but apparently there is no equivalent spray color, so I used desert sand (TS-49) Although I think the light blue looks pretty sharp, apparently it is not historically accurate. I did some research and found that Imperial Japanese Navy Gray Green (AS-29) is a pretty close analogue so I used that. For the dark green color the instructions had a 1-5 mix of flat black (XF-1) and deep green (XF-26). The only green I had on hand in spray form are olive drab and I didn't think that would look right, so I picked up a can if RAF dark green (AS-9)
Initial masking after a base coat of desert sand:

I didn't stop and photograph every step, but here it is before I start to take the tape off.


This is always the most nerve wracking part for me. Already, a spot where I wasn't careful enough:

And here is what it looks like with all the tape off.


There are a few spots where I need to touch up but overall I'm very pleased with how it turned out. The colors, I think, look fantastic. They may not be one hundred percent exact but considering the difficulty of exact color matching and the fading effect of a desert sun, I am more than satisfied with them.
Maine, United States
Joined: February 11, 2011
KitMaker: 1,654 posts
Armorama: 1,565 posts
Posted: Sunday, November 25, 2012 - 12:43 PM UTC
Torsten Man,what a difference that barrel makes

the cockpit looks great also,did you dry brush the guages,or did you have transfers?
Miniflea... I think the paint job looks awesome,you did a fine job figuring out the colors.It takes a good painter to make a spray can paint job look good,and You did it


Jeff T.
The building lamp is lit.Build'em if you got'em.
California, United States
Joined: June 30, 2008
KitMaker: 2,408 posts
Armorama: 2,394 posts
Posted: Monday, November 26, 2012 - 03:28 PM UTC
Torsten - the Me is coming along very well!
Miniflea - you nailed that camo - very awesome!

I'm building up my factory dio now and should be far enough along soon for some pics and advice.
European Union
Joined: August 09, 2009
KitMaker: 1,732 posts
Armorama: 326 posts
Posted: Tuesday, November 27, 2012 - 08:06 AM UTC
Quoted Text
Torsten Man,what a difference that barrel makes  the cockpit looks great also,did you dry brush the guages,or did you have transfers? .....
Jeff, I used a decal for the instruments, it's a lot better than my dry brushing ....

I bought the canon from
Modellbau Schatton in Germany. They have also a lot of stuff for 1/35 tanks. Have a look if you like. My canon is No. #4855
Happy modelling!
Torsten

PS: Some more pics of my "Happy Hunter" soon ....

My campaigns for 2020:
MiGs - Done !
The Big Three - Done !
65 years Bundeswehr - Done !
40 years Leopard 2 - Done !
Land Lease - Done !
European Union
Joined: August 09, 2009
KitMaker: 1,732 posts
Armorama: 326 posts
Posted: Thursday, November 29, 2012 - 08:05 AM UTC
A little update from me. I came pretty far this week

A final look on the canon interior ....


.... fuselage and "turbos" completed .....

.... just some masking the cockpit and the wheel wells ....

.... and the baby is ready to get some paint. Even with this big canon she still looks very racy, doesn't she?

Happy modelling!
Torsten

My campaigns for 2020:
MiGs - Done !
The Big Three - Done !
65 years Bundeswehr - Done !
40 years Leopard 2 - Done !
Land Lease - Done !
Northern Ireland, United Kingdom
Joined: April 10, 2012
KitMaker: 164 posts
Armorama: 130 posts
Posted: Thursday, November 29, 2012 - 08:17 AM UTC
That's lookin' great Torsten! Still hard to believe this beast was about in 1945! What camo scheme are you going to go for? As per the box art? Can't wait to see how you get on. Really neat so far.
Best regards,
Pete
How soft your fields so green, can whisper tales of gore.
European Union
Joined: August 09, 2009
KitMaker: 1,732 posts
Armorama: 326 posts
Posted: Thursday, November 29, 2012 - 08:36 AM UTC
Thanks Pete!

Yes, the "grandmother" of all military jets is still wonderfull to look at. I've seen a replica flying last year at the Hahnweide Airshow in Germany. Awesome!
To answer you question. No, I will not go with the painting on the box, as there were only 2 prototypes ready when the war ended. So the kit only offers the V 083, which was the one captured by the Americans in Augsburg. My 262 will become ficticious of JG 1 with some kill marks on the rudder with late war camo RLM76/81/83, which is Light Grey, Brown Violet and Dark Green.
Happy modelling!
Torsten

My campaigns for 2020:
MiGs - Done !
The Big Three - Done !
65 years Bundeswehr - Done !
40 years Leopard 2 - Done !
Land Lease - Done !
New York, United States
Joined: February 01, 2005
KitMaker: 25 posts
Armorama: 23 posts
Posted: Friday, November 30, 2012 - 02:37 AM UTC
Roger, what kit is that? I've never heard of a 1/48 big rig kit? Resin?
Miniflea, the camo is looking very nice!
Dunedin, New Zealand
Joined: September 17, 2012
KitMaker: 266 posts
Armorama: 70 posts
Posted: Friday, November 30, 2012 - 09:34 AM UTC
Quoted Text
Roger, what kit is that? I've never heard of a 1/48 big rig kit? Resin?

Waikong,
Mine will be +90% scratchbuild - however there is a resin kit/built model available from
here, bit pricey for my budget (480.00 Euro = $770.00 New Zealand). Since I have access to the dumper version and I know there are a number of shortcoming's with the kit it would just be a very expensive base kit, so for me it's easier and cheaper to scratchbuild

.
Also must point out it's actually 1:50, but as O-scale ranges from 1:43 - 1:50 dependant on what country you are in I'm sure there will be no issues

.
As for big kit models - there's a huge variety available (1:50 - diecast, resin, white metal) most associated with mining/construction types but also a lot on standard on-road types, just let me know if you are looking for anything in particular and I'm sure we can find a suitable link for you to follow up on.
New York, United States
Joined: February 01, 2005
KitMaker: 25 posts
Armorama: 23 posts
Posted: Friday, November 30, 2012 - 12:14 PM UTC
Wow, that's going to be some scratch building job. Looking forward to it. And $770 for a model is expensive in anybody's book!
Maine, United States
Joined: February 11, 2011
KitMaker: 1,654 posts
Armorama: 1,565 posts
Posted: Friday, November 30, 2012 - 12:18 PM UTC
I've paid less than that for some of the cars I've owned

Jeff T.
The building lamp is lit.Build'em if you got'em.
California, United States
Joined: June 30, 2008
KitMaker: 2,408 posts
Armorama: 2,394 posts
Posted: Saturday, December 01, 2012 - 07:43 AM UTC
My first car a 1980 Honda Civic Hatchback was $800. That should be quite a scratch building challenge though!
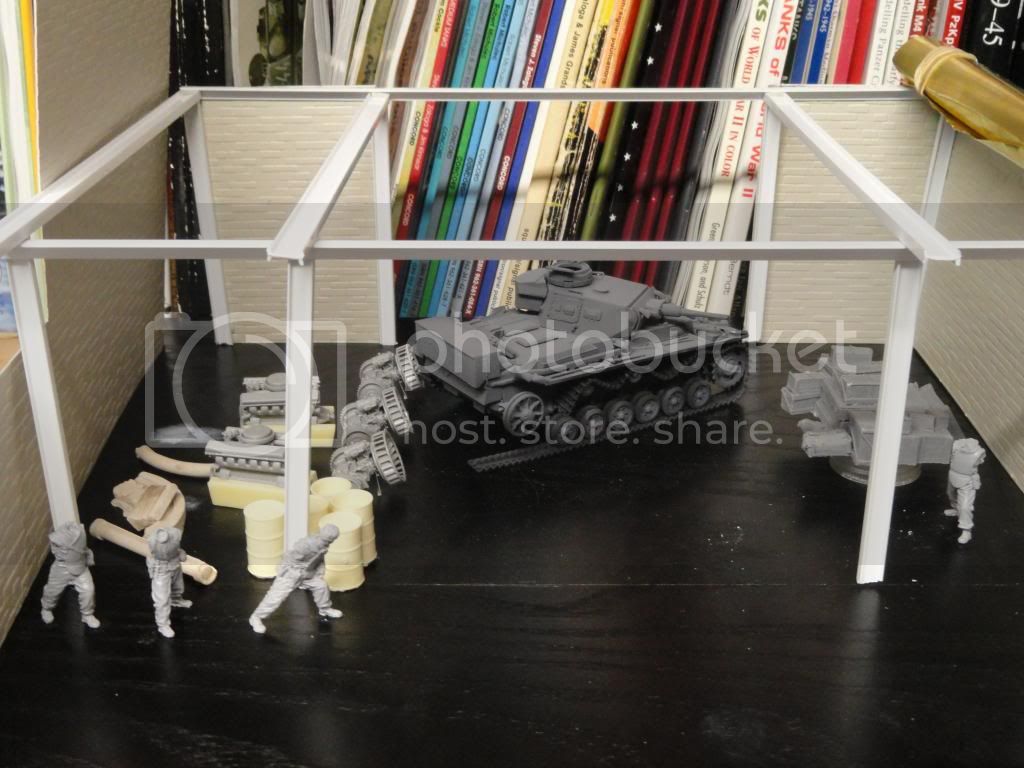
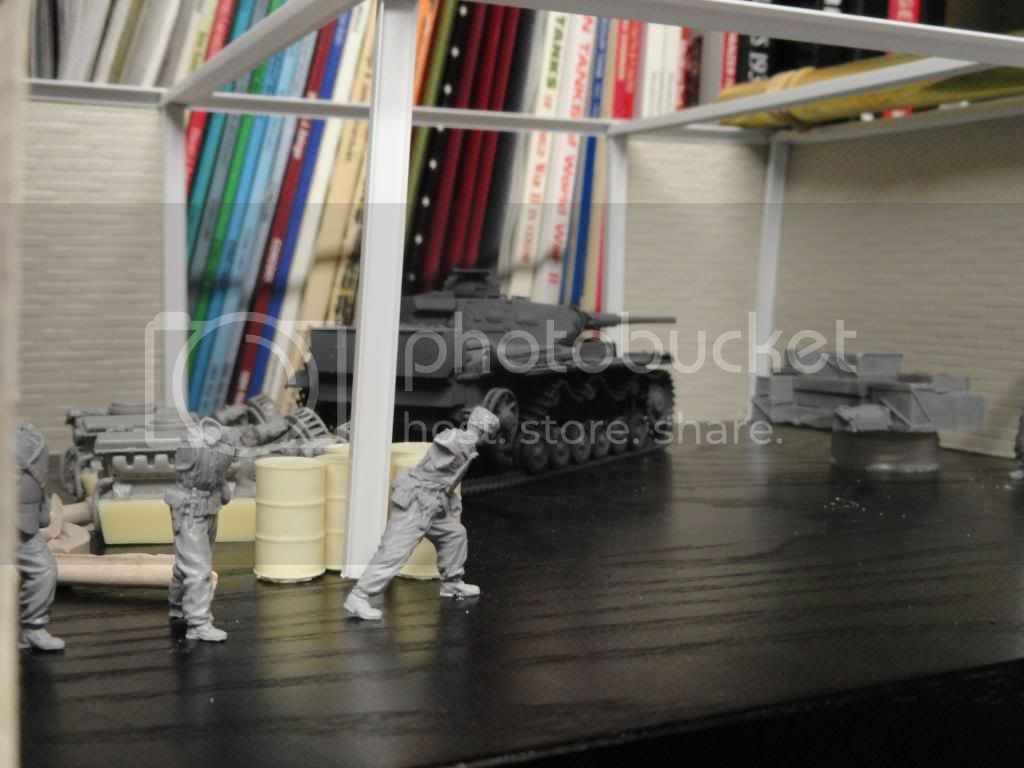
Well, here's my small update. I ordered this O scale resin crate pile thinking they were 10 times larger to fill that space in the back and give the Assault engineers some cover. So I guess I need to scratch some bigger crates too unless anyone has another resource? I ordered the 24 pz division unit signs and numbers from Archer Transfers today. I built this factory structure, but need to add lots of rubble and fallen debris to give the guys in the foreground some cover. The only problem I don't want to add too much or it may be hard to photograph or see what's going on. Ideas welcomed - I'm thinking maybe moving all the figures to
one end of the factory and photograph it from the door?


United States
Joined: February 01, 2009
KitMaker: 1,233 posts
Armorama: 557 posts
Posted: Saturday, December 01, 2012 - 10:14 AM UTC
Greg, that is going to be absolutely awesome. What a project!!!!!
It is a fact that under equal conditions, large-scale battles and whole wars are won by troops which have a strong will for victory, clear goals before them, high moral standards, and devotion to the banner under which they go into battle.
-Georgy Zhukov
Maine, United States
Joined: February 11, 2011
KitMaker: 1,654 posts
Armorama: 1,565 posts
Posted: Saturday, December 01, 2012 - 11:45 AM UTC
My first car was a 1965

Ford Falcon.I paid 225 for it and drove it a couple of years.I knew it was time to get rid of it when I started jacking up the rear bumper and the car stayed on the ground
 Greg...
 I think you'll be O.K. with a lot of rubble.The way I see it is,all the walls are still standing,right? So the only stuff on the floor would be from the roof.Except for some twisted up roof I-beams sticking up here and there,I would think that all the rubble would be mostly in a single layer,and not mounded up.If you kept the stuff low,then it wouldn't take away from the figures.

You could also put some posters or blueprints on the walls to use as a background for the figures to "frame" them so to speak.
Do you like any of it

Jeff T.
The building lamp is lit.Build'em if you got'em.
California, United States
Joined: June 30, 2008
KitMaker: 2,408 posts
Armorama: 2,394 posts
Posted: Saturday, December 01, 2012 - 11:55 AM UTC
Maine, United States
Joined: February 11, 2011
KitMaker: 1,654 posts
Armorama: 1,565 posts
Posted: Saturday, December 01, 2012 - 12:33 PM UTC
Greg,It doesn't have to be a blueprint,it could be like a propaganda poster,or a pin-up maybe

All you really need is something to frame the guy with.
I do like the men outside peering in,it leads you to the inside of the building.I agree, as you mentioned the stuff in front of the guy looking in needs to be taller.J.T.
The building lamp is lit.Build'em if you got'em.
Maine, United States
Joined: February 11, 2011
KitMaker: 1,654 posts
Armorama: 1,565 posts
Posted: Saturday, December 01, 2012 - 01:27 PM UTC
So it's time to Man up and join this campaign,insted of just shooting off replies to everybody.
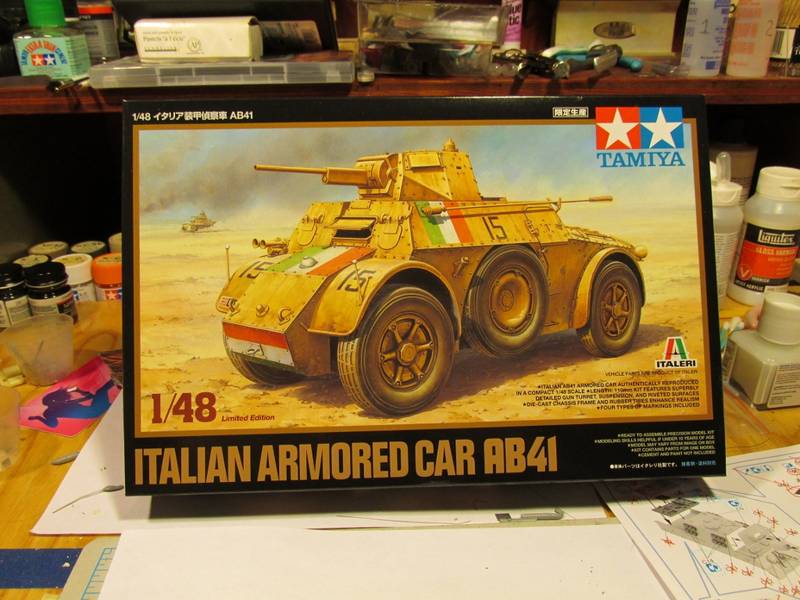
The kit

The parts

The decal sheet

And the really cool die cast frame,that is pretty well detailed

You can see,this is the Tamiya Re-pop,just like the Puma was.It was a little more expensive than the Italeri kit,so I thought it might have the extra stowage sprue with it,like the Puma kit did,but it didn't

Oh well.I still think the frame is cool though.It even came painted

Jeff T.
The building lamp is lit.Build'em if you got'em.
Oregon, United States
Joined: October 10, 2012
KitMaker: 151 posts
Armorama: 115 posts
Posted: Wednesday, December 05, 2012 - 07:19 AM UTC
hi Jeff and Greg .
sorry it took so long to reply been in a model slump lately.
Jeff your choice of armored cars interests me as i have this kit as well and will enjoy seeing it built up,good to see you've began it.
Greg a chain hoist might be fun to scratch up or some kind of overhead hoist,as for blue prints or posters i usually size and print likely looking pics i find online though you will want to split the paper to get scale thickness.
look forward to seeing your progress.
Chris
Oregon, United States
Joined: October 10, 2012
KitMaker: 151 posts
Armorama: 115 posts
Posted: Wednesday, December 05, 2012 - 10:09 AM UTC
i have the base coat on and am having a little trouble with unit markings and camo?
not sure if i need camo to be accurate .
my time frame is d-day---breakout ,anybody with a good knowledge of what 105's were wearing would be most welcome[where they blacking out the stars yet?]
thanks for looking
chris


California, United States
Joined: June 30, 2008
KitMaker: 2,408 posts
Armorama: 2,394 posts
Posted: Wednesday, December 05, 2012 - 10:37 AM UTC
Hi Chris - I'm far from an expert on this sort of thing but I think they started blacking out stars already at the outset of D-day. The black stripe camo began
at the Normandy breakout with Op Cobra. Glad to see progress!
Hawaii, United States
Joined: August 27, 2006
KitMaker: 1,646 posts
Armorama: 1,557 posts
Posted: Wednesday, December 05, 2012 - 10:42 AM UTC
Torsten: great work on the Me and nice gun!
Miniflea: the camo job looks great.
Greg: I like the overall composition for the dio. You should leave off the wall on the left as though the factory continues in that direction, which would help the photos from that angle. On a technical note, the I-beams on top are lying on their sides. They should be stood up with the middle bit being vertical.
Jeff: nice wheels! Also, great story on your first car.
Chris: starting a good looking scene there.
Happy Modeling, -zon

"Certainty of death.
Small chance of sucess.
What are we waiting for?"
-Gimli, Return of the King.
California, United States
Joined: June 30, 2008
KitMaker: 2,408 posts
Armorama: 2,394 posts
Posted: Wednesday, December 05, 2012 - 02:48 PM UTC
Zon (and Chris)- Thanks Buds! I'll study photos more closely on the web. I like that idea of no wall on the left to make it appear larger!

European Union
Joined: August 09, 2009
KitMaker: 1,732 posts
Armorama: 326 posts
Posted: Friday, December 07, 2012 - 09:04 AM UTC
Another update from my "Happy Hunter" ....

After a light white primer ....

.... the red fuselage band of JG 1 is on ....

.... while the fuselage band is covered with Parafilm the underside is sprayed with RLM 76 from Gunze ....

.... the upperside camo of RLM 81 and RLM 82 comes from Agama and is airbrushed free hand ....

.... next step is attaching the landing gear and all that small stuff like antennas and pitot. Hopefully she stands on her feet .... errr .... wheels without help ....

All that work should be done by the end of this weekend, so that I can put on Future and the decals next week. So stay tuned for another update

Some great builds go around here, guys! Greg, I really like your dio. Sure it will come out great in the end. How big will it be?
Happy modelling!
Torsten

My campaigns for 2020:
MiGs - Done !
The Big Three - Done !
65 years Bundeswehr - Done !
40 years Leopard 2 - Done !
Land Lease - Done !
Maine, United States
Joined: February 11, 2011
KitMaker: 1,654 posts
Armorama: 1,565 posts
Posted: Saturday, December 08, 2012 - 04:32 AM UTC
Nice work everybody
 Torsten...
 If you don't mind,what is Parafilm? Your model rack looks sweet,did you make it?
Chris...Glad you have this kit.Although if the rest of the build goes like the chassis it's going to be a long haul

May I present "The Case of the Challenging Chassis"
The parts involved

Shock mounts to tall for a good fit

Filed the shocks and mounting brackets,all four corners

Also ended up filing the upper and control arms down because the wheel spindles where to long. I ended up with this

Based on the work I had to do on it,I did not glue anything and just used the two screws to hold it together.Once I find out how it fits the body,I'll tighten things up

Jeff T.
The building lamp is lit.Build'em if you got'em.
.
 And it's really a change between all this "war toys".


