Nice works!
I have 1 Tilly too, looking your excellent paint job!
Regards
Alvaro
Campaigns
Where Armorama group builds can be discussed, organized, and updates posted.
Where Armorama group builds can be discussed, organized, and updates posted.
Hosted by Darren Baker, Richard S.
The Postcard challenge
alewar

Joined: December 27, 2006
KitMaker: 773 posts
Armorama: 765 posts

Posted: Wednesday, August 14, 2013 - 12:27 PM UTC

turkeyshot

Joined: February 06, 2012
KitMaker: 138 posts
Armorama: 133 posts

Posted: Thursday, August 15, 2013 - 02:10 PM UTC
Hi guys! I have made a little more progress since my last installment and have started slapping some paint on the base.
Following an undercoat, everything was painted in dark grey. Each individual stone was then picked out in various shades of mid-grey, brown and tan to add a little variation and the whole thing was then tied together with a wash of very dilute Tamiya Smoke. The cobbles and stones were then dry-brushed with light grey and Buff to highlight their texture, followed by a light dusting of Tamiya Weather Master pigments. To add a little extra interest I sprinkled some fine sand over the road bed which has now been locked in place with a quick spray of dullcoat.
The riverbed was painted in a greenish brown colour and sprinkled with more sand while still wet. I plan to fill be base with water, although as I have never attempted a water effect before, I am still undecided on which product to go with (and quite frankly am a little intimidated by the prospect). I am leaning towards one of the ready-to-pour products like Vallejo Still Water or similar from the likes of Faller or Woodland Scenics. Do any of you who have any experience making water have any recommendations for me (the water will be no deeper than 5mm)? I am thinking to tint the water a muddy greenish brown colour to create the illusion of depth, while still being transparent enough to show the stonework, debris, and drum descending into the depths. The drum was cut down to make it look like it is sitting deeper in the water than it is, and hopefully will add to the illusion of depth. The rubble is a combination of broken bits of plaster, small pebbles, course grit, and the odd brick by Verlinden. The next steps will be to paint and weather the debris pile in similar shades of grey to that of the bridge, finish off the sign and then get started on the figure and the motorcycle.
PHOTO #13
Front view showing the painting progress and debris pile.
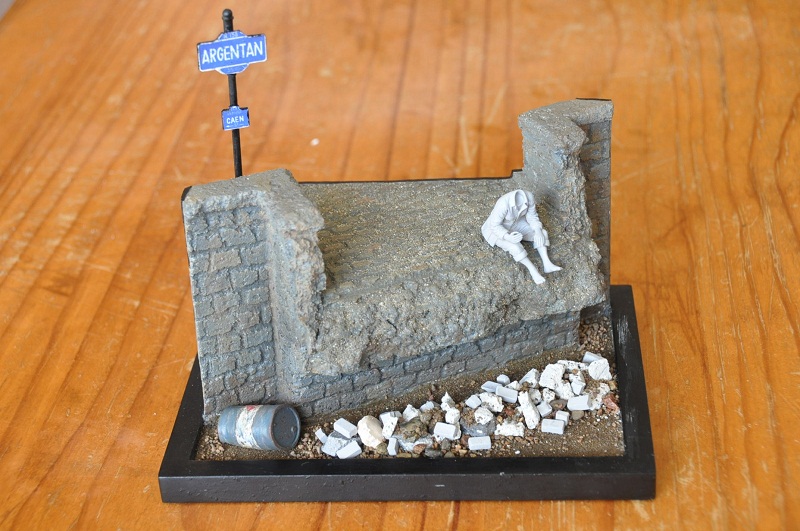
PHOTO #14
Top view showing the cobblestone detail.
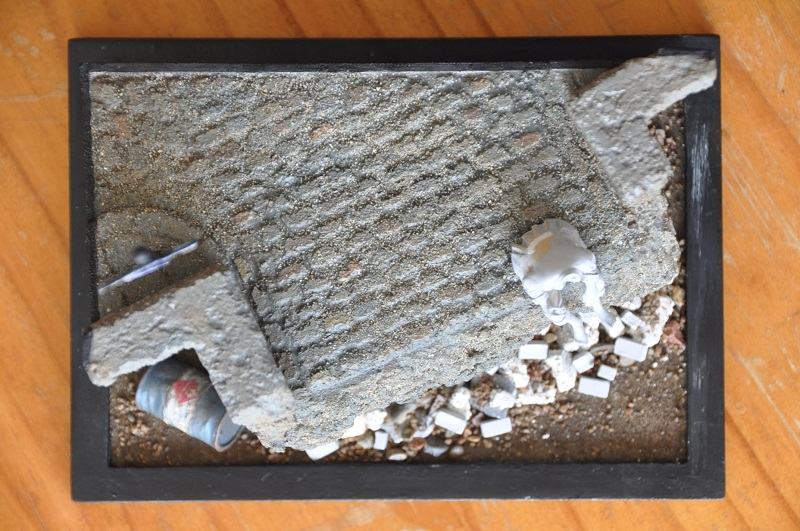
PHOTO #15
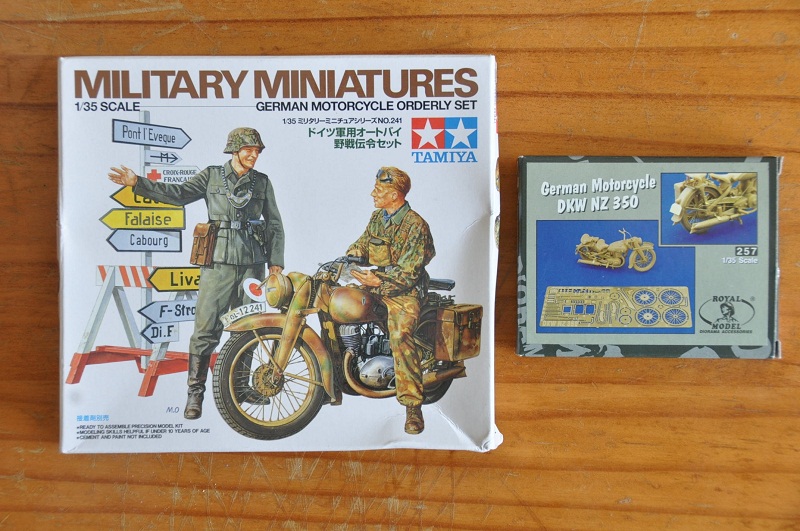
The DKW NZ-350 finally arrived yesterday, which I will attempt to dress up a little with the Royal Model PE kit. There are some VERY small parts in this and I think that I might be biting off more than I can chew, but I will give it a shot and see how it works out.
As always, your thoughts, comments and suggestions are most welcomed. Cheers.
Following an undercoat, everything was painted in dark grey. Each individual stone was then picked out in various shades of mid-grey, brown and tan to add a little variation and the whole thing was then tied together with a wash of very dilute Tamiya Smoke. The cobbles and stones were then dry-brushed with light grey and Buff to highlight their texture, followed by a light dusting of Tamiya Weather Master pigments. To add a little extra interest I sprinkled some fine sand over the road bed which has now been locked in place with a quick spray of dullcoat.
The riverbed was painted in a greenish brown colour and sprinkled with more sand while still wet. I plan to fill be base with water, although as I have never attempted a water effect before, I am still undecided on which product to go with (and quite frankly am a little intimidated by the prospect). I am leaning towards one of the ready-to-pour products like Vallejo Still Water or similar from the likes of Faller or Woodland Scenics. Do any of you who have any experience making water have any recommendations for me (the water will be no deeper than 5mm)? I am thinking to tint the water a muddy greenish brown colour to create the illusion of depth, while still being transparent enough to show the stonework, debris, and drum descending into the depths. The drum was cut down to make it look like it is sitting deeper in the water than it is, and hopefully will add to the illusion of depth. The rubble is a combination of broken bits of plaster, small pebbles, course grit, and the odd brick by Verlinden. The next steps will be to paint and weather the debris pile in similar shades of grey to that of the bridge, finish off the sign and then get started on the figure and the motorcycle.
PHOTO #13
Front view showing the painting progress and debris pile.

PHOTO #14
Top view showing the cobblestone detail.

PHOTO #15
The DKW NZ-350 finally arrived yesterday, which I will attempt to dress up a little with the Royal Model PE kit. There are some VERY small parts in this and I think that I might be biting off more than I can chew, but I will give it a shot and see how it works out.

As always, your thoughts, comments and suggestions are most welcomed. Cheers.

velotrain

Joined: December 23, 2010
KitMaker: 384 posts
Armorama: 320 posts

Posted: Thursday, August 15, 2013 - 06:56 PM UTC
Quoted Text
The rubble is a combination of broken bits of plaster, small pebbles, course grit, and the odd brick by Verlinden.
Jason - I'm curious where the bricks came from, as I thought the bridge was all stone? Where the bridge is broken ("blown"), the exposed edge seems generally smooth, with no jagged breaks, as if it was blown many years prior. However, most of the material in the river appears much more sharply defined. There also isn't very much of it, considering the thickness of the bridge bottom and sides at the break.
I realize that you're very near the edge of the dio, but the amount of rubble to my eye doesn't match what I would expect, based on the bridge profile at the break location. There being no rubble in the nearby corner creates an appearance that the rubble just tumbled off the edge, instead of being created by a bomb or artillery shell.
This may well just be my own issue, as I often feel that the amount and type of rubble, and its distribution, doesn't jibe with the damage portrayed above it. Too often rubble looks like it's been "stage managed" / designed / distributed, instead of being in a more natural pattern. I don't know if looking at photos of blown bridges with a similar construction would help. At a minimum you might add some grit and other smaller pieces over what you have, as most photos I've seen indicate smaller, lighter stuff falling on top of the big chunks.
One possibility might be to have the rubble pile actually fall over the frame of the base, suggesting that it continues beyond the diorama.

turkeyshot

Joined: February 06, 2012
KitMaker: 138 posts
Armorama: 133 posts

Posted: Friday, August 16, 2013 - 06:20 PM UTC
Thanks for your comments Charles, I appreciate the feedback.
To respond to your comments, the 'bricks' have been included to represent cobblestones from the roadway and some of the regular cut stones from which the bridge is built. The photos shown above were taken while the glue holding the debris pile in place was still wet, and so is still far from being finished. I'll likely add some more grit on top of the pile now that it is dry and after I have slapped a little paint on it to see how it looks. While I'll admit that it may be a little difficult to see in the photos, there is a lot of smaller debris on top of the pile and the majority of the debris is jagged broken pieces with relatively few intact 'bricks' showing through on top.
As for the size of the debris pile, I hear your concerns that a bridge of this size would likely produce a much larger pile of rubble, though I would ask you to remember that as the bridge spans a river, most of the debris will be below the level of the water. As I mentioned in my last post, I will fill the foreground with water, and try to depict a sense of depth to it with the debris pile extending down to the riverbed. As I have never attempted to depict water before, I unfortunately will only know if this is going to work after I finish all of the groundwork and work up the courage to pour the water product into the frame. You are right though, there is no rubble in the front right corner; however, this is deliberate because I have plans for that area which are central to this build which I have not yet revealed. Moreover, I think that given the size limitations required by this campaign and what I am trying to show in that small space, I am going to need to exercise a little artistic license and hope that the new techniques that I am trying out will produce the sense of depth that I am hoping it will.
Cheers.


Bluestab

Joined: December 03, 2009
KitMaker: 2,160 posts
Armorama: 1,906 posts

Posted: Monday, August 19, 2013 - 08:10 AM UTC
Update.
Figure time. The parts came from the spares. I left the right arm off to make painting easier.

I started reworking the tracks. The kit's tracks are horrible. They don't like to glue together...I think it's the plastic they use. The side with the figure is supposed to look like it's thrown a track. This was done to show the tank is knocked out and not just parked in a graveyard.

More damage. I cut back one of the front fenders. I also thinned the underside with a motor tool.


Grave marker time. I cut them from a sheet of styrene. I sanded them down to shape. The big stone was shaped odd to look like it was damaged. I placed the stones on a styrene base. And the last picture is a layout idea. Two in front. One run over. The last one, the Soviet tanker is hiding behind.


Anyway, that's it for now.
Figure time. The parts came from the spares. I left the right arm off to make painting easier.

I started reworking the tracks. The kit's tracks are horrible. They don't like to glue together...I think it's the plastic they use. The side with the figure is supposed to look like it's thrown a track. This was done to show the tank is knocked out and not just parked in a graveyard.

More damage. I cut back one of the front fenders. I also thinned the underside with a motor tool.


Grave marker time. I cut them from a sheet of styrene. I sanded them down to shape. The big stone was shaped odd to look like it was damaged. I placed the stones on a styrene base. And the last picture is a layout idea. Two in front. One run over. The last one, the Soviet tanker is hiding behind.


Anyway, that's it for now.
bronzey

Joined: January 06, 2012
KitMaker: 300 posts
Armorama: 256 posts

Posted: Monday, August 19, 2013 - 09:36 AM UTC
Well things are looking great, such a great range of work on this campaign, Alex I like the use of gravestones, have to say if that was me I would be tempted to play about with the naming on the gravestones and come up with a witty comment or two. Liking the tily too, little details go a long way! As for the rubble under the bridge, think once its all painted and weathered it will look much more natural.
Ok so now my update, been working on my van, following a good 1st try at the hairbrush technique I resprayed the van in rust, hairspray and then pit the blue back on. My own impatience risked ruining it as I don't think I waited long enough for it to dry but that said, I am happy with the result.

Bronzey
Ok so now my update, been working on my van, following a good 1st try at the hairbrush technique I resprayed the van in rust, hairspray and then pit the blue back on. My own impatience risked ruining it as I don't think I waited long enough for it to dry but that said, I am happy with the result.

Bronzey

Bluestab

Joined: December 03, 2009
KitMaker: 2,160 posts
Armorama: 1,906 posts

Posted: Tuesday, August 20, 2013 - 04:25 AM UTC
Bronzey,
I thought about playing with the names a bit. More subtle like "Isabel Catherine Weiner" (IC Weiner) or Michael K. Hunt (Mike Hunt). Or even Harold Busch. I'm not sure how I would "engrave" them though.
Another hold-up is location. I'm not sure where I would be placing the scene. I couldn't use those three in Poland or the Ukraine. Anyway, all that'll come together.
The van looks great. The mismatched door really adds to the look.

thewrongguy

Joined: October 17, 2002
KitMaker: 448 posts
Armorama: 306 posts

Posted: Tuesday, August 20, 2013 - 11:16 AM UTC
Quoted Text
Well things are looking great, such a great range of work on this campaign, Alex I like the use of gravestones, have to say if that was me I would be tempted to play about with the naming
As soon as I read this I thought of the tombstones at the Haunted Mansion at Disneyworld. Had a blast taking the family there last autumn.

@Jason. Love the way the bridge has come together. I've been wanting to pick up a DKW kit for a long time, can't wait to see how it goes together.
@Alex. You're braver then I to cut up that Valentine like that, but you definitely pulled it off.
@Bronzey. Van's looking good. I agree that the red door adds a lot of visual interest.
Cheers
Jeff

Bluestab

Joined: December 03, 2009
KitMaker: 2,160 posts
Armorama: 1,906 posts

Posted: Tuesday, August 20, 2013 - 11:37 AM UTC
Thanks Jeff, but it was pretty easy to risk cutting this particular kit. Not only did I have a spare to work with, I also have a strong dislike for it. If this had been the Miniart Valentine I probably wouldn't have risked it. The Dragon kit actually cut really easy. The hull was built pretty solid so it stayed together for me.
Now Bronzey's van...that one looked to be a real trick to cut.
Now Bronzey's van...that one looked to be a real trick to cut.
bronzey

Joined: January 06, 2012
KitMaker: 300 posts
Armorama: 256 posts

Posted: Tuesday, August 20, 2013 - 12:27 PM UTC
How to explain THAT cut....
Well you know when you have a brilliant idea and know just how you want it and know it will look great, then you start the idea and the thought runs in your head 'whos bloody idea was this its a nightmare!'
It was a learning curve for sure, before I started it I sat down with a bottle of beer and had half a dozen cigarettes before I was calm enough to do it! if I ever dare do something like that again, one thing is sure, im going to check inside the vehicle and make sure my cut isn't going to hit the thicker casting, as one side was nearly twice as thick to cut.
But now i see it how it is, i couldn't be happier, it was just what i wanted and i know its not going to be on anyone elses work!
Bronzey

Bluestab

Joined: December 03, 2009
KitMaker: 2,160 posts
Armorama: 1,906 posts

Posted: Tuesday, August 20, 2013 - 02:49 PM UTC
Bronzey,
I don't envy that cut either way. I figure those curved sides and roof were a pain to start. The van is metal too right? And I would be worried that the body would try to flex while cutting. Like I said, you did a great job cutting her.
I don't envy that cut either way. I figure those curved sides and roof were a pain to start. The van is metal too right? And I would be worried that the body would try to flex while cutting. Like I said, you did a great job cutting her.
Posted: Tuesday, August 20, 2013 - 07:08 PM UTC
Ola Guys
Wonderfull Progress is what I see here.
@ Alex Bronze


 That is kinda the definition of Dutch Courage isn't it


All kidding aside that van looks pretty awesome with the delapidated blue paintcoat.
@ Jason
I think once painted up and with the water poured in it will look quite good. I have built that DKW years ago and it already is a really nice kit on it's own but with that ROyal Models PE set you will bring it to a completely new level. Looking forward to that.
@ Alex Bluestab
Love your work on the tank. That heavy track sag on one side really works pretty well to give the sense of a knocked out tank. That Frankensteined figure also looks the part. Great use of your leftovers. Very convincing pose. Looking forward how the gravemarkers will progress the basic shape is very good.
I have been silent for a bit in this Challenge. Aside from being very busy at work I also had a little bit of modelling on location last weekend. A big private collection called Collectie 39 - 45 opened it's doors this weekend and there were quite a bunch of restored vehicles from WW2 running around. I was there to promote our nice hobby together with 2 other local modelers. There are worse backdrops to do your hobby. I have a little photoimpression to see where I was


I only had painting left for my T-20 and since my painttoolbox weighs a ton I rarely paint somewhere else. So I decided to crack open a new box. which is completely unrelated to this challenge but still want to show it


But... I do promise solemnly that from this week on all my focus is back on the Postcard Challenge.
With friendly greetz
Robert Blokker
Wonderfull Progress is what I see here.
@ Alex Bronze
Quoted Text
before I started it I sat down with a bottle of beer and had half a dozen cigarettes before I was calm enough to do it!


 That is kinda the definition of Dutch Courage isn't it


All kidding aside that van looks pretty awesome with the delapidated blue paintcoat.
@ Jason
I think once painted up and with the water poured in it will look quite good. I have built that DKW years ago and it already is a really nice kit on it's own but with that ROyal Models PE set you will bring it to a completely new level. Looking forward to that.
@ Alex Bluestab
Love your work on the tank. That heavy track sag on one side really works pretty well to give the sense of a knocked out tank. That Frankensteined figure also looks the part. Great use of your leftovers. Very convincing pose. Looking forward how the gravemarkers will progress the basic shape is very good.
I have been silent for a bit in this Challenge. Aside from being very busy at work I also had a little bit of modelling on location last weekend. A big private collection called Collectie 39 - 45 opened it's doors this weekend and there were quite a bunch of restored vehicles from WW2 running around. I was there to promote our nice hobby together with 2 other local modelers. There are worse backdrops to do your hobby. I have a little photoimpression to see where I was


I only had painting left for my T-20 and since my painttoolbox weighs a ton I rarely paint somewhere else. So I decided to crack open a new box. which is completely unrelated to this challenge but still want to show it


But... I do promise solemnly that from this week on all my focus is back on the Postcard Challenge.
With friendly greetz
Robert Blokker
Posted: Friday, August 23, 2013 - 06:01 AM UTC
Ola Guys
Happy weekend everybody. Take a beer. Go out. Have nice meals and built a little bit for the Postcard Challenge.
I have spend some time last week to construct the factory wall in styrene. I added several strips to create some different levels to the brick work

And then came the point of the laborious task of glueing all the cork bricks to it. It takes a lot of time but it definately looks good. Allthough I have to admit... if I were a real bricklayer. I probably would have been sacked a long time ago.

Currently I'm about one third on the way. Still a lot of bricks are to go on.
Happy weekend everybody. Take a beer. Go out. Have nice meals and built a little bit for the Postcard Challenge.
I have spend some time last week to construct the factory wall in styrene. I added several strips to create some different levels to the brick work

And then came the point of the laborious task of glueing all the cork bricks to it. It takes a lot of time but it definately looks good. Allthough I have to admit... if I were a real bricklayer. I probably would have been sacked a long time ago.

Currently I'm about one third on the way. Still a lot of bricks are to go on.

turkeyshot

Joined: February 06, 2012
KitMaker: 138 posts
Armorama: 133 posts

Posted: Friday, August 23, 2013 - 09:35 PM UTC
Robert - that wall is HUGE. I hope you have a tall enough cabinet to display it in once done. Great start on the brick work; I love the multiple levels that you are building in to it. I look forward to seeing more of it. Incidentally, I love the pose of that seated German tanker you have - which figure is that?
Alex - Awesome work on piecing that figure together from your spare parts box.
Bronzey - Looking good mate. That van looks to have seen some neglect!
Alex - Awesome work on piecing that figure together from your spare parts box.
Bronzey - Looking good mate. That van looks to have seen some neglect!
Posted: Friday, August 23, 2013 - 10:13 PM UTC
@ Jason
LOL yeah it is really big. It is nearly 28cm high but it will be a nice backdrop to the scene. I'm glad you noticed the several levels in the wall. It will become even more apparent when it is finished and in primer.
The seating tanker comes in a set with the standing crew member and are from Legend. Kit# 3551.
This is how it stands now. On a workbench covered in Corkdust. After working the evening in short sessions during breaks in movies. The biggest and hardest section is pretty much done bar some halfbricks. Some more hours of work and it should be done


thewrongguy

Joined: October 17, 2002
KitMaker: 448 posts
Armorama: 306 posts

Posted: Saturday, August 24, 2013 - 12:20 PM UTC
@Robert. That artillery tractor wouldn't be something I would usually be interested in building myself. But the more I see of yours, I can't help but think about picking a copy up for myself.
Here's my progress


The base still has some work to be done. Stone wall has a bit of a sheen to it. Thinking about what I'd like to add to the elevated area. Maybe nothing.
Haven't started weathering on the Tilly yet. Added some figures to the base. Since the Tilly was used pretty exclusively behind the lines, it's difficult to insert it into too actiony a scene. I'm figuring a British officer and his batman are heading back to their unit from HQ and notice something that warranted investigation.
Great work all around, thoroughly enjoying this campaign.
Cheers
Jeff
Here's my progress


The base still has some work to be done. Stone wall has a bit of a sheen to it. Thinking about what I'd like to add to the elevated area. Maybe nothing.
Haven't started weathering on the Tilly yet. Added some figures to the base. Since the Tilly was used pretty exclusively behind the lines, it's difficult to insert it into too actiony a scene. I'm figuring a British officer and his batman are heading back to their unit from HQ and notice something that warranted investigation.
Great work all around, thoroughly enjoying this campaign.
Cheers
Jeff

Bluestab

Joined: December 03, 2009
KitMaker: 2,160 posts
Armorama: 1,906 posts

Posted: Saturday, August 24, 2013 - 02:33 PM UTC
Jeff,
That base looks really nice. Are you going to add some grass poking through the retaining wall bricks?
That base looks really nice. Are you going to add some grass poking through the retaining wall bricks?

velotrain

Joined: December 23, 2010
KitMaker: 384 posts
Armorama: 320 posts

Posted: Sunday, August 25, 2013 - 03:43 AM UTC
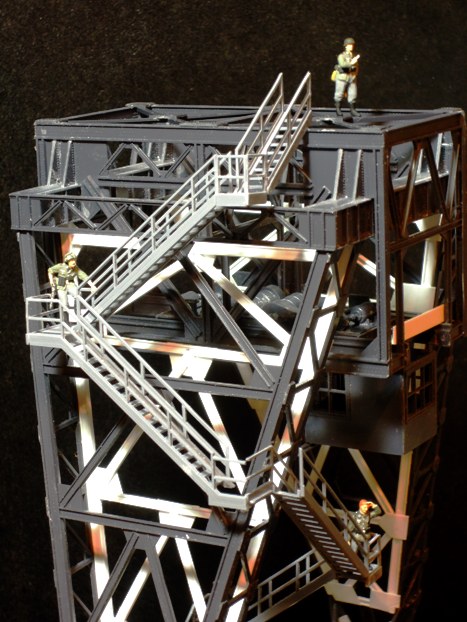
I’ve made some progress on the Ruhr coal depot, but discovered there’s a strange phenomena at work, such that for everything I accomplish, I think of something new that I’d like to add to it, with the net result being that I never seem any closer to being done.
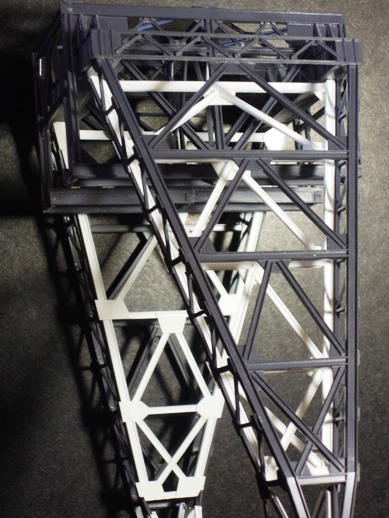
A failing of the kit is that there is no inside bracing for the pier legs, which impacts sturdiness as well as appearance. I built a pair from styrene I-beam, and added simulated gusset plates, more or less echoing the kit pieces.
I have not yet added the platform and roof of the operator’s cab, as I need to paint before I add the glazing and seal the interior off.
I also haven’t added the bucket, and may substitute a white metal kit from Crow River.

I’ve realized that working in 1:87 means you pay close to the same price for military items as you do in the larger scales, even though they have much less detail and but a fraction of the mass. However, you have access to a vast array of items for the model railroad market. This is also true in 1:48, but I specifically selected this bridge crane kit as I wanted to maximize volume through height, as the footprint is restricted.
The kit also provides no means for the operator to get to his cab, so I added stairs using the Walthers kit intended for their steel mill.

This has perhaps the finest railings cast in plastic, but they’re also just as fragile as PE parts. I must have broken them in a dozen places, and one platform had so many breaks that I was about ready to replace all of it. One issue with kitbashing is that the parts are usually designed for a 180 degree turn, so a 90 degree turn requires a lot of custom work – including trying to gently sand down the length of a railing (maybe 1/32 square) without breaking it off. I probably spent at least an hour on each level, with measuring, cutting, sanding, test-fitting, sanding, test-fitting, etc.
The stairs are a WIP, and I see that I need to adjust where the stairs join the top of the structure, where I’ve decided to add another AA gun - but smaller than the 88. I also need to add a platform off the “open” (incomplete) corner, that wraps around to the interior, for the operator to get to his cab.
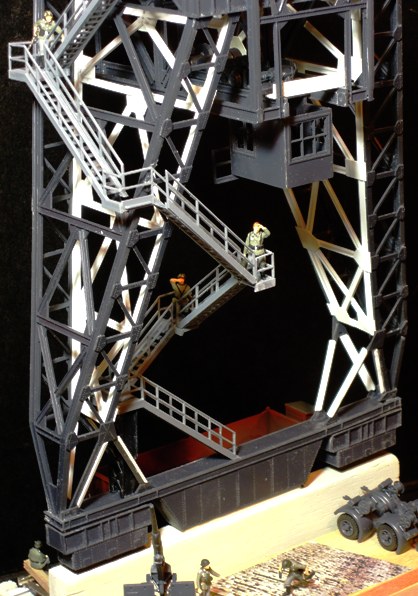
Along with all the obvious stuff, one major remaining task is to build a chute to dump coal directly into a railway car. I want to do this such that people on the stairway are not endangered by falling coal. I’ve given up on the idea of trying to suspend some coal in mid-air.
Outside of the bridge crane, all the rest is only fitted temporarily. Figures are from Preiser. I’ve decided that the concrete abutment supporting the rails (not yet installed) for bridge crane lateral movement is too high compared to the area the soldiers will be in, so will change that.
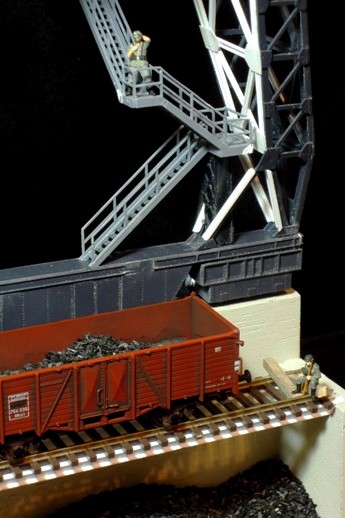
I like the height relationship with the railroad track. I may be removing the ties, as sometimes the rails were laid directly on an I-beam in a situation like this. However, that is more likely where a car will be discharging an aggregate load between the rails, to a conveyer belt below the track.
I’ve had no luck finding WW2-era photos of Ruhr industry, but have discovered that Peenemunde offers some proto justification. There was a bridge crane with a very similar function, although the engineering implementation was different. They used the crane to lift coal from vessels (likely barges) at one end of the bridge, and deliver it to a crusher building, from where it was carried to the power plant by a long conveyor. The bridge continued some ways inland after this building, so I have to think the adjacent area was used for coal storage – until needed at the crusher. However, a large harbor-type crane ran on the bridge, as well as a funnel-like device - which I gather was used to feed the coal into the crusher unit. There was no provision for lateral movement, but the crane itself could achieve this – with no need to move the bridge structure.
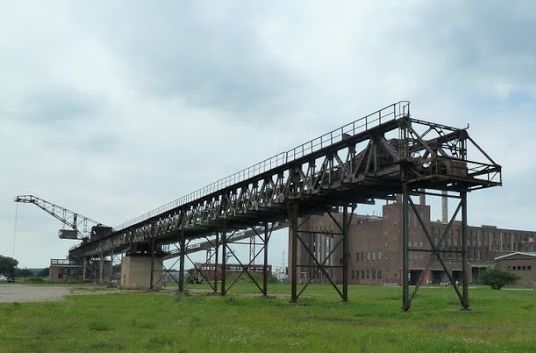
You can make out the conveyor from the breaker house to the top of the power plant under the bridge – the water access is at the far end of this photo. You can just make out the white superstructure of a ship beyond the left end of the power plant.
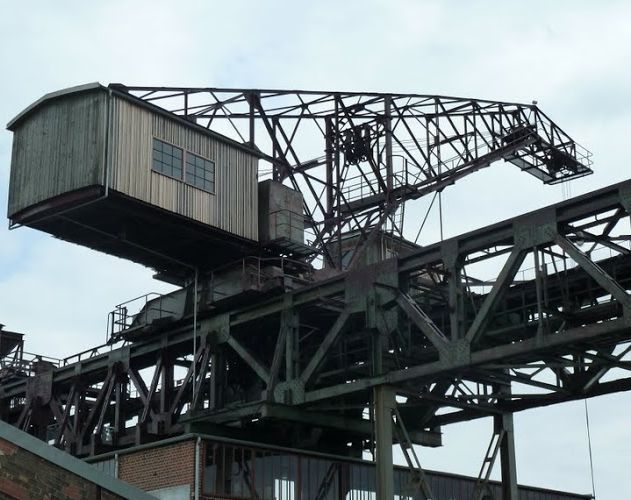
A failing of the kit is that there is no inside bracing for the pier legs, which impacts sturdiness as well as appearance. I built a pair from styrene I-beam, and added simulated gusset plates, more or less echoing the kit pieces.

I have not yet added the platform and roof of the operator’s cab, as I need to paint before I add the glazing and seal the interior off.
I also haven’t added the bucket, and may substitute a white metal kit from Crow River.

I’ve realized that working in 1:87 means you pay close to the same price for military items as you do in the larger scales, even though they have much less detail and but a fraction of the mass. However, you have access to a vast array of items for the model railroad market. This is also true in 1:48, but I specifically selected this bridge crane kit as I wanted to maximize volume through height, as the footprint is restricted.
The kit also provides no means for the operator to get to his cab, so I added stairs using the Walthers kit intended for their steel mill.

This has perhaps the finest railings cast in plastic, but they’re also just as fragile as PE parts. I must have broken them in a dozen places, and one platform had so many breaks that I was about ready to replace all of it. One issue with kitbashing is that the parts are usually designed for a 180 degree turn, so a 90 degree turn requires a lot of custom work – including trying to gently sand down the length of a railing (maybe 1/32 square) without breaking it off. I probably spent at least an hour on each level, with measuring, cutting, sanding, test-fitting, sanding, test-fitting, etc.
The stairs are a WIP, and I see that I need to adjust where the stairs join the top of the structure, where I’ve decided to add another AA gun - but smaller than the 88. I also need to add a platform off the “open” (incomplete) corner, that wraps around to the interior, for the operator to get to his cab.

Along with all the obvious stuff, one major remaining task is to build a chute to dump coal directly into a railway car. I want to do this such that people on the stairway are not endangered by falling coal. I’ve given up on the idea of trying to suspend some coal in mid-air.
Outside of the bridge crane, all the rest is only fitted temporarily. Figures are from Preiser. I’ve decided that the concrete abutment supporting the rails (not yet installed) for bridge crane lateral movement is too high compared to the area the soldiers will be in, so will change that.

I like the height relationship with the railroad track. I may be removing the ties, as sometimes the rails were laid directly on an I-beam in a situation like this. However, that is more likely where a car will be discharging an aggregate load between the rails, to a conveyer belt below the track.

I’ve had no luck finding WW2-era photos of Ruhr industry, but have discovered that Peenemunde offers some proto justification. There was a bridge crane with a very similar function, although the engineering implementation was different. They used the crane to lift coal from vessels (likely barges) at one end of the bridge, and deliver it to a crusher building, from where it was carried to the power plant by a long conveyor. The bridge continued some ways inland after this building, so I have to think the adjacent area was used for coal storage – until needed at the crusher. However, a large harbor-type crane ran on the bridge, as well as a funnel-like device - which I gather was used to feed the coal into the crusher unit. There was no provision for lateral movement, but the crane itself could achieve this – with no need to move the bridge structure.

You can make out the conveyor from the breaker house to the top of the power plant under the bridge – the water access is at the far end of this photo. You can just make out the white superstructure of a ship beyond the left end of the power plant.

Posted: Tuesday, August 27, 2013 - 10:26 PM UTC
@ Jeff
I can really recommend you the T-20. It is a wonderful kit of quite an interesting vehicle.
I love the colors you used on your base. Did you mist the road color over your grass? It seems to match very well creating an overall atmosphere. It would look really good once the Tilly gets weathered in matching colors.
The figures look pretty good as well. Looking forward to seeing them painted up. Would make for a small and still intense scene.
@ Charles
Love that progress. Those cranes are gigantic. I have to say that the modelrailroad world is completely alien to me but I'm amazed what you can buy there. In that scale you really can fit a world on a postcard. Love your scratchwork on those cranelegs and those stairs really look good.
Looking forward how this is going to take shape.

thewrongguy

Joined: October 17, 2002
KitMaker: 448 posts
Armorama: 306 posts

Posted: Thursday, August 29, 2013 - 04:12 AM UTC
Hi all.
@Charles. Wow! I think you nailed it perfectly for how busy the scene should be. I love HO stuff because the small scale helps you tell a larger story.
I tried, but wasn't really able to get it to look very convincing.
@Robert. Thanks for the compliments. I painted the road a couple different colours and went over everything will a really thin coat of Tamiya buff (Maybe 1:10). I'm planning on hitting the wall with some pigments to dust it up a little more. I am not looking forward to the figure painting because like a lot of people I really struggle there.
Cheers
Jeff
@Charles. Wow! I think you nailed it perfectly for how busy the scene should be. I love HO stuff because the small scale helps you tell a larger story.
Quoted Text
Jeff,
That base looks really nice. Are you going to add some grass poking through the retaining wall bricks?
I tried, but wasn't really able to get it to look very convincing.
@Robert. Thanks for the compliments. I painted the road a couple different colours and went over everything will a really thin coat of Tamiya buff (Maybe 1:10). I'm planning on hitting the wall with some pigments to dust it up a little more. I am not looking forward to the figure painting because like a lot of people I really struggle there.
Cheers
Jeff

turkeyshot

Joined: February 06, 2012
KitMaker: 138 posts
Armorama: 133 posts

Posted: Thursday, August 29, 2013 - 12:44 PM UTC
There is some great looking progress here fellas...
Charles - Those stairs look great (and tedious to build!). Though maybe I missed something, I thought you were building a factory scene?
Jeff - Great work on the base mate! Your mix of vegetation is very believable and realistic. I agree with you: a little more colour on that stonework might be just the trick.
As for me, I have worked up the courage to get started on the motorcycle and it is now about 90% built. I just need to add some wires and cables here and there and she should be ready for painting. What a pain in the ass this was to put together! This was my first attempt at an aftermarket PE kit, and boy, some of those parts are SMALL! After much swearing and frustration I am pretty happy with how it has come out thus far. For those of you who have never tried a PE kit, all I can say is wow, you are in for a 'treat' when you do. I have also started slapping a little paint on my figure and now have the main base colours blocked in.
I'd love to hear your thoughts guys.
PHOTO #16
The left side of the DKW NZ-350. Though this side lacks all of the tiny detail of the right side, this will likely be the 'front' shown in the dio.

PHOTO #17
The right side of the DKW NZ-350. I had a hell of a time putting all of these tiny pieces together, but the result is so much better than the standard kit. This is now about 90% done. I still need to attach some more wires and cables to the engine, and the brake and gear cables (the front brake cable can be seen as yet unattached).

PHOTO #18
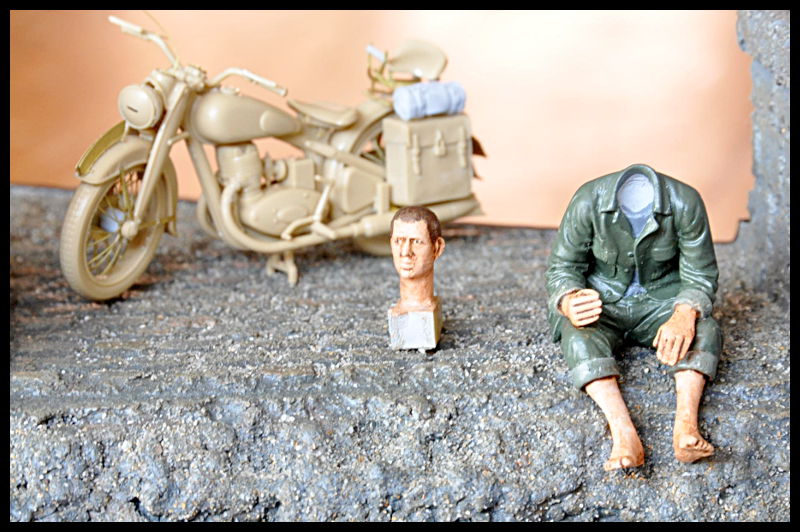
The beginnings of some colour now going onto the figure. So far I have only just blocked in the main base colours and still need to add the highlights/shadows and all of the little details to his uniform. Similarly, the head still needs a little more work on highlights/shadows.
Charles - Those stairs look great (and tedious to build!). Though maybe I missed something, I thought you were building a factory scene?
Jeff - Great work on the base mate! Your mix of vegetation is very believable and realistic. I agree with you: a little more colour on that stonework might be just the trick.
As for me, I have worked up the courage to get started on the motorcycle and it is now about 90% built. I just need to add some wires and cables here and there and she should be ready for painting. What a pain in the ass this was to put together! This was my first attempt at an aftermarket PE kit, and boy, some of those parts are SMALL! After much swearing and frustration I am pretty happy with how it has come out thus far. For those of you who have never tried a PE kit, all I can say is wow, you are in for a 'treat' when you do. I have also started slapping a little paint on my figure and now have the main base colours blocked in.
I'd love to hear your thoughts guys.
PHOTO #16
The left side of the DKW NZ-350. Though this side lacks all of the tiny detail of the right side, this will likely be the 'front' shown in the dio.

PHOTO #17
The right side of the DKW NZ-350. I had a hell of a time putting all of these tiny pieces together, but the result is so much better than the standard kit. This is now about 90% done. I still need to attach some more wires and cables to the engine, and the brake and gear cables (the front brake cable can be seen as yet unattached).

PHOTO #18
The beginnings of some colour now going onto the figure. So far I have only just blocked in the main base colours and still need to add the highlights/shadows and all of the little details to his uniform. Similarly, the head still needs a little more work on highlights/shadows.


velotrain

Joined: December 23, 2010
KitMaker: 384 posts
Armorama: 320 posts

Posted: Thursday, August 29, 2013 - 06:11 PM UTC
Jason - thanks, and the factory is my 2nd PIP, but I have about a dozen more ideas. I just had my own first encounter with PE; I bought the old (sold under some half-dozen brands) Hobby Boss Arizona at a very low price and Tom’s budget PE set for it. It took about a half-hour to bend my first handrail, which was all curved and with two sharp reverse bends – I don’t know how the 1:700 guys stay sane. I discovered a site after this that mentioned you could heat the PE to make it less springy, and thereby easier to bend to a specific profile.
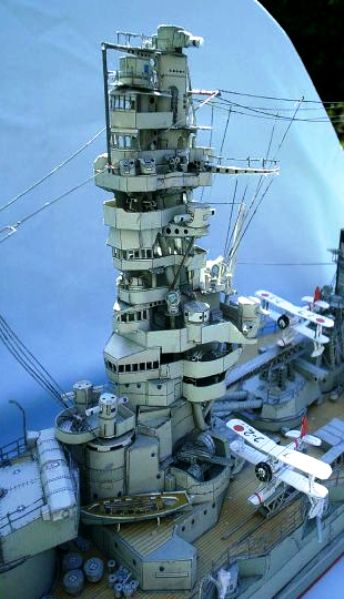
I used a razor saw to cut out a 6” section around the forward tower – I’m not really a ship guy, but I’m fascinated by the “wedding-cake” structures on ~1900 battleships. Here is a photo of a PAPER model of the “Over the top” Japanese Fuso – imagining the effort to do this (almost) makes PE not seem so bad.
I’ll have to wait to see why you’re posing the motorcycle with the “less-detailed” side to the front – perhaps another element you haven’t shared with us yet. Perhaps it’s how the casting came, but I like that there is clear separation between the limbs and clothing on your figure. Although – I wonder how he can sit there contemplating without his head ;-) Maybe place it in his hand?
Jeff – For myself I enjoy visual complexity even more than the busy-ness. I like the idea of forcing the viewer to really peer around to see everything. I also like the suspense of wondering what’s keeping the structure up; right now it’s on a tight-fitting chunk of balsa, but I’ll probably go with dowels for reliability, and then put something over the top of them such as electrical cabinets for the lateral movement motors.
I can’t wait for you to weather the Tilly, as it looks much too clean to be on that dusty road. I have a couple of comments, but it may just be me. I agree with Robert on your base, but perhaps vary the growth at the bottom of the wall a bit – it looks a little “planted”. I’m somewhat confused by the figures, as the crouching fellow with the helmet looks quite animated. However, the other one is standing up much higher and doesn’t seem to be taking the situation as seriously? I don’t know what he will be doing with his right hand (is he holding binoculars perhaps?), but he appears to be much more exposed – and relaxed. It has no real connection to your scene, but here’s a photo I saved some time ago as I liked the palpable tension in the figures.

Robert – if you think those cranes are big, you should have seen the bridge crane that I’m just using one end of. There was an even more massive and mechanically complex ore unloader called the Hulett; there are some videos of them in action on the web, including several animated models – here is an HO-scale extensively modified plastic kit : http://www.youtube.com/watch?v=uRRuTTAgeZU
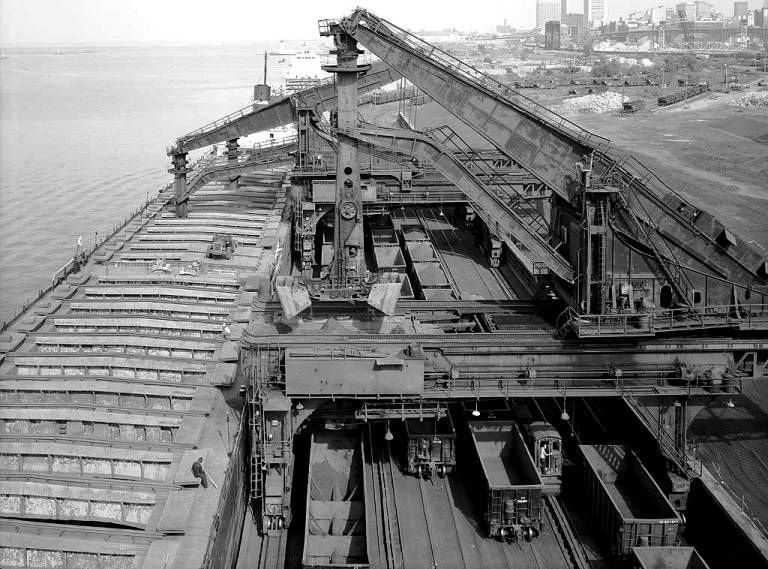
Here is a photo of a Great Lakes ore ship, docked outside Cleveland, being unloaded to hopper cars for the (short) trip to the steel mill. You can see the sort of supporting rails that I need to add.
When I first noticed the “Bank robbery” thread, I thought it was your Bonnie and Clyde dio, but I see you list it as WIP.
I used a razor saw to cut out a 6” section around the forward tower – I’m not really a ship guy, but I’m fascinated by the “wedding-cake” structures on ~1900 battleships. Here is a photo of a PAPER model of the “Over the top” Japanese Fuso – imagining the effort to do this (almost) makes PE not seem so bad.

I’ll have to wait to see why you’re posing the motorcycle with the “less-detailed” side to the front – perhaps another element you haven’t shared with us yet. Perhaps it’s how the casting came, but I like that there is clear separation between the limbs and clothing on your figure. Although – I wonder how he can sit there contemplating without his head ;-) Maybe place it in his hand?
Jeff – For myself I enjoy visual complexity even more than the busy-ness. I like the idea of forcing the viewer to really peer around to see everything. I also like the suspense of wondering what’s keeping the structure up; right now it’s on a tight-fitting chunk of balsa, but I’ll probably go with dowels for reliability, and then put something over the top of them such as electrical cabinets for the lateral movement motors.
I can’t wait for you to weather the Tilly, as it looks much too clean to be on that dusty road. I have a couple of comments, but it may just be me. I agree with Robert on your base, but perhaps vary the growth at the bottom of the wall a bit – it looks a little “planted”. I’m somewhat confused by the figures, as the crouching fellow with the helmet looks quite animated. However, the other one is standing up much higher and doesn’t seem to be taking the situation as seriously? I don’t know what he will be doing with his right hand (is he holding binoculars perhaps?), but he appears to be much more exposed – and relaxed. It has no real connection to your scene, but here’s a photo I saved some time ago as I liked the palpable tension in the figures.

Robert – if you think those cranes are big, you should have seen the bridge crane that I’m just using one end of. There was an even more massive and mechanically complex ore unloader called the Hulett; there are some videos of them in action on the web, including several animated models – here is an HO-scale extensively modified plastic kit : http://www.youtube.com/watch?v=uRRuTTAgeZU
Here is a photo of a Great Lakes ore ship, docked outside Cleveland, being unloaded to hopper cars for the (short) trip to the steel mill. You can see the sort of supporting rails that I need to add.

When I first noticed the “Bank robbery” thread, I thought it was your Bonnie and Clyde dio, but I see you list it as WIP.

strongarden

Joined: May 14, 2012
KitMaker: 730 posts
Armorama: 624 posts

Posted: Friday, August 30, 2013 - 05:11 PM UTC
Hello everyone, what a great Campaign! First off, I always enjoy an Open House, looks like it was a cool afternoon indeed.
@Robert- Lookin' good w/ your factory wall, and super job on your tractor!
@AlexBlue- What a cool action scene, that's gonna look awesome.
@Steph- Like the Command car idea, a nice dio scene.
@AlexBronze- A lot of work but the van looks perfect man. Really unique idea!
@Jeff- Your small truck looks great painted, and lookin' forward to the weathering.
@Tristan- Sweet lil-ol' FlakPanzer, a good kit for this challenge.
@Charles- Dude, you ARE "industrious", and that is a perfect scale to be in. Some very cool fotos too... wow!
@Ben- What an interesting technique! TY for that.
@Jason- I like the ruff sketch, and your chronological fotos will lead to a very nice dio. Any other figs to join the Motorcyclist?
Been following along and after sorting my idea to final design I finally got some bench time/prep work/fitting out done... which has led to some minor issues. Also have a small order arriving next wk w/ addtl figs.
Southern France, prior to D-Day. Partisans active in the area and the occupying forces are on the ready, but bored none-the-less. Small french farm bldg, w/ a cellar.
Not much really, but I'm enjoying this immensely!
*Soviet fig temp. borrowed from another project.


The MiniArt dbl doors are for ref only, and the Tamiya German Shepard is slightly over sized next to the ICM Feldengarmeries. Have to see about that...
Will have more to follow this long wknd!


Cheers
Dave
@Robert- Lookin' good w/ your factory wall, and super job on your tractor!
@AlexBlue- What a cool action scene, that's gonna look awesome.
@Steph- Like the Command car idea, a nice dio scene.
@AlexBronze- A lot of work but the van looks perfect man. Really unique idea!
@Jeff- Your small truck looks great painted, and lookin' forward to the weathering.
@Tristan- Sweet lil-ol' FlakPanzer, a good kit for this challenge.
@Charles- Dude, you ARE "industrious", and that is a perfect scale to be in. Some very cool fotos too... wow!
@Ben- What an interesting technique! TY for that.
@Jason- I like the ruff sketch, and your chronological fotos will lead to a very nice dio. Any other figs to join the Motorcyclist?
Been following along and after sorting my idea to final design I finally got some bench time/prep work/fitting out done... which has led to some minor issues. Also have a small order arriving next wk w/ addtl figs.
Southern France, prior to D-Day. Partisans active in the area and the occupying forces are on the ready, but bored none-the-less. Small french farm bldg, w/ a cellar.
Not much really, but I'm enjoying this immensely!

*Soviet fig temp. borrowed from another project.


The MiniArt dbl doors are for ref only, and the Tamiya German Shepard is slightly over sized next to the ICM Feldengarmeries. Have to see about that...
Will have more to follow this long wknd!


Cheers

Dave

paratrooper

Joined: July 31, 2003
KitMaker: 995 posts
Armorama: 64 posts

Posted: Saturday, August 31, 2013 - 03:08 AM UTC
Hi guys!
You all did a great job so far! Really nice!
I've got some time left when I'm not fishing/ caring for my wife/ cleaning the house (because she is pregnant) so I went further with my house. At the end of all the brick work I was not satisfied with the results and I made a mistake with the size of the building , so there is one thing to do start over again!
This time I'm planning it really carefully so I dont mistakes any more. The story is the same but the layout got some changes.
I made the roof first so fit the gutter. The roof is from verlinden and is all resin , the gutter was made of balsa wood and styrene from the spare box. The support beams are shaped with a file. This was an easy job to do because its really soft wood.
I even had some time to take some pictures!


see ya!
You all did a great job so far! Really nice!
I've got some time left when I'm not fishing/ caring for my wife/ cleaning the house (because she is pregnant) so I went further with my house. At the end of all the brick work I was not satisfied with the results and I made a mistake with the size of the building , so there is one thing to do start over again!
This time I'm planning it really carefully so I dont mistakes any more. The story is the same but the layout got some changes.
I made the roof first so fit the gutter. The roof is from verlinden and is all resin , the gutter was made of balsa wood and styrene from the spare box. The support beams are shaped with a file. This was an easy job to do because its really soft wood.
I even had some time to take some pictures!


see ya!

Posted: Saturday, August 31, 2013 - 10:11 PM UTC
Wow, looking at those nice WIP builds sure makes me break into a cold sweat!
Admittedly I have not put much effort on this campaign, as I got stuck on what to do. I have tossed and turned trying to figure out how to get a piece of a burnt 1/35 Panther within the space limitations, but I guess I would have to finally discard that idea.
My preference is still to stick to a 1/35 scene. So I am down to a couple of more manageable subjects that will surely fit the specified playing area.
I recall that the campaign's definition of a vehicle was modified a bit, so my question to you Robert is whether a Sprengpanzer Goliath can count as a vehicle? Am not after any special considerations so no issue if it doesn't qualify.
Cheers,
Tat
 |


