Ola Guys
How is every body progressing in this little campaign? I hope good.
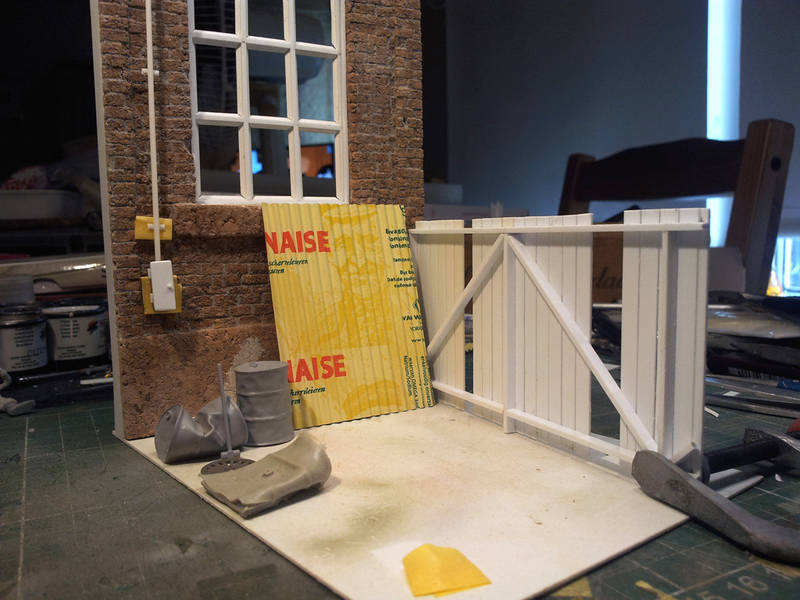
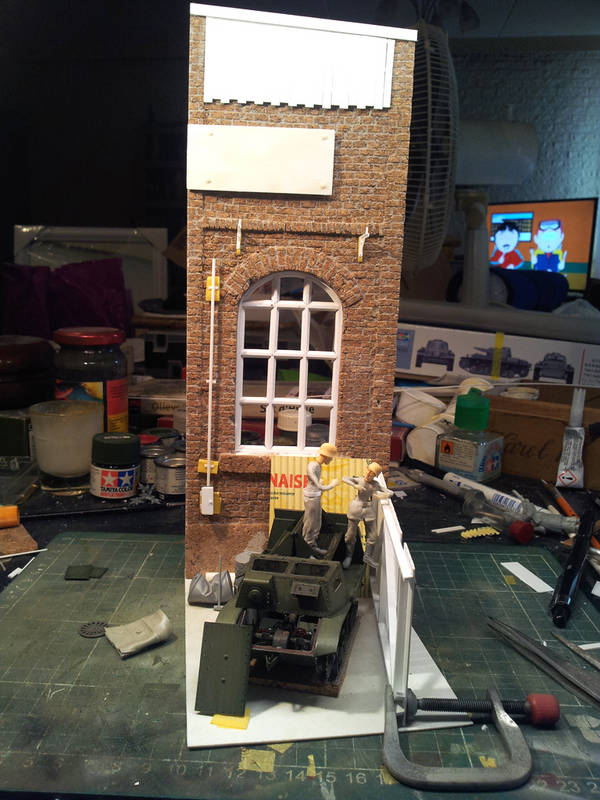
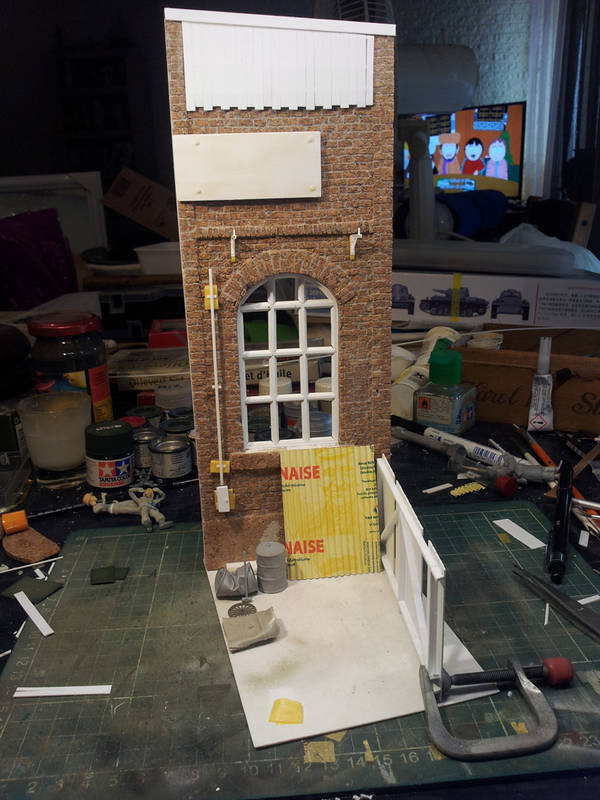
Construction of the factory wall is pretty much finished. I only need to do some clean up on the window and the concrete floor of the factory yard. And then it is off to primer and paint. This is how it stands now
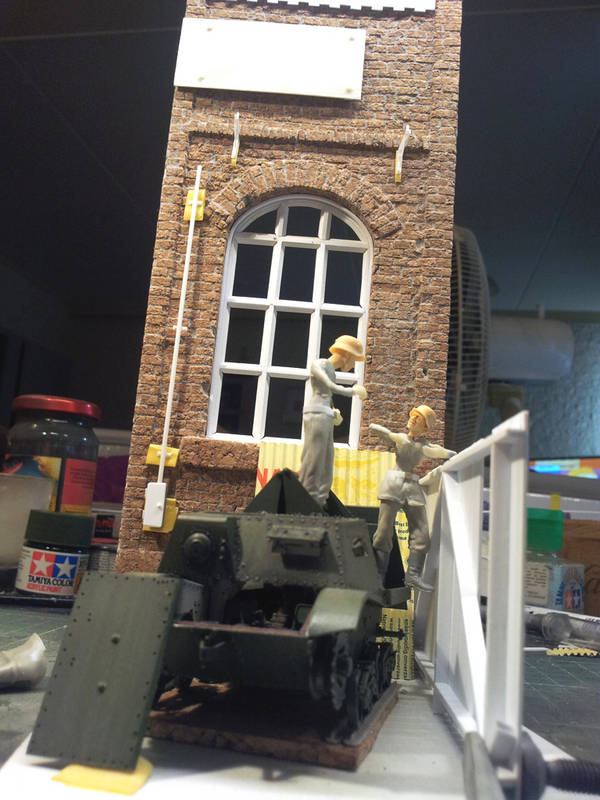
And with the vehicle and the 2 sculpts
I Always enjoy this part of the dio built when all the elements are nearly finished and coming together. Alreayd blowing some life into the scene.
Campaigns
Where Armorama group builds can be discussed, organized, and updates posted.
Hosted by Darren Baker, Richard S.
The Postcard challenge
Posted: Thursday, October 10, 2013 - 02:37 AM UTC
Bluestab
South Carolina, United States
Joined: December 03, 2009
KitMaker: 2,160 posts
Armorama: 1,906 posts
Joined: December 03, 2009
KitMaker: 2,160 posts
Armorama: 1,906 posts
Posted: Thursday, October 10, 2013 - 05:33 AM UTC
Lots of progress on the turret idea.
I hit up the spares and got these two turrets. The dark yellow one is an Academy ausf H while the white one is an Italeri ausf. F2. The F2 probably would have been the more realistic choice...old hardware. I even had the replacement barrel handy. And yes, that is the same base I was going to use for the Valentine idea.
I ended up going with the ausf. H. For the base/casement I'm building around a chunk of Styrofoam. That is the same base.
I marked off how I wanted it cut and cut it.
The removed Styrofoam was then used to form a base for the groundwork to come. This turret is going to be placed on a hillside so there's an incline.
I decided to make the casement made of concrete blocks holding up a concrete slab. I cut styrene sheet to make a façade. I added a couple of coats of thinned white glue to the bricks. I used a thicker glue mixture for the casement top to cover the styrene.
While the glue dried, I turned my attentions to the turret. I had planned to remove the cupola and add a larger, simpler hatch. Trying to remove the cupola didn't go well so I abandoned that idea. I did saw off the kit's turret ring. As is, it left a gap between the casement and turret.
Once the pain had dried, I primered the casement. I wanted to get it primered before adding the Celluclay. By the way, that is a penny you see. It's not for scale purposes. I have a habit of inserting a penny on my diorama bases. It's a good luck thing. It'll be covered by the groundwork.
I hit the figures boxes and came up with these two lower bodies to start working out ideas. The one on the right will probably be moved to sit up on the casement. I plan on having a third figure standing watch. My logic is that the crew is a mix of infantry (anti-tank gun) and a panzer crewman.
That's it for now.
I hit up the spares and got these two turrets. The dark yellow one is an Academy ausf H while the white one is an Italeri ausf. F2. The F2 probably would have been the more realistic choice...old hardware. I even had the replacement barrel handy. And yes, that is the same base I was going to use for the Valentine idea.
I ended up going with the ausf. H. For the base/casement I'm building around a chunk of Styrofoam. That is the same base.
I marked off how I wanted it cut and cut it.
The removed Styrofoam was then used to form a base for the groundwork to come. This turret is going to be placed on a hillside so there's an incline.
I decided to make the casement made of concrete blocks holding up a concrete slab. I cut styrene sheet to make a façade. I added a couple of coats of thinned white glue to the bricks. I used a thicker glue mixture for the casement top to cover the styrene.
While the glue dried, I turned my attentions to the turret. I had planned to remove the cupola and add a larger, simpler hatch. Trying to remove the cupola didn't go well so I abandoned that idea. I did saw off the kit's turret ring. As is, it left a gap between the casement and turret.
Once the pain had dried, I primered the casement. I wanted to get it primered before adding the Celluclay. By the way, that is a penny you see. It's not for scale purposes. I have a habit of inserting a penny on my diorama bases. It's a good luck thing. It'll be covered by the groundwork.
I hit the figures boxes and came up with these two lower bodies to start working out ideas. The one on the right will probably be moved to sit up on the casement. I plan on having a third figure standing watch. My logic is that the crew is a mix of infantry (anti-tank gun) and a panzer crewman.
That's it for now.
turkeyshot
New South Wales, Australia
Joined: February 06, 2012
KitMaker: 138 posts
Armorama: 133 posts
Joined: February 06, 2012
KitMaker: 138 posts
Armorama: 133 posts
Posted: Friday, October 11, 2013 - 08:33 PM UTC
Hey guys, it's been a while since I last posted anything here so I thought that I would drip in again and say hi.
Alex - I look forward to see what you can do with your turret idea. I like the poses of the disembodied legs. They are both nice and casual and both fit in with what you have there already.
Robert - Damn dude, you really need to quit this whole modelling business: you are putting the rest of us to shame!
I meanwhile have painted and weathered the motorbike and finished off the figure. After much thought I have abandoned my original idea of having him sitting on the edge of the bridge with a fishing pole in hand. The whole idea of trying to build a tiny little fishing rod after nearly going blind trying to attach all of the PE on the DKW no longer appeals to me. Besides, after taking a few measurements, the angle of the rod in his hand would have been much too steep in order to show a line dropping down into the water (if you know what I mean). It would not have looked very convincing. Meanwhile, I have added a little more debris and have worked up the courage to start pouring the water in under the bridge. I found some NOCH Modellwasser ('Artificial Water') in the LHS recently and added the first layer this morning. This stuff tends to shrink back quite a lot so I can imagine that I am going to need to apply a few layers until I am happy with the look and depth of the water.
Unfortunately I do not have any new photos for y'all as yet. I'll post some more up later during the week once I can shoot off a few frames in better light.
turkeyshot
New South Wales, Australia
Joined: February 06, 2012
KitMaker: 138 posts
Armorama: 133 posts
Joined: February 06, 2012
KitMaker: 138 posts
Armorama: 133 posts
Posted: Saturday, October 12, 2013 - 11:04 AM UTC
OK, so the morning after ... all of my water has disappeared overnight!
I didn't pour too much of it into the base, but all that is left this morning is a thin film, leaving the appearance of a muddy substrate. I had heard of others having similar problems when pouring water and I thought that I had painted the base well enough to create a seal to hold the water in. However, the obvious would point to the contrary. Hopefully the thin film that is left will create a seal so I can pour some more in once it is dry.
Does anyone have any ideas or suggestions for me? Do you think that will work? Anyone else have any experience using Noch Artificial Water?
Bluestab
South Carolina, United States
Joined: December 03, 2009
KitMaker: 2,160 posts
Armorama: 1,906 posts
Joined: December 03, 2009
KitMaker: 2,160 posts
Armorama: 1,906 posts
Posted: Saturday, October 12, 2013 - 11:52 AM UTC
Jason,
That's a shame about the fishing rod. I think that really could have been a nice touch to the scenes. Even just a crude length of stick, string, and cork would have worked well. Have it laying across his lap and use his right hand to hold a cup or smoke.
As far as your water issue, I'm afraid I cannot help you there. I've never messed with that particular product. I'd try adding a little and see if it holds.
Posted: Tuesday, October 15, 2013 - 10:49 AM UTC
Ola Guys
2 days after the event and the house feels empty without the diorama. It should be done somewhere near the end of November which hopefully is enough to finish in this campaign. I am definately aiming for that.
@ Alex Bluestab
Pretty big turnaround on your dio idea. I like what you did with the Panzer IV as turretbunker. Nice structure for the turret to sit on and the start of the groundworks also looks good. Looking forward how that progresses.
@ Jason
LOL... Well the downside of this is that I'm extremely slow in building. Even more so because now I can't really continue for a while.
WHat you describe sounds pretty good. And I'm looking forward to that. I by the way have a bottle of the same water product that you used and I'm not a big fan of it either for the same reasons you mentioned. There is a lot of shrinkage. For enclosed waterworks like puddles and such it works good for the rest not so.
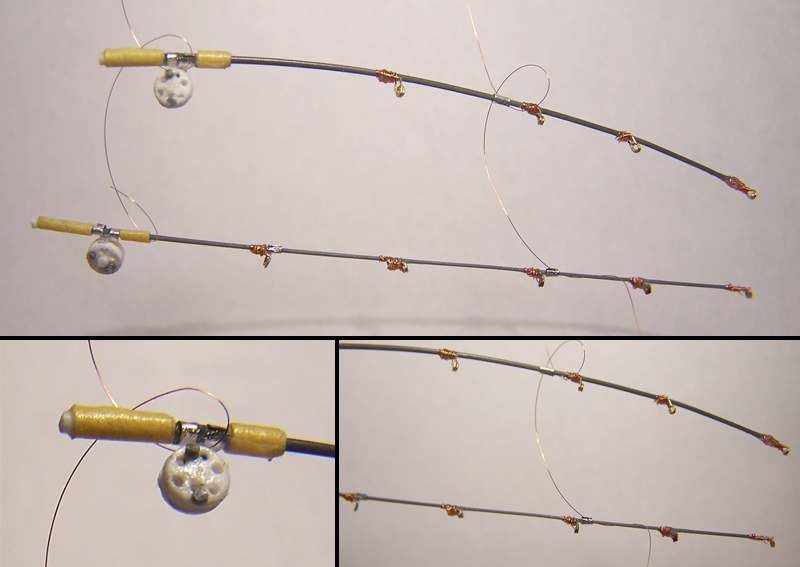
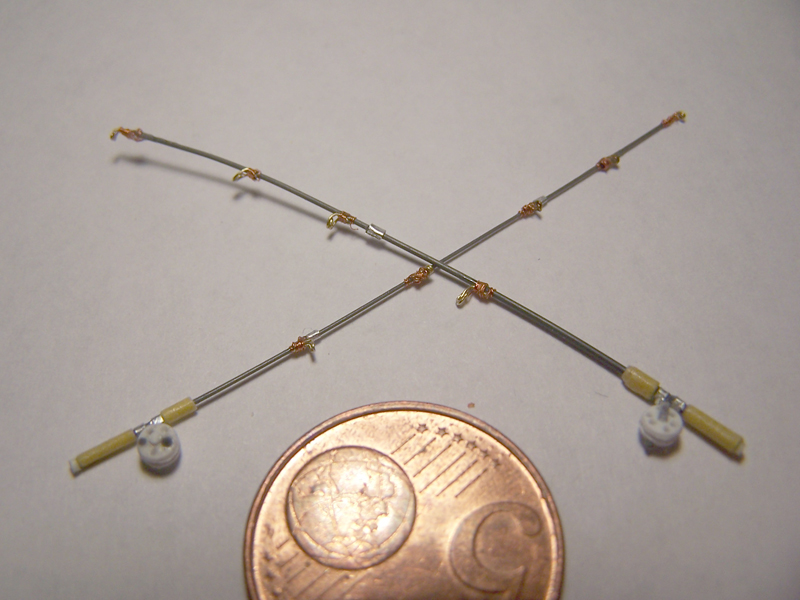
By the way... I know from experience how much work making fishingrods in scale is. I have made 2 in the past for a dio that I still need to finish.
Bluestab
South Carolina, United States
Joined: December 03, 2009
KitMaker: 2,160 posts
Armorama: 1,906 posts
Joined: December 03, 2009
KitMaker: 2,160 posts
Armorama: 1,906 posts
Posted: Tuesday, October 15, 2013 - 12:45 PM UTC
Thanks Robert. I got lucky and the concept came together really well. I'm still playing around with some ideas on what the figures will be doing though. Maybe reading mail, eating, etc. Maybe even have one playing an instrument. All the while, a third figure keeps watch.
I like those fishing rods.
Bluestab
South Carolina, United States
Joined: December 03, 2009
KitMaker: 2,160 posts
Armorama: 1,906 posts
Joined: December 03, 2009
KitMaker: 2,160 posts
Armorama: 1,906 posts
Posted: Tuesday, October 22, 2013 - 04:13 PM UTC
A very brief update. I added the base's Celluclay. I had top extend the slope to the edge of the base. As it was, it just looked like a bump. Given the weather, it'll take a few days to dry.
keenan
Indiana, United States
Joined: October 16, 2002
KitMaker: 5,272 posts
Armorama: 2,844 posts
Joined: October 16, 2002
KitMaker: 5,272 posts
Armorama: 2,844 posts
Posted: Wednesday, October 23, 2013 - 11:57 AM UTC
I am still in. Sorry for the hiatus. Good things on the way...
Shaun
Shaun
Posted: Thursday, October 24, 2013 - 01:12 AM UTC
@ Alex Bluestab
Great job... That base is really coming together. Also like the composition with the long barrel diagonally over the base. Only needs some vegetation and it should look Perfect.
@ Shaun
Great to see you are still with us mate... Looking forward to what yu will pull out of the hat.
Great job... That base is really coming together. Also like the composition with the long barrel diagonally over the base. Only needs some vegetation and it should look Perfect.
@ Shaun
Great to see you are still with us mate... Looking forward to what yu will pull out of the hat.
Bluestab
South Carolina, United States
Joined: December 03, 2009
KitMaker: 2,160 posts
Armorama: 1,906 posts
Joined: December 03, 2009
KitMaker: 2,160 posts
Armorama: 1,906 posts
Posted: Thursday, October 24, 2013 - 01:49 PM UTC
Thanks Robert. I'm putting together a couple strands of barbed wire for it now. I figured that I'd add a couple of strands on the slope in front of the turret to help fill up that area.
thewrongguy
Ontario, Canada
Joined: October 17, 2002
KitMaker: 448 posts
Armorama: 306 posts
Joined: October 17, 2002
KitMaker: 448 posts
Armorama: 306 posts
Posted: Friday, October 25, 2013 - 02:21 AM UTC
Amazing work all around. I'm in the middle of trying to sell my house so all the "toys" are in a storage unit right now. Hoping we get an offer soon so I can get back to painting plastic.
Cheers
Jeff
Cheers
Jeff
Posted: Tuesday, November 05, 2013 - 08:00 AM UTC
@ Alex...
Sounds good. You twist your own barbware I pressume? I do that too... It is funny that even my wife recognises that process when I set 2 chairs apart from each other and start tying twisted copperwire to it
@ Jeff
I wish you good luck in selling your house. I hope the housing market is better at your side of the pond then here in the Netherlands. It is really hard to sell your house at the moment.
Bit of an update from me. As we speak the dio is being processed for mold making and such. Hope to hear very soon from Olav of Reality in Scale what the status of it is... I am really curious. To all the other participants please keep the updates coming. I'm really curious how everybodies work is progressing.
With friendly greetz
Robert
Bluestab
South Carolina, United States
Joined: December 03, 2009
KitMaker: 2,160 posts
Armorama: 1,906 posts
Joined: December 03, 2009
KitMaker: 2,160 posts
Armorama: 1,906 posts
Posted: Tuesday, November 05, 2013 - 12:36 PM UTC
Thanks Robert.
Yes I make my own barbwire. I use to use thread but started using copper wire after seeing it made on this site. I had never thought of using wire to make wire. I stretch the lengths out using a set of helping hands, so I tend to work in shorter lengths.
I got the wire done and mounted it today. Base is basically painted and ready for groundwork. I still need to come up with a figure or two.
I'll try to update soon. I've been taking pictures as I go.
Bluestab
South Carolina, United States
Joined: December 03, 2009
KitMaker: 2,160 posts
Armorama: 1,906 posts
Joined: December 03, 2009
KitMaker: 2,160 posts
Armorama: 1,906 posts
Posted: Friday, November 08, 2013 - 06:53 AM UTC
A quick update.
Barbwire. I used copper strands from some scrap electrical wire. They are kind of hard to see...that's the best picture of the bunch.
Finished wire was painted black, then over-sprayed with a light dusting of medium gray for depth. I debated over using steel beams or wooden poles for them.
While I thought that over, I went ahead and masked off the casement and shot a coat of tan for the groundwork.
Barbwire laying on base to decide how I was going to use it.
I decided to go with the wooden poles....which are actually styrene and came from Italeri's old Barricades set. I decided to go with a short barbwire line. I'm not sure if it's practical, but I went with it to use up some of that open space.
With turret posed for looks.
I've weathered, washed, etc. the turret and I'm in the process of wrapping up the groundwork. Like the barbwire assembly, the groundwork isn't very photo-friendly. I'll salvage what I can and try to get some of those up when I can.
Also, I decided to scale back on the figure element to just a commander in the turret cupola.
Bluestab
South Carolina, United States
Joined: December 03, 2009
KitMaker: 2,160 posts
Armorama: 1,906 posts
Joined: December 03, 2009
KitMaker: 2,160 posts
Armorama: 1,906 posts
Posted: Friday, November 08, 2013 - 09:06 AM UTC
Sorry for the back-to-back posts, but I went ahead and put up the latest pictures.
There wasn't a lot of usable pictures of the groundwork being done. I just kind of skipped ahead to it being done.
As an aside, I made the discovery that Krylon Fusion paint does not like bare Styrofoam. I usually "prime" the Styrofoam with white glue but managed to miss a few spots. The paint melted sections of it and had to be repaired.
Bluestab
South Carolina, United States
Joined: December 03, 2009
KitMaker: 2,160 posts
Armorama: 1,906 posts
Joined: December 03, 2009
KitMaker: 2,160 posts
Armorama: 1,906 posts
Posted: Monday, November 18, 2013 - 09:02 AM UTC
Update on the Panzer Turm.
I've got to make the decision on figures. Originally, I was going to have the Turm's crew sitting on and outside of the turret relaxing. Changes to the slope made that more difficult so I decided to cut back on the figures. I put together two figures. The figure taking a drink is a mixture of parts. The torso and arms are from Dragon's DAK set. The legs are a mystery. The head is from Dragon's SPG Crew Set. The other figure is from Dragon's Actung Jabo set, but with a different head and cover.
I thought the base needed more vegetation on the ground, so I added more. I also dry-brushed the ground and dusted the concrete turret base to show dirt.
I tried positioning both figures but the drinking one really looked better in my head than on the turret so I decided to put him back in the tankers box for some other project. SO it'll be just the one figure.
With just the one figure. I also changed the hat from the service cap to a field cap.
And a couple pictures taken outdoors on the tailgate of my truck.
I'm calling this one almost done. I still have some touch-ups to take care of. That mold liner really shows on the mantlet in the pictures. Maybe add some gear on the turret in front of the cupola. My next update should be my last one for this one.
Posted: Monday, November 18, 2013 - 09:48 PM UTC
Ola Alex
Great result so far... As you found out with the figures... Sometimes you think up something that is totally awesome untill you make it in real life and it turns out it doesn't work very well. I'm running into this constantly as well with my dio ideas. Your tanker looks very comfy in his bunker. Love the groundworks. You are very close to the finish as it appears.
Bluestab
South Carolina, United States
Joined: December 03, 2009
KitMaker: 2,160 posts
Armorama: 1,906 posts
Joined: December 03, 2009
KitMaker: 2,160 posts
Armorama: 1,906 posts
Posted: Tuesday, November 19, 2013 - 08:23 AM UTC
Thanks Robert.
I'm fairly satisfied with how it worked out. Figure painting and groundwork are two of my weak points in the hobby. I think the pictures taken outside really look good, mostly because of the natural shadows. It worked very well for my captured Aerosan for the Waste Not Want Not Campaign.
I tend to be bad about over-planning my projects. I start out with a basic concept and then I start adding ideas. I usually drop most of them and the results aren't bad. The problem is wasted time and effort.
I'm really trying to simplify my projects so they don't require explanation. That really was the key issue with the original idea with the Soviet Valentine. The turret idea was easier to self-explain.
Anyway, I've enjoyed this campaign and I hope more similar campaigns follow.
Bluestab
South Carolina, United States
Joined: December 03, 2009
KitMaker: 2,160 posts
Armorama: 1,906 posts
Joined: December 03, 2009
KitMaker: 2,160 posts
Armorama: 1,906 posts
Posted: Thursday, November 21, 2013 - 08:32 AM UTC
I touched up a few places and here she is. I'm calling this one done. I'll go ahead and upload a couple of pictures in to the gallery.
turkeyshot
New South Wales, Australia
Joined: February 06, 2012
KitMaker: 138 posts
Armorama: 133 posts
Joined: February 06, 2012
KitMaker: 138 posts
Armorama: 133 posts
Posted: Sunday, November 24, 2013 - 10:08 AM UTC
It looks great Alex. Congrats on finishing it!
Now I've just got to find some time to do the same...
Posted: Sunday, November 24, 2013 - 10:26 AM UTC
Congrats on finishing your project for the Postcard Challenge. You managed to create a nice looking diorama my friend.
If all goes well I should receive a package wednesday or thursday and in it should be my diorama now as a product from Reality in Scale... My anticipation is really high for that.
Removed by original poster on 11/25/13 - 21:59:53 (GMT).
Removed by original poster on 11/25/13 - 22:01:17 (GMT).
keenan
Indiana, United States
Joined: October 16, 2002
KitMaker: 5,272 posts
Armorama: 2,844 posts
Joined: October 16, 2002
KitMaker: 5,272 posts
Armorama: 2,844 posts
Posted: Monday, November 25, 2013 - 10:03 AM UTC
There is a vehicle in there somewhere, or at least a part of one...
" TARGET="_blank">[url=http://www.flickr.com/photos/79560933@N05/11056449595/]
How many days do I have left?
" TARGET="_blank">[url=http://www.flickr.com/photos/79560933@N05/11056449595/]
How many days do I have left?