Jason,
Well I was going to go with some stone bricks with a tarp over the top on the pallet but I like the wall idea better, it does need abit of a border I think and that would do the trick for sure.
Steph,
Your groundwork looking good, simple yet effective, the stone wall looks good I have to say.
Bronzey
Campaigns
Where Armorama group builds can be discussed, organized, and updates posted.
Where Armorama group builds can be discussed, organized, and updates posted.
Hosted by Darren Baker, Richard S.
The Postcard challenge
bronzey

Joined: January 06, 2012
KitMaker: 300 posts
Armorama: 256 posts

Posted: Thursday, August 08, 2013 - 12:10 PM UTC
Posted: Thursday, August 08, 2013 - 07:19 PM UTC
@ Mr. Bronze
That is some nice progress on your dio. I like the positioning of the elements that way. Your van has a nice blue coat. Very well done. I think the idea of Jason would work very well. With a wall you border it off a bit and you create some height. You are aware that AFV Club offers an EOD Robot? Small inexpensive kit and migth just add something to the scene.
@ Steph
Nice work on that little base. It has that rural feel to it. Good use of the Styrofoam. And another nice retainerwall. Is that a filled pothole in the corner?
You guys are making me look extremely slow. I see some awesome work on groundworks already and with more than a month in I have only half a vehicle finished. Here is the last picture of the open interior. Put in some discarded rubbish. After this it gets closed off and masked for the final coats of green and the weathering. And then finally finally finally I am going to start on the fence and the factory wall.

steph2102

Joined: April 23, 2011
KitMaker: 735 posts
Armorama: 606 posts

Posted: Friday, August 09, 2013 - 03:48 AM UTC
Posted: Friday, August 09, 2013 - 07:23 AM UTC
[quote]
Returning to the mystery garage I kinda get the feel for what we are looking at. It seems that the guy in the overalls is being interviewed by a (modern) camerateam making this a modern garage where vehicles are being restored. I still have to say that the workmanship on that diorama is very good. I like it when people take care to finish off the sides in a neat way. However I still am puzzled a bit by the heap of Panzer Spares while they are working on a Sherman. And I had not even seen the crates and assorted junk behind the tank which is kinda asking for trouble and injuries.
One interesting question would be if it scored just as high when the clutter was not added to it. The judges might have found it too clean. Even though in real life any garage would try their best to keep stuff clean around their workspaces.
[quote]
I've been in the workshops of a modern restorer of WWII armour. At the time they were working on a Sherman, a Flakpanzer Gepard AND a landrover in a space this size
This is positively understated in terms of clutter to the workshop I visited.

velotrain

Joined: December 23, 2010
KitMaker: 384 posts
Armorama: 320 posts

Posted: Friday, August 09, 2013 - 10:00 AM UTC
Quoted Text
Here is the last picture of the open interior.
Great texture on that interior Robert.
bronzey

Joined: January 06, 2012
KitMaker: 300 posts
Armorama: 256 posts

Posted: Friday, August 09, 2013 - 11:02 AM UTC
Thank you everyone for your comments, its spurred me on to do some more tonight! So this is what I have now, got thinking about how vehicles are treated over there and thought its a great chance to drop in another colour! So say hi to my new replaced transit van door.

Rob yes I own the robot, did plan on using it first but liked the idea of the suit more, more dramatic in my opinion. you may not feel you have come far but what you have done looks spot on
Bronzey

Rob yes I own the robot, did plan on using it first but liked the idea of the suit more, more dramatic in my opinion. you may not feel you have come far but what you have done looks spot on
Bronzey

thewrongguy

Joined: October 17, 2002
KitMaker: 448 posts
Armorama: 306 posts

Posted: Friday, August 09, 2013 - 11:33 AM UTC
Lot of great work, I'll try to get the camera out this weekend to show my progress so far.
I love the Greenery Steph. If you don't mind me asking, what did you use?
Cheers
Jeff
I love the Greenery Steph. If you don't mind me asking, what did you use?
Cheers
Jeff

turkeyshot

Joined: February 06, 2012
KitMaker: 138 posts
Armorama: 133 posts

Posted: Friday, August 09, 2013 - 12:48 PM UTC
Bronzey - Glad that I could help mate. I look forward to seeing what you can come up with. IMO, that little splash of colour on the door adds a little more depth and interest to your build. I like it.
Robert - As I have said previously: that paint job is amazing. I love all of the little details and bits of junk that you have added to the interior. Is that a can of paint? And as Bronzey has said, your progress is looking great.
Steph - That base is looking fantastic. That little bit of colour has really brought it to life.
Heiner

Joined: August 10, 2013
KitMaker: 1 posts
Armorama: 1 posts

Posted: Friday, August 09, 2013 - 09:10 PM UTC
hi guys , I found a discussion about my Diorama "Destination atlantic in this thread.
Here is a link for interested modellers.
http://modelerssocialclub.proboards.com/thread/2871/destination-atlantic
greetings
Heiner
Here is a link for interested modellers.
http://modelerssocialclub.proboards.com/thread/2871/destination-atlantic
greetings
Heiner

turkeyshot

Joined: February 06, 2012
KitMaker: 138 posts
Armorama: 133 posts

Posted: Saturday, August 10, 2013 - 07:32 PM UTC
Hi again guys. I have managed a little more on the base this weekend. This build is progressing well. The stonework is now finished it is now getting to the painting stage. I am still waiting for the motorcycle and a few other small bits and pieces to arrive in the mail, although I have plenty to do to keep me busy until then. See the pics below:
PHOTO #10
All 'stones' have been laid and textured, and are now ready for the spackle to grout between them.
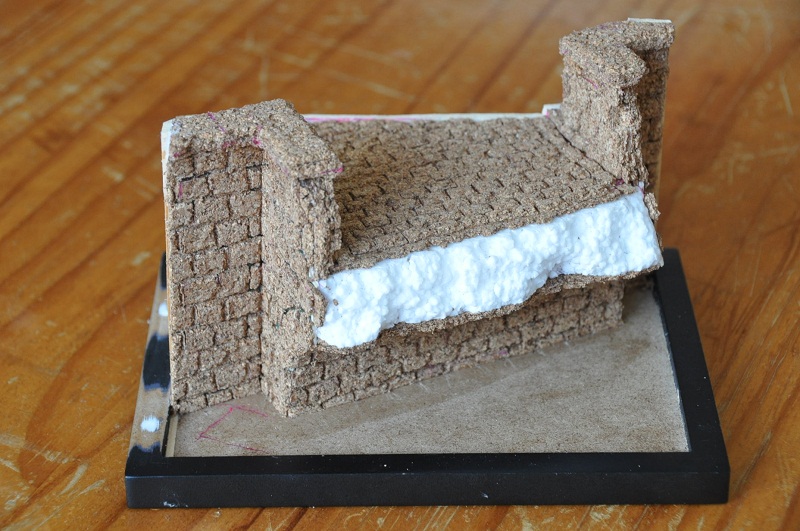
PHOTO #11
Spackle added to 'cement' the stones into place. As you can see I have also started work on the figure who arrived recently. Though it is kind of hard to see in this photo, this is my first "body hack": this figure is supposed to depict a soldier at rest reading a map or a newspaper, however, I did not want to show him reading so I hacked off his left hand, rotated it reattached it with his palm facing down resting over the leg. I think it came out alright.
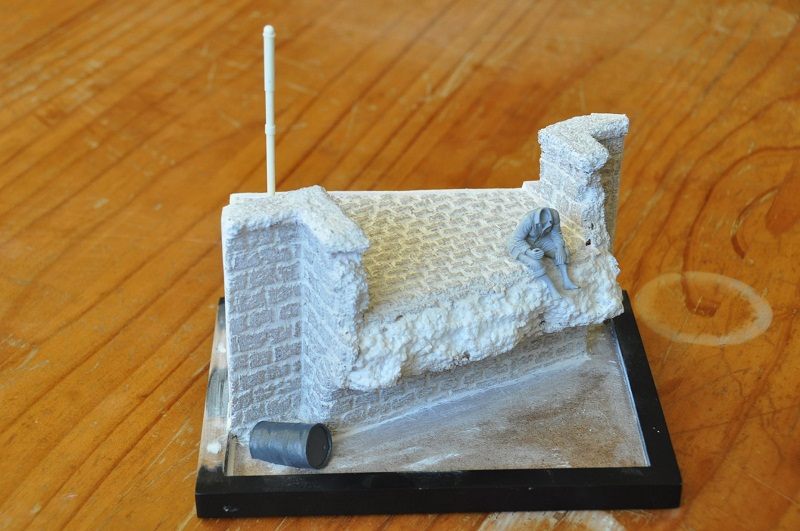
PHOTO #12
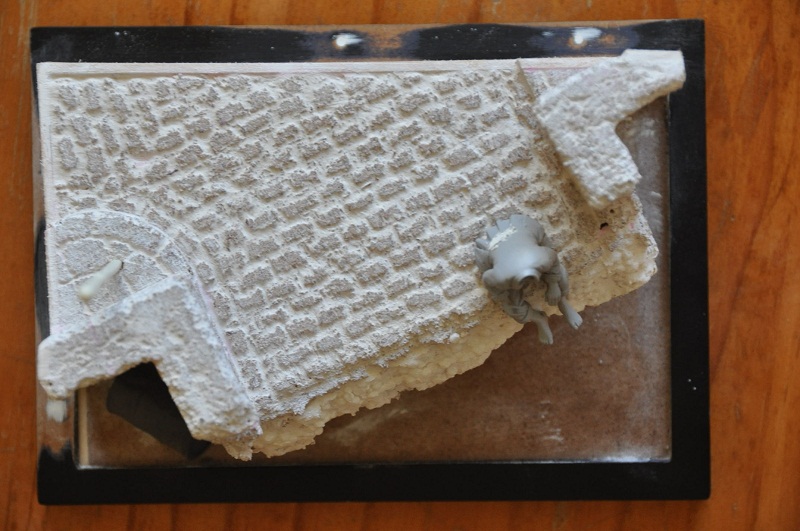
Yet another top view showing the detail in the cobblestones and the approximate position of the seated figure.
As always, your thoughts, comments and suggestions are most welcomed. Cheers.
PHOTO #10
All 'stones' have been laid and textured, and are now ready for the spackle to grout between them.

PHOTO #11
Spackle added to 'cement' the stones into place. As you can see I have also started work on the figure who arrived recently. Though it is kind of hard to see in this photo, this is my first "body hack": this figure is supposed to depict a soldier at rest reading a map or a newspaper, however, I did not want to show him reading so I hacked off his left hand, rotated it reattached it with his palm facing down resting over the leg. I think it came out alright.

PHOTO #12
Yet another top view showing the detail in the cobblestones and the approximate position of the seated figure.

As always, your thoughts, comments and suggestions are most welcomed. Cheers.
steph2102

Joined: April 23, 2011
KitMaker: 735 posts
Armorama: 606 posts

Posted: Saturday, August 10, 2013 - 08:11 PM UTC
hello,thank guys
Jeff, I use synthetic grass of Herki brand, moss, plants natural and bristle brush.

Jason
very nice, very realistic. I'll try your technique for next dio
here is my finished decor,


steph
Quoted Text
Lot of great work, I'll try to get the camera out this weekend to show my progress so far.
I love the Greenery Steph. If you don't mind me asking, what did you use?
Cheers
Jeff
Jeff, I use synthetic grass of Herki brand, moss, plants natural and bristle brush.

Jason
very nice, very realistic. I'll try your technique for next dio
here is my finished decor,


steph

Posted: Saturday, August 10, 2013 - 10:29 PM UTC
@ Chris
Thank you for dropping in. I'm sure that you will find workshops of all sorts all over the world. But I have to say that my experiences differ a bit from yours. I know 2 guys here in the Netherlands that restore WW2 Allied vehicles and a third one I will meet next weekend. The two I already know have barns that look like nothing from the outside but the inside is clean enough to perform open heart surgery. Absolutely cluter free aside from the stuff neccesary to work at. Even standard car garages and I know quite a few of them handle a really strict clean floor policy.
@ Heiner
Thanks to you as well for dropping in a sharing your amazing work with the U-Boot diorama. I know the Conning Tower from AA. I have seen it used a couple of times and great scratchbuilding work on the rest of the sub. I was already wondering if you had cut up the huge waterline model from AA. I have that one in the stash but that will probably 2 of the most expensive cuts of the modelling world. Love the rest of the diorama. All the levels are really well finished and I love how you filled every corner of the diorama.
@ Steph
Great work on that base. I love that well driven on muddy roadsurface with all the tiretracks on it and the vegetation really adds a lot to it colorwise. Great job.
@ Mr. Bronze
Even though it is a relatively small touch I like that red door on the van. It really adds to the scene and it is something that can be seen quite often on that type of van.
@ Jason
Wow that bridge is really taking shape. With the grouting it really looks good. That will paint up nicely. I like the figure sitting quite relaxed at the edge of the bridge. I'm also nearly at the point where I can start the corkwork. Looking forward to that.
@ Everybody
Thanks for the compliments on my work so far. It is really appreciated. The T20 is finally closed down and the exterior has been airbrushed in a fading green color. With the vehicle now pretty much in the finishing stages I could start planning the size of the factory wall and the height of the fence. I decided to use the no height limitations rule and went skywards making it the backwall of a very large assembly hall of sorts. I will need a lot of cork for that.
Well here is a picture of what I'm planning. I did a simple mock up in cardboard before I start to cut up some styrene.
I even thought up a little trick to give the idea that behind that huge window is an even bigger factory hall. But more on that later.

in the next update I will show some more of the tractor and hopefully already a start on the factory wall.
Thank you for dropping in. I'm sure that you will find workshops of all sorts all over the world. But I have to say that my experiences differ a bit from yours. I know 2 guys here in the Netherlands that restore WW2 Allied vehicles and a third one I will meet next weekend. The two I already know have barns that look like nothing from the outside but the inside is clean enough to perform open heart surgery. Absolutely cluter free aside from the stuff neccesary to work at. Even standard car garages and I know quite a few of them handle a really strict clean floor policy.
@ Heiner
Thanks to you as well for dropping in a sharing your amazing work with the U-Boot diorama. I know the Conning Tower from AA. I have seen it used a couple of times and great scratchbuilding work on the rest of the sub. I was already wondering if you had cut up the huge waterline model from AA. I have that one in the stash but that will probably 2 of the most expensive cuts of the modelling world. Love the rest of the diorama. All the levels are really well finished and I love how you filled every corner of the diorama.
@ Steph
Great work on that base. I love that well driven on muddy roadsurface with all the tiretracks on it and the vegetation really adds a lot to it colorwise. Great job.
@ Mr. Bronze
Even though it is a relatively small touch I like that red door on the van. It really adds to the scene and it is something that can be seen quite often on that type of van.
@ Jason
Wow that bridge is really taking shape. With the grouting it really looks good. That will paint up nicely. I like the figure sitting quite relaxed at the edge of the bridge. I'm also nearly at the point where I can start the corkwork. Looking forward to that.
@ Everybody
Thanks for the compliments on my work so far. It is really appreciated. The T20 is finally closed down and the exterior has been airbrushed in a fading green color. With the vehicle now pretty much in the finishing stages I could start planning the size of the factory wall and the height of the fence. I decided to use the no height limitations rule and went skywards making it the backwall of a very large assembly hall of sorts. I will need a lot of cork for that.
Well here is a picture of what I'm planning. I did a simple mock up in cardboard before I start to cut up some styrene.
I even thought up a little trick to give the idea that behind that huge window is an even bigger factory hall. But more on that later.

in the next update I will show some more of the tractor and hopefully already a start on the factory wall.

velotrain

Joined: December 23, 2010
KitMaker: 384 posts
Armorama: 320 posts

Posted: Sunday, August 11, 2013 - 12:51 AM UTC
I went to the sole remaining LHS yesterday and noticed they had a structure kit that I liked, and thought might have possibility as a postcard, so bought it. Since my first postcard will have precisely squared framing due to the modular dimensions of the bridge crane kit, I decided to go in the opposite direction here, with the axis rotated some 45 degrees to the borders. I’ve never done this before, and I rather like working with this angled slice of the structure.

Right now I’m thinking it will be the shipping area of a munitions factory – not necessarily producing the 88 shown. I need to get another flat wagon, as this one is a tad too long to fit – maybe one of those 20T, low-sided Russian ones (captured, and re-gauged, of course ;-).

Since I’ll be finishing the interior – not that I have any choice – I’m using the other end-wall to create the interior bricks. I’m swapping out the ugly windows for some by Tichy (top of photo), although they’ll require some wood framing to fit in the wall openings; they come with a laser-cut glazing sheet, vs. the thick cast styrene ones in the Walther's kit. I’ll use the kit half-round window, but doing some filing on the back side of the casting where everything is wider.


That meter-wide H-beam is just temporary.

Right now I’m thinking it will be the shipping area of a munitions factory – not necessarily producing the 88 shown. I need to get another flat wagon, as this one is a tad too long to fit – maybe one of those 20T, low-sided Russian ones (captured, and re-gauged, of course ;-).

Since I’ll be finishing the interior – not that I have any choice – I’m using the other end-wall to create the interior bricks. I’m swapping out the ugly windows for some by Tichy (top of photo), although they’ll require some wood framing to fit in the wall openings; they come with a laser-cut glazing sheet, vs. the thick cast styrene ones in the Walther's kit. I’ll use the kit half-round window, but doing some filing on the back side of the casting where everything is wider.


That meter-wide H-beam is just temporary.
Posted: Sunday, August 11, 2013 - 07:21 AM UTC
Quoted Text
@ Chris
Thank you for dropping in. I'm sure that you will find workshops of all sorts all over the world. But I have to say that my experiences differ a bit from yours. I know 2 guys here in the Netherlands that restore WW2 Allied vehicles and a third one I will meet next weekend. The two I already know have barns that look like nothing from the outside but the inside is clean enough to perform open heart surgery. Absolutely cluter free aside from the stuff neccesary to work at. Even standard car garages and I know quite a few of them handle a really strict clean floor policy.
I didn't say they were all clean, I was merely saying that some are definitely more cluttered so criticisms of that diorama such as the limited 'mess' and clutter being unrealistic were not fair. They are realistic, not for all places maybe, but it DOES happen
Removed by original poster on 08/13/13 - 01:30:47 (GMT).
bbyrnes

Joined: May 22, 2007
KitMaker: 6 posts
Armorama: 5 posts
Posted: Monday, August 12, 2013 - 01:39 PM UTC
Further progress on my diorama:
Basic stone wall made using Balsa wood strips for base wall with cereal packet cardboard cut and placed for stones.
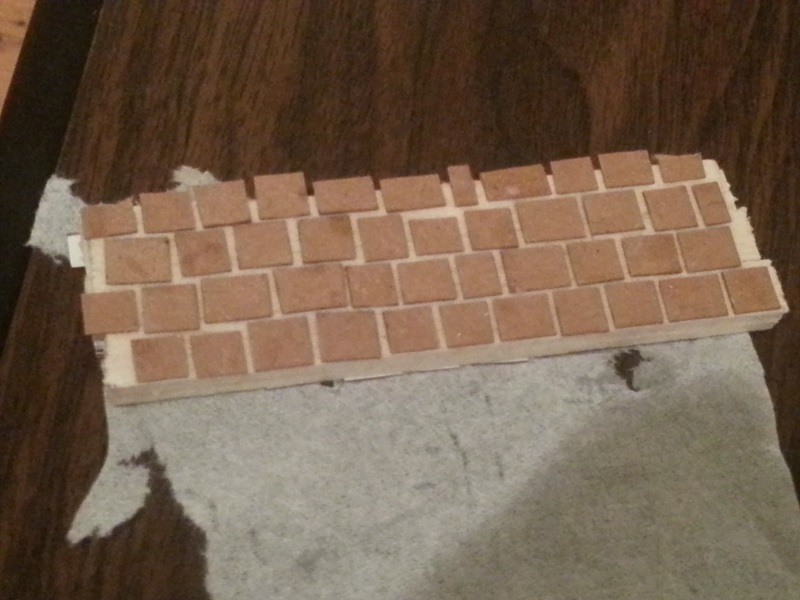
Put a bit of tissue paper over with diluted PVA glue for some texture.
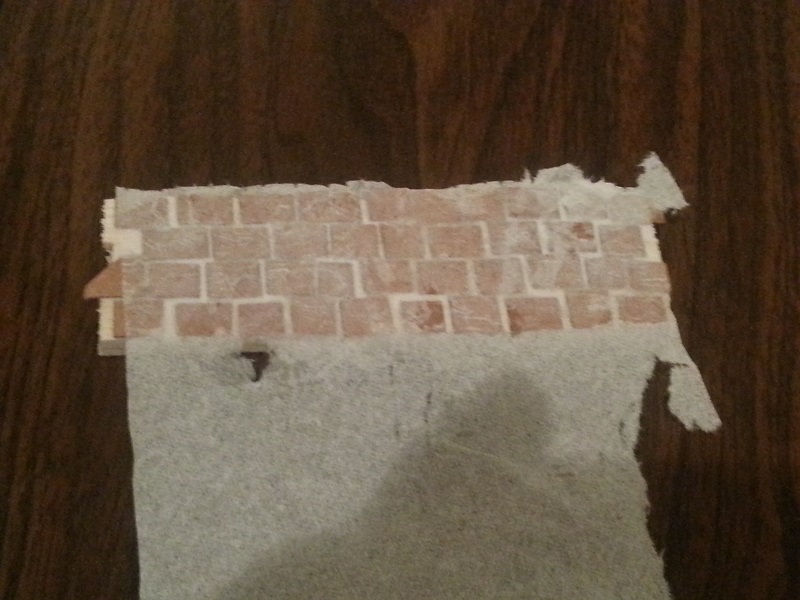
Going to add a Balsa end post which I will cover with tamiya textured paint to give it a rendered appearance. I also scratch built a gate with styrene strip and rod but having second thoughts about that as it looks too modern for a WW2 dio. so probably going to scratch up a timber paling one using styrene sheet tonight.
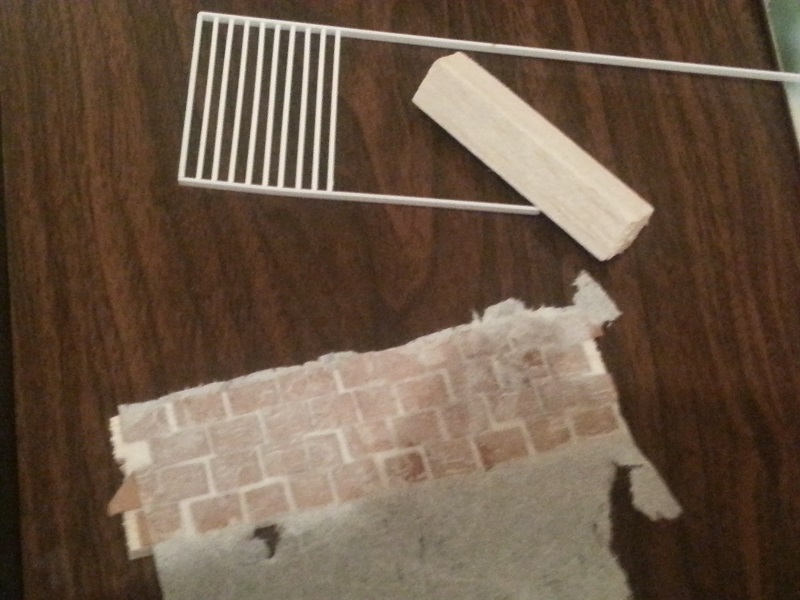
Basic stone wall made using Balsa wood strips for base wall with cereal packet cardboard cut and placed for stones.

Put a bit of tissue paper over with diluted PVA glue for some texture.

Going to add a Balsa end post which I will cover with tamiya textured paint to give it a rendered appearance. I also scratch built a gate with styrene strip and rod but having second thoughts about that as it looks too modern for a WW2 dio.
 so probably going to scratch up a timber paling one using styrene sheet tonight.

thewrongguy

Joined: October 17, 2002
KitMaker: 448 posts
Armorama: 306 posts

Posted: Tuesday, August 13, 2013 - 03:23 AM UTC
Hi all.
Here's where I am with the Tilly.


Had the iso speed set pretty high so the photos are a little grainy. Haven't started the weathering yet. Added a few straps to the tilt but otherwise bone stock. Hoping to go for a dusty finish to match the dusty french farm road I'm building.
Cheers,
Jeff
Here's where I am with the Tilly.


Had the iso speed set pretty high so the photos are a little grainy. Haven't started the weathering yet. Added a few straps to the tilt but otherwise bone stock. Hoping to go for a dusty finish to match the dusty french farm road I'm building.
Cheers,
Jeff

velotrain

Joined: December 23, 2010
KitMaker: 384 posts
Armorama: 320 posts

Posted: Tuesday, August 13, 2013 - 05:21 AM UTC
Jeff - I don't know what ISO you were using, but I'm not seeing unreasonable grain.
That rear cover ("tilt" ?) is fantastic; I'm curious if/how you made it? You mention the straps, so I'm thinking that the basic form is from the kit. Very fine paint job also.
I'm now suspecting it might be a casting, as the sag pattern indicates a central support (I've seen a special term for the hoop, but don't recall it), but I don't see one attached to the truck bed.
steph2102

Joined: April 23, 2011
KitMaker: 735 posts
Armorama: 606 posts

Posted: Tuesday, August 13, 2013 - 05:57 AM UTC
Jeff, very beautiful mount
steph
steph
steph2102

Joined: April 23, 2011
KitMaker: 735 posts
Armorama: 606 posts

Posted: Tuesday, August 13, 2013 - 07:51 PM UTC

turkeyshot

Joined: February 06, 2012
KitMaker: 138 posts
Armorama: 133 posts

Posted: Tuesday, August 13, 2013 - 10:37 PM UTC
Looking good fellas. Some of these builds are really starting to come together.
Robert - Wow, that factory is going to be HUGE!
Ben - That's an interesting technique you are using for that wall. I have never seen it before and am interested to see how it progresses.
Jeff - That is looking great. Awesome work on the tarp.
Steph - Great work on the jeep. that whole dio is really starting to pull together now.
As for me, I have started slapping some paint on my bridge and should have some more photos to post up soon. I have just laid down some basic colours so far and will soon start on the drybrushing and washes.

thewrongguy

Joined: October 17, 2002
KitMaker: 448 posts
Armorama: 306 posts

Posted: Wednesday, August 14, 2013 - 03:28 AM UTC
Quoted Text
That rear cover ("tilt" ?) is fantastic; I'm curious if/how you made it? You mention the straps, so I'm thinking that the basic form is from the kit.
@Charles. Tilt is an odd bit of nomenclature. In my area it was always called a truck cap. All the references I found called it a tilt so I ran with that.
It's just the standard injected kit piece. It was missing a bunch of strapping that should have been there. So I just rolled out some kneadatite into really thin strips, cut it into appropriate sized rectangles and placed it on.
@All . Thanks for the compliments. I was worried the tilt was looking a little too stark. I love this campaign. I haven't been in another where I've learned so much.
Cheers
Jeff
Posted: Wednesday, August 14, 2013 - 07:06 AM UTC
Ola Guys
Superb progress again. Some real gems are growing here.
@ Charles
That is some impressive work. I love how you cut the building and with the 88 on that flatbed. Pretty nice. That has some possibilities with figures as well to make that come even more to live.
@ Chris
I think you misunderstood me. I did not say you were wrong. I know how different garages can be. And I'm not saying all the garages I have been into looked like operating rooms. But a lot did. Still I like the garage dio. It is well made. Well finished and the workmanship is pretty good as well.
@ Ben
That is a pretty neat wall you are working on there. I don't think that gate looks too modern. I have seen gardengates from the victorian era made by local blacksmiths that were pretty much that design. It is the easiest approach for something simple that is designed to do 1 job for the lowest cost possible.
@ Jeff
Good progress on the tilly. It almost looks like you photographed it at a reenactorsevent all polished up. Nice paintjob and very clean. that should work a treat once you start weathering.
@ Steph
You are flying ahead with your diorama man. The Bantam looks really nice and I like the red cross twist. I'm really looking forward how that progresses.
@ Jason
Yeah it is a pretty big wall but because of the big window in it it is not all that massive. 1:1 it would end up just under 10 meters high. Which is not all that strange for some of the massive factories in Russia. Plus I have some little plans to make it less boring.
@ Jeff
That is exactly what I wanted to achieve with this campaign. A. to have pleasure and B. to learn new things and think differently about things done previously.
And I have updated the T-20 Builtlog with the latest series of pictures. You can check it out here. T-20 Builtlog
Very soon I will start on the basic structure of the factory wall and start the corkwork.
I only see good work in this challenge guys. Looking forward to more.
with friendly greetz
Robert Blokker
Superb progress again. Some real gems are growing here.
@ Charles
That is some impressive work. I love how you cut the building and with the 88 on that flatbed. Pretty nice. That has some possibilities with figures as well to make that come even more to live.
@ Chris
I think you misunderstood me. I did not say you were wrong. I know how different garages can be. And I'm not saying all the garages I have been into looked like operating rooms. But a lot did. Still I like the garage dio. It is well made. Well finished and the workmanship is pretty good as well.
@ Ben
That is a pretty neat wall you are working on there. I don't think that gate looks too modern. I have seen gardengates from the victorian era made by local blacksmiths that were pretty much that design. It is the easiest approach for something simple that is designed to do 1 job for the lowest cost possible.
@ Jeff
Good progress on the tilly. It almost looks like you photographed it at a reenactorsevent all polished up. Nice paintjob and very clean. that should work a treat once you start weathering.
@ Steph
You are flying ahead with your diorama man. The Bantam looks really nice and I like the red cross twist. I'm really looking forward how that progresses.
@ Jason
Yeah it is a pretty big wall but because of the big window in it it is not all that massive. 1:1 it would end up just under 10 meters high. Which is not all that strange for some of the massive factories in Russia. Plus I have some little plans to make it less boring.
@ Jeff
Quoted Text
I love this campaign. I haven't been in another where I've learned so much.
That is exactly what I wanted to achieve with this campaign. A. to have pleasure and B. to learn new things and think differently about things done previously.
And I have updated the T-20 Builtlog with the latest series of pictures. You can check it out here. T-20 Builtlog
Very soon I will start on the basic structure of the factory wall and start the corkwork.
I only see good work in this challenge guys. Looking forward to more.
with friendly greetz
Robert Blokker

velotrain

Joined: December 23, 2010
KitMaker: 384 posts
Armorama: 320 posts

Posted: Wednesday, August 14, 2013 - 09:30 AM UTC
Quoted Text
It's just the standard injected kit piece. It was missing a bunch of strapping that should have been there. So I just rolled out some kneadatite into really thin strips, cut it into appropriate sized rectangles and placed it on.
What impressed me was how much it really carries the sense of canvas. Perhaps it's the color, or that roll at the back giving it three-dimensionality, or - maybe it is the grain coming through!
I agree with Robert:
"It almost looks like you photographed it at a reenactors event all polished up."
Sort of takes "clean build" to a whole new level.
You might bend some wire supports for the tarp (if not supplied in the kit) to justify the shape with the open back - for those who may peer in.
I'd never heard of Kneadatite, but just did a bit of search-research.
Are you in Ottawa? Beautiful city, with an amazing amount of green space. Many years ago, I was with my girlfriend in that old (former) downtown campground, when we heard this unusual, intermittent sound shortly after dawn. I went out to discover dozens of hot-air balloons passing over the city, and she quickly joined me.

thewrongguy

Joined: October 17, 2002
KitMaker: 448 posts
Armorama: 306 posts

Posted: Wednesday, August 14, 2013 - 11:32 AM UTC
Quoted Text
You might bend some wire supports for the tarp (if not supplied in the kit) to justify the shape with the open back - for those who may peer in.
A couple pages back or so I posted about considering building the support rod structure inside, but I think I'm going to pass this go around. It's difficult to notice except at certain angles and I'm hoping that when it's on the base it'll become more difficult to see. Its honestly the best building kit I've ever done (there's no glue holding it together in those photos), so I'm planning on building another soon and going hog wild on it.
If you're interested in trying kneadatite I got mine here as it was impossible to find in Canada. I figured for 6 bucks shipped it was worth a shot. I'm pretty positive you could find better deals stateside though.
Ottawa is nice I have family out that way. I live in the same province but 9 hours away. Ontario is a pain in the neck to get through as it's around 3 times the size of Germany.
Cheers
Jeff
 |


