Dioramas: Campaigns
Group builds and online competetions. Join the fun!
Hosted by Darren Baker
Sdkfz 250/251 Campaign
Namabiiru
Staff MemberAssociate Editor
MODEL SHIPWRIGHTS
#399
Visit this Community
Rhode Island, United States
Joined: March 05, 2014
KitMaker: 2,888 posts
Armorama: 1,920 posts
Posted: Sunday, May 29, 2016 - 12:03 AM UTC
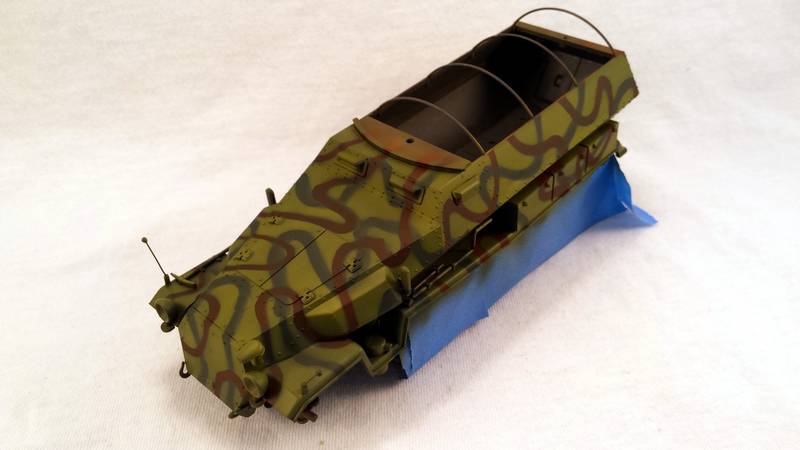
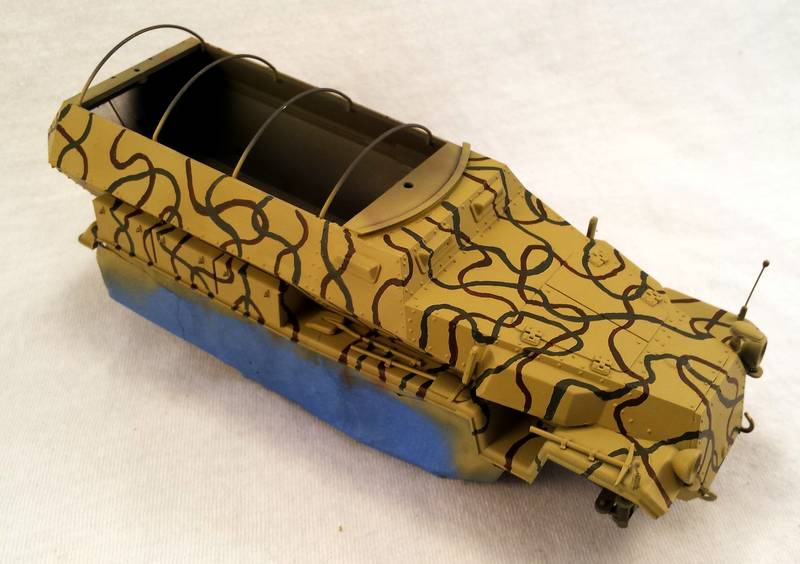
Second attempt at camo, this time using Mig Masking Putty:

Not sure I like it any better than the first. Looks kind of cartoonish to me. Thinking about trying a third time. What do you guys think?

jrutman
Visit this Community
Pennsylvania, United States
Joined: April 10, 2011
KitMaker: 7,941 posts
Armorama: 7,934 posts
Posted: Sunday, May 29, 2016 - 12:32 AM UTC
I like it. This is a C version and a lot of these were sprayed in the field by the werkstatt or the crews so you would see a lot of wild schemes. It would fit right in. Plus,a few nice washes will tone things down and blend it all together?
J
Thirian24
Visit this Community
Oklahoma, United States
Joined: September 30, 2015
KitMaker: 2,493 posts
Armorama: 2,344 posts
Posted: Sunday, May 29, 2016 - 01:54 AM UTC
I really like it.

I need to get started on mine. Lol
tatbaqui
Staff MemberNews Writer
ARMORAMA
#040
Visit this Community
Metro Manila, Philippines
Joined: May 06, 2007
KitMaker: 2,713 posts
Armorama: 2,451 posts
Posted: Sunday, May 29, 2016 - 04:07 AM UTC

Quoted Text

Second attempt at camo, this time using Mig Masking Putty:

Not sure I like it any better than the first. Looks kind of cartoonish to me. Thinking about trying a third time. What do you guys think?


I second Jerry on the washes -- such should soften / tone it down. But if it were up to a vote I like your first one.
LikesTanks
Visit this Community
Wales, United Kingdom
Joined: May 07, 2013
KitMaker: 242 posts
Armorama: 234 posts
Posted: Sunday, May 29, 2016 - 06:21 AM UTC
Second that, I liked the feathering of the first attempt.
Namabiiru
Staff MemberAssociate Editor
MODEL SHIPWRIGHTS
#399
Visit this Community
Rhode Island, United States
Joined: March 05, 2014
KitMaker: 2,888 posts
Armorama: 1,920 posts
Posted: Sunday, May 29, 2016 - 06:36 AM UTC
Thanks for the comments, Guys! I've already decided I couldn't stand the second one, so it's all been over- sprayed in prep for attempt three. May try hand-painting to see how that goes. Pretty frustrated with the A/B at this point.

yeahwiggie
Visit this Community
Dalarnas, Sweden
Joined: March 24, 2006
KitMaker: 2,093 posts
Armorama: 1,359 posts
Posted: Sunday, May 29, 2016 - 10:50 AM UTC
Try to think "1/35". How would a guy spray a vehicle like this in real scale? how would he reach all the areas?
Would he creap all over it, holding the trigger, getting nice flowing long lines or would he finish one area at a time, one color at a time?
Namabiiru
Staff MemberAssociate Editor
MODEL SHIPWRIGHTS
#399
Visit this Community
Rhode Island, United States
Joined: March 05, 2014
KitMaker: 2,888 posts
Armorama: 1,920 posts
Posted: Sunday, May 29, 2016 - 09:01 PM UTC
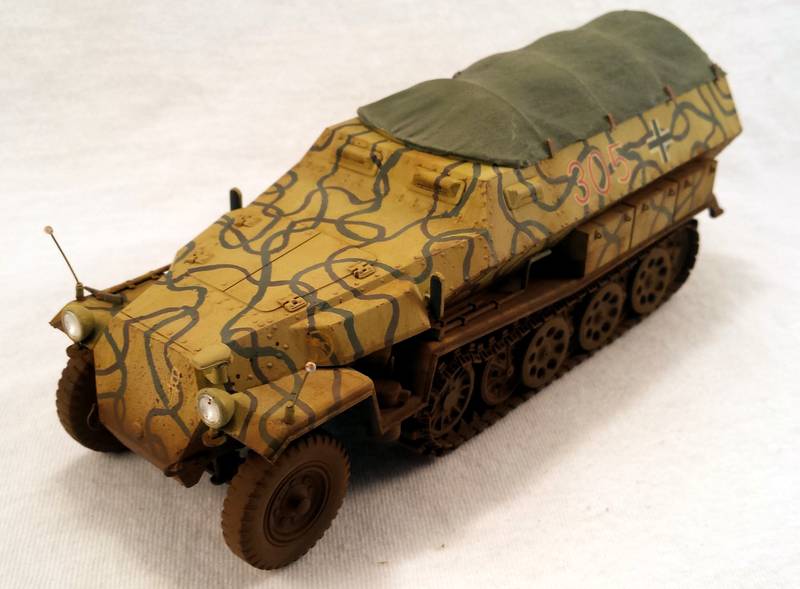
Hopefully, the third time's the charm:


I think this captures the rough look of battlefield application and comes pretty close to what I was aiming for. As has already been mentioned, washes and filters should tone this down and tie everything together.

Dioramartin
Visit this Community
New South Wales, Australia
Joined: May 04, 2016
KitMaker: 1,476 posts
Armorama: 1,463 posts
Posted: Monday, May 30, 2016 - 05:53 PM UTC
You guys are doing some excellent stuff here, congratulations to all. I’m inspired to join the convoy if my AFV Club 250/9 Ausf C Stummel passes muster? As you may be aware (Diorama or Bust) I’m assembling German & Soviet vehicles present on the northern Kursk salient around Ponyri in July ’43. References kept drawing me to the 2nd Pz Div’s Stummels, which most sources seem to agree had their original grey over-sprayed with dark yellow freestyle squiggles, as seen in these images from Restayn’s/Moller’s magnificient “Operation Citadel – North Salient” tome.


Being barely proficient with my airbrush I’d always shied away from attempting this pattern, it seemed impossible to get into all the panel angles without making a mess and, judging by how few attempts by others I could find on the net, perhaps it actually is impossible. Anyway I bought the kit last month with the intention of making it a standard yellow/green livery from some other unit and started making it. Then I caught up with what you guys are doing and thought maybe with a support group I might rise to the challenge by using an alternative strategy.


Standard practice is to give every AFV a base coat of Humbrol Enamel, they haven’t made “Steel” for years alas so I’ve settled for Metallic Aluminium. This coat provides enough grip for cheap Student quality acrylic paint overcoats, which with gentle fine-sanding can be teased off on edges etc. to reveal the “metal” beneath. I brush everything on in order to get tone variations, an airbrush (in my hands) gives a too-uniform finish. Over the Aluminium I scrubbed thin washes of black acrylic inside and out which created a decent weathered panzer-grey approximation. (Can’t believe I missed those ejector-pin marks on the inside of the gun-shield, good thing it isn’t glued down yet)
Then the tricky part – tilting each panel in turn to the horizontal to prevent runs, I dampened with plain water and then applied the dark yellow as per the pictures, in the end resorting to the mini-clamp/vice to get stability for the in-sloping panels, and a hair-dryer to fix it before it blurred too much.


So here’s the full paint-job - I’ve got way too close to it, does it look like it’s been sprayed on by 1/35th Man? I should add that there will be some thin “dirty” washes to darken the yellow & generally unify it with the grey after the decals have gone on, finishing off with a bit more caked mud on & behind the undercarriage plus an overall dust of dry powder paint or pastel like the other 250 in the pics below (PS Don’t look at the radio in the Stummel, it’s an abomination compared to Karl’s. And I’m not sure the fire extinguisher should be red, I dimly recall reading somewhere they were metallic or field-grey…?)


Namabiiru
Staff MemberAssociate Editor
MODEL SHIPWRIGHTS
#399
Visit this Community
Rhode Island, United States
Joined: March 05, 2014
KitMaker: 2,888 posts
Armorama: 1,920 posts
Posted: Monday, May 30, 2016 - 07:51 PM UTC
I think you nailed that camo, Tim. Looks great!

Thirian24
Visit this Community
Oklahoma, United States
Joined: September 30, 2015
KitMaker: 2,493 posts
Armorama: 2,344 posts
Posted: Wednesday, June 01, 2016 - 07:51 AM UTC
Hey fellas. I have my work bench some what free'd up, so I thought I would get working on this.

This is my campaign entry photo.


Cheers,
Dustin
Thirian24
Visit this Community
Oklahoma, United States
Joined: September 30, 2015
KitMaker: 2,493 posts
Armorama: 2,344 posts
Posted: Wednesday, June 01, 2016 - 10:25 PM UTC
A bit of progress here.


Cheers,
Dustin
erichvon
Visit this Community
England - East Midlands, United Kingdom
Joined: January 17, 2006
KitMaker: 1,694 posts
Armorama: 1,584 posts
Posted: Saturday, June 04, 2016 - 08:27 AM UTC
Tim, the extinguishers came in a variety of colours. I've seen them in red, dunkel gelb, a brownish olive drab and in field grey so I don't think there's a right or wrong colour really. I suppose a crew would grab whatever was available if they'd used the factory installed one to make sure that they'd got one on board. I like the foeld applied cam. Looks really effective.
Dioramartin
Visit this Community
New South Wales, Australia
Joined: May 04, 2016
KitMaker: 1,476 posts
Armorama: 1,463 posts
Posted: Saturday, June 04, 2016 - 05:28 PM UTC
Thanks guys & yes Karl that chimes with my dim memory so I’ll leave it red. Made more progress than expected mainly due to apocalyptic weather conditions in Sydney for the past 48 hours with no sign of abating – indoors was/is the only sane option.
Getting some help test-fitting the wheels (because they don’t)…

The dirty washes brought the yellow down the necessary shade, tracks & decals went on OK

The inside of the gun-shield’s fixed

Tone down the wooden handles on the tools?

Nearly done – still need to detail/accessorise the interior a bit more, fit the break-off favourites (width indicators, rear MG support, aerial) then a final all-over dusting, and maybe a crew. I’d swear those mechanics haven’t moved since I showed them the problem.

Looking forward to seeing how other builders are going. Cheers, Tim

jrutman
Visit this Community
Pennsylvania, United States
Joined: April 10, 2011
KitMaker: 7,941 posts
Armorama: 7,934 posts
Posted: Saturday, June 04, 2016 - 09:15 PM UTC
Looks good Time!! And clever use of the figs as well.
erichvon
Visit this Community
England - East Midlands, United Kingdom
Joined: January 17, 2006
KitMaker: 1,694 posts
Armorama: 1,584 posts
Posted: Monday, June 06, 2016 - 09:21 AM UTC
That's something I've never seen in a dio/vignette before. A wheel change. The figures you've used look spot on as they're so natural for what they're doing. Nice touch and great idea.
Dioramartin
Visit this Community
New South Wales, Australia
Joined: May 04, 2016
KitMaker: 1,476 posts
Armorama: 1,463 posts
Posted: Wednesday, June 08, 2016 - 06:37 PM UTC
All done & dusted, thanks guys for the encouragement:


And thanks for the prod Karl, when I thought about it I couldn’t remember seeing a wheel-change dio either although they must be out there somewhere? I was just messing around because the axles were too fat. There’s a few details I’m not altogether happy about but overall it came out better than I expected. As it finally stopped raining here I’ve taken 10 photos including these 3, I’ll see if Darren might take them for the Photos section on the home page – doing my bit to promote this Campaign. How’s Dustin going – need some mechanics?
Cheers, Tim
Namabiiru
Staff MemberAssociate Editor
MODEL SHIPWRIGHTS
#399
Visit this Community
Rhode Island, United States
Joined: March 05, 2014
KitMaker: 2,888 posts
Armorama: 1,920 posts
Posted: Wednesday, June 08, 2016 - 07:22 PM UTC
Looks awesome, Tim! Putting me to shame!

TankManNick
Visit this Community
California, United States
Joined: February 01, 2010
KitMaker: 551 posts
Armorama: 543 posts
Posted: Thursday, June 09, 2016 - 09:54 AM UTC
I finished, and importantly photographed, my little 250/9. Finish was inspired by a pic from this guy:


ZAPanzer
Visit this Community
North-West, South Africa
Joined: September 12, 2012
KitMaker: 88 posts
Armorama: 49 posts
Posted: Thursday, June 09, 2016 - 06:09 PM UTC
Hi
I've been away from the workbench for a long time now, but have some progress.

 photo WP_20160609_002_zpsjlduqnzk.jpg
erichvon
Visit this Community
England - East Midlands, United Kingdom
Joined: January 17, 2006
KitMaker: 1,694 posts
Armorama: 1,584 posts
Posted: Friday, June 10, 2016 - 03:00 AM UTC
Tim, that's a fantastic build. I really like it. The field applied cam gives it a really different look and the interior looks superb. Well done mate.
TankManNick
Visit this Community
California, United States
Joined: February 01, 2010
KitMaker: 551 posts
Armorama: 543 posts
Posted: Monday, June 13, 2016 - 07:53 AM UTC
When I started I said I had only one 250 in the stash. Well that was then! Thanks to my favorite 'book' store, Dan Webb, I now have this in the stash - but not for much longer!


So I will subject everyone to another 1/72 build! Let's see how this one goes...

Looks like the model is an Ausf C and I have already decided to open the view slits for a bit more interest and finish in dark grey overpainted with dark yellow. I think the picture I liked was taken in Tunisia. I was going to include some AB figures but I decided to use them on a Pz III instead.
alliedbuilder
Visit this Community
Pennsylvania, United States
Joined: December 31, 2015
KitMaker: 16 posts
Armorama: 3 posts
Posted: Thursday, June 16, 2016 - 06:54 AM UTC
Now that I've gotten some time and my pacific M4 hybrid hull Sherman is nearing completion I've begun my entry for the campaign, Dragon's 250/10 with the 37 mm anti-tank gun.


I plan to build the kit fairly out of the box. I'm not the fastest builder nor do I have a large amount of time to build but I should be able to wrap this one up by the end of the campaign. I'm looking forward to completing this kit for the campaign, it's my first campaign and my second model after around a 7 year hiatus from modelling.
Namabiiru
Staff MemberAssociate Editor
MODEL SHIPWRIGHTS
#399
Visit this Community
Rhode Island, United States
Joined: March 05, 2014
KitMaker: 2,888 posts
Armorama: 1,920 posts
Posted: Friday, June 17, 2016 - 04:26 AM UTC
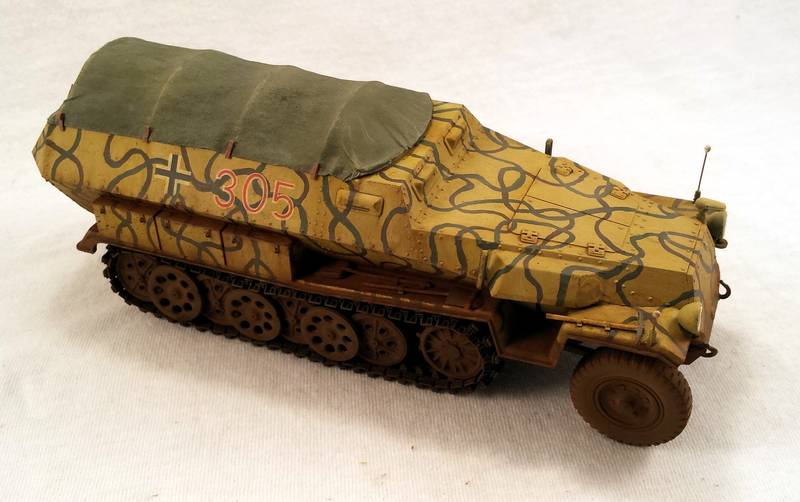
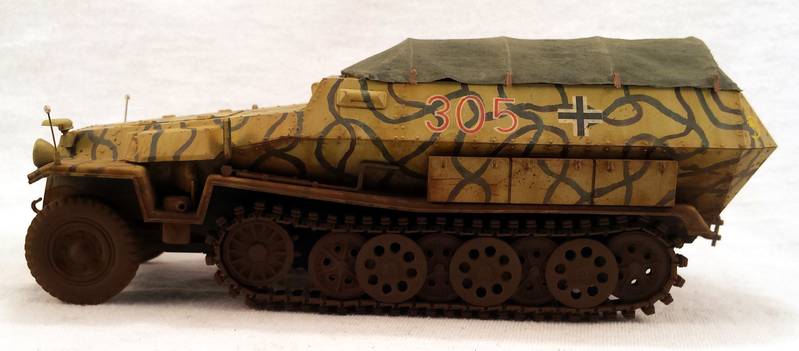
Calling mine done:


Doggone indy link tracks decided to explode as I was working with the pigment on the undercarriage. 2 hours of frustration later they are back to some semblance of normality with minimal chance of falling off sitting on the shelf...

Can't find a gallery for this campaign. Do we have one?

brekinapez
Visit this Community
Georgia, United States
Joined: July 26, 2013
KitMaker: 2,272 posts
Armorama: 1,860 posts
Posted: Friday, June 17, 2016 - 05:18 AM UTC

Quoted Text

I ended up selling my entire hardrock & heavy metal collection too.... but not due to evil ex-wives, but the vile monster of bad economics. Had to put food on the table in the most literal sense of the word.
Nothing I really, really regret though. They were just standing there gathering dust. Although the empty space did bother me for a little while.


Due to a layoff when the economy tanked in '08, I too ended up selling a lot of vinyl - including a full set of picture discs from the Earache label in Birmingham, England - and I regret having done so.

But...

Before I sold anything I ripped everything to my pc - records, singles, tapes. Not the same, of course, but at least I still get to hear it all.