Campaigns
Where Armorama group builds can be discussed, organized, and updates posted.
Of Wheels and Tracks
DaGreatQueeg
Visit this Community
Napier, New Zealand
Joined: August 01, 2005
KitMaker: 1,049 posts
Armorama: 841 posts
Posted: Friday, May 11, 2007 - 06:19 PM UTC
Hi Gents,

Heres my entry (entries!) for the Campaign. Not sure if we should be posting the pics here and/or anywhere else ......?

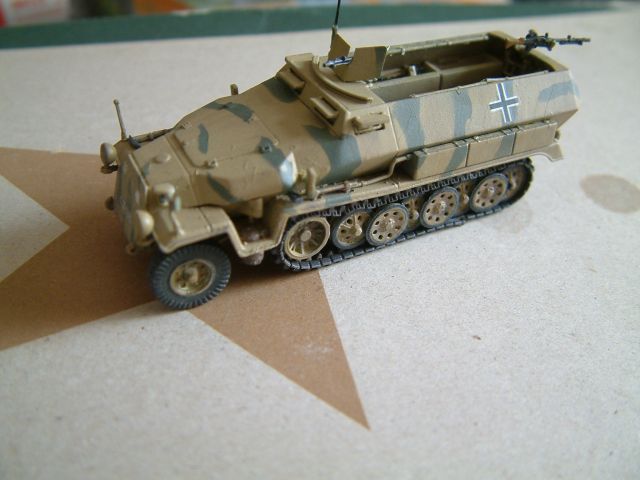
Anyway just finished a bunch of 20mm Wargaming halftracks destined to be re-inforcements for a 21stPzD battlegroup.

cheers
Brent


kirk1313
Visit this Community
Texas, United States
Joined: March 08, 2006
KitMaker: 24 posts
Armorama: 17 posts
Posted: Sunday, May 13, 2007 - 04:35 AM UTC
Well, I have been creating a dio of a Sdkf251 pulling a PAK 40 that is about to be ambushed by some bazooka wielding G.I.s. I will try to post some pics of the dio later.
trahe
Visit this Community
Virginia, United States
Joined: April 03, 2006
KitMaker: 1,158 posts
Armorama: 950 posts
Posted: Tuesday, May 15, 2007 - 05:20 PM UTC
Photos added to the campaign gallery. This is the DML kit built OOB with figures from Tristar.
spongya
Staff MemberAssociate Editor
MODELGEEK
Visit this Community
Budapest, Hungary
Joined: February 01, 2005
KitMaker: 2,365 posts
Armorama: 1,709 posts
Posted: Tuesday, May 15, 2007 - 09:32 PM UTC
Brent,
Sorry to bother you with a question, but would you please point out some differences in the techniques used for 1/35 and 1/72 scale, and maybe differences in techniques used for wargaming and modeling? I've been following your builds, and they really look nice. (I'm building in both scales, and I think some techniques that you use in 1/72 for camo and weathering would really benefit me... you know, brain-drain.) Thank you for your time.

Here's a halftrack I built in 1/72 (masked and sprayed the camo -I'm not good with a brush...):


Any suggestions are welcome to improve it...
DaGreatQueeg
Visit this Community
Napier, New Zealand
Joined: August 01, 2005
KitMaker: 1,049 posts
Armorama: 841 posts
Posted: Wednesday, May 16, 2007 - 04:14 AM UTC

Quoted Text

Brent,
Sorry to bother you with a question, but would you please point out some differences in the techniques used for 1/35 and 1/72 scale ...............


Hi Andras,

Its probably a longish question to answer so I'll try to keep it brief, pm me if you've any questions at all. The main differences are I go for a darker look with more contrast in the smaller scale. I like my vehicles looking used and worn plus a bit more contrast makes it stand out on the wargaming table (or cabinet for that matter). Generally everythings a lot more subtle in the larger scales - Tim Sloans excellent Panther F is a great example in my book.

So how do I do it ? Well I only brush and tend to use mostly 90-95% acrylics. This has an effect on how the weathering is applied. I do use enamels for the undercoat (and Humbrol 83 for German yellow base coat) because its harder wearing.

As you've done I usually complete the build (yours looks very good btw) but usually leave off the smaller details, headlights, weapons, aerials etc. This is because they're easier to damage with a brush, and my weathering usually uses drybrushing amongst other things so they are at risk. I add the details and decals usually right at the end before pigments and varnishing.

For wargaming the difference isnt usually in the finish but often in descision on where to place things like turret MGs and small details so they're not so easily knocked off. I often use metal MGs and mounts (from MMS) for instance.

Next I paint the base colour and add any camo. The next step is a bit different, I weather in the camo by drybrushing with the base colour and highlight the edges. For this I use the basecolour plus off-white, adding more white in succesive steps. The weathering will tone this back but it gives high contrast to edges of the main panels and is a base for the worn/chipped areas.

From here I think you could weather largely as per the bigger scales. For instance I then apply a wash/filter, pin wash around hatches and panels, wash and streak and apply rust and chipping.

About the only thing I do differently here is apply a bit more shade/articial shadow around panels and the lower hull. This helps create the higher contrast look.

Anyway PM me if needed and you could also have a look at the two links attached, one is to my Yahoo group and the other is where I post most of my vehicles. Feel free to drop in and have a look .......

Finally - sorry to everyone else as I think I definately failed to keep it brief! Hope its been of some help.

cheers
Brent

http://xsorbit30.com/users5/wargamesroom/index.php?board=2.0
http://games.groups.yahoo.com/group/House-of-Queeg/
spongya
Staff MemberAssociate Editor
MODELGEEK
Visit this Community
Budapest, Hungary
Joined: February 01, 2005
KitMaker: 2,365 posts
Armorama: 1,709 posts
Posted: Sunday, May 20, 2007 - 09:55 PM UTC
Thank you for the long and detailed answer.
It is fascinating to see the differences in the two kinds of philosophies (wargaming-modeling) -I think I might just try it on one of my small-scale tanks to see the difference with my own eyes

I'll probably ask you for some advice in the future if you really do not mind...
SGTJKJ
#041
Visit this Community
Kobenhavn, Denmark
Joined: July 20, 2006
KitMaker: 10,069 posts
Armorama: 4,677 posts
Posted: Monday, May 28, 2007 - 11:38 AM UTC
Here is a small update on my SdKfz. 251. with 37mm PAK. Sub assemblies are finished and it is ready for paint. I am going for an overall grey scheme.


mondo
Visit this Community
Mindanao, Philippines
Joined: July 04, 2003
KitMaker: 1,036 posts
Armorama: 465 posts
Posted: Saturday, June 02, 2007 - 06:36 AM UTC
I've long been away from the campaign trails since shifting jobs last year. So I'm getting back with an Italeri kit # 6434, SWS
SGTJKJ
#041
Visit this Community
Kobenhavn, Denmark
Joined: July 20, 2006
KitMaker: 10,069 posts
Armorama: 4,677 posts
Posted: Sunday, June 10, 2007 - 05:28 AM UTC
I have made a little more progress on my SdKfz. 251. The base colour has been applied although it needs to be touched up after the construction is completed. Most of the details have been finished. Next is the decals and "mud" applied as camouflage.

SGTJKJ
#041
Visit this Community
Kobenhavn, Denmark
Joined: July 20, 2006
KitMaker: 10,069 posts
Armorama: 4,677 posts
Posted: Tuesday, June 12, 2007 - 05:52 PM UTC
A short update on my build. Everything is put together now and most details are painted except the LMG and some other small details.

The colours look much lighter in the picture due to the flash. Pictures of the finished model I will take in daylight. More to follow later....

Patrick1
Visit this Community
Noord-Brabant, Netherlands
Joined: July 23, 2004
KitMaker: 148 posts
Armorama: 27 posts
Posted: Sunday, June 17, 2007 - 01:01 AM UTC
Hey Guys

Long time since I posted here. How is everybody building? Still alive?

A little update. I've just finished building Dragon's M2. I've sprayed in a grey primer.
Now it's time fot the airbrush. I just bought it, so It is gonna be my first airbrush-model.
I post pics asap.

Grtz
Patrick
gbkirsch
Visit this Community
Ohio, United States
Joined: June 04, 2005
KitMaker: 627 posts
Armorama: 455 posts
Posted: Sunday, June 17, 2007 - 03:24 AM UTC

Quoted Text


Now it's time fot the airbrush. I just bought it, so It is gonna be my first airbrush-model.
I post pics asap.


I'm anxious to hear your results with the airbrush. I am strictly a brush painter myself but I'm open to the possibility of trying an airbrush someday?!

Good luck,
Gary
Patrick1
Visit this Community
Noord-Brabant, Netherlands
Joined: July 23, 2004
KitMaker: 148 posts
Armorama: 27 posts
Posted: Sunday, June 17, 2007 - 09:23 AM UTC
Well, here they are.
My pictures of my first airbrushed model.
It's tougher than I thought. First I've primed the model. Then I pre-shaded the panel-lines. Then I covered the model in 4 layers of Olive Drab.
I'm not to happy about the pre-shade because it's almost gone
But for my first time, I'm satisfied for now. Next is camouflage.
Comment anyone?

The pictures:
So funny when you take pictures, you always see things you forgot.


Grtz
Patrick
blackeast19
Visit this Community
Singapore / 新加坡
Joined: February 22, 2005
KitMaker: 394 posts
Armorama: 217 posts
Posted: Monday, June 18, 2007 - 12:02 AM UTC
Hi,

looks great so far, loved the way you did the driving panel. looking forward to see the finished products.

Cheers!
WELLY
Visit this Community
England - East Anglia, United Kingdom
Joined: August 31, 2006
KitMaker: 28 posts
Armorama: 25 posts
Posted: Monday, June 18, 2007 - 07:25 AM UTC
Hello to all

Sorry its bean sooooooooo long sine i last posted, I would like some advise on the best and quickest way off posting some off my pic for this campaign

great to see saw many good halftracks
take it easy

SGTJKJ
#041
Visit this Community
Kobenhavn, Denmark
Joined: July 20, 2006
KitMaker: 10,069 posts
Armorama: 4,677 posts
Posted: Monday, June 18, 2007 - 08:41 PM UTC
Patrick, Very good result on your first airbrushed model. I am looking forward to see more.
SGTJKJ
#041
Visit this Community
Kobenhavn, Denmark
Joined: July 20, 2006
KitMaker: 10,069 posts
Armorama: 4,677 posts
Posted: Tuesday, June 26, 2007 - 05:35 AM UTC
Here is a little update on my Sd.Kfz. 251. Painting of base colour and details complete. Next moved on to the decals. I am not making any particular vehicle. I have seen Sd.Kfz. 251s with the 37mm PAK with two digit numbers and German crosses on the sides of the superstructure so I went for that solution on mine to add some colour and break up the overall grey.

The license plates are made up of individual numbers and letters. I really think this is a great solution for modellers who want to model a specific vehicle or likes to fiddle around with lining up numbers on license plates. I am not one of them and think it is a mess to line up numbers like that.

However, I think Dragon should have added some "ready made" license plates along with the lots of individual numbers and letters. They provide four complete sets of license plates wth all numbers and letters, but no "ready ade" license plates. This could be improved in my opinion. A mix of "ready made" and blank license plates with individual numbers would satisfy everybody.

Anyway, here are the pictures. More to follow shortly....


Delbert
#073
Visit this Community
Pennsylvania, United States
Joined: October 05, 2002
KitMaker: 2,659 posts
Armorama: 1,512 posts
Posted: Saturday, June 30, 2007 - 12:51 PM UTC
Hello Friends,

I've finished my entry for this campaign. Its the Hasegawa 1/72 M3A1 Half Track. Basecoat is Tamiya Olive Drab lightened with yellow.

This is my 2nd model in 1/72, and I think it will be my last, I vastly perfer the 1/35 scale.


SGTJKJ
#041
Visit this Community
Kobenhavn, Denmark
Joined: July 20, 2006
KitMaker: 10,069 posts
Armorama: 4,677 posts
Posted: Sunday, July 01, 2007 - 06:57 PM UTC
Hi guys

Here is my entry: the Dragon Sd.Kfz. 251 with 37mm PAK. A great kit! Only issue is the decal license plates as I have described earlier in this tread.

It is overall dark grey with camopuflage added from smeared on mud. This seems to have been quite normal among Sd.Kfz. 251s on the Eastern front during the Summer of 1942 as I have found several pictures where this have been done.
The two digit numbers was added based on a picture of a Sd.Kfz. 251 with 37mm PAK in Africa. A little artistic license was used to apply two digit numbers to this one as well as it is an Eastern Front vehicle.

The "mud" was made of lots of picments and paint mixed with a little water. Then it was "smeared" over the vehicle with an old brush. I am quite satisfied with the result.

In some pictures the 251 got a reddish tinge to it so I have tried experimenting a little with the light in the pictures. That is why the lighting is different in the pictures.

It was great participating in this well run campaign. Looking forward to the next one!


JeepLC
Visit this Community
Virginia, United States
Joined: June 20, 2007
KitMaker: 510 posts
Armorama: 469 posts
Posted: Tuesday, July 03, 2007 - 06:13 PM UTC
Almost done with my Sd.Kfz.251/1 Ausf.D!!! I have the interior and exterior done. I am waiting on all the glued tracks (real pain they were) to dry. I also need to finish up the Dragon recon crew I built. The base is put together and awaiting its first coats of paint and the water effects. I will post pictures soon as my camera is being unhelpful. I am also tooling with the idea of a white-wash... I will see how everything turns out before i do anything drastic!


HAPPY 4th of JULY AMERICA! Keeping all the Soldiers, Airmen, Marines and Sailors in my heart.
JeepLC
Visit this Community
Virginia, United States
Joined: June 20, 2007
KitMaker: 510 posts
Armorama: 469 posts
Posted: Thursday, July 05, 2007 - 10:59 AM UTC
Coming along... still needs some work. I caved on the white...


Added the cammo netting using gause bandages. I am still working on the base and will match the mud scheme to that of the riverbed. There are some little extras I will be throwing in such as ammo boxes and extra weapons.
Danial
Visit this Community
Singapore / 新加坡
Joined: May 23, 2005
KitMaker: 693 posts
Armorama: 275 posts
Posted: Thursday, July 05, 2007 - 04:54 PM UTC
hi guys, its been very very long since i last posted anything on this campaign. it a bad thing for a campaign leader not being there most of the time. work and studies commitment do not go well with modeling. I'm very sure you guys will agree.

anyways, its good to be back and seeing the effort you guys put in to build the haltracks. 3 more weeks to go. hang on in there.

Roy
Visit this Community
Alvsborgs, Sweden
Joined: April 21, 2003
KitMaker: 230 posts
Armorama: 64 posts
Posted: Friday, July 13, 2007 - 01:21 AM UTC
Hello, here is my contribution to the campaign.

The half-track vehicle Opel Maultier was developed in 1942 to handle the immobilizing road conditions encountered on the Eastern Front. Conventional wheeled vehicles were useless on the unpaved roads; the supply columns could not get through the mud and snow. This Maultier belongs to the 4th Panzer Division on the Eastern Front. 1/35 Scale. Manufacturer and kit: ITALERI: Opel Maultier.
regards/ Christer


eMan
#298
Visit this Community
Hong Kong S.A.R. / 繁體
Joined: August 08, 2002
KitMaker: 1,182 posts
Armorama: 665 posts
Posted: Tuesday, July 17, 2007 - 02:18 AM UTC
Here is my entry, Dragon 1/35 Sd.Kfz. 253.


WARLORD
Staff MemberAssociate Editor
HISTORICUS FORMA
Visit this Community
Warszawa, Poland
Joined: April 23, 2003
KitMaker: 1,923 posts
Armorama: 868 posts
Posted: Wednesday, July 18, 2007 - 11:47 PM UTC
My entry: Dragon's Kettenkrad