

1⁄35Sokol
35
Comments
The guns
I was afraid that I was about to start the holey gun cradle/platform and I would trash the whole project at the first downside if things turned nasty.So I had to begin the diorama with something easy enough to build and yet challenging enough to sustain my motivation in harder times.
I decided I would start with the guns.
The small one would be a 37 mm Hotchkiss single barrelled gun. It was built by the French society Hotchkiss around 1890 and sold throughout the world as both a land gun and a naval artillery piece (used by the British as the One Pounder).
It was of course sold to Russia around 1890 so that it could be mounted on most of their ships. After the Russo-Japanese war, this close combat gun was removed from the larger ships and stayed only on River monitors as well as PT boats. I really wanted to model this one because I sensed it was pretty easy to make and I had a ton of good quality plans at my disposal.
The first step was the barrel that I cut from a brass tube I bought in a RC shop. I glued an evergreen cylinder of a larger section at the big end of the tube, put some Magic Sculp on the tube and rolled the mastic covered brass on a very flat surface.
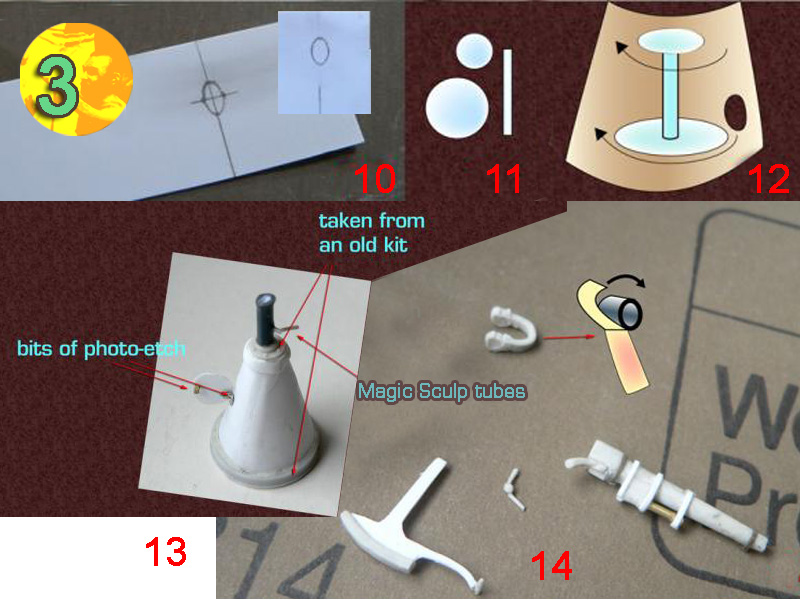
Then I modelled the bore of the gun out of Magic Sculp: I made a square shape and let it dry. Then I carved a depression with a cutter on the top of the bore and drilled the opening. The trigger was created out of some old photoetch that I bent around a needle. I then added the grip and some further detailing under the gun with small plasticard bits.
Once this was done I started with the gun mount. First I cut a hole in a thin plasticard sheet to create this opening in the mount whose usefulness escapes me (maybe an ashtray of sorts?)
I cut two circles of plastic the right size -one for the top, one for the bottom of the mount- and a bit of plastic tubing the size of the height of the mount. Then I glued the whole thing while bending the soft plasticard. If the handle was easily done by cutting plasticard at the right dimension, the barrel handling was more difficult to figure out.
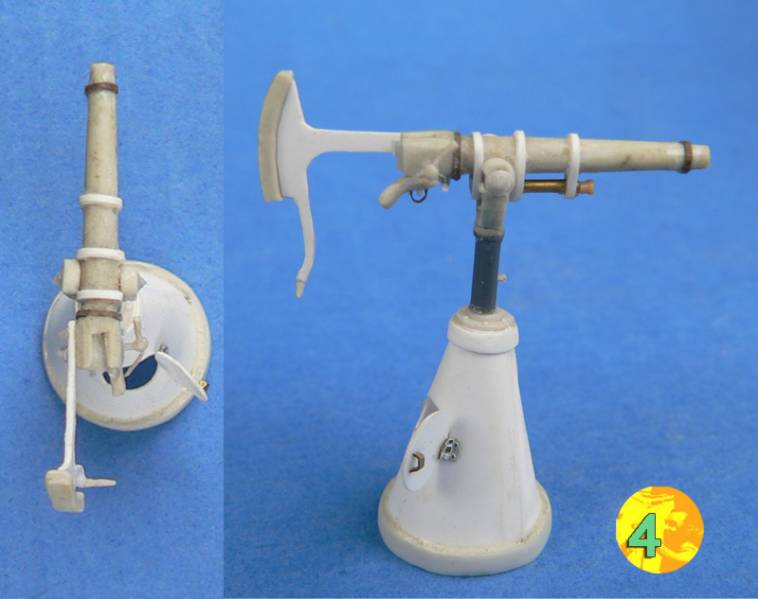
First I let Magic Sculp strip dry completely, then I glued two small bits of evergreen tubing to it. I glued on two other strips of semi-hardened Magic Sculp. Keep in mind that the difficulty is to keep all the angles straight which means the pieces must be dry enough to do that -and yet smooth enough to be bent. (pic 2 3 -4)
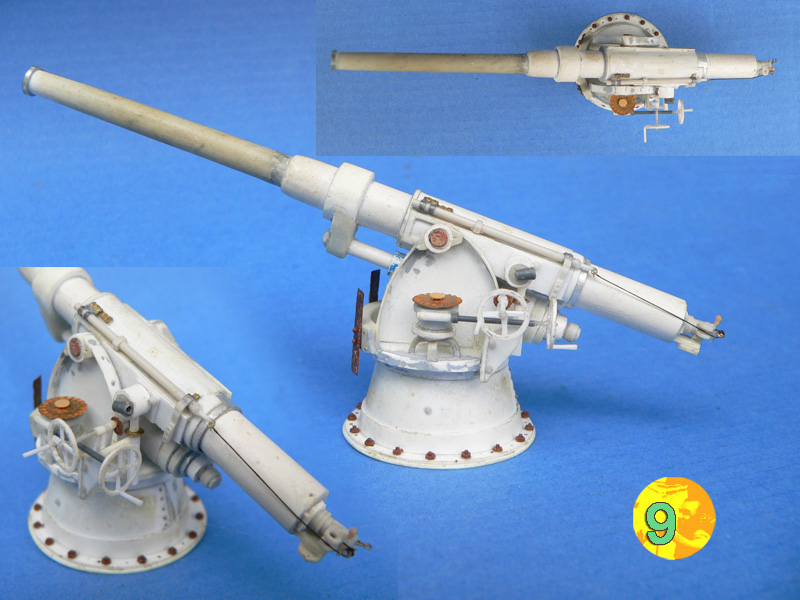
The big gun is the 75mm Canet naval gun, another French export that you can see as a main gun on most Russian torpedo boats and destroyers towards the beginning of the 20th century.
Now I had no problem finding at least four different plans; the trouble was they all showed a different gun and gun mount, and that none really reproduced any of the pictures I had. There is one which I really wanted to make which had a very complicated sighting system that particular model is on display at the St Petersburg Artillery Museum but there were too few pictures available on the internet for me to really understand the weak quality of the corresponding plans I had.
Finally after some enquiry in a forum I was sent some good pictures taken on the Russian cruiser Rossia which show a rather squat mount which didnt correspond to the thin and round mount I could make out from my small Sokol picture library. But on one picture I found I could bet that the mount was the same as Rossias, so as I also had a corresponding plan, I decided to go for it.
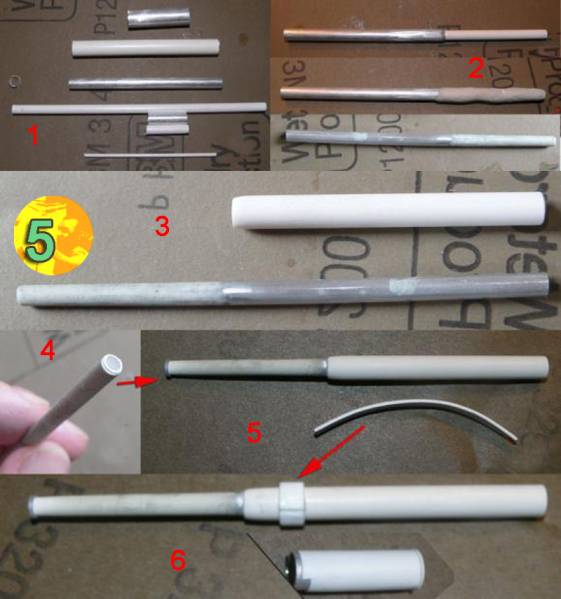
It looks kind of hard, but really, most of the job in those bigger guns is to cut the brass and plastic tubes at the right dimensions. (pic 5)
I first built the tube by putting a small bit of aluminium tube of the right diameter at the end of the plastic tube the respective thickness of both material proved ideal for the construction. Then again, I applied some Magic Sculp and rolled the tube on a glass surface. When the whole thing dried, I sanded it thoroughly so that no joint would be visible. (pic 6)
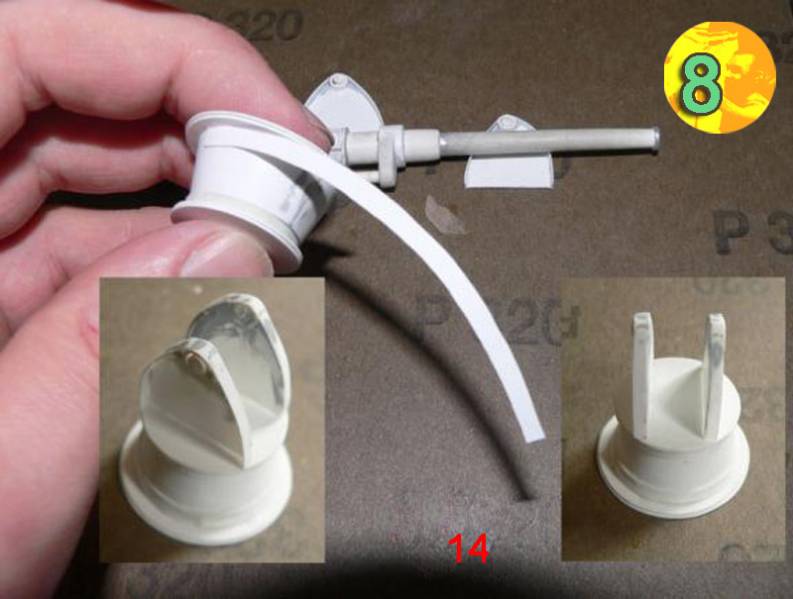
Most of the lower part of the gun was done using the same technique. The mount was fairly easy to do too, using mostly bent length of plastic and cutting out some thicker evergreen sheets to create all the contact surfaces between every element. The wheels were done out of cut plastic tubing. (pic 7 - 8)
One special note here concerns the strips that often circle many parts of the guns (especially the 37mm that I wrote about earlier but also some special parts of the 75mm). Its been a long time since I gave up cutting them out of plastic. First I never enjoyed having to sand the stuff after cutting it. The action of cutting would produce a thin line of extra material around the cut as anyone knows. And then, when you glue the plastic around a round piece, you better be careful or you will glue your own fingers as the elasticity of the plastic leads your part to straighten. So now when I have such job to do I use semi hardened Magic Sculp. Its very easy to cut when half dry, it retains its straight angles and doesnt have the plastics elasticity which makes it a lot easier to glue.
Of course to seal the different parts together, I use some Tamiya mastic.
Now it was time to add the last details - mostly stuff picked on some old photoetch sets as well as some lead foil cut from a wine bottle top. I choose to ignore the sighting system because I couldn't understand any of my plans at this particular place.
No problem. As the boat is a wreck I guess the priciest stuff would have been scavenged. I also liked the look of the gun like it was; just some tube with some stuff underneath. The riveting was done by using some Grant line like rivets which were offered to me as a gift which is certainly something i wont forget tomorrow. (pic 9)


About the Author


FROM: RHONE, FRANCE
Here are my 10 rules for better dioramas! 1 -The diorama is everything modelling is about, it's the meeting point of the manufactured object that is the model and the human input, you can and have to- tell stories with dioramas. 2 -When doing your diorama you should not be influenced by any tr...
Comments
Hi Claude -well this expo was at half an hour *walking* from my home so..
I arrived at the opening at 9am on saturday, left 10 mn later and took the dio back 10 mn before the closing on Sunday so you see, I am not very good at public relations
It was a fig show called Lugdunum, and no i didn't win anything -not that it was important indeed
plenty of pics of the show
thanks for asking anyway
here
FEB 29, 2008 - 02:44 AM

Simply superb, and forget taking your work to model shows, JBA, you need a studio of your own!
Peter F
MAR 26, 2008 - 08:06 PM
Thanks Peter, but honestly i 've always been knowing my own diorama promised land was certainly not paved with gold medals from shows
But i would still go for the friends. maybe see you at Telford in one year or 10!
MAR 28, 2008 - 12:54 AM

Jean-Bernard,
Your work as always is just spectacular. I hope to someday do a diorama so fully realized. I do follow my interests now and let them inspire me. I am growing very tired of the same old types of subjects. I am starting a figure company with my best friend and our subject matter is inspired by history, but civilian history rather then military history. Every one who has seen our first three figures has really liked them. I only hope that our figures add to the hobby the way your work does.
Best
Jeff
APR 17, 2008 - 03:24 PM

I just saw this, and JBA, my friend, all I can say is, you are a genius. While most dioramists try to faithfully replicate reality, you go much further, and try to replicate a moment of your self. Fantastic work.
APR 18, 2008 - 08:03 AM
So well, I just caught your comments while in a cybercafe in the "worse" kind of French wild west i could be stucked in and you can imagine those really cheers me up
Jeff I can only pray for your new company to be successful! And thanks David as always (very long time, very no see!!) may your inspiration still be there wherever in the world you are right now
bye for now my friends
JB
APR 22, 2008 - 01:53 AM

JBA I really admire your creative skills,such as using cigarette paper for clothes and such. Taking the time to explain your techniques and the reasons behind them is truly a learning experience for me. It would be a joy to see your projects in person. Keep it up! rR
APR 22, 2008 - 02:56 AM

HI JBA
For some reason I never replied/posted first time around ... so I´ll do so this time. Have always loved your models, and its always great to see them brought back again. Even the still water looks great!!
MAR 07, 2010 - 02:39 AM
Thanks Michael for unearthing such an old thing, it still looks okay after 3 years..
Than you Franck, the "reverse water" method is completely crazy to be honest and I wouldn't do this again. but i still like the way i treated the green colours.
Someday i might change the guy which is the weak point of the scene
MAR 07, 2010 - 11:30 PM
Copyright ©2021 by Jean-Bernard André. Images and/or videos also by copyright holder unless otherwise noted. The views and opinions expressed herein are solely the views and opinions of the authors and/or contributors to this Web site and do not necessarily represent the views and/or opinions of Armorama, KitMaker Network, or Silver Star Enterrpises. All rights reserved. Originally published on: 2008-02-16 00:00:00. Unique Reads: 60669

WEB HOSTING BY


Copyright ©2021 Armorama and Kitmaker Network, a subsidiary of Silver Star Enterprises
All Rights Reserved. Please read our Conditions of Use and Privacy Policy.
All Rights Reserved. Please read our Conditions of Use and Privacy Policy.