

1⁄35Sokol
35
Comments
Painting
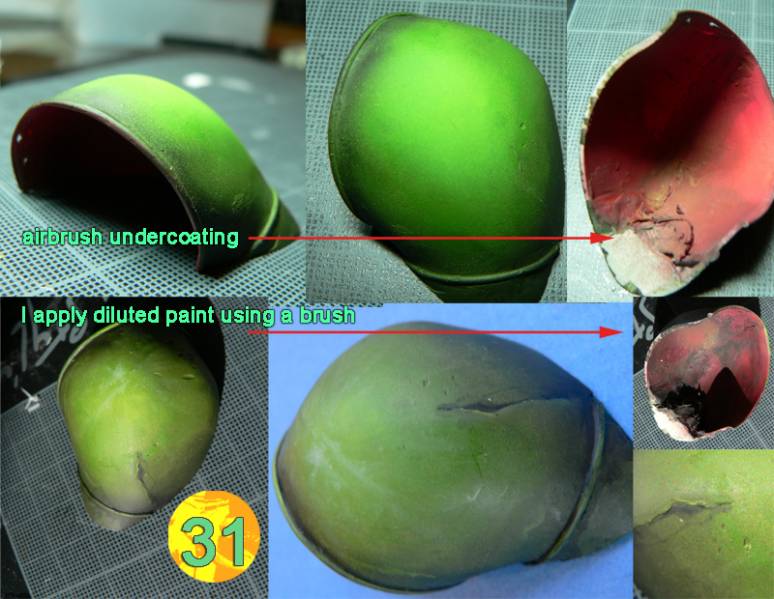
Now all the different bits were prepared, time for painting according to the direction of the light I previously set. To train a bit I started to paint the underwater parts of the funnel, the air intake and the gun cradle. I made two kind of rusty paint while mixing various dark shades of acrylics. Those underwater parts were supposed to be completely rusted so I added a bit of Windsor & Newton Black and Red pigments in the mix to get a very thick paint whose texture I could work in order to get a rough texture of rusted metal.When those were done, I sprayed the upper parts of the Sokol with some tints of various greens: something like Dark Olive Drab in the parts where the light was not supposed to shine, a much clearer shade of green almost yellow in the high highlight areas, in order to get the warm tints you get at sundown. (pic 31)
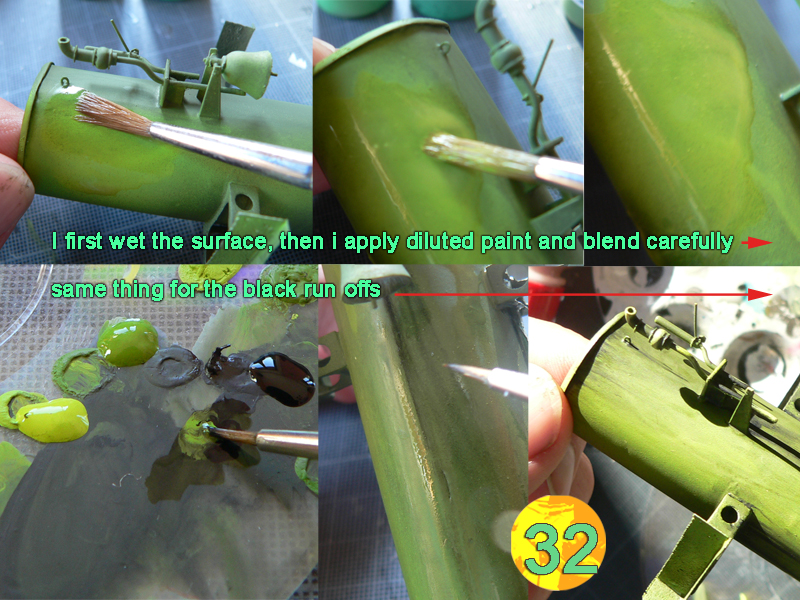
Now those colours really looked a bit weird so I added very strong weathering.
The first kind of weathering is certainly very straightforward as I screened the boat with different kind of washes from green to almost white. Those screens are not just daubs the Verlinden way. These are carefully applied with a very few loaded brush and carefully blend one on another. (pic 32)
Sometimes to get some special effect, I just paint the surface with water, and add some paint on the wet area. I added all the black colored run offs/drips this way, which allowed them to really blend efficiently with the surrounding colours, and yet stand out. (pic 33)
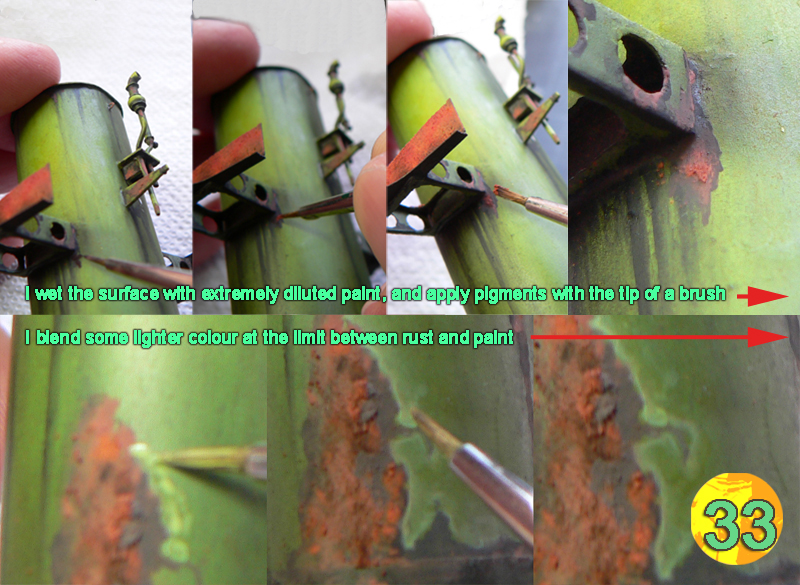
Next I added my usual kind of rust: the first is a diluted mix between black and burnt sienna acrylic paint. I paint the rusted areas and then I add some pigments (mixes between red, black, burnt sienna and yellow) on the wet area. This technique is really great to get a real feeling of rust as the pigments will stay darker if the paint underneath was wet enough to go through the pigments layer, or, on the contrary, if the diluted paint you applied first just acted like some contact glue to the pigments where they retain some grainy texture and their initial colour. (pic 34)
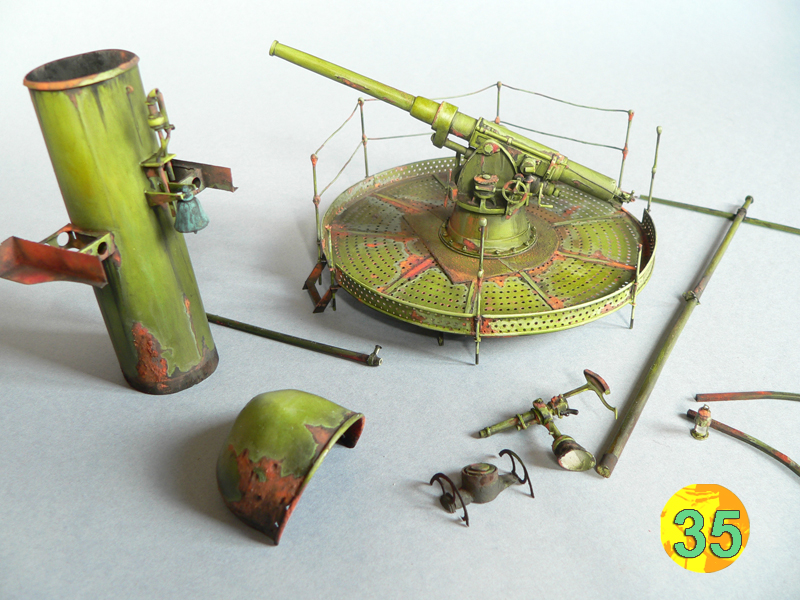
But now I was a bit worried of something: rust really stands out well on some light colours, but how does it look on dark colours?
I was precisely thinking of this while walking in the street when my eyes came to rest on a green portal, a very rusted green portal. I noticed that the paint near the places where the rust settles gets discoloured pretty fast. Okay then, I took back all my work and proceeded to add some kind of clear dull transition between normal paint and rusted parts. (pic 35)
The keys to the present are in the past.
I was recently cursing some of my friends because they were turning back to their childhood (and bloody registered trademarks) by painting some Citadel figs when I remembered something in their range of products which was quite cool indeed. It was their inks.Those are transparent liquids filled with pigments that you cant wash under a tap like you could do with normal inks.
All the Citadel figures I ever painted where painted with inks and I remembered loving the stuff. So I bought most of the colours available and proceeded to screen all of the high highlight areas of the Sokol with very dilute yellow ink with a tiny drop of green added. It worked fantastically, adding a slight glow from inside.
Since then, I tried not to flame my friends whenever I see them painting Citadel figures anymore.
Now I often notice that whenever diorama makers try to paint groundwork they can be very bad at varying the green shades they use. Take a landscape picture at random and you will see that the groundwork is not only brown, grey, green, and there are an infinite number of shades of each of those colours.
So I tried to make sure that my own groundwork was not the same shade of green as the Sokol.
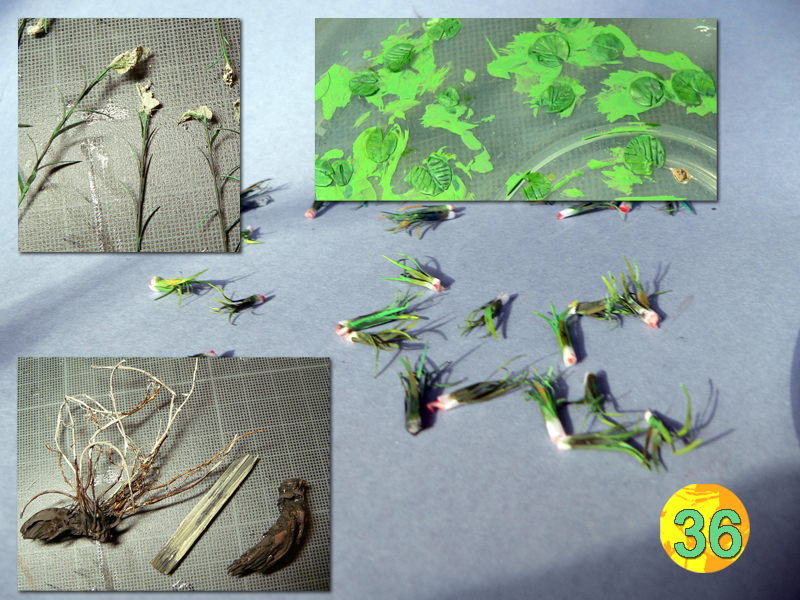
I sprayed the ground with a dark green kind of colour and proceeded to paint each leaf of each plants individually by ever so slightly changing the colour mix. Of course I used my Citadel inks quite often to get a very fluid screen on some special standout leaves.
Of course I didnt care much about the direction of light at all at this stage, as it would be impossible to specify anything until those numerous ferns were planted.
The water lilies were painted almost entirely with inks using a mix of brown, yellow, green and light green acrylic paint. As for the twigs and dead trees, I had the idea of painting them completely white as its often the case in marshes where the bark falls out to reveal only the clear tints of the wood. But when I dry fitted the diorama, I noticed that the white was standing out too much, so I painted it in a mix of Van Dyk brown pigments and diluted black paint, as well as a mix of Citadel brown and chestnut inks for the upper stems. (pic 36)

About the Author


FROM: RHONE, FRANCE
Here are my 10 rules for better dioramas! 1 -The diorama is everything modelling is about, it's the meeting point of the manufactured object that is the model and the human input, you can and have to- tell stories with dioramas. 2 -When doing your diorama you should not be influenced by any tr...
Comments
Hi Claude -well this expo was at half an hour *walking* from my home so..
I arrived at the opening at 9am on saturday, left 10 mn later and took the dio back 10 mn before the closing on Sunday so you see, I am not very good at public relations
It was a fig show called Lugdunum, and no i didn't win anything -not that it was important indeed
plenty of pics of the show
thanks for asking anyway
here
FEB 29, 2008 - 02:44 AM

Simply superb, and forget taking your work to model shows, JBA, you need a studio of your own!
Peter F
MAR 26, 2008 - 08:06 PM
Thanks Peter, but honestly i 've always been knowing my own diorama promised land was certainly not paved with gold medals from shows
But i would still go for the friends. maybe see you at Telford in one year or 10!
MAR 28, 2008 - 12:54 AM

Jean-Bernard,
Your work as always is just spectacular. I hope to someday do a diorama so fully realized. I do follow my interests now and let them inspire me. I am growing very tired of the same old types of subjects. I am starting a figure company with my best friend and our subject matter is inspired by history, but civilian history rather then military history. Every one who has seen our first three figures has really liked them. I only hope that our figures add to the hobby the way your work does.
Best
Jeff
APR 17, 2008 - 03:24 PM

I just saw this, and JBA, my friend, all I can say is, you are a genius. While most dioramists try to faithfully replicate reality, you go much further, and try to replicate a moment of your self. Fantastic work.
APR 18, 2008 - 08:03 AM
So well, I just caught your comments while in a cybercafe in the "worse" kind of French wild west i could be stucked in and you can imagine those really cheers me up
Jeff I can only pray for your new company to be successful! And thanks David as always (very long time, very no see!!) may your inspiration still be there wherever in the world you are right now
bye for now my friends
JB
APR 22, 2008 - 01:53 AM

JBA I really admire your creative skills,such as using cigarette paper for clothes and such. Taking the time to explain your techniques and the reasons behind them is truly a learning experience for me. It would be a joy to see your projects in person. Keep it up! rR
APR 22, 2008 - 02:56 AM

HI JBA
For some reason I never replied/posted first time around ... so I´ll do so this time. Have always loved your models, and its always great to see them brought back again. Even the still water looks great!!
MAR 07, 2010 - 02:39 AM
Thanks Michael for unearthing such an old thing, it still looks okay after 3 years..
Than you Franck, the "reverse water" method is completely crazy to be honest and I wouldn't do this again. but i still like the way i treated the green colours.
Someday i might change the guy which is the weak point of the scene
MAR 07, 2010 - 11:30 PM
Copyright ©2021 by Jean-Bernard André. Images and/or videos also by copyright holder unless otherwise noted. The views and opinions expressed herein are solely the views and opinions of the authors and/or contributors to this Web site and do not necessarily represent the views and/or opinions of Armorama, KitMaker Network, or Silver Star Enterrpises. All rights reserved. Originally published on: 2008-02-16 00:00:00. Unique Reads: 60669

WEB HOSTING BY


Copyright ©2021 Armorama and Kitmaker Network, a subsidiary of Silver Star Enterprises
All Rights Reserved. Please read our Conditions of Use and Privacy Policy.
All Rights Reserved. Please read our Conditions of Use and Privacy Policy.