

1⁄35Sokol
35
Comments
Building the Sokol underwater and over water.
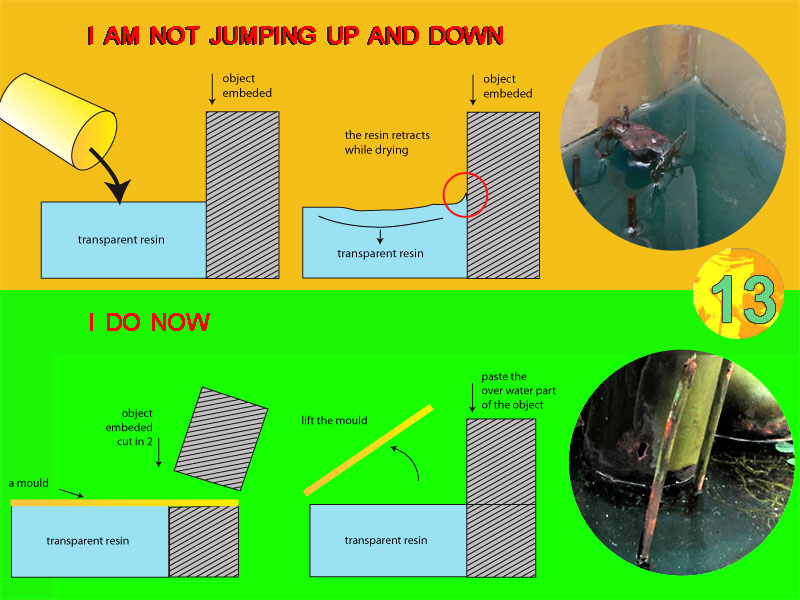
Compared to what I went through, building the rest of the Sokol looked like dumb model making as most of the important parts where already done.You may notice that I built two different parts: both the emerged and underwater parts of the Sokol and there is a good reason why: polyester resin or actually most of the stuff you may use to create water- actually retracts while drying which produces some completely unrealistic effects if the water is supposed to be still. So I thought that if I were about to actually embed the parts of the boat that are supposed to be underwater inside a mould, I would just have to glue the emerged parts on some perfectly smooth surface. I choose to embed 3cm of the boat underwater. (pic 13)
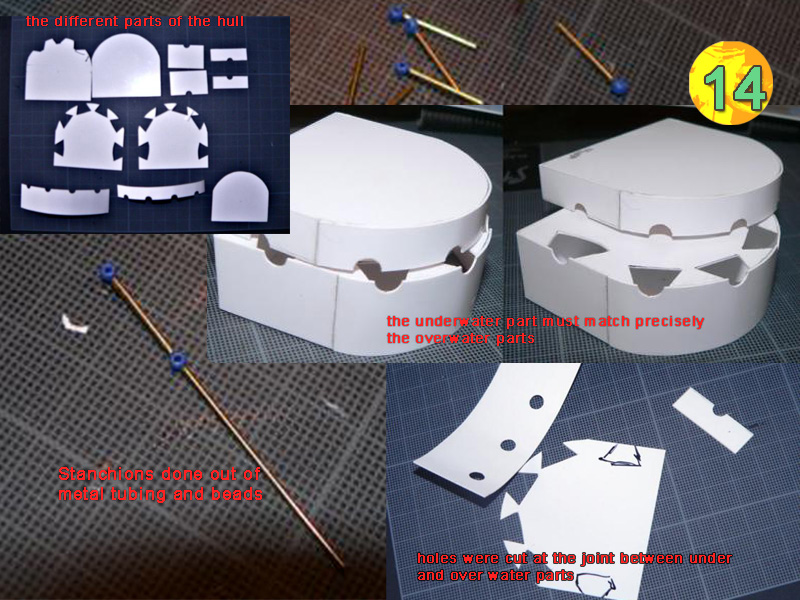
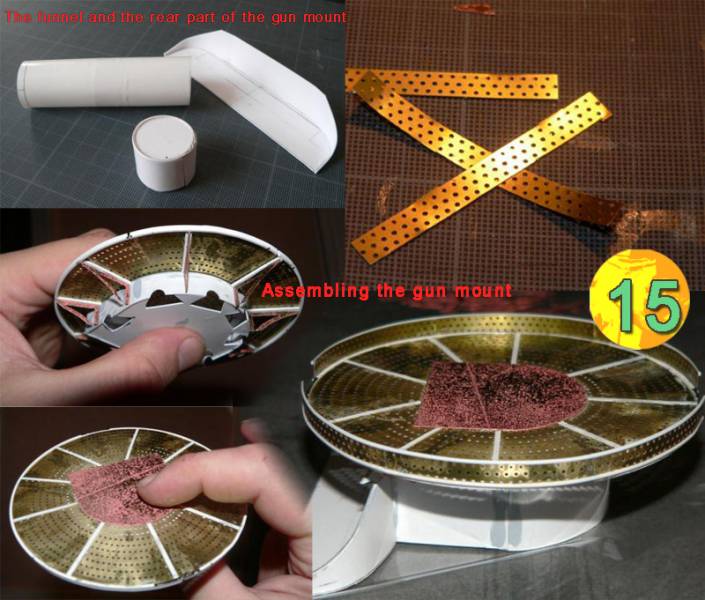
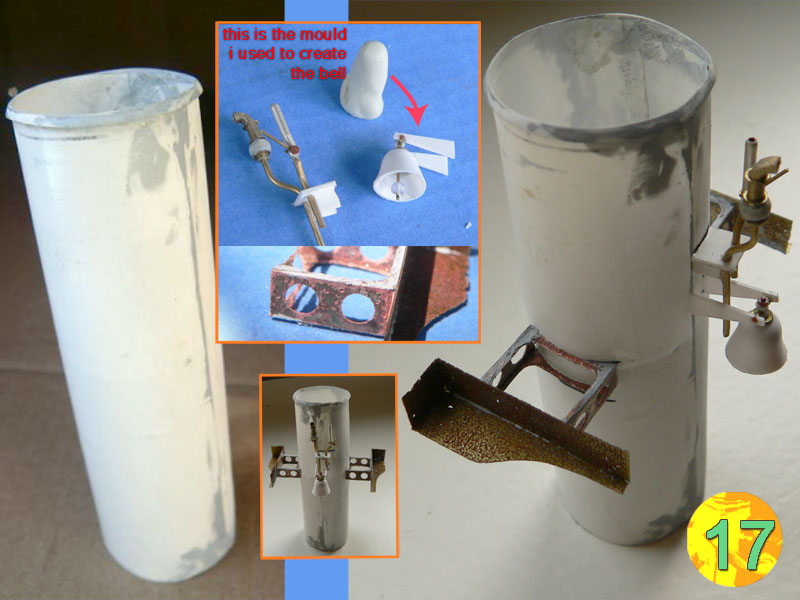
So here I was again, gluing and cutting some plastic, sanding and applying mastic. I bent the photoetch sides of the gun cradle, glued the different stanchions holders, and made the ladders by gluing all the different parts I had created on the photoetch fret. The funnel was created out of very thin plasticard so that it could be easily bent using finger pressure; which would lead the whole thing looking pretty worn out. (pic 14 -15 -17)
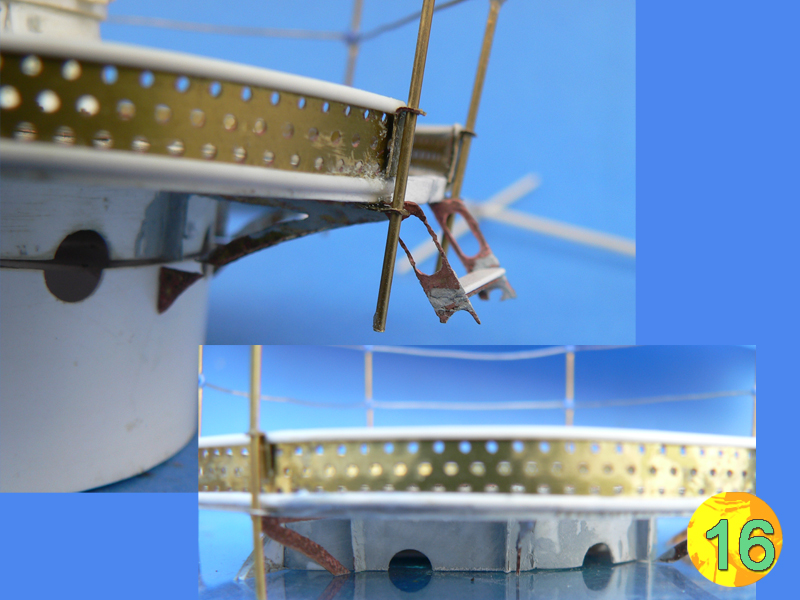
The stanchions are always a problem because I take the risk of breaking them with each manipulation with the technique I use: glass beads for necklaces glued on some 0.7 mm thick brass tubing. I sanded each of the wire's extremities so that they would offer more adherence when I glue them. In order for the whole thing to be stronger, I added a very tiny drop of 2 part epoxy at each joint. Even with all those precautions I had to glue them back every 5 minutes after handling. (pic 16)
The last tricky thing to build was the big air intake that lies on one of the sides of the gun cradle. I had no other way than to vacu-form it as it would be completely hollow. So I created a master in Magic Sculp using some plastic circles and a cross section as some guides. I tried different ways of heating the plastic: -under the lit oven I only managed to burn myself while holding the thick (1,5mm ) plastic sheet, under one single candle flame, I couldn't manage to get enough plastic melting.
So I finally got round this stupid problem by holding the sheet of plastic under *4* different candles. When the plastic began to sink, I pressed it over the shape. I tried several times and got half a dozen different halves and choose the 2 best ones. On one of the halves you can see some stretched holes which were done because the plastic actually began to burn. But then this proved to be ideal to create some extremely rusted part.
When I got my two halves, I glued them together and used a ton of mastic to make the joint disappear. Then I used some half moon shaped evergreen length to create the borders of the intake. (pic 18)
I must confess this method is really appalling it certainly works really well for small parts like for instance Sokols bell, but an device designed for vacu-forming would have work a lot better. (pic 19)
Doing the groundwork.
I repeat this article after article, I have got nothing against rivet counters as long as they count the rivets of their groundwork as well as they count those of their panzers.The genius of man is that he was able to name the things that surround us, and I want to be able to more or less name the different ferns I use in my dioramas.
This project is a sort of swamp so I set up for water lilies, reeds, and water hyacinth. Only three species, but those would be reproduced the best that I could. And then, less than 6cm2 of the final diorama would end up being covered with groundwork. This still means I have to do a large number of individual ferns to create; as a realistic effect can only be achieved through the sheer mass of plants.
You could have chosen some ready made photoetch fret to create those but then I would reply that as far as I am concerned, using photoetch to create ground cover is one of diorama makings worse capital sins.
This is nothing to do with the vast amount of money you have to spend on it, its just that the stuff looks totally unrealistic: I never see any straight borders on a plant; I never see any flat twigs in nature.
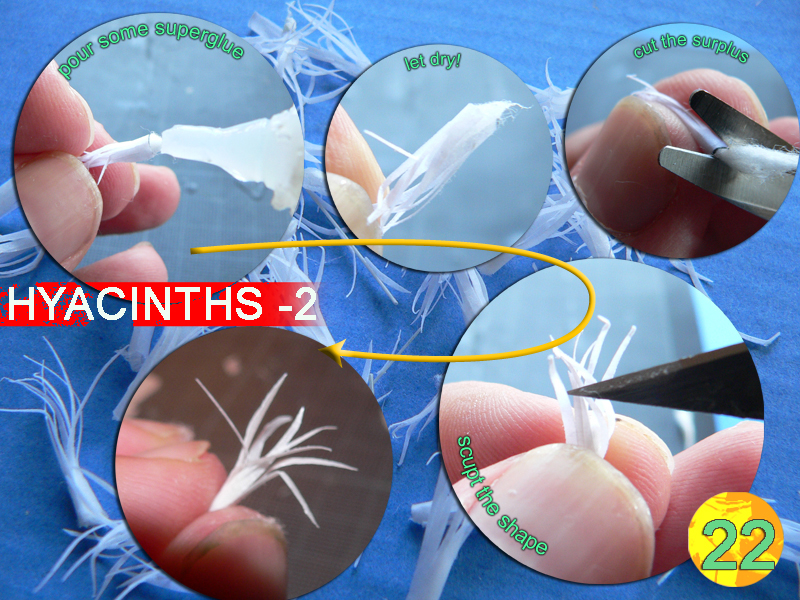
My method is to simply use some dumb superglue covered paper and cut out the leaves from it.
So the trick is simple: you just cover some piece of normal paper with superglue (take care of the fumes) and you let it dry for a dozen minutes. The good thing is that when you cut some fine bits from that special material, those tend to twist naturally which is ideal for leaves.
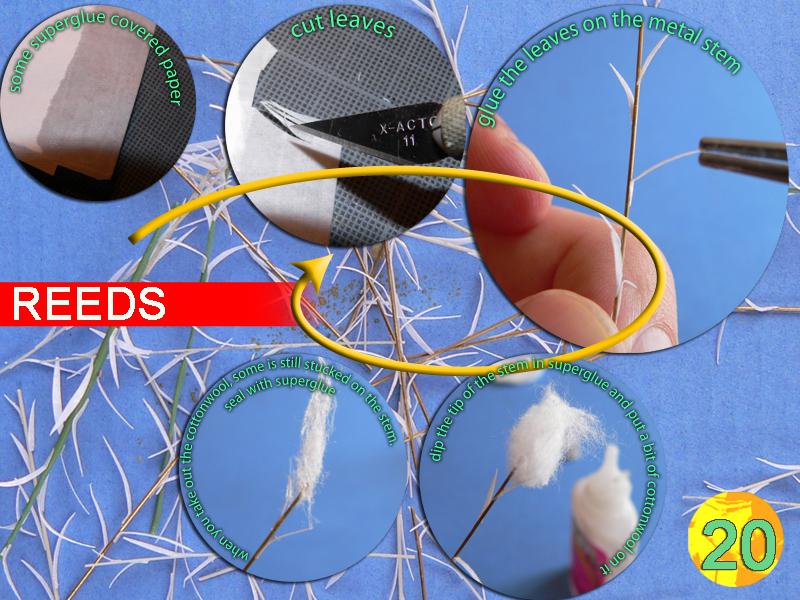
I first did the reeds, using a variety of material for the stem: all with their different advantages.
First I did four of them while using some rolled up Duro. The good thing is that I had a perfect shape which means thinner on the top, thicker at ground level. But then the stuff is just too soft for an easy gluing process of the leaves, and then proves to be a nightmare to paint.
Then I built a good number out of stretched plastic under a flame. Those were not too bad because I also could get those to be thinner at the top if I was careful. But then the stuff was still pretty soft which led to be rather complicated to paint.
Then I built another good number using some brass tubing which proved very easy to glue some leaves on, and very easy to paint. But the paint tended to peel revealing the brass background every time I touched the stem and then there was no way I could get the stem thinner at the top.
So I cut an average of eight leaves per stem and glued them on the opposite direction from one to the another.
To add the fluffy bit on the top of the reeds, I put a bit of superglue on the stem and dipped it in some cotton wool. When I pulled the cotton wool away, some stayed attached on the stem. I then sealed the whole thing with yet another coat of superglue. (pic 20)
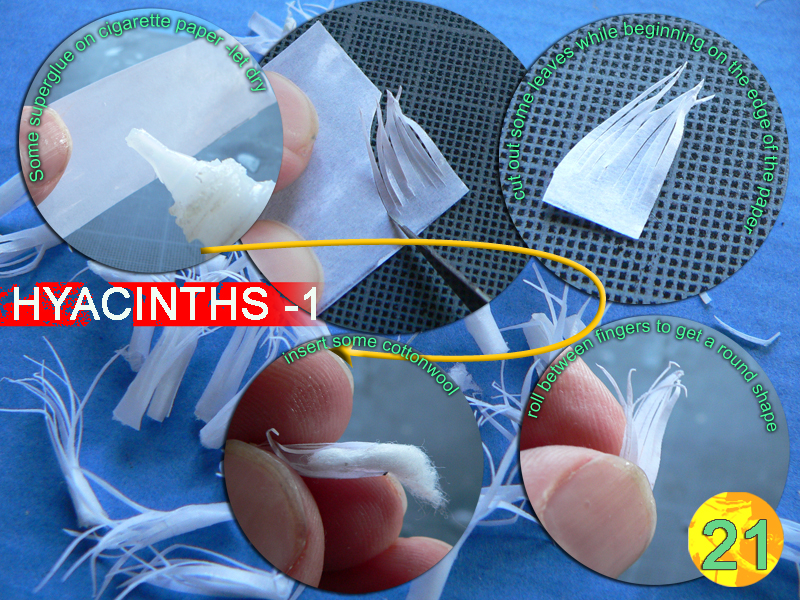
The problem with reeds is that they dont really cover the ground much. On examination of marsh pictures, there is some growth that is the same composed of water hyacinths according to my books.
I set up to build a large quantity of those.
To create those I started to cut out some leaves while leaving a bit of paper underneath for them not to come out individually like for the reeds leaves. Those cuts were always done starting from the edge of the paper (for the next one, just use a new sharp blade!).
Remember to try and cut thin leaves. Once its done, roll the paper between your fingers -but try to make sure that the bigger leaves face *inwards*' 'Roll a length of cotton wool inside the "tube" that you made while rolling the paper fern. Cut the cottonwool with extra. Now with the tip of the blade, try to make the fern take shape by bending some of the leaves unevenly. Cottonwool is very responsive to superglue, and that will bind and produce some strength to the entire thing -so just drop a bit of superglue in the "tube" and try not to touch it afterwards because you will glue your fingers and ruin your work. I have done some 40 of them in 2/3 days, how boring. (pic 21 -22)
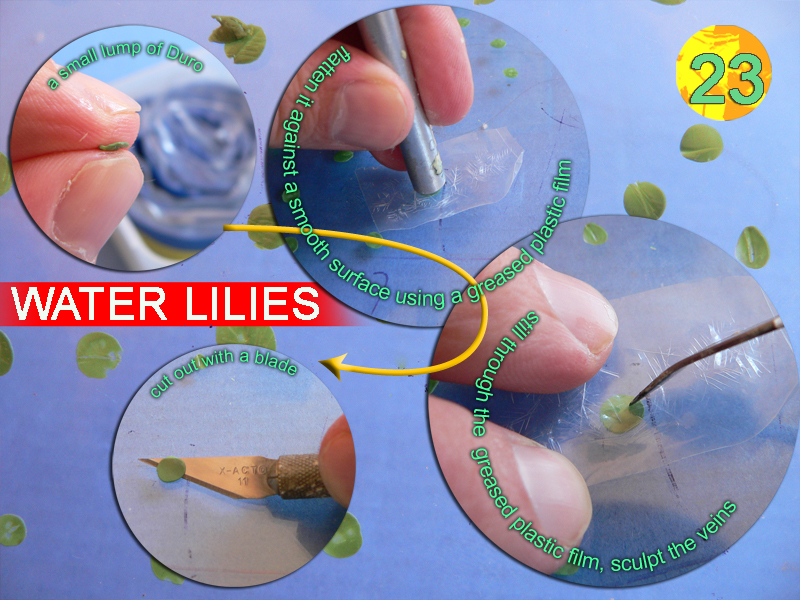
Now on to some water lilies; I must admit one of the reason I made them was that I foresaw there could be eventually problems to join the underwater and emerged parts of the Sokol and was kind of counting on water lilies to be able to cover the mess. My method to create those is in 5 steps
First, take a flat surface and grease it (I have been using some table oil!). Then make some small Green Stuff balls.
Then use the bottom of your XActo knife and press your ball flat on the greased glass surface using some bit of greased plastic bit of plastic bag to avoid direct contact between the metal of the knife and the green stuff -otherwise it will glue to the metal of course. Then use a modelling knife and still through the bit of plastic bag, scribe some of the leaves veins.
Let it dry overnight, cut out a V shape form at the base of the leaf and detach the stuff from the glass with a blade et voilà.
As the green stuff always stays kind of elastic, you wont break anything while cutting them out from the glass surface.
The water lilies produced this way are very thin and certainly better than you could find anywhere else -even if using some laser cut paper, and I wont even mention bloody photoetch. (pic 23)
There are two kind of underwater plants in this diorama: the first are the water lilie roots which were done out of Duro thin rolls. The rest was either twigs or mosses that I dig from the garden. The stuff is pretty rough but it looks very realistic as some underwater plants that you wont see clearly.
Finally, I noticed that strawberry roots are perfect to create trees that look like willows, so I dug one up and let it dry several weeks as I noticed the diorama could use a bit of extra detail behind the funnel.

About the Author


FROM: RHONE, FRANCE
Here are my 10 rules for better dioramas! 1 -The diorama is everything modelling is about, it's the meeting point of the manufactured object that is the model and the human input, you can and have to- tell stories with dioramas. 2 -When doing your diorama you should not be influenced by any tr...
Comments
Hi Claude -well this expo was at half an hour *walking* from my home so..
I arrived at the opening at 9am on saturday, left 10 mn later and took the dio back 10 mn before the closing on Sunday so you see, I am not very good at public relations
It was a fig show called Lugdunum, and no i didn't win anything -not that it was important indeed
plenty of pics of the show
thanks for asking anyway
here
FEB 29, 2008 - 02:44 AM

Simply superb, and forget taking your work to model shows, JBA, you need a studio of your own!
Peter F
MAR 26, 2008 - 08:06 PM
Thanks Peter, but honestly i 've always been knowing my own diorama promised land was certainly not paved with gold medals from shows
But i would still go for the friends. maybe see you at Telford in one year or 10!
MAR 28, 2008 - 12:54 AM

Jean-Bernard,
Your work as always is just spectacular. I hope to someday do a diorama so fully realized. I do follow my interests now and let them inspire me. I am growing very tired of the same old types of subjects. I am starting a figure company with my best friend and our subject matter is inspired by history, but civilian history rather then military history. Every one who has seen our first three figures has really liked them. I only hope that our figures add to the hobby the way your work does.
Best
Jeff
APR 17, 2008 - 03:24 PM

I just saw this, and JBA, my friend, all I can say is, you are a genius. While most dioramists try to faithfully replicate reality, you go much further, and try to replicate a moment of your self. Fantastic work.
APR 18, 2008 - 08:03 AM
So well, I just caught your comments while in a cybercafe in the "worse" kind of French wild west i could be stucked in and you can imagine those really cheers me up
Jeff I can only pray for your new company to be successful! And thanks David as always (very long time, very no see!!) may your inspiration still be there wherever in the world you are right now
bye for now my friends
JB
APR 22, 2008 - 01:53 AM

JBA I really admire your creative skills,such as using cigarette paper for clothes and such. Taking the time to explain your techniques and the reasons behind them is truly a learning experience for me. It would be a joy to see your projects in person. Keep it up! rR
APR 22, 2008 - 02:56 AM

HI JBA
For some reason I never replied/posted first time around ... so I´ll do so this time. Have always loved your models, and its always great to see them brought back again. Even the still water looks great!!
MAR 07, 2010 - 02:39 AM
Thanks Michael for unearthing such an old thing, it still looks okay after 3 years..
Than you Franck, the "reverse water" method is completely crazy to be honest and I wouldn't do this again. but i still like the way i treated the green colours.
Someday i might change the guy which is the weak point of the scene
MAR 07, 2010 - 11:30 PM
Copyright ©2021 by Jean-Bernard André. Images and/or videos also by copyright holder unless otherwise noted. The views and opinions expressed herein are solely the views and opinions of the authors and/or contributors to this Web site and do not necessarily represent the views and/or opinions of Armorama, KitMaker Network, or Silver Star Enterrpises. All rights reserved. Originally published on: 2008-02-16 00:00:00. Unique Reads: 60669

WEB HOSTING BY


Copyright ©2021 Armorama and Kitmaker Network, a subsidiary of Silver Star Enterprises
All Rights Reserved. Please read our Conditions of Use and Privacy Policy.
All Rights Reserved. Please read our Conditions of Use and Privacy Policy.