

1⁄35Sokol
35
Comments
First, I had to understand the whole thing of homemade photoetching. You have to find a way to print a black scheme on some copper, dip the tinted copper in some FeCL3 bath, and the acid will basically attack the metal where it wasnt tainted.
Most of the material can be found at okay prices in electronic shops as this method is also used to create printed circuits.
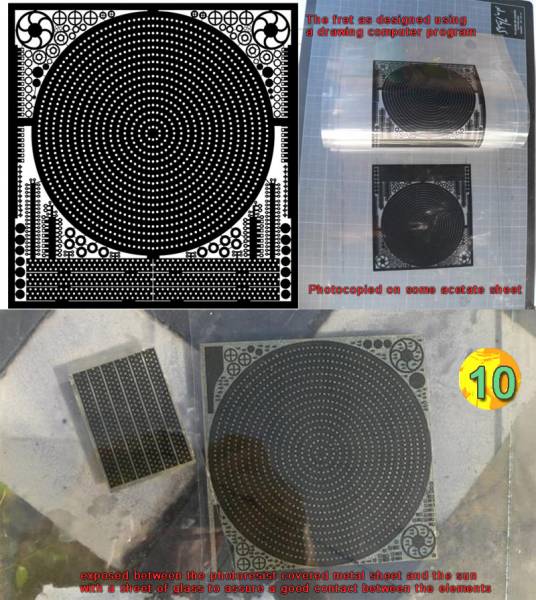
The first step was not really hard to do as far as I was concerned. I used some graphic software to draw all the pieces I needed. (pic 10)
Those included the holed plate under the gun but also the side plates, stanchion supports, supports for the gun cradle, funnel parts, access ladders etc.
The thing you have to remind yourself is that the less metal the acid will have to eat, the less your acid will be clogged. Which means you will be able to use it several times afterwards.
So I absolutely crammed the drawing of the fret with various wheels and stuff I could need for later.
Of course I used some kind of pen instruments available in the software to tie each piece to every one in order for these not to fall in the acid when they would be etched enough. I then put some big side borders because you have to be able to handle the fret between the different operations.
When it was done, I used a laser black and white printer to print the future fret and went to a photocopy shop to get 2 copies done on transparent celluloid (I know there is some special transparent paper available directly for the printer too but those dont come any cheaper).
Now the thing you are supposed to do is to spray a small metal fret (copper or brass, 0.02 inch thick) with a photoresistant spray on both sides and then expose the metal covered with your celluloid sheet to the rays of the sun for a few minutes on each side. Then to go in a dark room to dip the metal fret in a revelant bath until the pattern you want to revel comes in.
Thats the bloody theory, the very same as if you were about to develop your film by yourself. It certainly works for printed circuits maybe because you can afford getting a dirty job but not when it comes to model making.
I just couldnt manage to spray the metal evenly and then as the photoresistant takes several hours to get dry, a single grain of dust falling on the fret would attract the liquid and completely spoil the whole job.
I tried this way several times, getting more or less bad results, which led invariably to some Frankenstein like bits once I dipped them into the acid until I made the decision to buy some special recto verso photoresistant brass that is sold on railroad modelling mail-order shops.
The stuff comes as a fret covered on each side by an opaque plastic film and is not so cheap.
The following step would expose the fret under the light of the sun with your pattern as a screen for a few minutes so that the photoresistant material is getting activated. I used the simple trick of putting the fret in sandwich between my 2 celluloid sheets and to actually use superglue to attach the fret to the celluloid this way I was pretty sure that the 2 sides of the fret would be corresponding. Now the problem is How much exposition time? I have been reading 2.5 min under full sun.
Duh and what about winter sun?!
I let 4 minutes each side under French June sun and it worked, up to you to work this out.. (pic 10)
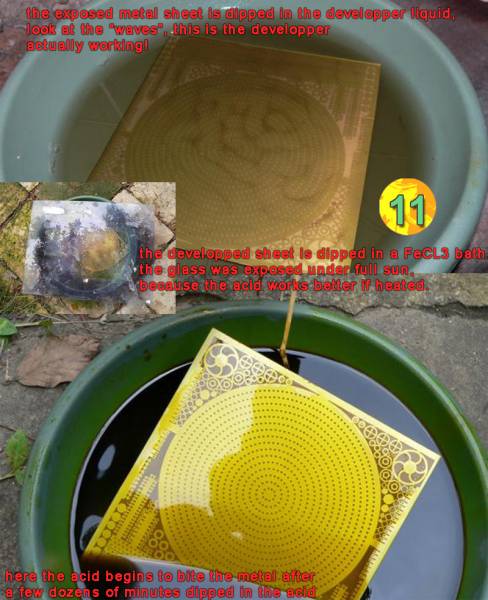
Well, the problem is that there is no sign your fret is supposed to be ready until you developed the stuff... (pic 11)
Anyway, you have to go in a dark room (because your fret will still be sensitive to light until its been fully developed!) and use a plastic container (I used the kind of things you put under plants) and then to mix the right amount of water and developer (refer to the documentation). The problem is that the mix should be at a temperature of 25°C to really work, and be constantly agitated/stirred. Once I used a mix that was too hot and I saw the pattern develop extremely fast and then dissolve completely. So you have to be careful and find a way to use the right temperature.
Just agitate the liquid gently and then you will see your pattern appear. When it does, just wash the fret under clear water to stop the developing process.
Then dip the fret in your acid.
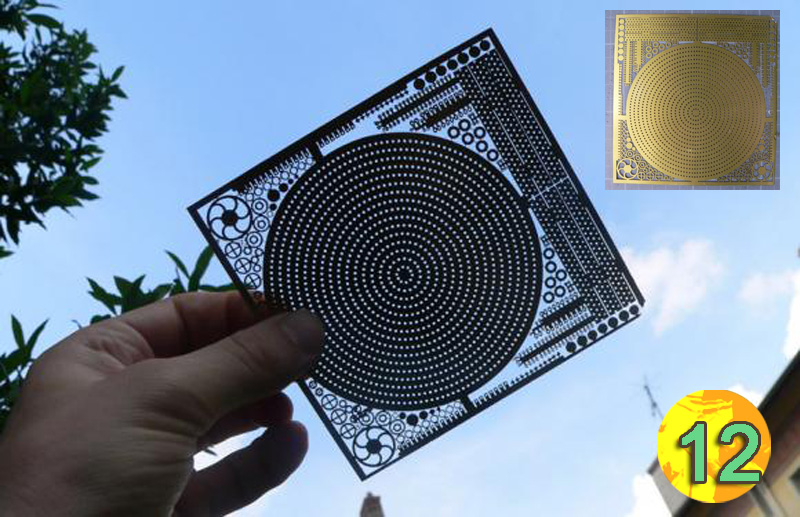
And be very patient. I know there are some ways to speed the process using very aggressive chemicals but those may be very dangerous so I wont cover them. Just let a few hours and try to agitate the acid regularly so that it bites the metal okay and work better.. I succeeded with the first fret on my first try once I had bought the already photoresistant brass sheet.
I tried to do another fret a week later and somehow did one or two failures but those proved fantastic to model some rusted parts. (pic 12)
Most of the material can be found at okay prices in electronic shops as this method is also used to create printed circuits.
The first step was not really hard to do as far as I was concerned. I used some graphic software to draw all the pieces I needed. (pic 10)
Those included the holed plate under the gun but also the side plates, stanchion supports, supports for the gun cradle, funnel parts, access ladders etc.
The thing you have to remind yourself is that the less metal the acid will have to eat, the less your acid will be clogged. Which means you will be able to use it several times afterwards.
So I absolutely crammed the drawing of the fret with various wheels and stuff I could need for later.
Of course I used some kind of pen instruments available in the software to tie each piece to every one in order for these not to fall in the acid when they would be etched enough. I then put some big side borders because you have to be able to handle the fret between the different operations.
When it was done, I used a laser black and white printer to print the future fret and went to a photocopy shop to get 2 copies done on transparent celluloid (I know there is some special transparent paper available directly for the printer too but those dont come any cheaper).
Now the thing you are supposed to do is to spray a small metal fret (copper or brass, 0.02 inch thick) with a photoresistant spray on both sides and then expose the metal covered with your celluloid sheet to the rays of the sun for a few minutes on each side. Then to go in a dark room to dip the metal fret in a revelant bath until the pattern you want to revel comes in.
Thats the bloody theory, the very same as if you were about to develop your film by yourself. It certainly works for printed circuits maybe because you can afford getting a dirty job but not when it comes to model making.
I just couldnt manage to spray the metal evenly and then as the photoresistant takes several hours to get dry, a single grain of dust falling on the fret would attract the liquid and completely spoil the whole job.
I tried this way several times, getting more or less bad results, which led invariably to some Frankenstein like bits once I dipped them into the acid until I made the decision to buy some special recto verso photoresistant brass that is sold on railroad modelling mail-order shops.
The stuff comes as a fret covered on each side by an opaque plastic film and is not so cheap.
The following step would expose the fret under the light of the sun with your pattern as a screen for a few minutes so that the photoresistant material is getting activated. I used the simple trick of putting the fret in sandwich between my 2 celluloid sheets and to actually use superglue to attach the fret to the celluloid this way I was pretty sure that the 2 sides of the fret would be corresponding. Now the problem is How much exposition time? I have been reading 2.5 min under full sun.
Duh and what about winter sun?!
I let 4 minutes each side under French June sun and it worked, up to you to work this out.. (pic 10)
Well, the problem is that there is no sign your fret is supposed to be ready until you developed the stuff... (pic 11)
Anyway, you have to go in a dark room (because your fret will still be sensitive to light until its been fully developed!) and use a plastic container (I used the kind of things you put under plants) and then to mix the right amount of water and developer (refer to the documentation). The problem is that the mix should be at a temperature of 25°C to really work, and be constantly agitated/stirred. Once I used a mix that was too hot and I saw the pattern develop extremely fast and then dissolve completely. So you have to be careful and find a way to use the right temperature.
Just agitate the liquid gently and then you will see your pattern appear. When it does, just wash the fret under clear water to stop the developing process.
Then dip the fret in your acid.
And be very patient. I know there are some ways to speed the process using very aggressive chemicals but those may be very dangerous so I wont cover them. Just let a few hours and try to agitate the acid regularly so that it bites the metal okay and work better.. I succeeded with the first fret on my first try once I had bought the already photoresistant brass sheet.
I tried to do another fret a week later and somehow did one or two failures but those proved fantastic to model some rusted parts. (pic 12)
About the Author


FROM: RHONE, FRANCE
Here are my 10 rules for better dioramas! 1 -The diorama is everything modelling is about, it's the meeting point of the manufactured object that is the model and the human input, you can and have to- tell stories with dioramas. 2 -When doing your diorama you should not be influenced by any tr...
Comments
Hi Claude -well this expo was at half an hour *walking* from my home so..
I arrived at the opening at 9am on saturday, left 10 mn later and took the dio back 10 mn before the closing on Sunday so you see, I am not very good at public relations
It was a fig show called Lugdunum, and no i didn't win anything -not that it was important indeed
plenty of pics of the show
thanks for asking anyway
here
FEB 29, 2008 - 02:44 AM

Simply superb, and forget taking your work to model shows, JBA, you need a studio of your own!
Peter F
MAR 26, 2008 - 08:06 PM
Thanks Peter, but honestly i 've always been knowing my own diorama promised land was certainly not paved with gold medals from shows
But i would still go for the friends. maybe see you at Telford in one year or 10!
MAR 28, 2008 - 12:54 AM

Jean-Bernard,
Your work as always is just spectacular. I hope to someday do a diorama so fully realized. I do follow my interests now and let them inspire me. I am growing very tired of the same old types of subjects. I am starting a figure company with my best friend and our subject matter is inspired by history, but civilian history rather then military history. Every one who has seen our first three figures has really liked them. I only hope that our figures add to the hobby the way your work does.
Best
Jeff
APR 17, 2008 - 03:24 PM

I just saw this, and JBA, my friend, all I can say is, you are a genius. While most dioramists try to faithfully replicate reality, you go much further, and try to replicate a moment of your self. Fantastic work.
APR 18, 2008 - 08:03 AM
So well, I just caught your comments while in a cybercafe in the "worse" kind of French wild west i could be stucked in and you can imagine those really cheers me up
Jeff I can only pray for your new company to be successful! And thanks David as always (very long time, very no see!!) may your inspiration still be there wherever in the world you are right now
bye for now my friends
JB
APR 22, 2008 - 01:53 AM

JBA I really admire your creative skills,such as using cigarette paper for clothes and such. Taking the time to explain your techniques and the reasons behind them is truly a learning experience for me. It would be a joy to see your projects in person. Keep it up! rR
APR 22, 2008 - 02:56 AM


HI JBA
For some reason I never replied/posted first time around ... so I´ll do so this time. Have always loved your models, and its always great to see them brought back again. Even the still water looks great!!
MAR 07, 2010 - 02:39 AM
Thanks Michael for unearthing such an old thing, it still looks okay after 3 years..
Than you Franck, the "reverse water" method is completely crazy to be honest and I wouldn't do this again. but i still like the way i treated the green colours.
Someday i might change the guy which is the weak point of the scene
MAR 07, 2010 - 11:30 PM
Copyright ©2021 by Jean-Bernard André. Images and/or videos also by copyright holder unless otherwise noted. The views and opinions expressed herein are solely the views and opinions of the authors and/or contributors to this Web site and do not necessarily represent the views and/or opinions of Armorama, KitMaker Network, or Silver Star Enterrpises. All rights reserved. Originally published on: 2008-02-16 00:00:00. Unique Reads: 60669

WEB HOSTING BY


Copyright ©2021 Armorama and Kitmaker Network, a subsidiary of Silver Star Enterprises
All Rights Reserved. Please read our Conditions of Use and Privacy Policy.
All Rights Reserved. Please read our Conditions of Use and Privacy Policy.