

1⁄24Rusting, Chipping and Weathering
47
Comments
chipping
After a full cure of the clear coat, the fun can begin. This is where we lay down some chipping fluid to aid in the removal of the next stage(s) of paint to give the chipped, worn, weathered look we are trying to achieve.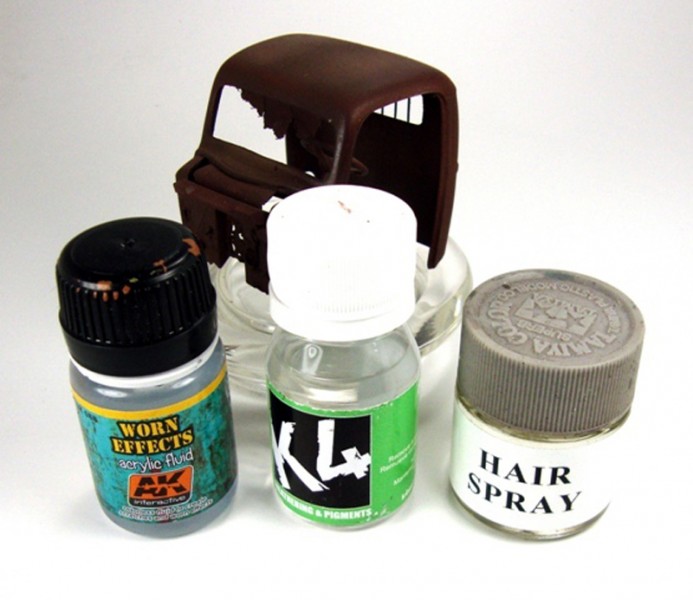 As you can see, I have 3 options to choose from at the moment. First is AK Interactive's Worn Effects, the second is K4's Paint Off and last, but certainly not least, common household hair spray. All should achieve basically the same results. The AK Worn Effects has been out for a while and works excellent. A couple of thin coats, then let dry, and you are good to go. The K4 is brand new to the market and works pretty much in the same fashion but is actually used more after the painting than before. Then there is the tried and true hair spray. I personally still like the Hair Spray (HS) method, but I can get old school a bit. The AK and K4 add a layer under the next paint stage so when you apply damp warm water to the surface of the covering paint work, you are able to chip away at the finish with various tools like cotton swabs (buds), stiff paint brushes and for the daring, the almighty toothpick. This is really easy to accomplish with these newer products and the best way to go for beginning the trip into chipping. The HS does the same thing with the exception that you can be a little more aggressive when removing the paint. Scrubbing of the surface is possible and picking away with toothpicks in the corners and edges can be done. Not to mention that I steal my supply from any one of the 3 girls that live in the house!!
OK then, after all that, here we go. I decided to use all three on this to show that there is relatively not much end result difference, only the ease to which you make the achievement.
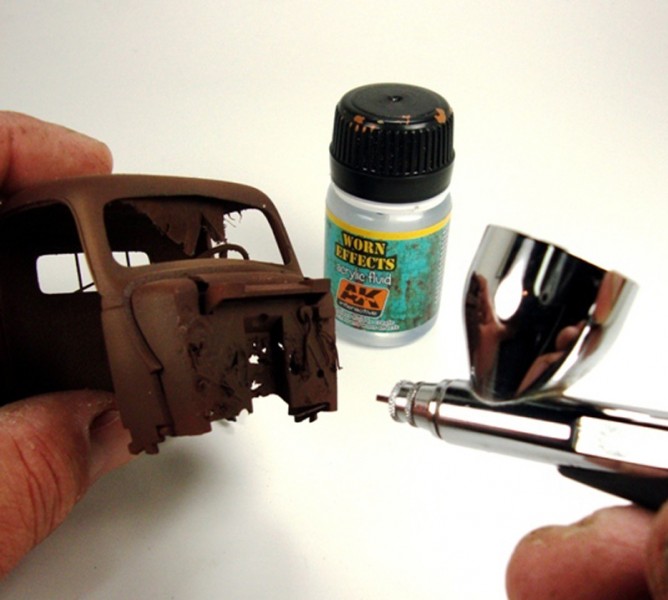
I applied AK's Worn Effect to the firewall and interior of the cab.
As you can see, I have 3 options to choose from at the moment. First is AK Interactive's Worn Effects, the second is K4's Paint Off and last, but certainly not least, common household hair spray. All should achieve basically the same results. The AK Worn Effects has been out for a while and works excellent. A couple of thin coats, then let dry, and you are good to go. The K4 is brand new to the market and works pretty much in the same fashion but is actually used more after the painting than before. Then there is the tried and true hair spray. I personally still like the Hair Spray (HS) method, but I can get old school a bit. The AK and K4 add a layer under the next paint stage so when you apply damp warm water to the surface of the covering paint work, you are able to chip away at the finish with various tools like cotton swabs (buds), stiff paint brushes and for the daring, the almighty toothpick. This is really easy to accomplish with these newer products and the best way to go for beginning the trip into chipping. The HS does the same thing with the exception that you can be a little more aggressive when removing the paint. Scrubbing of the surface is possible and picking away with toothpicks in the corners and edges can be done. Not to mention that I steal my supply from any one of the 3 girls that live in the house!!
OK then, after all that, here we go. I decided to use all three on this to show that there is relatively not much end result difference, only the ease to which you make the achievement.
I applied AK's Worn Effect to the firewall and interior of the cab.
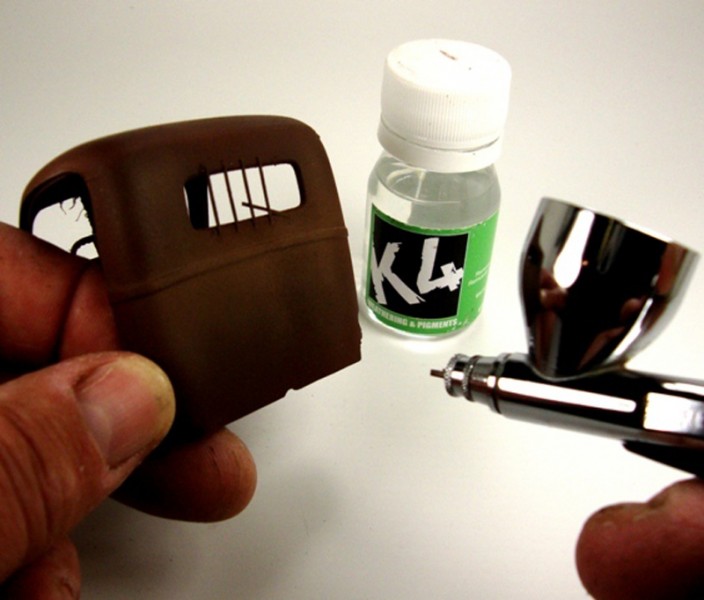
 I next applied K4's Paint Off to the rear of the cab.
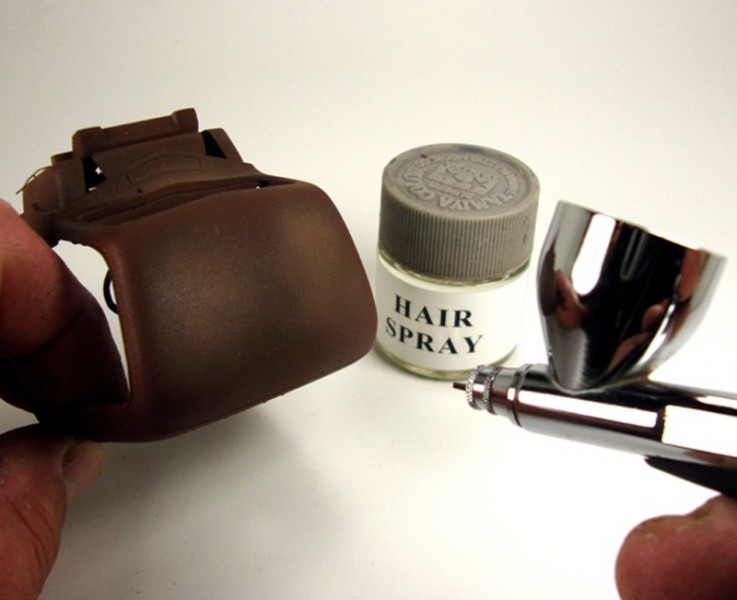
 And lastly, I applied Hair Spray to the roof, doors and chassis.
 With the chipping fluids in place the next step I will add in here will be some salt. Mind you, with all of these chipping fluids you do not need to use salt to get a desired chipping effect. Simply skip this part and proceed to the paint stage. The salt is used specifically to protect certain layers from being painted over and giving a really nice chipped effect by itself.
OK, I use Margarita Salt. Mainly because that is what I have in the shop and it is rather coarse. I crush the coarse salt with a hard object to reduce the size of the granules. You can simply use table salt for the finer granules. I like to spray a quick thin layer of Hair Spray and/or any of the chipping fluids to the surface that you want to use the salt on. This will dampen the area just so the salt has something to stick too. I have been known to use White Spirit as well. This will not break down the chipping fluids and still dampens the area.
With the chipping fluids in place the next step I will add in here will be some salt. Mind you, with all of these chipping fluids you do not need to use salt to get a desired chipping effect. Simply skip this part and proceed to the paint stage. The salt is used specifically to protect certain layers from being painted over and giving a really nice chipped effect by itself.
OK, I use Margarita Salt. Mainly because that is what I have in the shop and it is rather coarse. I crush the coarse salt with a hard object to reduce the size of the granules. You can simply use table salt for the finer granules. I like to spray a quick thin layer of Hair Spray and/or any of the chipping fluids to the surface that you want to use the salt on. This will dampen the area just so the salt has something to stick too. I have been known to use White Spirit as well. This will not break down the chipping fluids and still dampens the area.
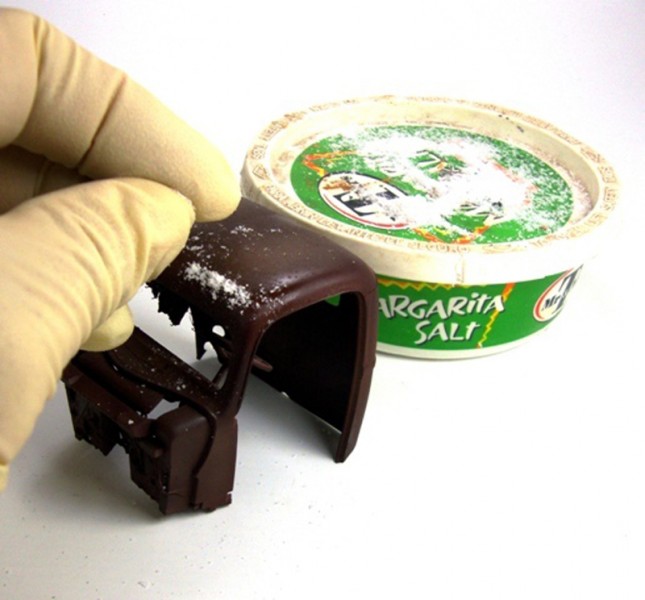 Here I am not being shy with the use. You, however, can apply in any amount you see fit to do.
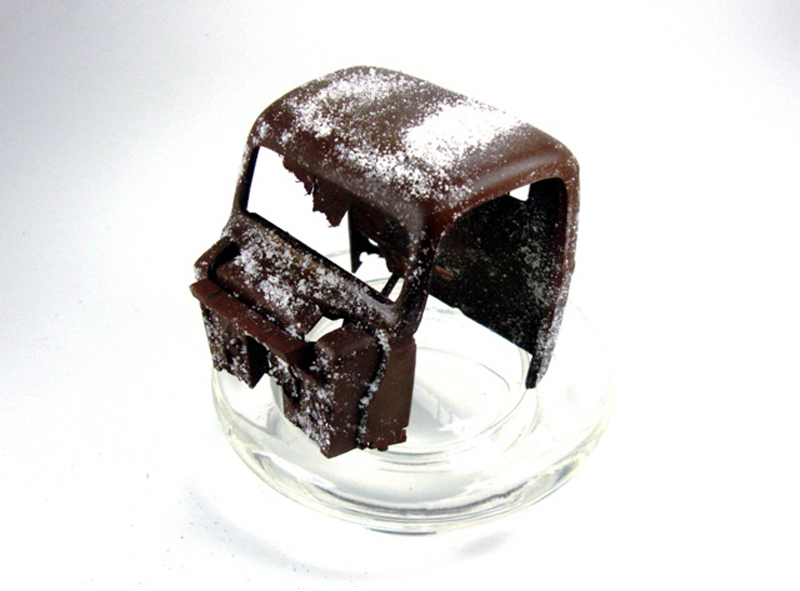 After the application of salt, you may want to add a thin layer of chipping fluid again to the top side of the slat. This will help keep the granules in place when you lay down your paint layer.
About the Author


FROM: MASSACHUSETTS, UNITED STATES
I am building what I like, when I like and how I like it; having fun doing it. I have been building and finishing models on and off my whole life but the past ten years things really exploded. Just about anything goes when it comes to hitting the bench, but wrecked armor, rusted hulks, ships or ...
Comments

I know it's been a while since the last post here, but I just wanted to let you know that I still refer people to your tutorial Todd and they have yet to give anything but very positive feedback on it regardless of what hobby discipline they come from.
JUN 25, 2013 - 05:08 AM

Thank you very much Jeremy! I am happy to see it useful for some. Most of the techniques are really simply to use they just take some practice to get the feel down. Even better, is when someone takes something and adapts their own way, maybe even coming up with newer techniques or just improving on the old ones. Circle of learning!! Thanks again!
JUN 25, 2013 - 07:55 AM
Hello Richard,
AK's Heavy Chipping Fluid works pretty much the same as other chipping medium layers:
1 - Make sure your base paint has been sealed with a clear coat.
2 - Spray on the chipping medium (Vallejo, AK, AMMO, Hair Spray...)and allow to dry (should only take a few minutes)
3 - Spray top coat of acrylic paint you desire to chip and allow to dry...not cure! 10 -15 minutes...enough to clean up your AB.
4 - Using a damp (Not Wet) with water brush apply a light single coat over the area you want to start in...typically no the entire model at once.
5 - Use any number of tools to aid in the removal of top coat paint to the desired effect you want; paint brushes, toothpicks, cotton swabs, etc
It is best to test things out on an old shelf queen until you get the hand of how to obtain different looks.
AUG 29, 2014 - 09:38 PM

I just spent a thoroughly enjoyable hour reading through this. Highly informative and well documented with word and pictures.
J
OCT 25, 2014 - 04:35 AM
I seemed to miss your post. Ace in Sept Richard. ..thanks
Thank you J. ..glad you enjoyed it!
OCT 25, 2014 - 05:35 AM

I realize this is an old thread. I was referred to it by a friend. There are several missing images on the first page. Is there a way you can edit the article and add the missing images?

AUG 15, 2015 - 11:22 PM
Thanks for the heads up on this Ivan! Not too sure what happened here as the pictures are loaded to the site's servers...I will dig a bit and see what I can turn up to correct his!
Cheers,
T
AUG 15, 2015 - 11:46 PM
Copyright ©2021 by Todd Michalak. Images and/or videos also by copyright holder unless otherwise noted. The views and opinions expressed herein are solely the views and opinions of the authors and/or contributors to this Web site and do not necessarily represent the views and/or opinions of Armorama, KitMaker Network, or Silver Star Enterrpises. All rights reserved. Originally published on: 2012-08-19 00:00:00. Unique Reads: 57192

WEB HOSTING BY


Copyright ©2021 Armorama and Kitmaker Network, a subsidiary of Silver Star Enterprises
All Rights Reserved. Please read our Conditions of Use and Privacy Policy.
All Rights Reserved. Please read our Conditions of Use and Privacy Policy.