Ontario, Canada
Joined: February 04, 2009
KitMaker: 743 posts
Armorama: 549 posts
Posted: Saturday, July 09, 2011 - 12:26 AM UTC
Eric,
Outstanding work! the stowage looks great and these are some of the best sandbags I have ever seen. I think this battlewagon is going to look even better once painted and weathered.
Great job!
Dave.

http://ghmicro.wix.com/twis-first-cut
Missouri, United States
Joined: July 03, 2002
KitMaker: 626 posts
Armorama: 456 posts
Posted: Saturday, July 09, 2011 - 02:24 AM UTC
Eric
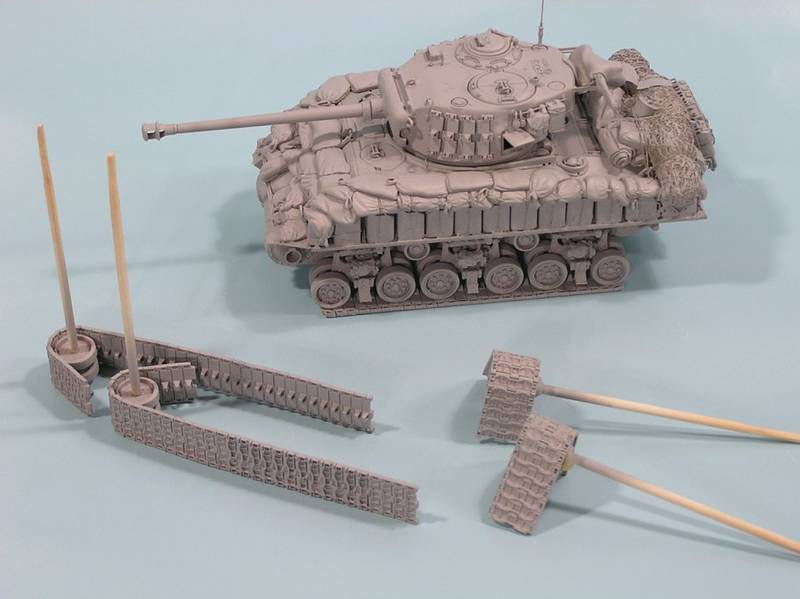
I too have been using a similar method for over 30 years now and it works great!
My only issue with your method is that the distance between the hull and the handles are not all the same! this is a easy fix, cut a piece of evergreen strip and place between the hull and the handle, then push the handle through the holes that you drilled and they will all be at the same height.
You might want to go back and properly align one or two of those that are in the images.
Thanks and have a great day.
Mrosko
Camouflage, all I see is Camouflage. Yeah BABY! Ya gotta dig them there colors !
Baron-von Mrosko
Paris, France
Joined: August 30, 2005
KitMaker: 2,315 posts
Armorama: 2,158 posts
Posted: Saturday, July 09, 2011 - 06:11 AM UTC
Not a Shermie expert or fan
But I really enjoy reading the build and the result is pretty pretty good.
I love the extra armor with the jerrycans and sandbags.
Congrats
Seb
California, United States
Joined: June 30, 2008
KitMaker: 2,408 posts
Armorama: 2,394 posts
Posted: Saturday, July 09, 2011 - 06:27 AM UTC
Thanks for sharing your techniques!


got my model juices flowing
Joined: April 09, 2011
KitMaker: 181 posts
Armorama: 175 posts
Posted: Sunday, July 10, 2011 - 04:37 AM UTC
You Sir get 5 stars and a special service award for handy hints and tips
Your sandbagging on the hull just looks fantastic, you have captured the look perfectly, the model has a huge amount of atmosphere and character, and the casting effects on the mantlet might be a little overdone but in my opinion sometimes thats the best way to do things, draw the viewers eye into a particular area by overdoing a feature.

#045
South Carolina, United States
Joined: September 23, 2005
KitMaker: 362 posts
Armorama: 350 posts
Posted: Sunday, July 10, 2011 - 08:02 AM UTC
Thanks to everyone for your nice words.
This project started out as way for me to get back into the hobby with more effort the in the past and then turned into a labor of love as it started to take on a life of its own.
@Paul; Thanks for the complement and like I said before great jot with the Sherman Campaign!
@Dave; Thanks and I sure hope I can pull off a good finish so as not to waste all the building that went into this.
@Chris; Thanks, I have been using that grab handle method for about 20 years myself, don't recall where I picked that idea at. Thanks for the suggestion I'll give it a try on my next project. Don't think I'll be going back into this one to correct the handles though.
@Seb; Thanks! It was the extra armor that really drew me to build this. I am big Sherman fan but I'm no expert, just having fun!
@Greg; Thanks and I'm happy I could help you to get the model bug back. Remember that its only a hobby and the only one that need to be happy with the results is you...So have fun!!!
@Matt; Not looking for any awards or anything. I just wanted to show folks how I do things as an alterative. People always read how to do the techniques but sometimes its much better to show the step-by-step. I agree that the casting effect is to heavy for Shermans, however I also totally agree with guiding the viewers eye around the subject. Let me how that mud works out.
BTW and a bit off topic, I just finished watching the F1 GP from Silverstone this afternoon (in the US that is). Kind of made me a little home-sick as I was stationed in the RAF Mildenhall/Lakenheath area of East Anglia back in the 2003 time frame. Had good times there and kind of miss the pubs!
Eric Rains
Greenwood, SC, USA
#045
South Carolina, United States
Joined: September 23, 2005
KitMaker: 362 posts
Armorama: 350 posts
Posted: Sunday, August 14, 2011 - 12:26 PM UTC
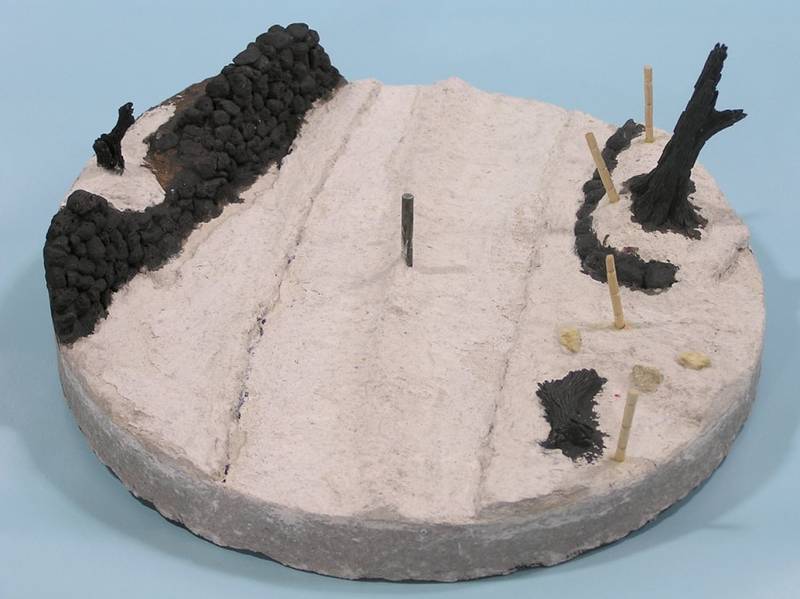
A Quick Update No I haven't started painting the Battlewagon yet.....

Got side tracked and started working on the display base.
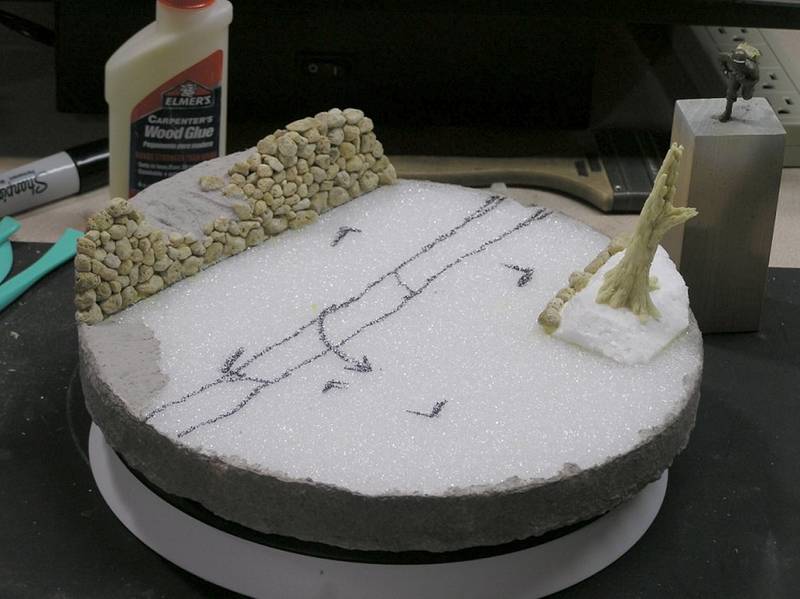
The stone wall was build using Woodland Scenics Medium, Coarse and Extra Coarse Buff Talus...aka Rocks. They come in 10oz bags for about 4-5 bucks, so not to bad of a deal. The wall was built stone by stone so it took a bit of time.
Will Thats it for now...Enjoy
Eric Rains
Greenwood, SC, USA
Ohio, United States
Joined: August 12, 2010
KitMaker: 731 posts
Armorama: 711 posts
Posted: Sunday, August 14, 2011 - 03:57 PM UTC
Eric,
That Sherman is a MASTERPIECE! You really did one heck of a job with it. I know exactly how you feel about the fear of applying paint. But take your time and plan your steps out, and I think it will come out fine.
New Jersey, United States
Joined: July 25, 2006
KitMaker: 1,139 posts
Armorama: 946 posts
Posted: Sunday, August 14, 2011 - 05:32 PM UTC
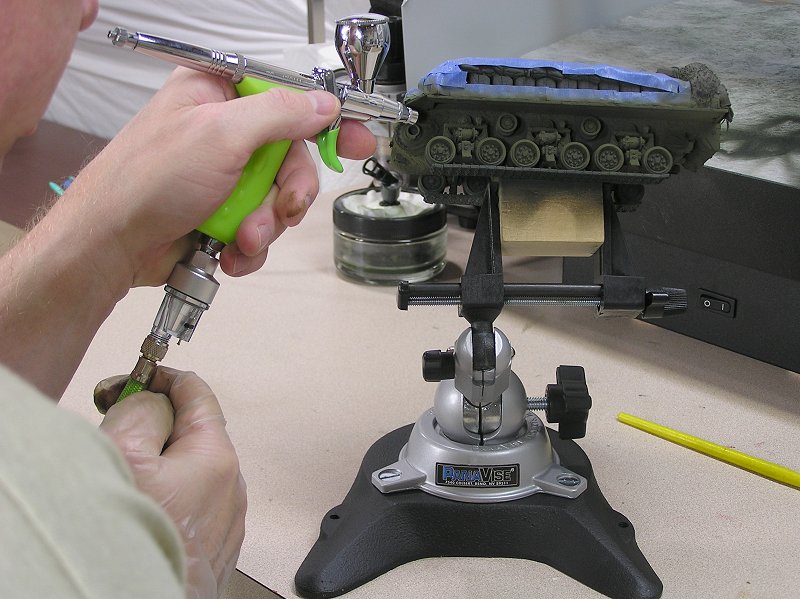
Great modeling, I love the idea for the grab handles and gun barrel jig. I have one nit pick with the stowage though . You don't cover your engine grills. The engine cooling air is pulled through the top and blown out the back. Your arrangement works for an M4 but not for an M4A3. Major over heating issues other wise. Minor point on absolutely great work.
Tom
"ALLONS" 11TH ACR BLACKHORSE
"Death Before Dismount"
19K40/ Dino Rider 19F10
England - West Midlands, United Kingdom
Joined: June 21, 2011
KitMaker: 87 posts
Armorama: 83 posts
Posted: Sunday, August 14, 2011 - 09:12 PM UTC
Eric
Great model it will be great when the whole thing is finished.
A question : in reality would all of the clobber on the the engine deck cause the engine to over heat as it's covering the deck vents?
Pete
If you have a question about having something etched please send me an E-mail through my web site. Click here to visit my site:
Thank you
#045
South Carolina, United States
Joined: September 23, 2005
KitMaker: 362 posts
Armorama: 350 posts
Posted: Monday, August 15, 2011 - 11:50 AM UTC
Thanks Guys! I'm about done with my paint plan so as soon as the display is finished I'll ease into applying the finish to my M4.

I do admit I got a bit carried away with the rear deck stowage in my zeal to depict a heavily war weary tank. I do understand in closing off the intakes would present problems on the actual vehicle.

Eric Rains
Greenwood, SC, USA
New Jersey, United States
Joined: July 25, 2006
KitMaker: 1,139 posts
Armorama: 946 posts
Posted: Monday, August 15, 2011 - 05:33 PM UTC
Eric I was a tanker for 27 years so I tend to focus on the realism side of the hobby over the artistic. If it were my tank, would I have put the gear there and so on. I have seen trees drag gear off tanks and cammo nets get shredded when the turret was traversed. Since the air flow to a tank engine is fan forced with no natural draw or wind flow like a car, blocking the vents would cause over heating. We had to brush debris off of the oil coolers in the engine compartment on the M60s to avoid overheating. As a side note a responsible driver checks the engine oil before starting operations every day. How much gear would he have to move on your Sherman to do that.
The detail in your build is excellent and I learned major tips reading your thread, thank you. i know if you put as much care in the paint job as you did in the build the results will awe.
Tom
"ALLONS" 11TH ACR BLACKHORSE
"Death Before Dismount"
19K40/ Dino Rider 19F10
Minnesota, United States
Joined: February 20, 2007
KitMaker: 339 posts
Armorama: 325 posts
Posted: Tuesday, August 16, 2011 - 04:25 PM UTC
Lookin' good Eric! Time to break out the airbrush!
"Seems like a lot of work for only a small amount which will actually be visible...but hey, I'll know it's there!" -- Rallying cry of anal-retentive modelers everywhere!
Ontario, Canada
Joined: February 04, 2009
KitMaker: 743 posts
Armorama: 549 posts
Posted: Monday, August 22, 2011 - 04:26 PM UTC
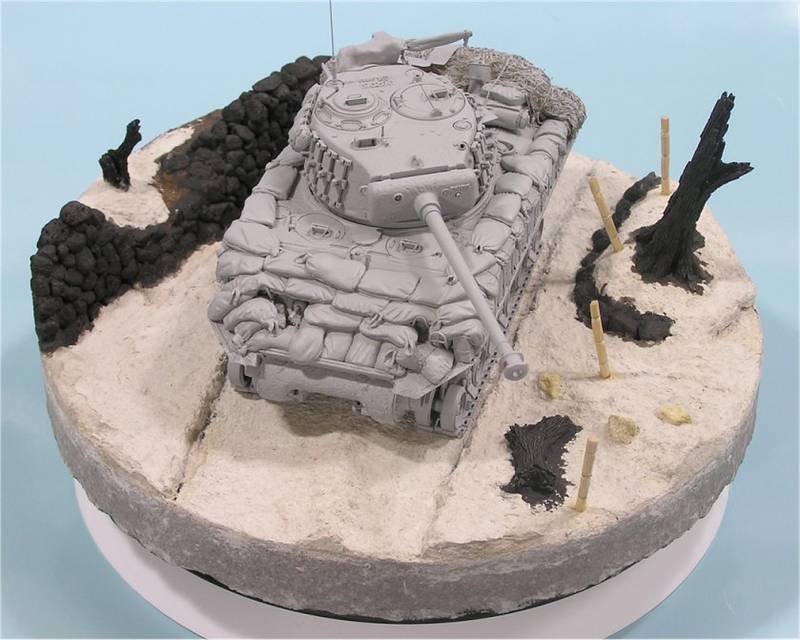
The battlewagon is going to look sweet in this vignette.
Keep' er going Eric. Great work.
Dave.

http://ghmicro.wix.com/twis-first-cut
Arkansas, United States
Joined: June 29, 2009
KitMaker: 11,610 posts
Armorama: 7,843 posts
Posted: Tuesday, August 23, 2011 - 11:22 AM UTC
D*mn the torpedos!! Full speed ahead!! Forget realistic, this tank looks mean just how you did it.
Ideals are peaceful. History is violent.
#045
South Carolina, United States
Joined: September 23, 2005
KitMaker: 362 posts
Armorama: 350 posts
Posted: Saturday, September 03, 2011 - 05:55 AM UTC
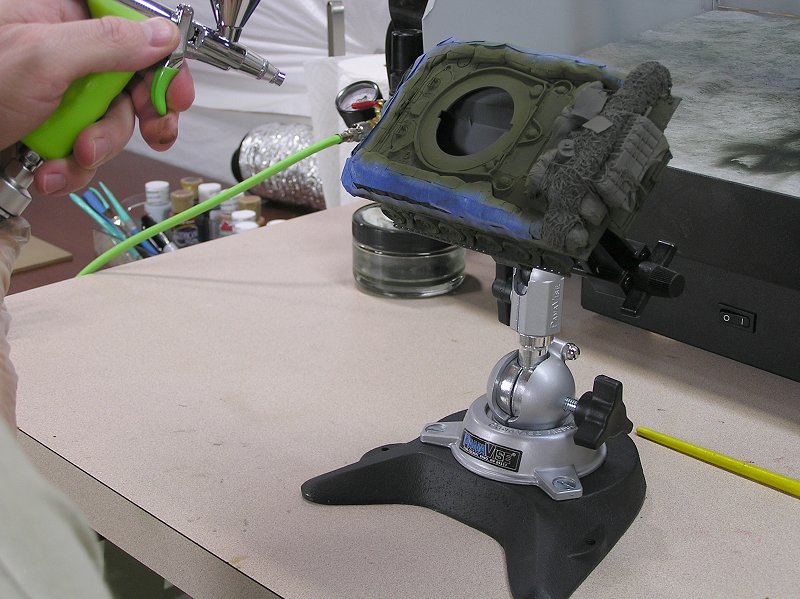
Part 14- All Primed Up! It has finally begun!
I applied the primer coat and in a couple of days the pre-shading coat will be laid on. For the primer I used Tamiya's surface primer straight from the can. It went on good with the only problem being little "hairs" from the primer on the lower hull and running gear. The hairs were removed easily with an old tooth brush. I'm not sure why I didn't decant the primer and use an airbrush to then apply it, but maybe next time.
Also I continue to develop the base and will start painting and detailing it over the next couple of weeks.
I'll post an update once the pre-shade and the first coats of color have been added.
This its for now just a quick post to show I'm moving ahead.

Eric Rains
Greenwood, SC, USA
Ontario, Canada
Joined: February 04, 2009
KitMaker: 743 posts
Armorama: 549 posts
Posted: Saturday, September 03, 2011 - 01:03 PM UTC
Eric,
Great to see you got some primer on your E8 and some further work done on the base. It's really coming together. If i haven't said it already I really like the sandbags you did on this tank.The stowage of course is very well done too.
Looking forward to seeing more.
http://ghmicro.wix.com/twis-first-cut
Luzon, Philippines
Joined: May 15, 2004
KitMaker: 1,086 posts
Armorama: 783 posts
Posted: Saturday, September 03, 2011 - 05:04 PM UTC
great reference for an upcoming Sherman project. impressive build Eric...!
Ohio, United States
Joined: August 12, 2010
KitMaker: 731 posts
Armorama: 711 posts
Posted: Monday, September 05, 2011 - 12:04 AM UTC
Looking good Eric. I like the base as well.
Goias, Brazil
Joined: March 29, 2002
KitMaker: 730 posts
Armorama: 688 posts
Posted: Monday, September 05, 2011 - 01:56 AM UTC
Wonderfull work !!!
Congrats !!!
Marcos Serra (Panzerserra)
Minnesota, United States
Joined: February 20, 2007
KitMaker: 339 posts
Armorama: 325 posts
Posted: Wednesday, September 07, 2011 - 05:15 PM UTC
Hi Eric. Wow, it sure looks different with primer on it! I'm always a little sad to see the different components and materials that make up a cool build covered up with paint for the first time. But once you get the colors on it, it will look great, especially with all those sandbags and jerry cans on there.
You seem to have a good start on the base. Any plans for crew or figures on there also?
Keep at it!
"Seems like a lot of work for only a small amount which will actually be visible...but hey, I'll know it's there!" -- Rallying cry of anal-retentive modelers everywhere!
Milano, Italy
Joined: July 13, 2010
KitMaker: 3,845 posts
Armorama: 3,543 posts
Posted: Wednesday, September 07, 2011 - 08:20 PM UTC
I'm not into allied tanks, but this is a great job indeed in my opinion
Congrats!
...well in my opinion T-55 isn' t just a tank. Actually it is THE TANK...
#045
South Carolina, United States
Joined: September 23, 2005
KitMaker: 362 posts
Armorama: 350 posts
Posted: Monday, September 19, 2011 - 01:12 PM UTC
Eric Rains
Greenwood, SC, USA
Ohio, United States
Joined: August 12, 2010
KitMaker: 731 posts
Armorama: 711 posts
Posted: Monday, September 19, 2011 - 01:46 PM UTC
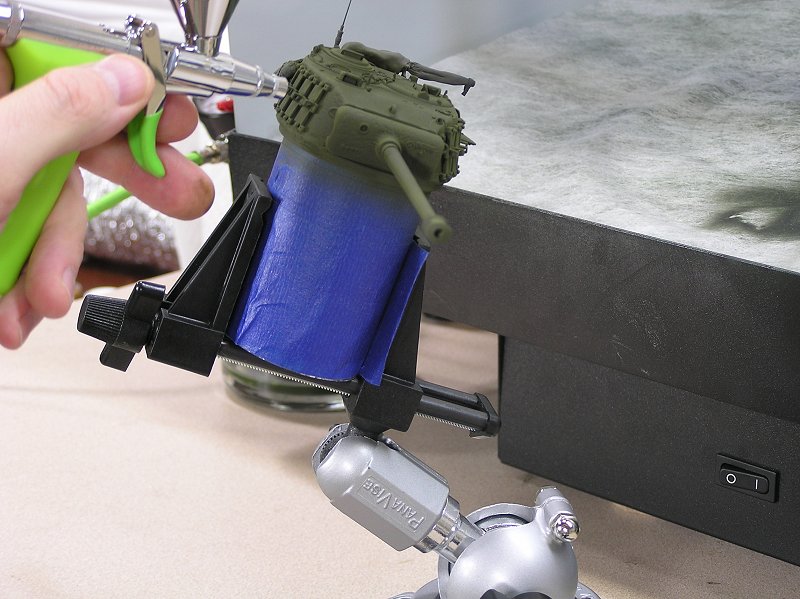
WOOOOOOO HOOOOOO its going green!
Looking mighty fine. Thats some serious looking shop equipment you got there!
Ohio, United States
Joined: May 02, 2010
KitMaker: 596 posts
Armorama: 265 posts
Posted: Monday, September 19, 2011 - 02:33 PM UTC
This is one impressive build! Can't wait to see the finished product!