Constructive Feedback
For in-progress or completed build photos. Give and get contructive feedback!
M4A3E8 ETO ~ Battlewagon
Tiger_213
Visit this Community
California, United States
Joined: August 10, 2012
KitMaker: 1,510 posts
Armorama: 1,443 posts
Posted: Tuesday, September 04, 2012 - 11:10 AM UTC
Very, very nice. Though I do have to say I personally believe there is a LOT going on with your Sherman. An a bright yellow tarp, very bright yellow...

Anyway, looking forward to seeing the completed dio.
errains
#045
Visit this Community
South Carolina, United States
Joined: September 23, 2005
KitMaker: 362 posts
Armorama: 350 posts
Posted: Wednesday, September 05, 2012 - 03:13 AM UTC
Thanks Tiger_213!

I know there is a ton of stuff on that Sherman but if you go back to my first post you'll notice in my primary reference photo that the Sherman has a lot going on too and that was the look I was shooting for. The Yellow Tarp on the back is actually an Air ID Panel so that friendly aircraft don't attack friendly ground forces. The lighting in the photo makes this come out brighter then it actually is, however I am going to work this area a little to tone it down a notch or two.

Thanks again for stopping by.
pseudorealityx
Visit this Community
Georgia, United States
Joined: January 31, 2010
KitMaker: 2,191 posts
Armorama: 1,814 posts
Posted: Wednesday, September 05, 2012 - 03:57 AM UTC
I don't think the reference photos are still showing up.

I like the finishing. If I had to comment on anything, it would be that the stowage really covers up the intake louvers a lot. Hope that thing doesn't overheat.
ProfessorP
Visit this Community
Minnesota, United States
Joined: February 20, 2007
KitMaker: 339 posts
Armorama: 325 posts
Posted: Wednesday, September 05, 2012 - 06:01 AM UTC

Quoted Text

I don't think the reference photos are still showing up.


Yes, the link to Eric's part 1 goes to the wrong page of the old Sherman campaign...the first photos show up on page 14 of that topic, not page 12 where the link sends you. Once found, it's easy to see that this model is very true to the reference photo, which shows a Sherman literally festooned with stuff!

In any case, outstanding work sir! Big improvement over the last series of photos now that everything is blended together and weathered up. Really has that "war weary" look to it.

One suggestion might be to add a thin line of OD around the edges of your ID panel. My sources show that they all had an OD cloth edging sewn around the edges and the back of the panels were actually white. Can't find a photo of one online, but Steve Zaloga has one in his "Modeling US Armor of WWII book" if you have that handy. This might help to offset the bright yellow a bit and make it look more like a "purposeful" item rather than a bolt of bright yellow cloth on the back!

Can't wait to see this wrapped up! You are sooooo close now.

Cheers.
errains
#045
Visit this Community
South Carolina, United States
Joined: September 23, 2005
KitMaker: 362 posts
Armorama: 350 posts
Posted: Wednesday, September 05, 2012 - 06:41 AM UTC
Thanks Jesse, I have to admit I got a bit carried away with the stowage on the rear deck, a bit of artistic license there...ah I think the ol Battlewagon is operating is some cold weather ...maybe.

Hey Don Thanks! It certainly has been a long journey but I can see the end in sight now While it has been fun its time to bring this to an end. I have a few other projects begging for attention! I did try to add the OD boarder on the ID panel before I fixed it to the Sherman, but I had to much coffee that morning and it turned into a disaster. But now with it attached I'll give it another go and before I have my coffee

BTW here is the Photo I used for my Primary Reference...Enjoy
errains
#045
Visit this Community
South Carolina, United States
Joined: September 23, 2005
KitMaker: 362 posts
Armorama: 350 posts
Posted: Tuesday, September 18, 2012 - 08:59 AM UTC
Part 20: Bases Covered

Finished up the base and thought I would give a quick post before the finally.

The road way is from Verlinden and the wall is carved out of Balsa Foam, which is awesome material to make structures out of, and Aves ClayShay for the ground work. Tamiya paints, oils and AK Interactive for color and weathering. Lastly Grass tuffs from Scenic Express and Hudson & Allen Forest Litter for ground covering.

As usual any constructive feedback from the community is most welcome…Enjoy


Tiger_213
Visit this Community
California, United States
Joined: August 10, 2012
KitMaker: 1,510 posts
Armorama: 1,443 posts
Posted: Tuesday, September 18, 2012 - 09:26 AM UTC
It looks fantastic. I'll have to find me one of those Verlinden road pieces now.

Can't wait to see the finished M4 sitting there!
Totalize
Visit this Community
Ontario, Canada
Joined: February 04, 2009
KitMaker: 743 posts
Armorama: 549 posts
Posted: Tuesday, September 18, 2012 - 11:11 AM UTC
Eric,


Excellent job on the vignette. Very realistic with the foliage. The verlinden set with the uneven stone road is a nice choice.

Looking forward to seeing more.

Dave.
Kencelot
Visit this Community
Florida, United States
Joined: December 27, 2001
KitMaker: 4,268 posts
Armorama: 2,804 posts
Posted: Tuesday, September 18, 2012 - 12:03 PM UTC
I just love the job you did on the Sherman and like many others, am looking forward to seeing it finished.
Dangeroo
#023
Visit this Community
Zurich, Switzerland
Joined: March 13, 2009
KitMaker: 2,058 posts
Armorama: 1,656 posts
Posted: Tuesday, September 18, 2012 - 07:06 PM UTC
The base looks first class! Good to see this one finally coming together, I seem to remember you started it for the last Sherman campaign?

Cheers!
Stefan
jrutman
Visit this Community
Pennsylvania, United States
Joined: April 10, 2011
KitMaker: 7,941 posts
Armorama: 7,934 posts
Posted: Wednesday, September 19, 2012 - 01:40 AM UTC
I am really lovin that base and the groundwork. Brilliant!
J
PantherF
Visit this Community
Indiana, United States
Joined: June 10, 2005
KitMaker: 6,188 posts
Armorama: 5,960 posts
Posted: Friday, September 21, 2012 - 10:02 PM UTC
I love this build and love this groundwork!

What is your secret on painting rodawheels already on the model and primed? They look great!

Of course, I love Shermans too.


~ Jeff
HONEYCUT
Visit this Community
Victoria, Australia
Joined: May 07, 2003
KitMaker: 4,002 posts
Armorama: 2,947 posts
Posted: Friday, September 21, 2012 - 11:03 PM UTC
Hey Eric
Some great moving and shaking on this one since I last perused the forums! Was like seeing an old friend again still treading the boards
Such a variety of techniques and applications!
Forgive me if this has already been mentioned in the annals of this thread, but did you notice what appears to be the '35' or '33' stencilled on the port hull side, and if so did you not plan to include it?
Look forward to how she ties in with your beaut base.
Cheers
Brad
asmodeuss
Visit this Community
Quebec, Canada
Joined: November 19, 2011
KitMaker: 1,389 posts
Armorama: 1,388 posts
Posted: Saturday, September 22, 2012 - 12:25 AM UTC
Hi Eric, it is always a pleasure to see your progres. Your base is so vivid I can't wait to see the ol battle wagon on there! You are one of the few true master modeler. What did you useto carve out your balsa resin?

Phil.
errains
#045
Visit this Community
South Carolina, United States
Joined: September 23, 2005
KitMaker: 362 posts
Armorama: 350 posts
Posted: Tuesday, October 02, 2012 - 10:35 AM UTC
Part 21: The End is Near!

It has been a long yet fun filled road and this build is more or less finished!

I just wanted to post some teaser pictures now as I start to work up the finished photographs, which will be posted here soon.

As usual any constructive feedback from the community is most welcome…Enjoy


asmodeuss
Visit this Community
Quebec, Canada
Joined: November 19, 2011
KitMaker: 1,389 posts
Armorama: 1,388 posts
Posted: Tuesday, October 02, 2012 - 11:53 AM UTC
Ok! this is it.
Amazing work Eric, just beautyful with a hint of poetry
I really can't find something that does not fit or need amelioration. I'm blasted....I just love it mate.
The colors and leafs used on the road realy create a embiance. Please sing your donor card before you die, humanity needs your hands and eyes
Seriously, great work and i'm looking forward to your next build.

Phil.
ProfessorP
Visit this Community
Minnesota, United States
Joined: February 20, 2007
KitMaker: 339 posts
Armorama: 325 posts
Posted: Friday, October 05, 2012 - 11:11 AM UTC
Fantastic job Eric!

You have managed to capture the look of a very dark and weathered war-weary tank while at the same time making everything quite vibrant around it. A welcome contrast to the "photo-realistic" style so common these days (not that there's anything wrong with that!).

Kudos on a job well done! Really enjoyed following along and learned some valuable stuff along the way.

OK, so when do you start the next project?

Cheers.
errains
#045
Visit this Community
South Carolina, United States
Joined: September 23, 2005
KitMaker: 362 posts
Armorama: 350 posts
Posted: Friday, October 05, 2012 - 11:21 PM UTC
THANKS Philippe & Don for stopping by and taking a few minutes to leave a comment. I'm glade the two of really enjoy the finale results of this build. I will be finishing up additional photographs and will be posting them soon (hopefully this weekend).

Thanks Again!
dlesko
Visit this Community
Alabama, United States
Joined: January 08, 2003
KitMaker: 124 posts
Armorama: 106 posts
Posted: Saturday, October 06, 2012 - 04:53 AM UTC
Eric, i just stumbled upon your build. I have to say, this is one of the most impressive tanks builds ive seen here. I love how you took a monotone tank and gave it life and character. It looks fantastic. I have a questions. The round base you used, how did you make that? I looks like foam, is that what it is? How did you paint it, did it have to be sealed first somehow? Thanks.
SSgtTowers
Visit this Community
Utah, United States
Joined: June 22, 2002
KitMaker: 73 posts
Armorama: 31 posts
Posted: Saturday, October 06, 2012 - 05:20 AM UTC
Very awesome little display. I have followed you for a while and your builds. One question that I have and maybe I have missed it but the red paint on the unpainted model what is it suppose to be? On your blog I see it on the lower part of the tank but it is suppose to be a type of paste or something to give some texture to the turret too? Sorry if I just sound dumb, just see so many different techniques and I am wondering what it is intended to do. Again awesome build.

Curtis Towers
errains
#045
Visit this Community
South Carolina, United States
Joined: September 23, 2005
KitMaker: 362 posts
Armorama: 350 posts
Posted: Saturday, October 06, 2012 - 09:32 AM UTC
Thanks Dave & Curtis for stopping by and asking your questions. Remember this is a hobby where people share how they do different things...that is how we all improve...and no matter how "good" you think you are, you can always learn something new!

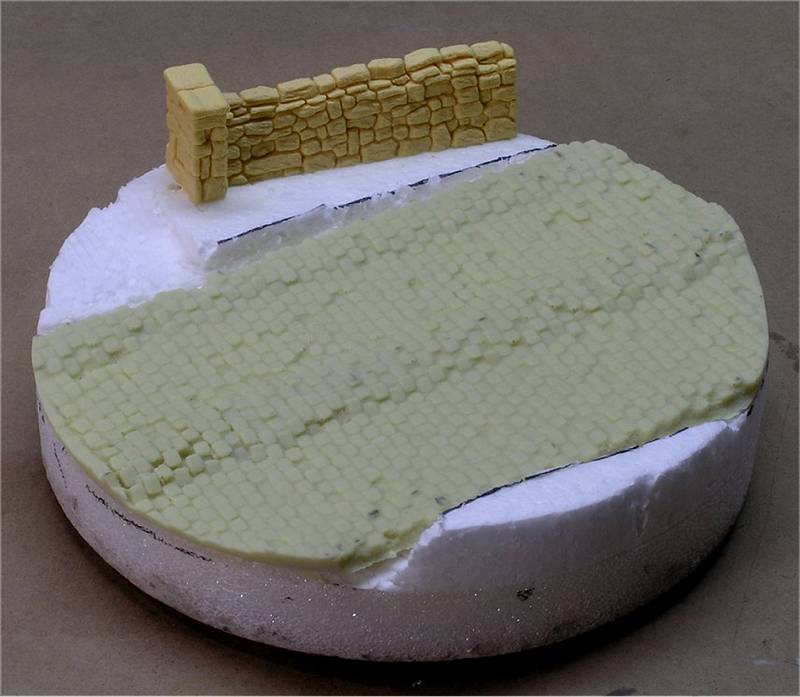
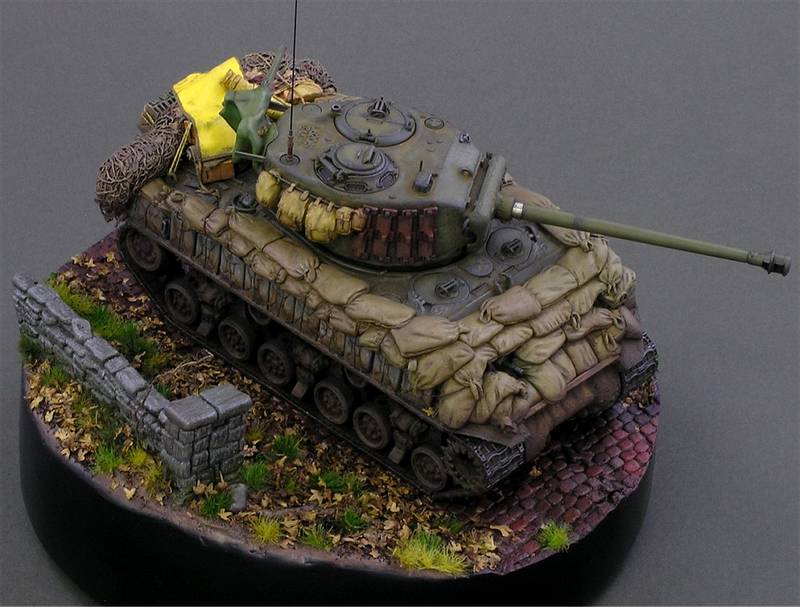
First up is Dave's question on what the base is made from.
If you notice the base has two layers of foam. The lower layer is a 5 inch (12.7cm) diameter by 1 inch (2.57cm) thick large cell hard foam that I picked up from Michaels Arts & Craft store. But any kind of foam core can be used. The top layer is some scrap packing foam from a furniture shipping box and is softer then the first layer, though this really doesn't matter the two layers can be made from the same type of foam, I just had these two on hand so I used them.

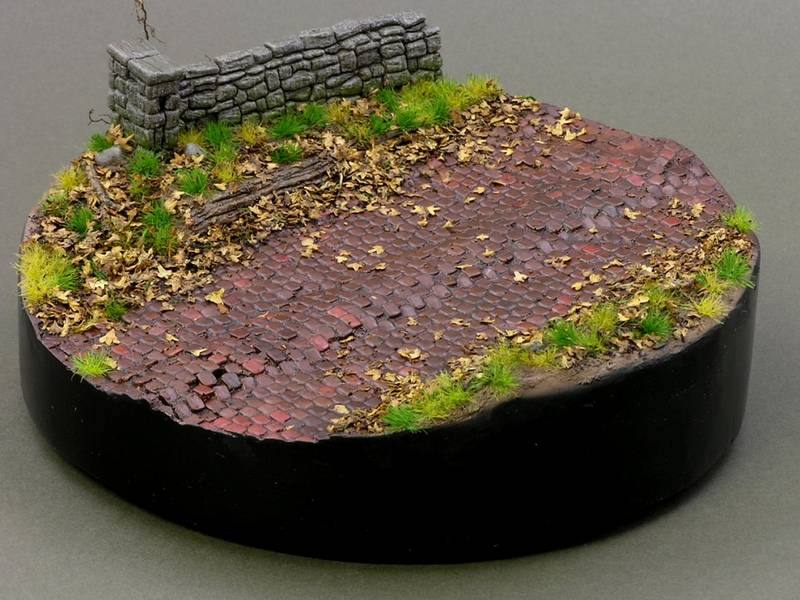
After I glued the two layers together and carved the top layer to its basic form I applied a thin covering of Celluclay on the sides. Celluclay is a paper mache product that is easy to use and can be picked up at most art and craft stories. When I applied the Celluclay I tried to make is as smooth as possible. Once this thin layer was dry I sanded it smooth as possible. Next I applied a thin coat of Drydex Speckling from DAP that I picked up at either Homedepot or Lowes. This will make the side vary smooth once sanded when dry. Once all the basic ground work was added I primed/sealed the entire base with Rust-Oleum Specialty Camouflage Flat Black paint fro a spray can . I then painted and detailed the ground work. The last step was to apply several coats of Vallejo satin varnish to the sides.

I hope that kind of answers you question Dave but if you have more please ask.

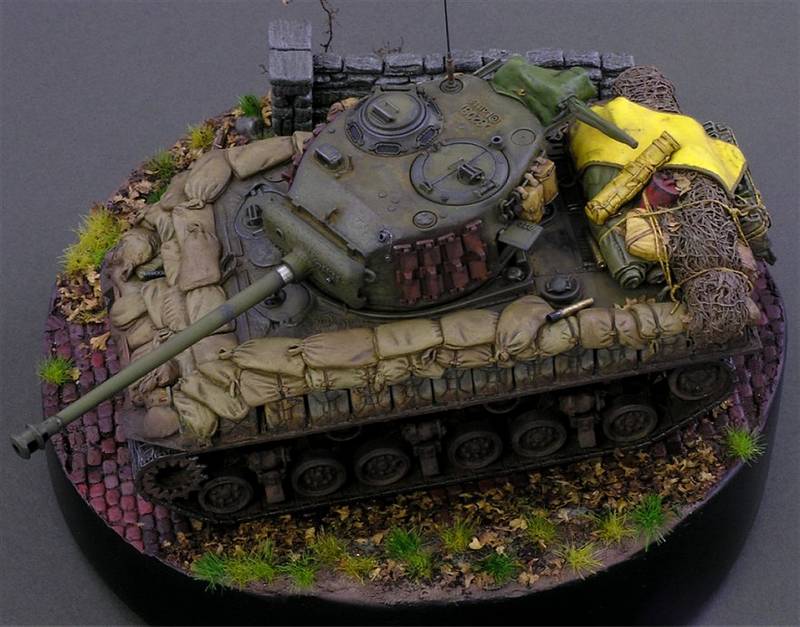
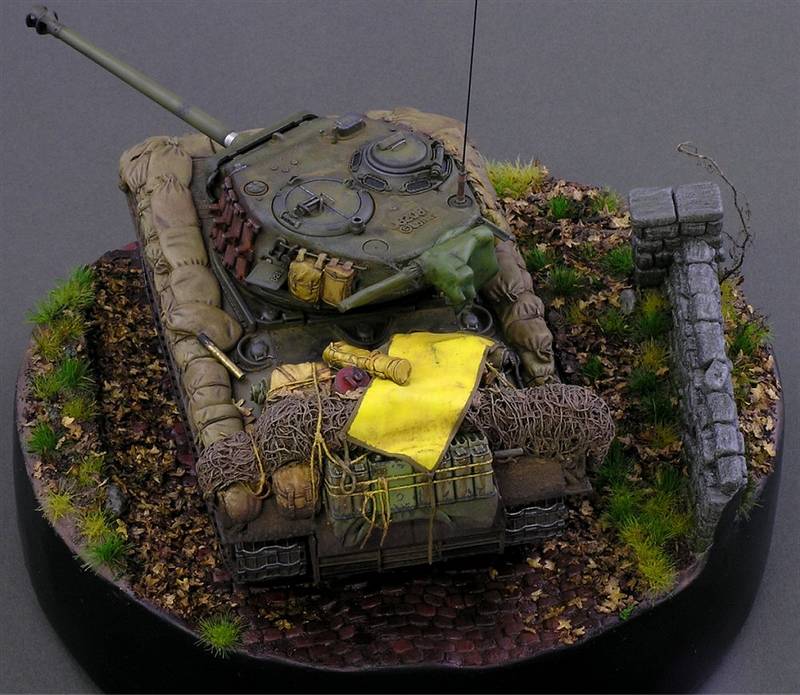
And now for Curtis's question about what the red stuff on the suspension and turret are....Actually they are two different materials

The stuff on the suspension is Liquitex Blended Fibers with brick red craft paint added to it. The Liquitex Blended Fibers is an acrylic product and is intended to add volume for a heavy layer of Mud in and around the suspension. Since heavy tanks travel through the terrain and not "Over it" I wanted to have a heavy accumulation of mud on the lower parts of the Sherman. The Liquitex Blended Fibers just helped in that process. The Brick red paint was so that I could see where I applied the blended fibers as it dries mostly clear thus making it hard to see with my 48 year old eyes to see
Liquitex Blended Fibers can be picked up at a good arts and craft store.

The red stuff on the turret is an automotive Glazing & Spot Putty. I used this to lessen the casting effect that I was not happy with on the turret (kind of over did it with a motor tool). I only used this Auto Putty because I had a tube of it laying around and wanted to see how it might work in model building. I think any good model putty would have had the same effect.

I hope that helps out Curtis, let me know if you have any other questions.
SSgtTowers
Visit this Community
Utah, United States
Joined: June 22, 2002
KitMaker: 73 posts
Armorama: 31 posts
Posted: Saturday, October 06, 2012 - 10:20 AM UTC
Yeah it was just curious because I use to use the squadron red putty mixed with some of the testers liquid cement that you apply with a brush and used it to fill gaps and lines that didn't need a huge amount of putty bit enough to fill the gaps and such. you would leave a little out and then mix it sum it worked really good. It is always good to learn others tricks to the hobby. Anyway thanks for the reply. Again awesome build. I look forward to doing some stuff once I finish my thesis. I could be working on stuff now but some how when I am not working on my thesis I feel guilty. The thesis though is centered around the bulge so its not a huge separation from the hobby. Just not building. HA

Curtis
errains
#045
Visit this Community
South Carolina, United States
Joined: September 23, 2005
KitMaker: 362 posts
Armorama: 350 posts
Posted: Saturday, October 06, 2012 - 10:47 AM UTC
No Problem Curtis that sheep skin is vary important so hang in there! Your thesis subject sounds interesting and best of luck. The model will be there when your ready to get back to building!
reccymech
Visit this Community
Victoria, Australia
Joined: February 20, 2011
KitMaker: 87 posts
Armorama: 74 posts
Posted: Saturday, October 06, 2012 - 12:47 PM UTC
Been a great read Eric, picked up some excellent hints. Will put them to good use when I finish the house move (building a newbie) and re-org my garage.

Cheers to all for the input.
AngryEchoSix
Visit this Community
Armed Forces Pacific, United States
Joined: October 19, 2012
KitMaker: 93 posts
Armorama: 61 posts
Posted: Sunday, October 28, 2012 - 05:54 PM UTC
i may be late to the party on this one, but I sure am glad that I found it!

All I can say is WOW! Amazing job. Makes me REALLY mad that I no longer live in Stafford! (lived there for 3 years while stationed at Quantico, now in Okinawa Japan) I would have been sitting in the corner just watching and learning, that's for damn sure!