

Steph,
I am using Model Master enamel OD green (1711). I am breaking the decals into two sessions for two reasons.
1. Sanity
2. I did every other one. Tonight, I am going to spray a light coat of Future, let it dry and then do the remaining decals.
All I could envision if I tried to do them all at once was getting one where I wanted it, and then having it slide away as the next wet decal was positioned.
Michael
Campaigns
Where Armorama group builds can be discussed, organized, and updates posted.
Where Armorama group builds can be discussed, organized, and updates posted.
Hosted by Darren Baker, Richard S.
Dragon OOB Campaign

paxtonm

Joined: February 06, 2007
KitMaker: 89 posts
Armorama: 61 posts
Posted: Wednesday, February 22, 2012 - 02:00 AM UTC

ltb073
Joined: March 08, 2010
KitMaker: 3,662 posts
Armorama: 3,078 posts
Posted: Wednesday, February 22, 2012 - 02:23 AM UTC
Hey Guys, great progress here by all 
@ Rob and James welcome to the Campaign, looking forward to seeing your work and Rob if you need help with anything just ask thats what campaigns are all about
@ Benjamin, I think the wash looks great the way you have it
@ Michael nice job with those decals on the rounds, must have been painstaking
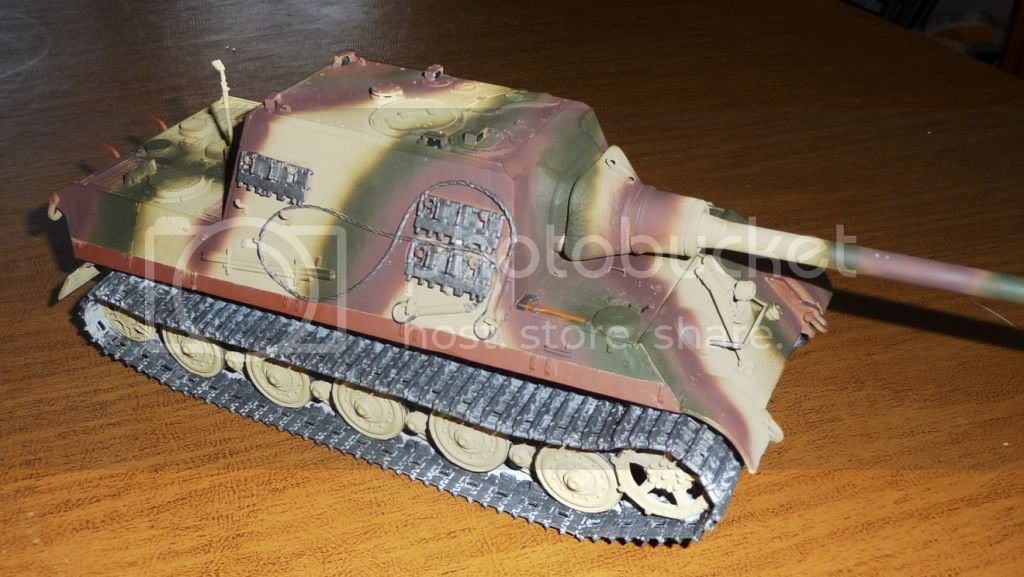
Ok I sprayed my OD color on and felt that the red/brown was lacking so I thinned up some Tamiya XF-10 flat brown and went over the brown that i had


I intentionally left the primer line on the right side as my reference photo has that once i add the washes it should dull it a bit 

Through out the day yesterday I put some more paint on this and did some more work on the tracks, comments, opinions, suggestions are more then welcome
@ Rob and James welcome to the Campaign, looking forward to seeing your work and Rob if you need help with anything just ask thats what campaigns are all about
@ Benjamin, I think the wash looks great the way you have it
@ Michael nice job with those decals on the rounds, must have been painstaking
Ok I sprayed my OD color on and felt that the red/brown was lacking so I thinned up some Tamiya XF-10 flat brown and went over the brown that i had


I intentionally left the primer line on the right side as my reference photo has that
once i add the washes it should dull it a bit 
Through out the day yesterday I put some more paint on this and did some more work on the tracks, comments, opinions, suggestions are more then welcome

Removed by original poster on 02/24/12 - 00:12:36 (GMT).
Removed by original poster on 02/24/12 - 00:18:45 (GMT).
Dragon164

#226

Joined: February 20, 2012
KitMaker: 1,909 posts
Armorama: 1,066 posts

Posted: Thursday, February 23, 2012 - 12:20 PM UTC
Ok, Started by sanding the wheels.
Cheers Rob.

Cheers Rob.


JonDicks

Joined: October 13, 2009
KitMaker: 223 posts
Armorama: 224 posts
Posted: Thursday, February 23, 2012 - 11:51 PM UTC
Well the build is 99% complete. Now if only the rain would stop pouring I can start the paintjob!


max_meeki
Joined: December 19, 2011
KitMaker: 92 posts
Armorama: 88 posts
Posted: Friday, February 24, 2012 - 04:07 PM UTC
Nice progress peoples....must upload some pics on my progress soon.
Hey Jon maybe you should move to Tassie, 38 and today. Ok, I had to make the most of the opportunity, it's not often that Tassie is warmer than QLD .
Cheers
Hey Jon maybe you should move to Tassie, 38 and
today. Ok, I had to make the most of the opportunity, it's not often that Tassie is warmer than QLD .Cheers

panzerbob01
Joined: March 06, 2010
KitMaker: 3,128 posts
Armorama: 2,959 posts
Posted: Friday, February 24, 2012 - 04:52 PM UTC
Folks:
Wow! Here it is, what, only FEB 24, and some already have paint splashed on plastic! All kinds of cool things are happening out there (here), and I've just finally got it together and choose my kit from the stash! Hey, it's only been about 2 months of dithering... what's the biggie! It was tough, I'll tell ya - real tough. Lots to choose from, and many screaming loudly "Build Meeeee!"
I'm declaring "I'm IN and ready to build at last!" The "winner" is the Aufklaungspanzer 38(t) mit 2cm KwK 38, kit 6294. The 38(t) series is about my favorite, and this one is, well, a pretty cool little beast, so...
Here is my dated "bits pic" just shot with Wednesday's supermarket ad flyer. For those who look carefully, there is a small plastic bin which has the road and sprocket wheels which I clipped off my sprue in eagerness this afternoon - after which I remembered that I needed to shoot a start pic! Better late than never

I'll head off and get enlisted next thing. I'll post some progress pretty soon!
Bob
Wow! Here it is, what, only FEB 24, and some already have paint splashed on plastic! All kinds of cool things are happening out there (here), and I've just finally got it together and choose my kit from the stash! Hey, it's only been about 2 months of dithering... what's the biggie! It was tough, I'll tell ya - real tough. Lots to choose from, and many screaming loudly "Build Meeeee!"
I'm declaring "I'm IN and ready to build at last!"
The "winner" is the Aufklaungspanzer 38(t) mit 2cm KwK 38, kit 6294. The 38(t) series is about my favorite, and this one is, well, a pretty cool little beast, so...Here is my dated "bits pic" just shot with Wednesday's supermarket ad flyer. For those who look carefully, there is a small plastic bin which has the road and sprocket wheels which I clipped off my sprue in eagerness this afternoon - after which I remembered that I needed to shoot a start pic! Better late than never
I'll head off and get enlisted next thing. I'll post some progress pretty soon!
Bob

Whiskey_1

Joined: November 22, 2008
KitMaker: 279 posts
Armorama: 272 posts

Posted: Friday, February 24, 2012 - 10:00 PM UTC
Sal: like the way the colors turned out. Camo is much moe smooth too. Great work, man 
Rob: and they call me a Mad Scientist with my optivisors
Jon: git`et ter the paintshop!
Bob: Welcome to ze campaign, herr Becker
As for the Pz.kpfw.IV, I`m calling the interior done. Chipped and added some pigments here and there. The irony is that the most visible section (the area around the commanders seat) is the one that I like the least. Went a little overboard with the pigments there. On the whole, it`s not too shabby for my second-ever interior, but constructive comments are always welcome

steph2102

Joined: April 23, 2011
KitMaker: 735 posts
Armorama: 606 posts

Posted: Saturday, February 25, 2012 - 03:15 AM UTC
hello,
benjamin pretty effects of aging. here are my progress. there is still assembling the tracks and a few small details paint. your comments are well come


benjamin pretty effects of aging. here are my progress. there is still assembling the tracks and a few small details paint. your comments are well come

Lakota
#123
Joined: November 17, 2008
KitMaker: 1,202 posts
Armorama: 635 posts
Posted: Saturday, February 25, 2012 - 01:30 PM UTC
Howdy Y'all 
I'll be building something a little different if no one minds. This is going to be for our clubs "1912, 1942, 1962 & 1982 Anniversary" contest later this year.

Y'all Take Care,
Don "Lakota"
I'll be building something a little different if no one minds. This is going to be for our clubs "1912, 1942, 1962 & 1982 Anniversary" contest later this year.
Y'all Take Care,
Don "Lakota"
paxtonm
Joined: February 06, 2007
KitMaker: 89 posts
Armorama: 61 posts
Posted: Sunday, February 26, 2012 - 03:18 PM UTC
I've made some progress, namely completing the gun assembly! I dry fitted some of the components, even though I still want to weather some of the interior spaces.


and, I finished the ammo tubes!

I am humbled by how quickly and how great the builds are coming! Nice work to all!
and, I finished the ammo tubes!
I am humbled by how quickly and how great the builds are coming! Nice work to all!
TheDiggs
Joined: April 25, 2008
KitMaker: 338 posts
Armorama: 75 posts

Posted: Sunday, February 26, 2012 - 11:25 PM UTC
I got the hull and the turret together. I didn't fit test as well as I should have and I have a coule of gaps to show for it. There are also a lot of seams and gaps from a lot of the peices being slightly the wrong size.

Dragon164
#226
Joined: February 20, 2012
KitMaker: 1,909 posts
Armorama: 1,066 posts
Posted: Monday, February 27, 2012 - 12:15 AM UTC
Hi All,
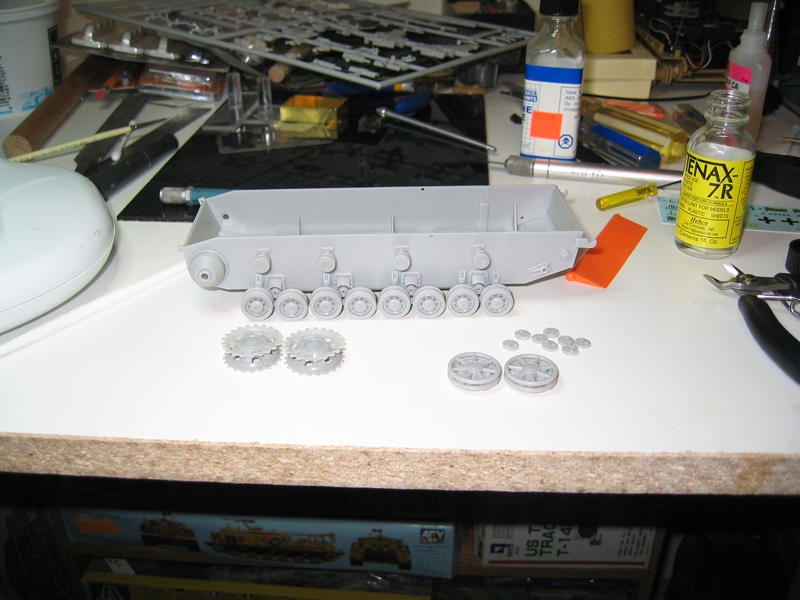
I got some work done this weekend and am starting to see why this kit got the rep it has.The mating surface of both halves of every road wheel has three protruding ejector pin marks.

Anyway it seems to be coming along,and here are the pics.
First all the running gear cleaned and glued then put aside till I decide how I am going to display it.

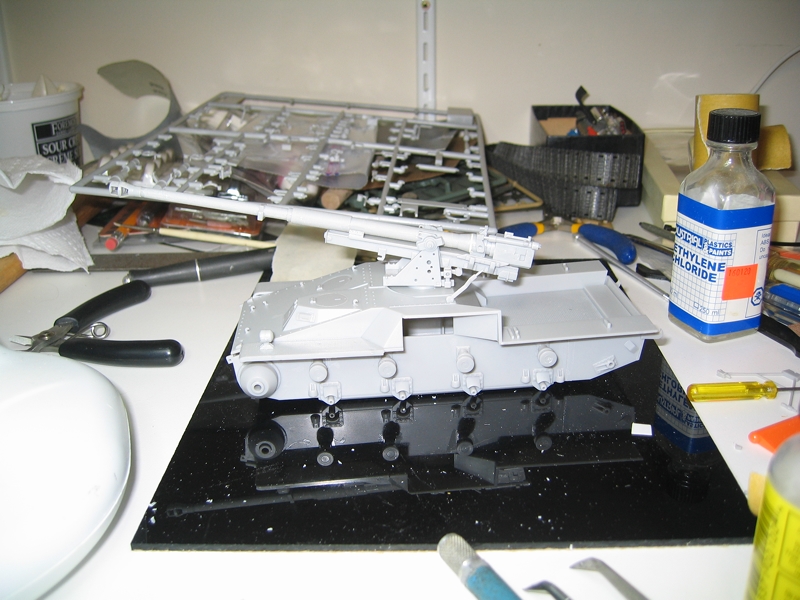
Then I built the gun.


That's it so far.
Cheers Rob.
I got some work done this weekend
and am starting to see why this kit got the rep it has.The mating surface of both halves of every road wheel has three protruding ejector pin marks. Anyway it seems to be coming along,and here are the pics.
First all the running gear cleaned and glued then put aside till I decide how I am going to display it.
Then I built the gun.
That's it so far.
Cheers Rob.
ltb073
Joined: March 08, 2010
KitMaker: 3,662 posts
Armorama: 3,078 posts
Posted: Monday, February 27, 2012 - 03:09 AM UTC
Everyone is making some great progress here the kits are looking great
Welcome to Panzerbob01 and Don, I remember seeing that ship on the news as a kid
@ Jon are you using the same kit over at the Panther campaign I believe the rule is 1 campaign per kit
I made some progress as well finally finished the tracks and got them glued on
The hull and Barrel are dry fitted and I need to add the MG

even got some clear green in on the periscopes

need to touch up some paint on the tracks then add the spots to the Ambush camo which will be next
keep up the post and the great work guys
Welcome to Panzerbob01 and Don, I remember seeing that ship on the news as a kid
@ Jon are you using the same kit over at the Panther campaign
I believe the rule is 1 campaign per kit I made some progress as well finally finished the tracks and got them glued on

The hull and Barrel are dry fitted and I need to add the MG

even got some clear green in on the periscopes

need to touch up some paint on the tracks then add the spots to the Ambush camo which will be next
keep up the post and the great work guys
JonDicks
Joined: October 13, 2009
KitMaker: 223 posts
Armorama: 224 posts
Posted: Monday, February 27, 2012 - 09:54 AM UTC
Quoted Text
@ Jon are you using the same kit over at the Panther campaign
Mate I was planning on entering this kit in the Panther Campaign, but pulled out after I was advised that campaign required a detailed build log of every step, and I don't have enough space for all the photos required! And as I was also enrolled in this campaign I decided to do the build here instead. Hope that is OK? I tried to delete my post in the Pather Campaign but could not.
Cheers
Jon

ltb073
Joined: March 08, 2010
KitMaker: 3,662 posts
Armorama: 3,078 posts
Posted: Monday, February 27, 2012 - 02:00 PM UTC
Quoted Text
Mate I was planning on entering this kit in the Panther Campaign, but pulled out after I was advised that campaign required a detailed build log of every step, and I don't have enough space for all the photos required! And as I was also enrolled in this campaign I decided to do the build here instead. Hope that is OK? I tried to delete my post in the Pather Campaign but could not.
Cheers
Jon
No problem, I just thought I had 1 too many drinks the other night and was seeing double
If you are having a photo space issue you can try compressing the images a bit and/or use a Photobucket account they are free that's what I use. Hope that helps
paxtonm
Joined: February 06, 2007
KitMaker: 89 posts
Armorama: 61 posts
Posted: Tuesday, February 28, 2012 - 04:18 PM UTC
The subassemblies are starting to come together. This kit is really well engineered!
Here's the driver's compartment installed and the instrument panel painted. I did the dials in black, dry brushed with some medium grey and placed a drop of Future. It's really telling when you look at your photos up close. I can see I missed around the from of the driver's seat when airbrushing and will need to do some touching up!

The rear from the top and from the back. The photo etch screens took only a couple of swipes with a metal file to clean up the sprue attachment points.


A side view with the ammo compartments installed.

And the front from the right and left side.


That's all for tonight! I love the point in a build where it actually starts to look like a vehicle!
Here's the driver's compartment installed and the instrument panel painted. I did the dials in black, dry brushed with some medium grey and placed a drop of Future. It's really telling when you look at your photos up close. I can see I missed around the from of the driver's seat when airbrushing and will need to do some touching up!
The rear from the top and from the back. The photo etch screens took only a couple of swipes with a metal file to clean up the sprue attachment points.
A side view with the ammo compartments installed.
And the front from the right and left side.
That's all for tonight! I love the point in a build where it actually starts to look like a vehicle!

c5flies
Joined: October 21, 2007
KitMaker: 3,684 posts
Armorama: 2,938 posts
Posted: Tuesday, February 28, 2012 - 05:06 PM UTC
Michael, those gauges came out looking great, and nice work getting the decals lined up on the ammo tubes.
Rob & David, all those roadwheels look familiar to me...I've been grumbling away at a similar Tristar kit.
Jon, panther is looking hot, nice job on the kit.
Benjamin, I think the weathering looks very good for an interior...even around the commanders seat...when you're only looking down through the hatch it'll all pull together nicely.
Sal, I'm going to have to get in gear to get anywhere close to where you're at

ltb073
Joined: March 08, 2010
KitMaker: 3,662 posts
Armorama: 3,078 posts
Posted: Thursday, March 01, 2012 - 02:49 AM UTC
Michael, really coming together nice looking good
Here is where I am at, Build is complete and I added a pin wash and overall wash of burn umber to the hull
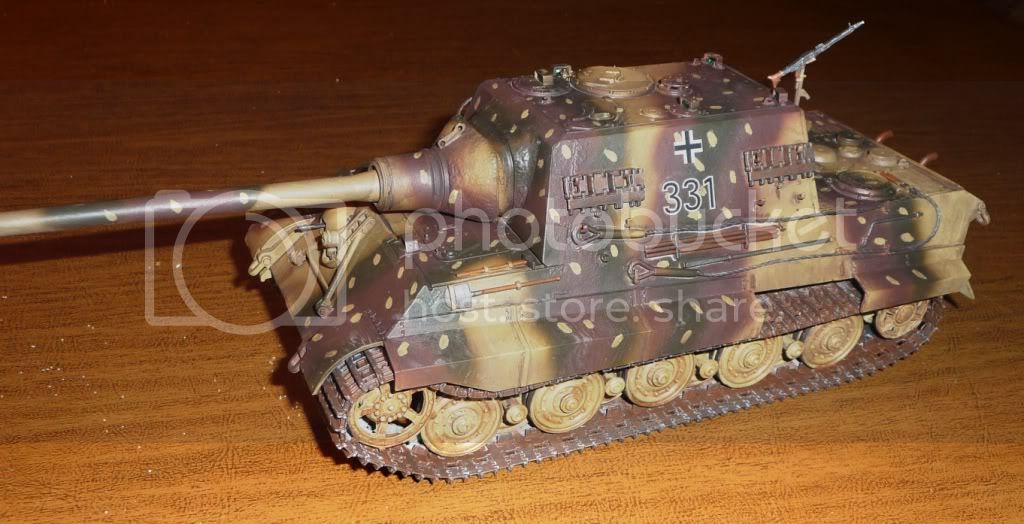

I also added a rust wash to the tracks, but it looks like i still have some spots on them to touch up


I also need to hit the inside of the barrel with some silver, any other suggestions or constructive criticism is more then welcome

Tojo72
Joined: June 06, 2006
KitMaker: 4,691 posts
Armorama: 3,509 posts
Posted: Thursday, March 01, 2012 - 03:51 AM UTC
Sal,looks real good,but what about the ambush spots for the dark yellow ?
Ben,real nice inside weathering,the breach looks great
Steph,fast progress
Ben,real nice inside weathering,the breach looks great
Steph,fast progress
panzerbob01
Joined: March 06, 2010
KitMaker: 3,128 posts
Armorama: 2,959 posts
Posted: Thursday, March 01, 2012 - 03:53 AM UTC
Sal;
The JT is looking fine! About that barrel... I would suggest something darker than "silver" - gun-barrels, unless they are chromed like Russian small-arms and other more-recent combat weapons are, are actually rather darker steel inside. And probably, even if recently fired, more likely slightly sooted (inside - not that big black mess some depict all over outside that muzzle). That is, after all, why tanks came with big bore-cleaning swabs and rods! IF they were all scraped clean and shiny, nobody would have to clean the darned things!
I use pencil graphite over black, myself - picks out the lands versus grooves!
Just a suggestion!
Bob
ltb073
Joined: March 08, 2010
KitMaker: 3,662 posts
Armorama: 3,078 posts
Posted: Thursday, March 01, 2012 - 04:03 AM UTC
Quoted Text
Sal,looks real good,but what about the ambush spots for the dark yellow ?
Yeah, I was thinking about that but in this poor photo that I found it looks like only big yellow spots

What do you guys think?
@ Bob, I'll try the black graphite method
Tojo72
Joined: June 06, 2006
KitMaker: 4,691 posts
Armorama: 3,509 posts
Posted: Thursday, March 01, 2012 - 04:08 AM UTC
Wow,theres no way I can interpret that picture,so whatever you think then,go with it.
Still at least a month to starting mine,I need to finish my Light Tank Entry,then a quick break to do my 1/48 mustang entry.but all this great work has me chomping at the bit
Still at least a month to starting mine,I need to finish my Light Tank Entry,then a quick break to do my 1/48 mustang entry.but all this great work has me chomping at the bit
bwiber
Joined: August 03, 2008
KitMaker: 436 posts
Armorama: 320 posts
Posted: Thursday, March 01, 2012 - 04:22 AM UTC
Hi all,
Actually some progress to show off....


A few little things to paint and install..... then weathering.
The tracks were an experience.... one that I hope not to repeat to soon. I think I just didn't wait long enough before fitting them... but I didn't want the glue to set up to much. However, it only took 10-15 minutes of fiddling to get them on and set where I wanted them. Then the hard part was leaving them to sit.
Bob
Actually some progress to show off....
A few little things to paint and install..... then weathering.
The tracks were an experience.... one that I hope not to repeat to soon. I think I just didn't wait long enough before fitting them... but I didn't want the glue to set up to much. However, it only took 10-15 minutes of fiddling to get them on and set where I wanted them. Then the hard part was leaving them to sit.
Bob
 |

WEB HOSTING BY


Copyright ©2021 Armorama and Kitmaker Network, a subsidiary of Silver Star Enterprises
All Rights Reserved. Please read our Conditions of Use and Privacy Policy.
All Rights Reserved. Please read our Conditions of Use and Privacy Policy.