Constructive Feedback
For in-progress or completed build photos. Give and get contructive feedback!
My Leopard in repair
Il_Colonnello
Visit this Community
Modena, Italy
Joined: March 08, 2012
KitMaker: 140 posts
Armorama: 140 posts
Posted: Friday, March 16, 2012 - 06:42 PM UTC

Quoted Text

Il_Colonnello,

Wow, you are an inspiration. Extraordinary work! The first of Tamiya's R/C tanks I built waaaayyyy back in 1970 or so was the Leo I. I still have the screen-covered engine deck somewhere

I concur that the Leo I is under represented in models.


Hello Frederick, Thanks for the compliments, but I'm sure there are many other modelers better than me and who they don't write and they don't post any pictures of their work....
I know well of someone of these... and I envy them ...
Il_Colonnello
Visit this Community
Modena, Italy
Joined: March 08, 2012
KitMaker: 140 posts
Armorama: 140 posts
Posted: Friday, March 16, 2012 - 06:46 PM UTC

Quoted Text

The greatest reward is the satisfaction gained from a job well done.


Hello Matt, you're absolutely right. This is also my thought. Bravo!

Gianfranco
Plasticbattle
#003
Visit this Community
Donegal, Ireland
Joined: May 14, 2002
KitMaker: 9,763 posts
Armorama: 7,444 posts
Posted: Friday, March 16, 2012 - 08:05 PM UTC
Fantastic scratchbuilding Gianfranco. Not really into modern armor, but can´t stop admiring your work. Top notch.
Il_Colonnello
Visit this Community
Modena, Italy
Joined: March 08, 2012
KitMaker: 140 posts
Armorama: 140 posts
Posted: Saturday, March 17, 2012 - 03:42 AM UTC

Quoted Text

Fantastic scratchbuilding Gianfranco. Not really into modern armor, but can´t stop admiring your work. Top notch.


Thanks Frank but, as I said yet, "the first love is never forgotten" (even if it is old...). Unfortunately, now begins the hard work ... the "engine" ...
However, I will take as basis the excellent model of it, made ​​from "Real Model", which I will use some parts of it very well done, as the covers of the tappet and more.
In addition, this engine will serve me to compare the size of mine with the images and sketches I have of it, so I can reproduce it properly.
But I already know that it will a long work anyway, given the many details of it from self-build.
Let's hope well ....
Meanwhile, I'll try to finish the hull with the scratchbuilding the cockpit. I am already in a good point, so soon I'll post the pictures of the continuation of my work.
Finally, I must also begin to work on Bergepanzer ... and here there will begin the stomach pains ... (but who made ​​me do all this?)
Cheers - Gianfranco
AKirchhoff
Visit this Community
Germany
Joined: September 12, 2008
KitMaker: 307 posts
Armorama: 304 posts
Posted: Saturday, March 17, 2012 - 10:32 PM UTC
Hi!
Amazing work so far. Really amazing. I wish I would have the time to do scratchbuilding these days, but it is always great to follow such impressive scratchbuilding projects. Thanks for your comments on the hight of the hull with the engine removed. If I have my lots of pictures at hand in the future, I will compare more carefully "before" and "after", lets see. Pictures show the engine taken off Leopard 1A5 DK on several occasions. If you want to do the Bergepanzer 2, I would strongly, very strongly recommend to go for the Perfect Scale one and not the Elite one. There are several reasons for this, for example the casting quality, detailing and the fact that Elite has a completely wrong dozer blade in the kit. The kit features the size of the blade of Pionierpanzer with the design of Bergepanzer. I built one myself and offered the master to them, but they were not interested. The PSM blade is correct, believe me ;-)

I noticed that PSM removed the Bergepanzer 2 from their online shop, it is sold off at this time but will come back later as Gerold told me.

What about contacting them for casting your excellent scratch built parts?

Looking forward to seeing more of your build!

Andreas

Removed by original poster on 03/18/12 - 13:08:36 (GMT).
Il_Colonnello
Visit this Community
Modena, Italy
Joined: March 08, 2012
KitMaker: 140 posts
Armorama: 140 posts
Posted: Sunday, March 18, 2012 - 01:11 AM UTC
Hello Andreas,
thanks for your comments very accurate. I'm very interested at the pictures of the engine of Leopard, especially if you can see the part below that, usually, you can never see well.
I know that the Bergepanzer of PSM is much better than that of Elite, but I will build this because it's was a gift by my wife ...
So I know that I'll have to work hard on it to get a good model, also because I have to convert it from Bergepanzer2 to Bergepanzer1.
But this does not scare me ... it's just a more work long.
However I hope to be ready for the show in September, to which I will attend "out of competition", according to my way of understanding the modellism.
To yield to PSM about my masters, for now I'm not ready. Unfortunately they are unique pieces that are not ready for casting. In the near future, if PSM is still interested in my work, I can always redo them but ready to be casted.
Best regards.
Gianfranco
Spiderfrommars
Visit this Community
Milano, Italy
Joined: July 13, 2010
KitMaker: 3,845 posts
Armorama: 3,543 posts
Posted: Sunday, March 18, 2012 - 01:25 AM UTC
AEWSOME JOB GIANFRANCO!!
Il_Colonnello
Visit this Community
Modena, Italy
Joined: March 08, 2012
KitMaker: 140 posts
Armorama: 140 posts
Posted: Sunday, March 18, 2012 - 02:18 AM UTC
Thanks Mauro,
but you expect to see the follow ... ...

Gianfranco
Il_Colonnello
Visit this Community
Modena, Italy
Joined: March 08, 2012
KitMaker: 140 posts
Armorama: 140 posts
Posted: Sunday, March 18, 2012 - 05:25 AM UTC
Hi guys,
these days, I worked a lot on the driver's station.
To do this, I used the pictures that I had done when I was in command, and even those that I recovered on the WEB. I also used many of the pictures who my friends have sent me, and I think I have done a good job.
The only thing I regret a little bit is that the dashboard of the driver it came too big but, through the hatch, luckily it is not easy noticing of this...
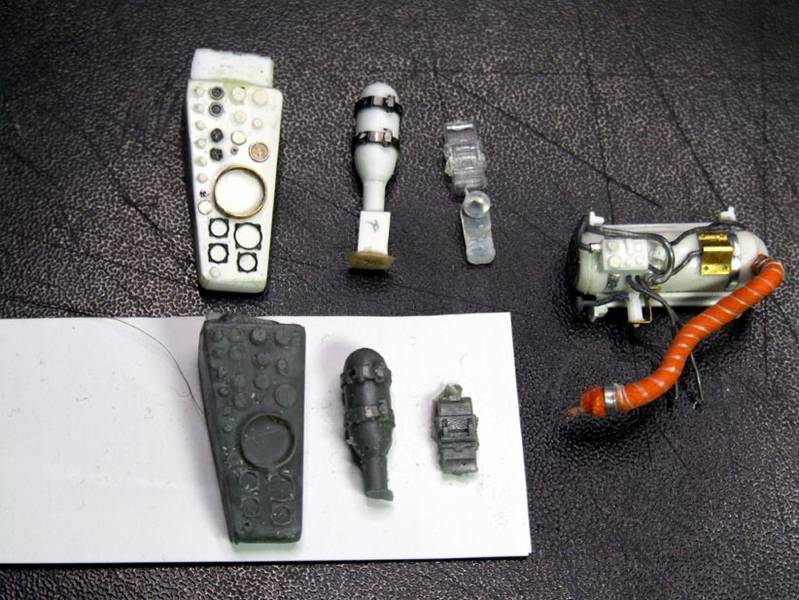
Many of these pieces I have also cloned them in resin from a master, so I can use them also for the Bergepanzer.


Here are the masters that I have made and their copies in resin.
I know I'm not perfect copies, but I've tried to work the best but in a hurry.
Furthermore, they will be hardly visible once they are mounted.
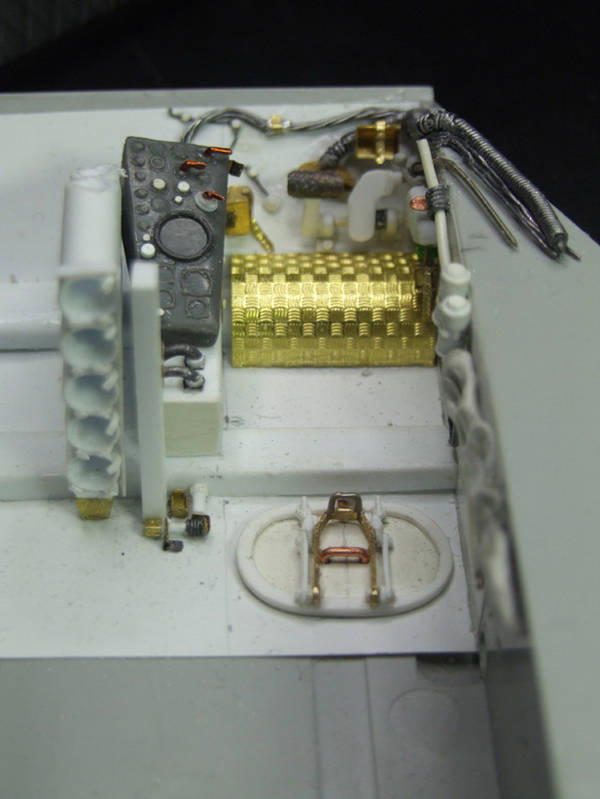
At right you see the master of the diesel oil heater, of which I have yet to make the mold (to do this, I will take away all the cables and pipes, which I would realize at part).


I made all the details by using pieces of plasticard and photoetched parts (you can see the front of support for the shovel of a German tank, which I used as the heating vent).
The cables and pipes are all derived from the wires on lead made by "Plus Model".


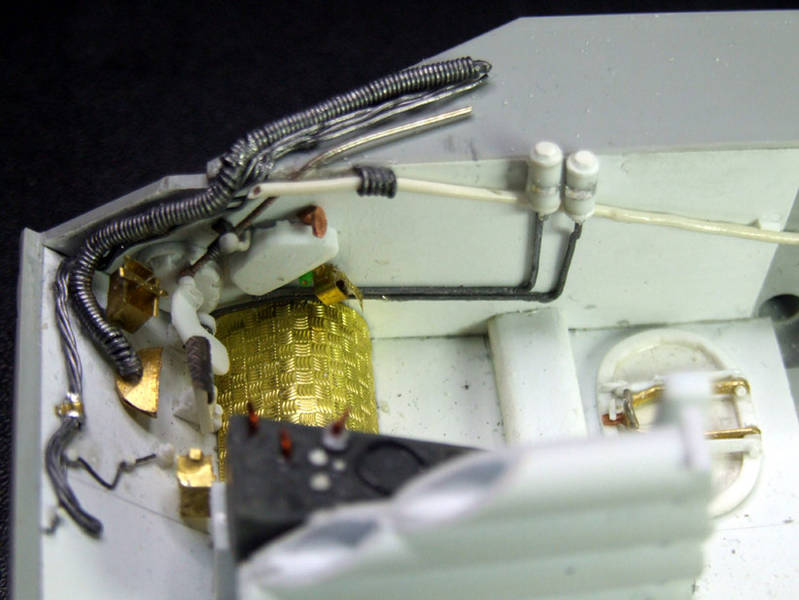
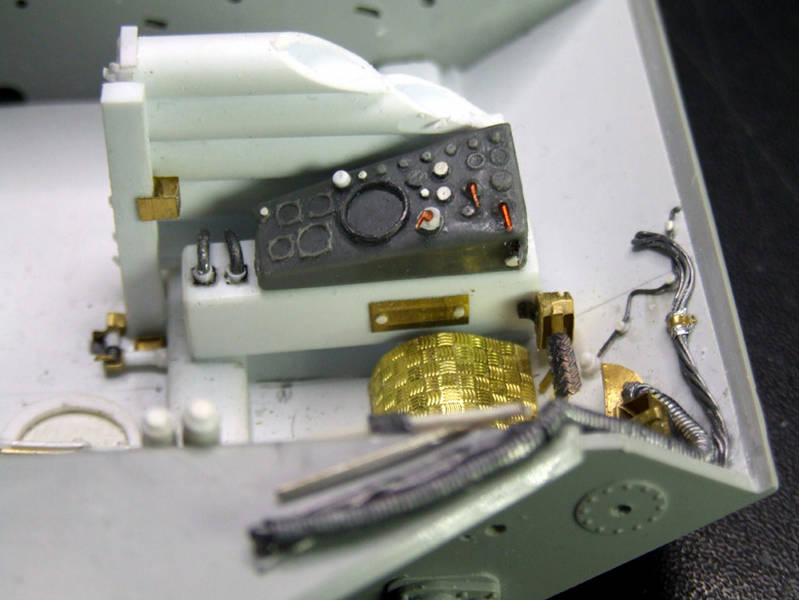
I then mounted the resin copy of the dashboard, which I completed with lights, press studs and levers necessary.
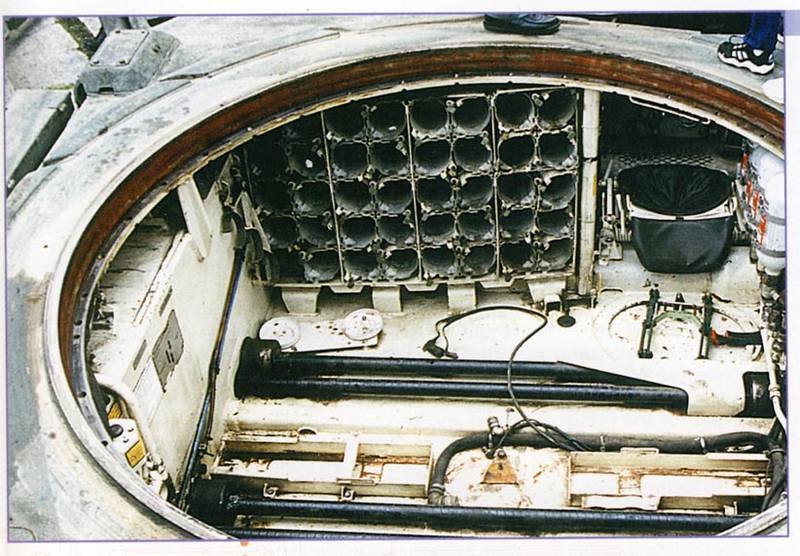
In the background, you notice the tubes in the reserve of the projectiles of 105 mm.
Unfortunately they are not to scale, because I don't had available the plasticard tube of proper size, so I had to utilize one larger.
This means, that they don't arrive to the front part of the hull, and that this forced me to sawing them a part to allow the closure of the upper plate of the hull.


To complete the driver's post now I have to make the seat, which is very complex and it is the detail that I will do these days.
I already casted, in resin, the bottles of "halon" of the fire protection system (on the right wall you can see the self-adhesive paste "Patafix", that I used to see their correct place).
I also noted, that it is possible to see the torsion bars behind the driver's seat, so I must also make them, including the carter who cover them partially.
The remaining lower surface of the hull will be covered at the end with the basket of turret.


Here's the picture I took as a reference.
The work, as we see, to be done hard ...


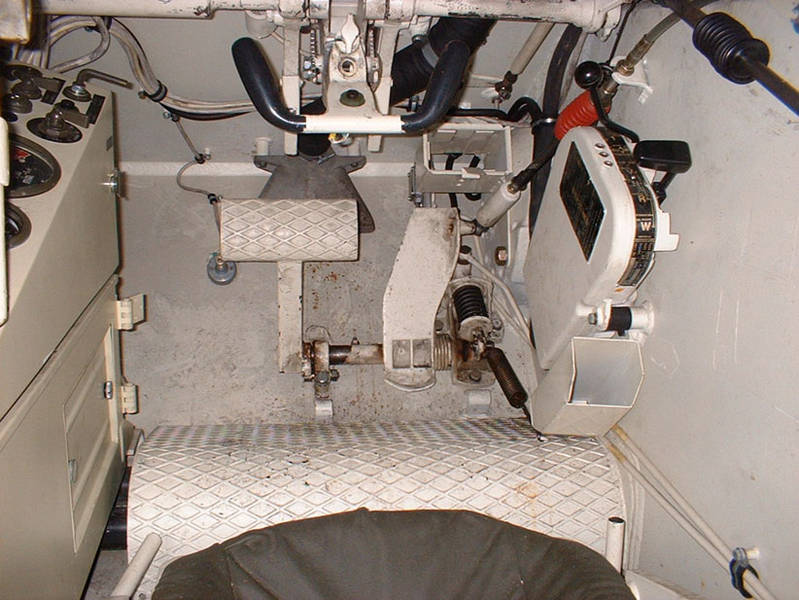
I have also started to work on the steering system, which is fixed to the upper part of the plate of the hull and the other details, such as the episcopes of the pilot and the parking brake levers.


Here's another picture in my archive that I took as a reference.
There are many details but they are not difficult or complicated to reproduce, thankfully.


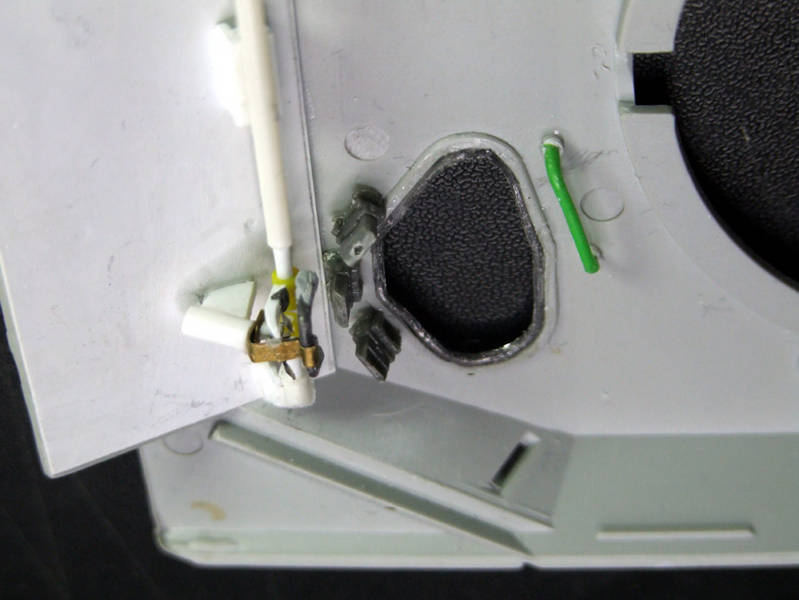
The episcopes are my resin copies of those of the "Centauro", but I have to complete them with some small details.
The steering handles are made of putty and I still have to finish them to smooth their surfaces with sandpaper.
I also had to remove the rubber gasket of the hatch of the pilot, I have reproduced with a lead wire shaped and glued into place.
At the end, I engrave it with a serrated blade to reproduce the corrugated surface of the gasket.

__________________

For a while, I really need to stop work on this combat Leopard and also start working some on my Bergepanzer.
I really want to start working on it also, to realize how much work I'll have to actually do ...
Furthermore, this will allow to "detoxify" me a little from the "cat of steel "...
Cheers
Gianfranco


AKirchhoff
Visit this Community
Germany
Joined: September 12, 2008
KitMaker: 307 posts
Armorama: 304 posts
Posted: Sunday, March 18, 2012 - 08:54 AM UTC
Hi!
Your build is incredible. I only remember to have seen such work once before-on a Bradley IFV. What a pity with the engine-I was just standing in front of one 2 days ago. But it is some 250km away. Only took pictures once around, not the downside. I will see what I can do for you and check my collection. I am not sure yet if I took detail pictures from the powerpack in the past.

Andreas
Il_Colonnello
Visit this Community
Modena, Italy
Joined: March 08, 2012
KitMaker: 140 posts
Armorama: 140 posts
Posted: Sunday, March 18, 2012 - 02:15 PM UTC
Hi Andreas,
thanks for the compliments and for the kindness you do to me to search for images of the underside of the engine.
I know that these are very difficult to find because it is not often photographed as it is of little interest to everyone.
Also I have many pictures of the engine, taken ​​by all sides and above, but none of under ...
I will be very happy if you can find some, and I hope to reciprocate with that in my possession that may be of interest to you.

Gianfranco
bison126
Visit this Community
Correze, France
Joined: June 10, 2004
KitMaker: 5,329 posts
Armorama: 5,204 posts
Posted: Sunday, March 18, 2012 - 07:11 PM UTC
Stunning job on the driver station !
When you cast your own parts, do you make one-use-only molds ? The parts look so complicated for a multiple use mold.
Removed by original poster on 03/19/12 - 11:33:51 (GMT).
Il_Colonnello
Visit this Community
Modena, Italy
Joined: March 08, 2012
KitMaker: 140 posts
Armorama: 140 posts
Posted: Sunday, March 18, 2012 - 11:35 PM UTC
Hello Olivier,
usually I cast only the parts that I will need for my other models.
In addition, if the piece is particularly complicated, I break it down in more molds, while the small details, which are difficult to clone well, I build them from time to time.
In this case, I must also do the model of Bergepanzer, where its interior is depressingly empty.
As I want to do some its hatches open, I have cloned only those pieces that I will use for it (for now the diesel heater, the episcopes, the bottles of Halon and the dashboard of the driver).
Greetings
Gianfranco
bison126
Visit this Community
Correze, France
Joined: June 10, 2004
KitMaker: 5,329 posts
Armorama: 5,204 posts
Posted: Monday, March 19, 2012 - 06:54 AM UTC
Thanks Gianfranco.
But stop answering my questions and go back to your workbench
Il_Colonnello
Visit this Community
Modena, Italy
Joined: March 08, 2012
KitMaker: 140 posts
Armorama: 140 posts
Posted: Monday, March 19, 2012 - 09:35 AM UTC
Olivier,
since I am retired, I have all day to build my models, so it will assure you that when I reply to you and other interested parties, I don't lose anything of my time (I must also eat and drink and sleep - sometimes - you find ...?)
However, when I dialogue with other big fans of modeling I am very pleased.
Is also very nice to see how good modelers are still there.
Greetings
(I am going to eat something ... then, just here to model ...)
Il_Colonnello
Visit this Community
Modena, Italy
Joined: March 08, 2012
KitMaker: 140 posts
Armorama: 140 posts
Posted: Tuesday, March 20, 2012 - 06:57 AM UTC
These days, I put my hand on the Bergepanzer of Elite.
The model, which was gift me by my wife some years ago for my birthday, reproduces a Bergepanzer 2, so I will have to bring it back to version 1.
The hull, as indeed that of the Leopard fighting, is depressingly empty, but I want to do it operational with hatches open, as they used to do when it was used for the job.
This will involve me a lot of work to fill the inside with all the details that you can see through the three hatches that I'm going to leave open (of the pilot, of the commander and of the left side).
As I said before, now they begin the stomach pains ...


I started to clean the entire hull of the tank with the removal of burrs very numerous.
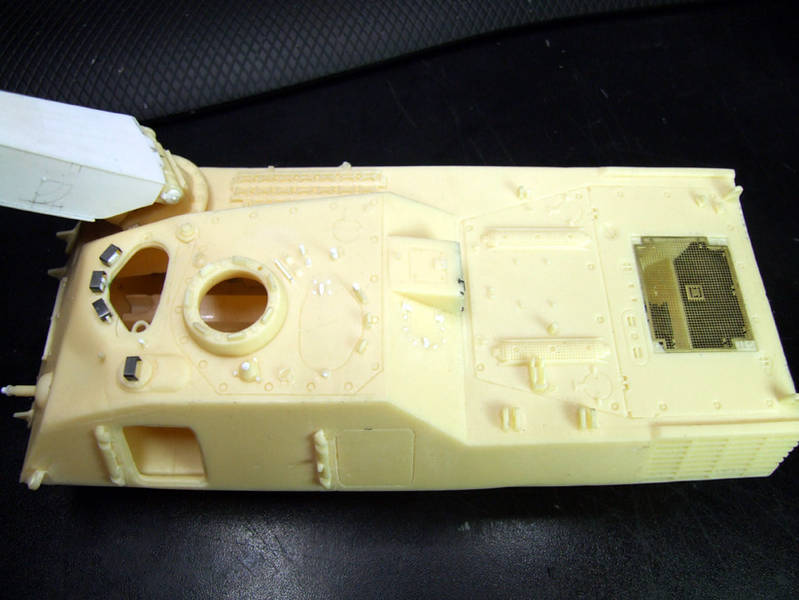
Next, I opened the door to the left with a micro mill and then I hacked the frame on the hull to stop the hatch .
Then, I started to finish the exterior with some things, like the cap for the front support of the machine gun, a few bolts on bad results of cast, and with other bolts and bars on the hull, wrong or not copied by Elite.
I also removed the slot in resin of the cooling system, where I glued on it the photoetched grid made by Eduard.


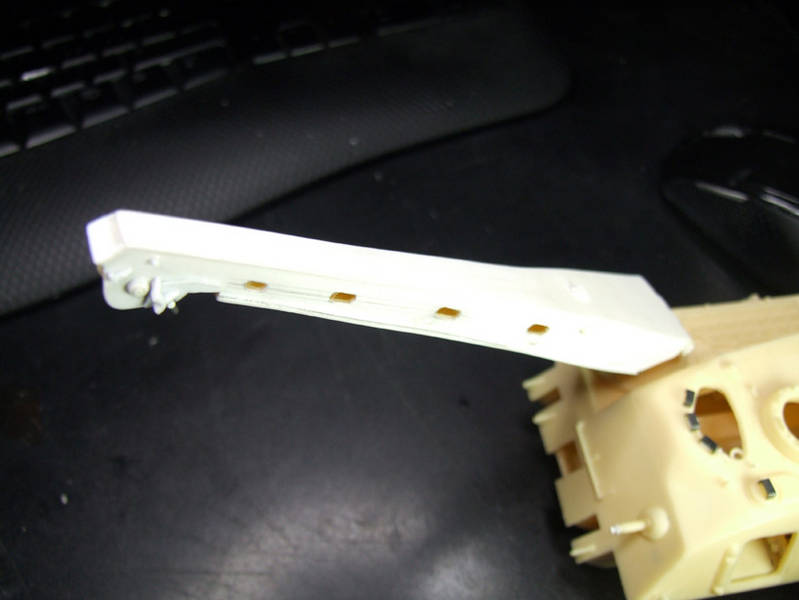
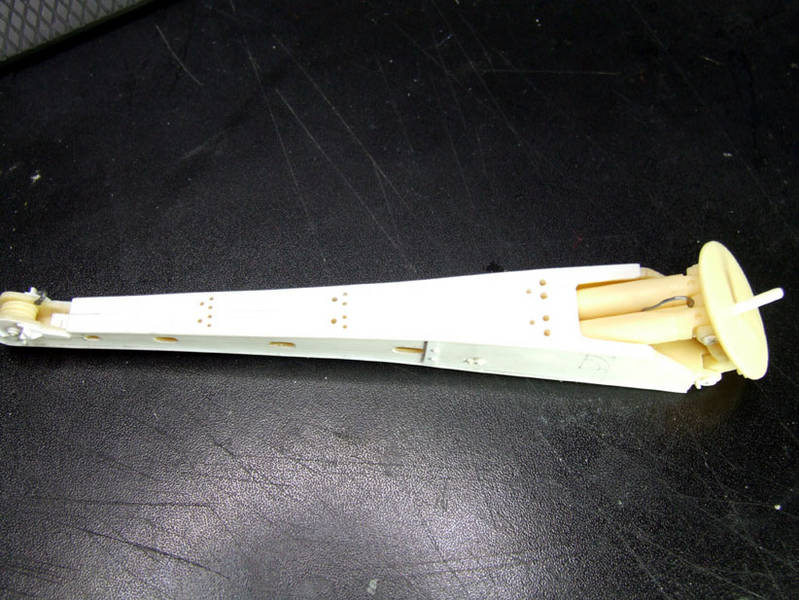
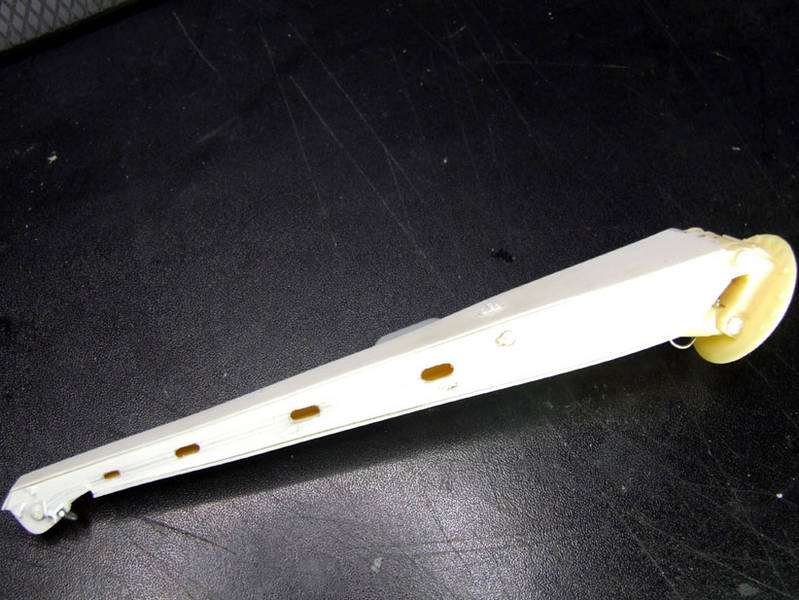
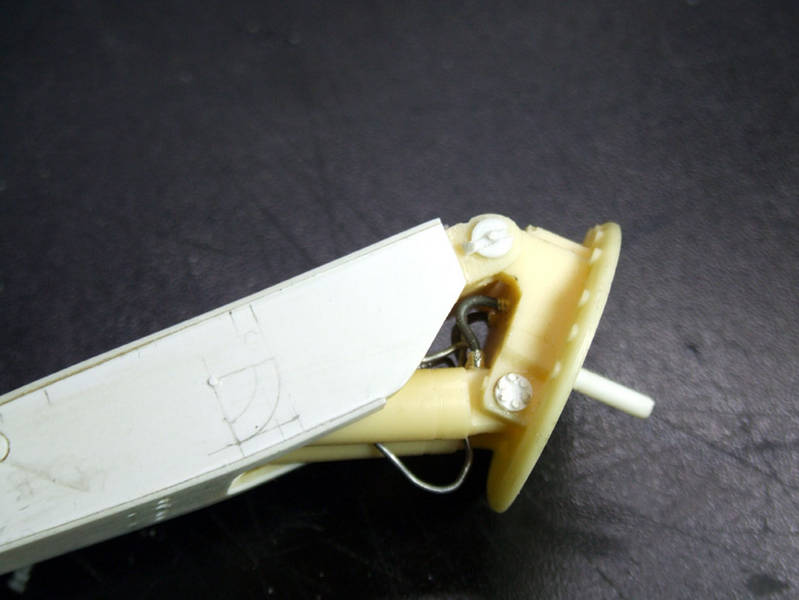
I had to completely redo the arm of crane because it was all crooked.
Furthermore, the lateral cracks were very difficult to thoroughly clean by the burrs' castings.
So, I preferred to do it again from scratch, taking the arm of the kit as a reference for measurements and using some of its parts.
Finally, I completed it with all the details that I saw on the reference photographs of my collection.


I then also used the idler wheel of the winch, the rotating base, the back support of arm and the pneumatic lifting jacks, then I completed they with the pipes and cables to control them.


I ended my work up the arm with bolts and reinforcement plates that, in the model of the kit, were cast in the wrong place.


Now is missing only the indicator of "maximum allowable load," which I will put in place only after deciding the inclination of the arm and after you have printed and put in place his decal.


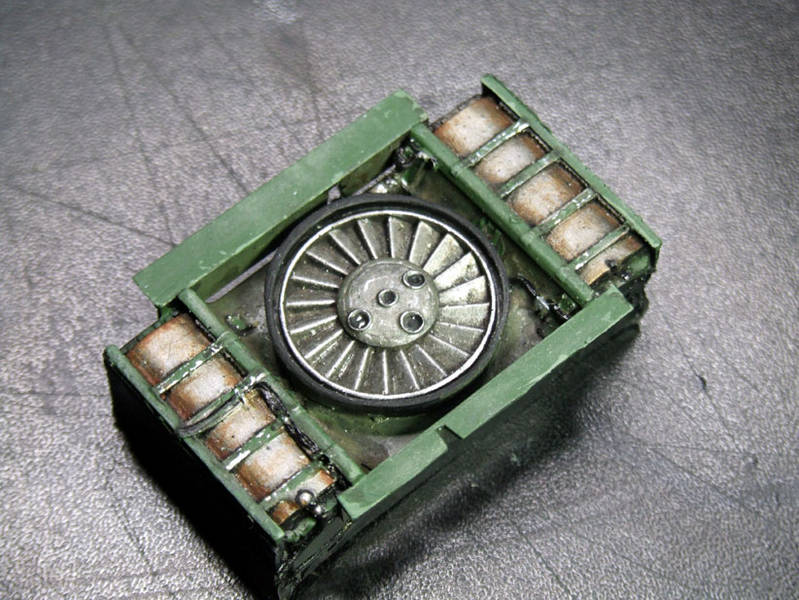
Finally, I enjoyed to copy, in resin, the rear of engine of Real Model.
I then painted it, to see how it would come and try out different colors.
I also aged it, because eventually it will be positioned below the grid of the hull (really, it eventually will see it very little ... but I'll know that it is always here ...).

_______________________________

Now I stop for a few days because I have to rest a while '(also starts the season of trout fishing with the fly ...).
Greetings to all fans.
Gianfranco
Removed by original poster on 03/25/12 - 00:06:51 (GMT).
Removed by original poster on 03/25/12 - 00:20:04 (GMT).
Il_Colonnello
Visit this Community
Modena, Italy
Joined: March 08, 2012
KitMaker: 140 posts
Armorama: 140 posts
Posted: Saturday, March 24, 2012 - 12:34 PM UTC
Hi guys,
In this period I rest at home because affected by flu, so after building the flies needed for the start of fishing season, I devoted myself to make some details of the Bergepanzer.
Fortunately, some time ago I managed to find and purchase a beautiful and complete opus in three volumes on the Leopard 1, written by Michael Shackleton and published by Barbarossa Books.
From these volumes, I got the triptychs of Bergepanzer who interest me in 1:35 scale, so this time I was able to quickly build the motor mount that carries Bergepanzer fitted to the rear of the his hull.


This is the first page of the triptych designed by Dirk Degenhardt, which is located on the second volume, from which I took the shape the general and and the sizes of the lateral support.


From the second page, instead I took the shape and dimensions of the top and front of the support.


Among the many photos that I recovered on the Web and those who sent me a dear friend before I starting this project, I found exactly those photos that interest me including this, who It was indispensable for me.


This is another of the essential images that I used to make my support of the engine.


Here are some pictures of the final result. To realize this, I have used various types of pipes and profiles of Evergreen and Plastruct.


I have completed the various parts with handholds made from copper wire of the correct diameter, and with chains photo-etched that I have recovered from a few sheets used by some friends to complete their German tanks and they were advanced them.


After making reference templates from cardboard, I made the pieces in plasticard that I glued in place.


Finally, I made the windows side, who I finished with the worm gears that block the engine support.


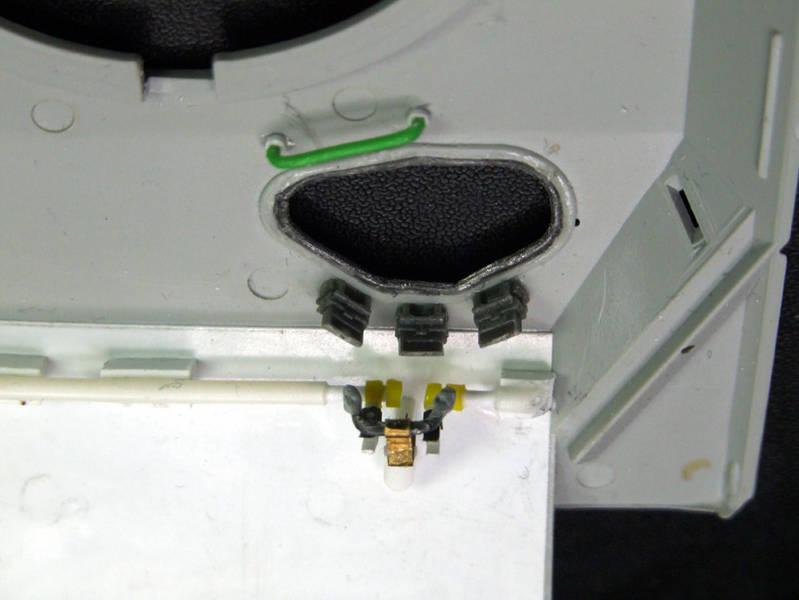
I have finally realized the locking pins of the support to the hull of the Bergepanzer, which I have completed with the locking pegs with their chains.


Now I'm much better and I cured the flu and, therefore, tomorrow I will go eventually to fish ...
See you later ...
Greetings
Gianfranco
Removed by original poster on 04/04/12 - 03:36:53 (GMT).
Il_Colonnello
Visit this Community
Modena, Italy
Joined: March 08, 2012
KitMaker: 140 posts
Armorama: 140 posts
Posted: Tuesday, April 03, 2012 - 09:08 PM UTC
Finally the trout fishing season has started and I started it well. I am very happy for the catches I made with the fly-fishing (I practical the "catch and release") but the effort was very tough because I'm out of form.
So, now for a while I have to take me back from the fatigue of going to the mountain streams - soon I will be 57 years old and I make more effort to recover, unfortunately ... - and so in these days have dedicated myself to modeling.
In these days so I completed it some internal details of my Bergepanzer.
In particular, starting from the left and above, I constructed the bulkhead near the left hatch, the box of the inspection unit for the main winch cable, the box of the anti-NBC unit to air filtering, the rear storage basket, the sling to lift the engine and the mechanism of the hydraulic winch.


This is one of the photos that I used to build my model of the sling to lift the motor.
Unfortunately, I have no designs or patterns clearer of it, so I had to do a sketch and then I used this and other images to compare it the size and shape.
Eventually, after many attempts, I got a good result for me.


The sling is entirely scratch built with profiles and strips of Plasticard and Evergreen.
Bolts and pins were made with a punch & die, exagonal and cylindric.
Instead of using the traditional methods, the welds were made using a cyanoacrylic glue very liquid on which I poured a little of artificial snow crystals in micro-spheres of Kallamity.


I have also improved the sheave of the winch lifting, remaking any parts and pivots original damaged and completing it with some few bolts missing.


To reproduce some parts, I used some photoetched scraps, modified accordingly.


This is the photo of the inner box of the ventilation anti-NBC system (it's the big box on top, tilted forward because it's welded to the rear wall of the tank's armor).
You may notice the two large twin pumps for air and the relay box.


The perspective distorts the part in the picture, but I have carefully measured its size and shape, referring to those of the real part of the system outside the shell.
I etched the central hatch with an engraver and a template, while the cables and tubes are made as usual with the lead's wire.
The piece will be completed at the end with some cloth bags that contained tools (these have yet to get them ...).


This is a picture of the winch mechanism that you can see, partially, through of the left hatch of the bulkhead of the tank... unfortunately...
This is the design of the overall...


... this is the scheme of the mechanism.


... and here is the corresponding piece that I realized with the usual materials.


In addition to homemade parts, I also used some resin pieces taken from my bank of scrap pieces (a roller, that I excavated, for the wheel of the cable's reel, and a wheel's hub for the hydraulic engine).


I built the conic gear with a disc of resin to which I gave the conical shape with a little file, and then I engraved it with the blade of a small saw mounted on a mini-drill.


This is the photo of what you can see through the hatch that I'm going to leave open ... (there is really a lot of pieces to do... damn it!)
In the background, behind the orange corrugated pipe of the heating system, you can see the box of the inspection system of the cables of the main winch.


The piece that I obtained, using the usual profiles and some photo-etched pieces properly adapted.


In fact, there are some differences from reality but I hope that, from afar, you don't they note too much ...


This is the photo of the rear storage basket.
A piece pretty easy to fix or redo.


In fact, the original piece was incorrect because the walls were crooked, the tube was damaged and the wire mesh bottom was unrealistic, so I have corrected its flaws.


I straightened the walls of the workpiece by heating them, I replaced all the tube with a copper wire of suitable diameter and I cut away the underlying net and I replaced it with a net cropped and shaped from an photoetched piece.
Later, I'll finish it with the hinges, the two straps, the locking hook to the armor and the two small boxes that are seen on its surface.


But now it's time that I resume the work on my Leopard, otherwise I'll be back too.
At the next time ...
Cheers - Gianfranco
bison126
Visit this Community
Correze, France
Joined: June 10, 2004
KitMaker: 5,329 posts
Armorama: 5,204 posts
Posted: Wednesday, April 04, 2012 - 12:41 AM UTC
Gianfranco,
it's always a pleasure to have a look at your blog ! I'm really impressed by the quality of your scratch built parts.
Keep enjoying us with your updates !
Olivier
FD3S20B
Visit this Community
California, United States
Joined: April 27, 2011
KitMaker: 255 posts
Armorama: 250 posts
Posted: Wednesday, April 04, 2012 - 01:55 AM UTC
great job so far