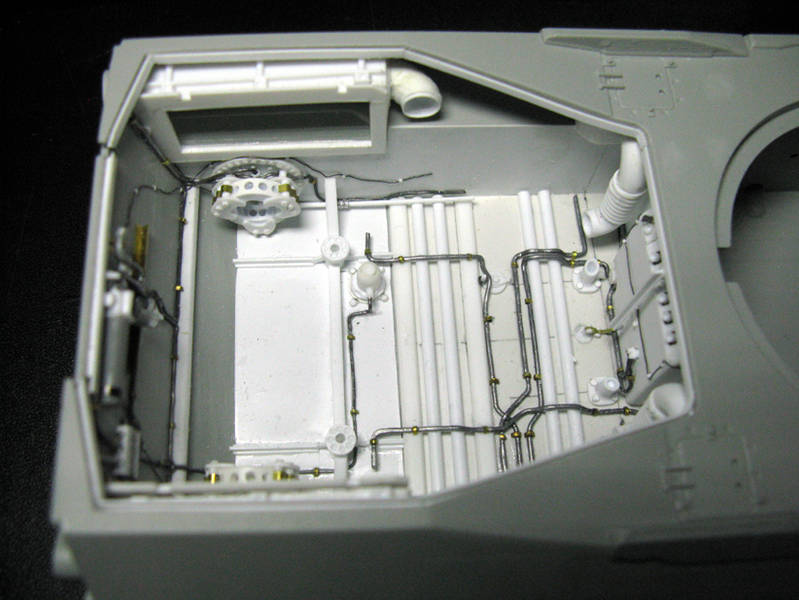
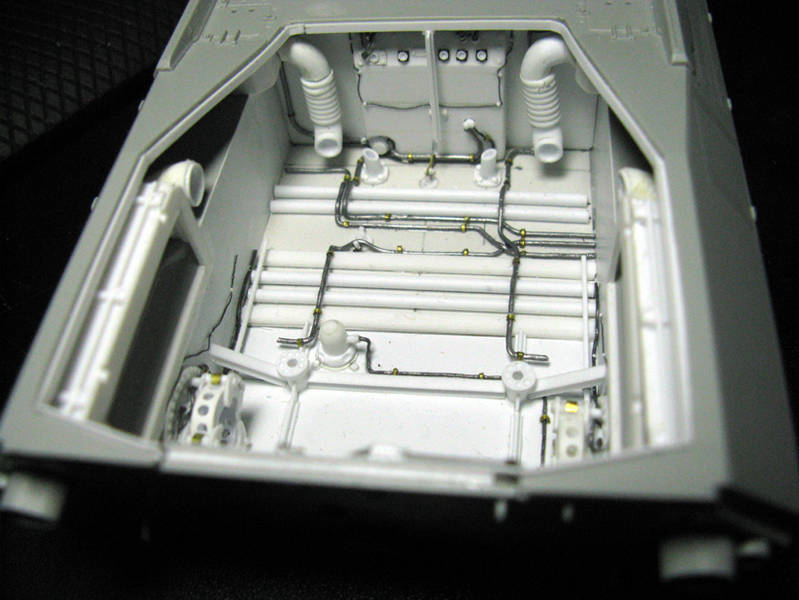
Hi all,
this is my first post on Armorama (sorry for my basic English, but I studied French and Spanish in school and after... ;-)))
I am an Officer in the Italian Army and have just gone to the reserves after 37 years of active service.
So now that I'm retired, I started doing modeling seriously, that was a hobby that I never left.
For over 11 years, from 1979 to 1990, I commanded a company of tanks Leopard 1A2, and this beautiful tank has always remained in my heart (the first love is never forgotten!).
After thinking of building your own template for my tank, and after seeing some of my photos and others taken from the WEB, I thought to reconstruct an incident that happened to me many years ago when I was in training camp with my soldiers.
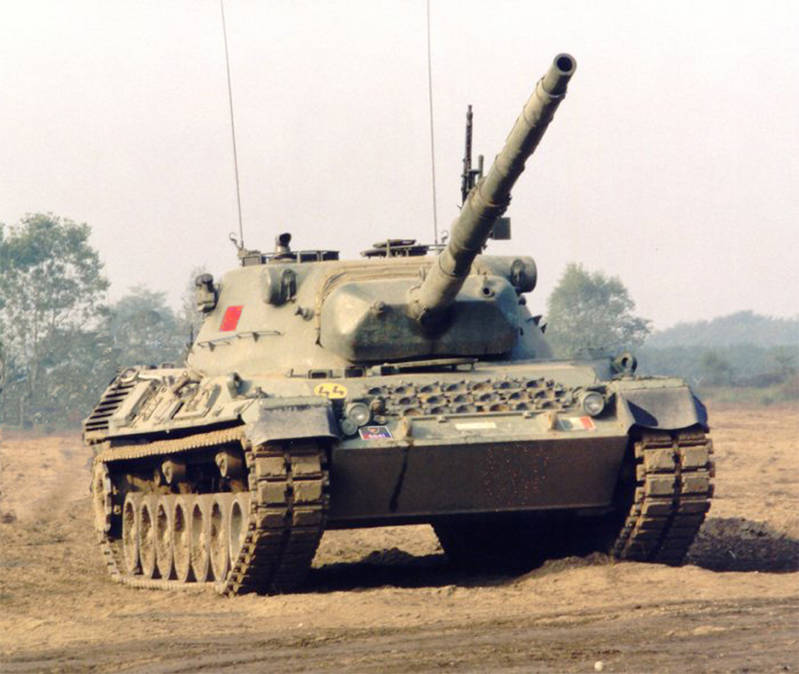
(This is an old picture of my tank. It is recognized that it is a tank for Commander platoon / company because it has the two antennas of the radio system RV4 213-V, consisting of a transceiver apparatus and an auxiliary receiver apparatus, while the other tanks of the platoon have only one transceiver apparatus RV3 13-V, and therefore only one antenna.
This photograph was taken during a training exercise at the Polygon Training of “Cascina Pelato”, near Biella (Vercelli).)
Basically, when I and my company finished the transfer of the column of 18 tanks from the barracks to the camp, in the engine of my tank - my own! - a sleeve of the cooling system broke and so my mechanic had to step over the entire engine to replace the broken piece.
I therefore decided to build a small diorama with models of Bergepanzer driven by my mechanic, which raises the engine of my tank to replace the broken piece, just like in the picture I found on the WEB.
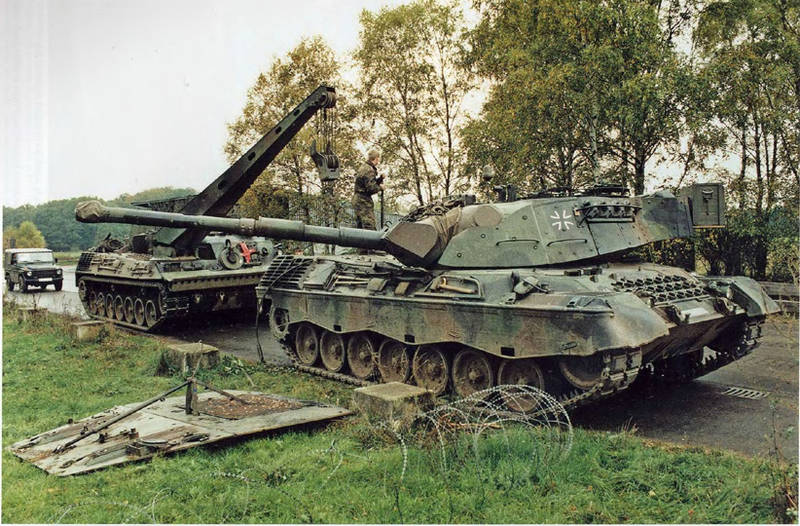
(This is the picture I took from the Web and that it recalled me the incident that happened in 1986. From this picture I took the inspiration for realize my diorama.)
I therefore decided to build a small diorama with models of Bergepanzer, driven by my mechanic, which raises the engine of my tank to replace the broken piece, just like in the picture I found on the WEB.
Late last year I have therefore taken from my reserve of kit boxes, the kit of the Italeri Leopard 1A5 (catalog No. 6481) and I started to modify it to do again become a 1A2, since could not find the model of this version, this one produced by Italeri (catalog No. 374), that the factory realized a few years ago.
To properly play the scene, it was necessary to remove the top plate that covers the engine compartment or completely rebuild the interior ... my first serious scratch-built construction, which I started only after I have collected and cataloged all the images of the parts to build (about 2,000 images) through an in-depth research and by having the user's manual.
These are some pictures of my work.
As you proceed in the work, I'll post more pictures for your comments and suggestions.
I hope you will like my work.
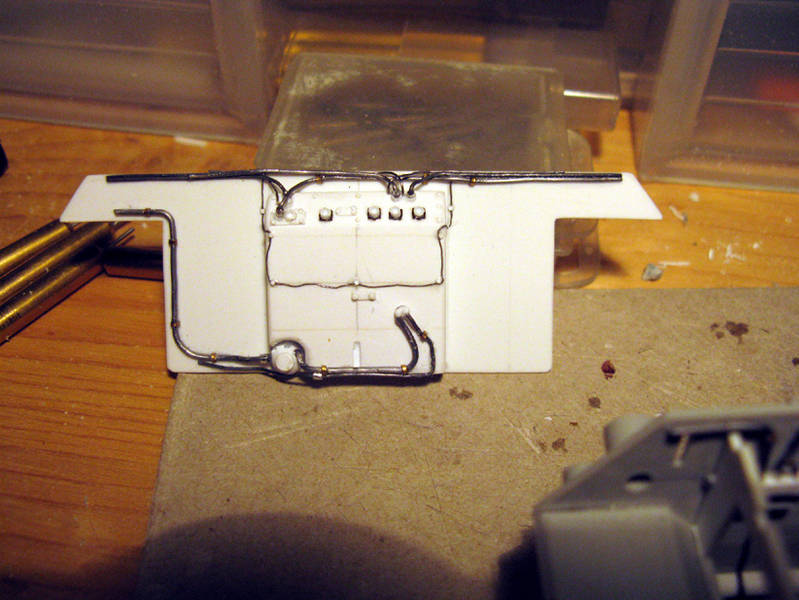
(Because the interior of the model is completely devoid of internal, I had to do a lot of tests to make correctly the dry spark bulkhead, which separates the engine compartment from the fighting compartment.
I then realized the box for relays and electrical contacts, based on the images at my disposal.)
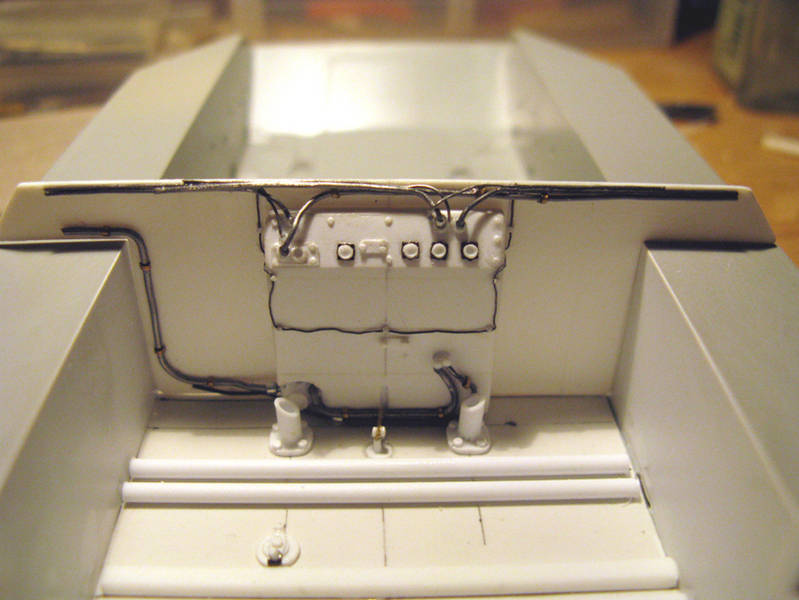
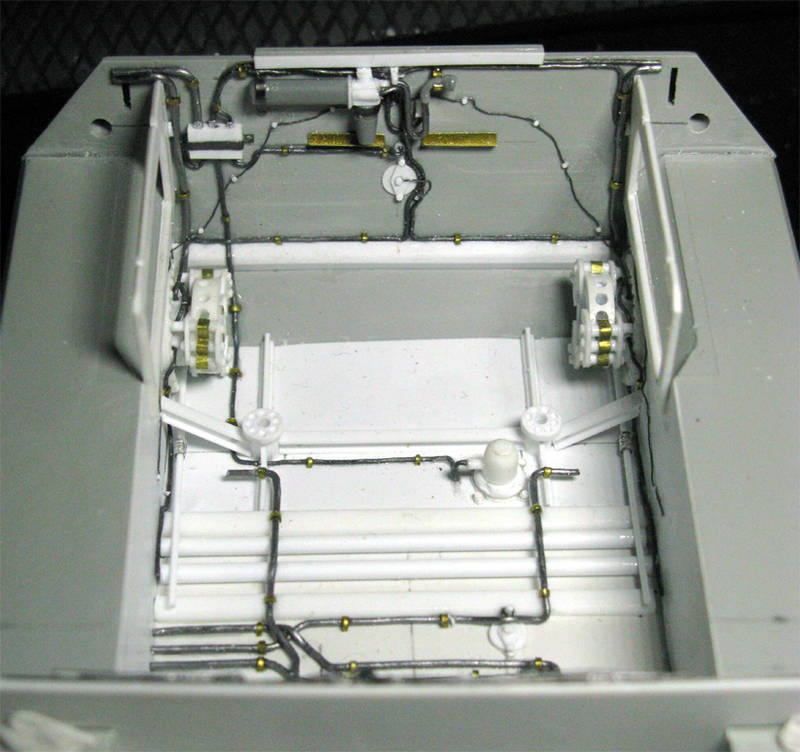
(Meanwhile, also began to realize the inside of the engine compartment by mounting on its bottom, made with a thin sheet of plasticard, torsion bars, the supports of the engine, the drain valve and other details.
The thin wire, which is seen through the relay box, is the sensor of the fire protection system which surrounds the entire engine compartment and which controls the use, either automatically or by manual control, the fire system.)
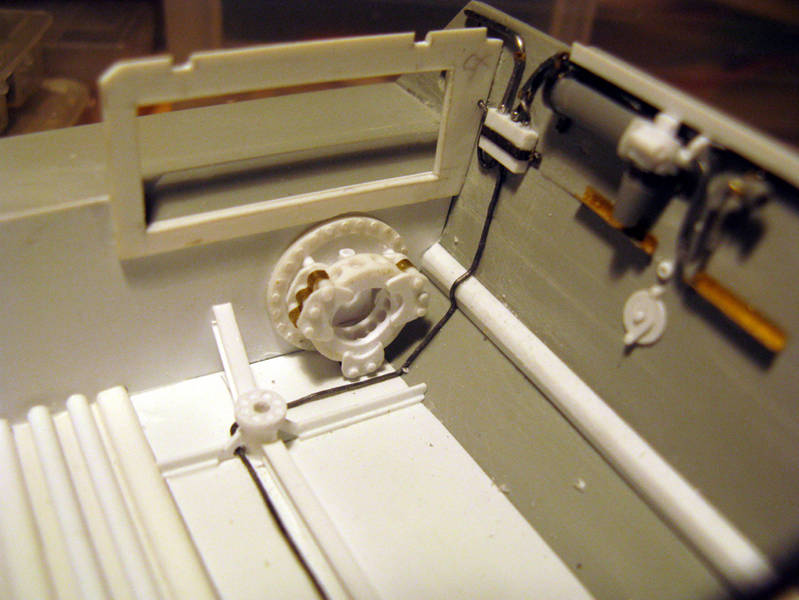
(I began to realize the frame bounding the compartments of the discharge and the final reduction groups with their controls and the brake calipers of the parking brakes.
I began to achieve even the rear supports of the engine, the bars of stiffening the hull bottom and the details that are fixed to the rear compartment bulkhead.)
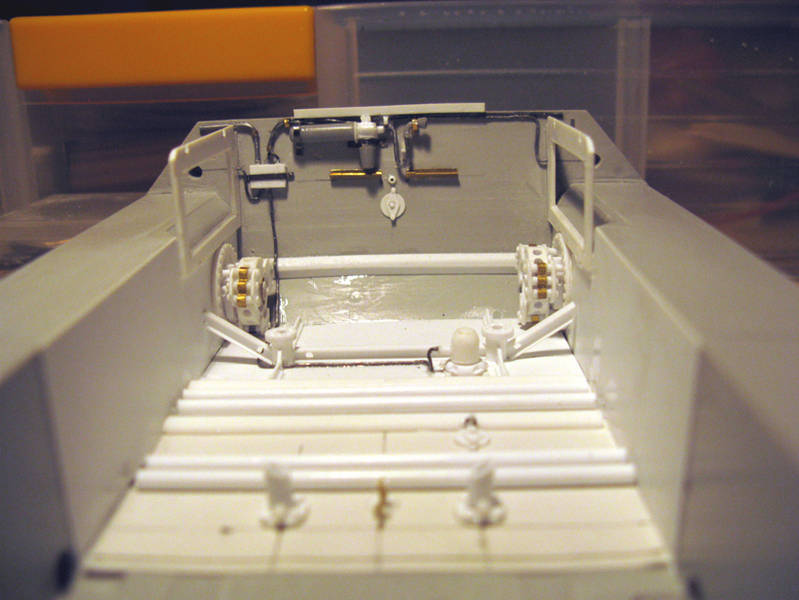
(This image shows the rear compartment bulkhead on which I set to the left, the junction box for electrical controls, the pump for the brakes with his commands and pipes, inspection hatch at the center of the PTO of the engine.)
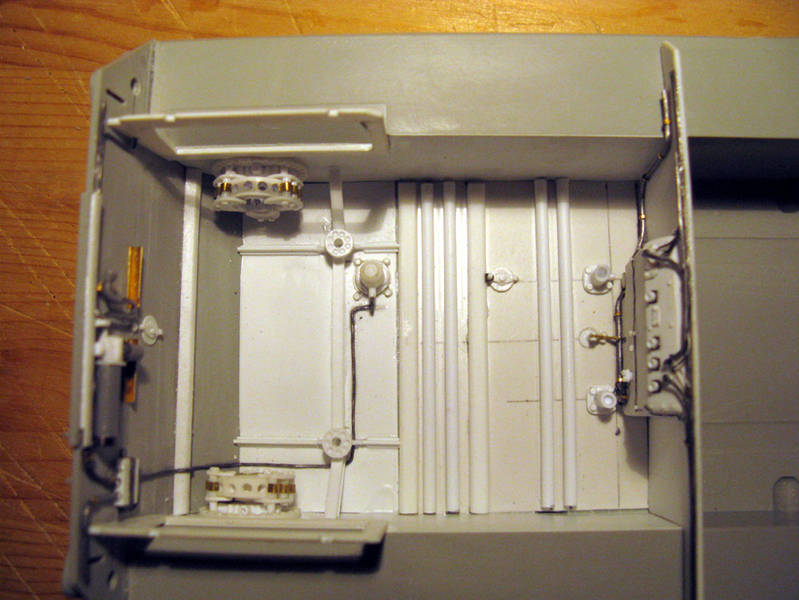
(Top view of the engine compartment, which allows to see the arrangement of all the details so far realized.)
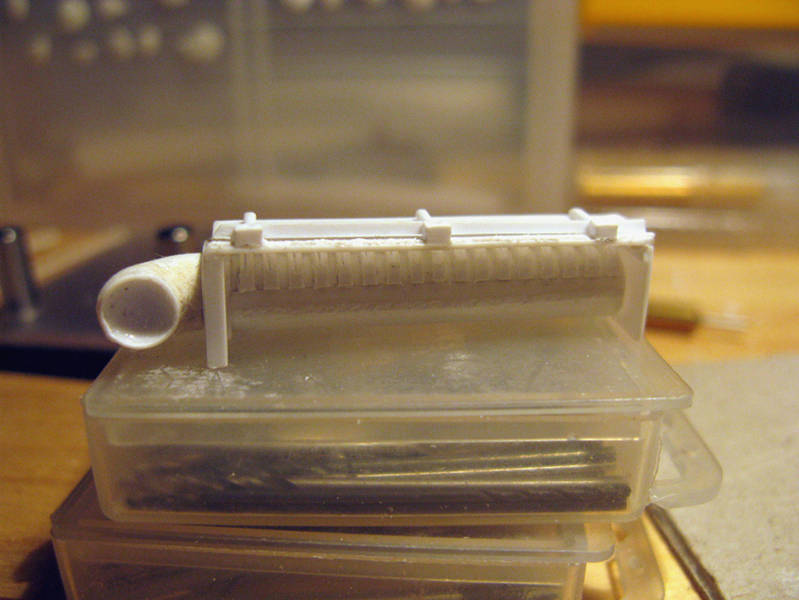
(This is the reproduction of the exhaust muffler, inserted into its compartment which separates it from the engine compartment and which prevents the fumes to enter into, and its collector which connects it to the engine.
To achieve these details, I took a round of plasticard and I dug it with a mini-drill to thin the board, on which I glued a thin section of plasticard to play the clutch to the engine exhaust collector.
I then coated the exhaust pipe with a piece of paper taken from a towel, to simulate the fireproof fabric.)
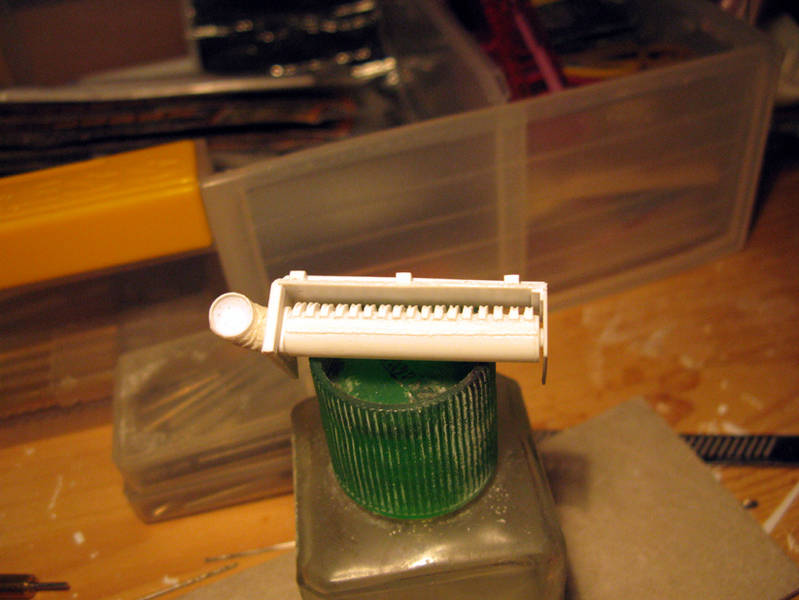
(I then realized the welding which joins the two parts of the muffler, pasting a thin strip of plasticard.
After, I've wet it with liquid glue Tamyia "Green Cap" and then I engraved with the blade of a knife.
I have also made the slots for the exit of the exhaust gases with thin strips of plasticard which I then etched with a circular blade mounted on the mini-drill.)
Constructive Feedback
For in-progress or completed build photos. Give and get contructive feedback!
Hosted by Darren Baker, Dave O'Meara
My Leopard in repair
Il_Colonnello
Modena, Italy
Joined: March 08, 2012
KitMaker: 140 posts
Armorama: 140 posts
Joined: March 08, 2012
KitMaker: 140 posts
Armorama: 140 posts
Posted: Saturday, March 10, 2012 - 09:22 AM UTC
retiredyank
Arkansas, United States
Joined: June 29, 2009
KitMaker: 11,610 posts
Armorama: 7,843 posts
Joined: June 29, 2009
KitMaker: 11,610 posts
Armorama: 7,843 posts
Posted: Saturday, March 10, 2012 - 09:51 AM UTC
Are you building the entire tank from scratch? Your work, so far is exceptional. Subscribed.
_Viper_
Roma, Italy
Joined: April 15, 2010
KitMaker: 163 posts
Armorama: 86 posts
Joined: April 15, 2010
KitMaker: 163 posts
Armorama: 86 posts
Posted: Saturday, March 10, 2012 - 10:20 AM UTC
Benvenuto Gianfranco!!
And what an introduction you just made! Cannot wait to see more!
Outstanding!!!!!
And what an introduction you just made! Cannot wait to see more!
Outstanding!!!!!
Il_Colonnello
Modena, Italy
Joined: March 08, 2012
KitMaker: 140 posts
Armorama: 140 posts
Joined: March 08, 2012
KitMaker: 140 posts
Armorama: 140 posts
Posted: Saturday, March 10, 2012 - 10:38 AM UTC
Quoted Text
Are you building the entire tank from scratch? Your work, so far is exceptional. Subscribed.
No, I just want to rebuild what you see through the opened hatches, because I don't have enough time. In fact, I will present my work in September in an exhibition to be held in the city where my old barracks and my old unit.
After my Leopard, in fact, I must put my hands even on the Elite model Bergepanzer. I will have to rebuild it in practice entirely because it is the type of Bergepanzer 2A2, and I shall bring it to version 1A2 (and I will also rebuild all the interior visible, a job even more complex than what I'm already doing).
Thanks for the compliments.
Il_Colonnello
Modena, Italy
Joined: March 08, 2012
KitMaker: 140 posts
Armorama: 140 posts
Joined: March 08, 2012
KitMaker: 140 posts
Armorama: 140 posts
Posted: Saturday, March 10, 2012 - 11:27 AM UTC
Quoted Text
Benvenuto Gianfranco!!
And what an introduction you just made! Cannot wait to see more!
Outstanding!!!!!
Thanks, Viper, for the welcome.
I know that my presentation is a bit prolix, but it is a fault which I always carry around (even the teachers would always say this to school ... o))).
Tomorrow I'll post and comment on other images of my work.
I hope that they continue to please you and other friends of Armorama.
cagkancakir
Ankara, Turkey / Türkçe
Joined: April 28, 2011
KitMaker: 434 posts
Armorama: 409 posts
Joined: April 28, 2011
KitMaker: 434 posts
Armorama: 409 posts
Posted: Saturday, March 10, 2012 - 12:02 PM UTC
Benvenuto Il Colonello,
First of all thanks for this incredible introduction, very inspiring. The Leopard interior looks amazing.
And I am very happy that "A Leopard 1 Pro" is here in Armorama, we all can take advantages of your knowledge and experience in military and tanks..
Grazie mille..
Cagkan
First of all thanks for this incredible introduction, very inspiring. The Leopard interior looks amazing.
And I am very happy that "A Leopard 1 Pro" is here in Armorama, we all can take advantages of your knowledge and experience in military and tanks..
Grazie mille..
Cagkan
recceboy
Alberta, Canada
Joined: July 20, 2006
KitMaker: 706 posts
Armorama: 665 posts
Joined: July 20, 2006
KitMaker: 706 posts
Armorama: 665 posts
Posted: Saturday, March 10, 2012 - 12:21 PM UTC
WOW
From another EX-Leopard commander, job well done so far.
Anthony
From another EX-Leopard commander, job well done so far.
Anthony
Removed by original poster on 03/11/12 - 10:13:07 (GMT).
Removed by original poster on 03/11/12 - 10:14:18 (GMT).
Il_Colonnello
Modena, Italy
Joined: March 08, 2012
KitMaker: 140 posts
Armorama: 140 posts
Joined: March 08, 2012
KitMaker: 140 posts
Armorama: 140 posts
Posted: Saturday, March 10, 2012 - 10:15 PM UTC
Quoted Text
Benvenuto Il Colonello,
First of all thanks for this incredible introduction, very inspiring. The Leopard interior looks amazing.
And I am very happy that "A Leopard 1 Pro" is here in Armorama, we all can take advantages of your knowledge and experience in military and tanks..
Grazie mille..
Cagkan
Thanks for the compliments. I hope the rest of my work continues to delight.
I am also very happy to put everything I know and my experiences available to all.
Il_Colonnello
Modena, Italy
Joined: March 08, 2012
KitMaker: 140 posts
Armorama: 140 posts
Joined: March 08, 2012
KitMaker: 140 posts
Armorama: 140 posts
Posted: Saturday, March 10, 2012 - 10:16 PM UTC
Quoted Text
WOW
From another EX-Leopard commander, job well done so far.
Anthony
Thanks again for the compliments.
I am really happy to know another Leopard tank commander, with whom I can share my experiences.
I am convinced that these tanks were the best products in the 70s and 80s in the world.
bison126
Correze, France
Joined: June 10, 2004
KitMaker: 5,329 posts
Armorama: 5,204 posts
Joined: June 10, 2004
KitMaker: 5,329 posts
Armorama: 5,204 posts
Posted: Sunday, March 11, 2012 - 01:13 AM UTC
Welcome to Armorama and congratulations for the work in progress !
Olivier
Olivier
Il_Colonnello
Modena, Italy
Joined: March 08, 2012
KitMaker: 140 posts
Armorama: 140 posts
Joined: March 08, 2012
KitMaker: 140 posts
Armorama: 140 posts
Posted: Sunday, March 11, 2012 - 03:44 AM UTC
Quoted Text
Welcome to Armorama and congratulations for the work in progress !
Olivier
Olivier, thanks for the welcome and the compliments. I hope that my work continues to delight.
Removed by original poster on 03/11/12 - 15:57:14 (GMT).
Il_Colonnello
Modena, Italy
Joined: March 08, 2012
KitMaker: 140 posts
Armorama: 140 posts
Joined: March 08, 2012
KitMaker: 140 posts
Armorama: 140 posts
Posted: Sunday, March 11, 2012 - 04:18 AM UTC
Now I resume to post and comment on the latest pictures that I made to my model of a Leopard tank.
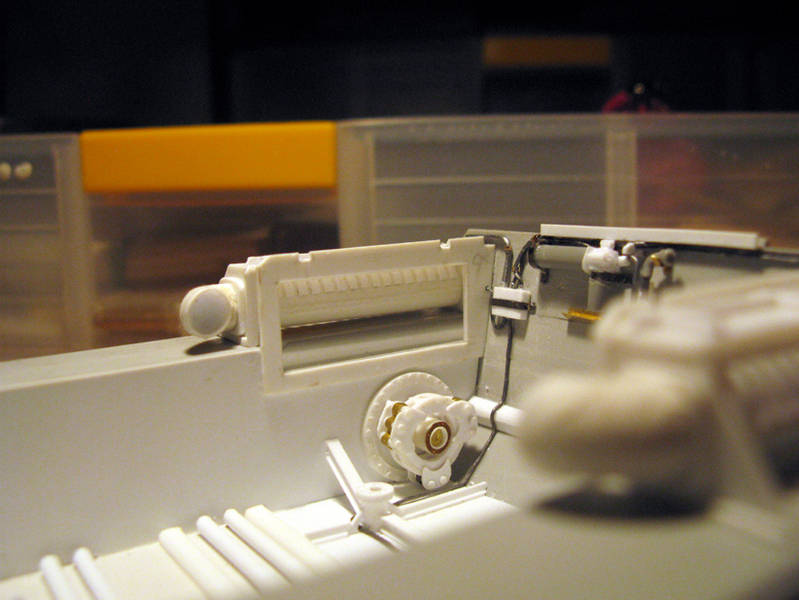
(Try for the correct position of the exhaust. The photoetched details in copper were recovered from surpluses photoetched plates of various models, that a dear friend gave me, or obtained from the supports of the same plates that I cut and fitted.)
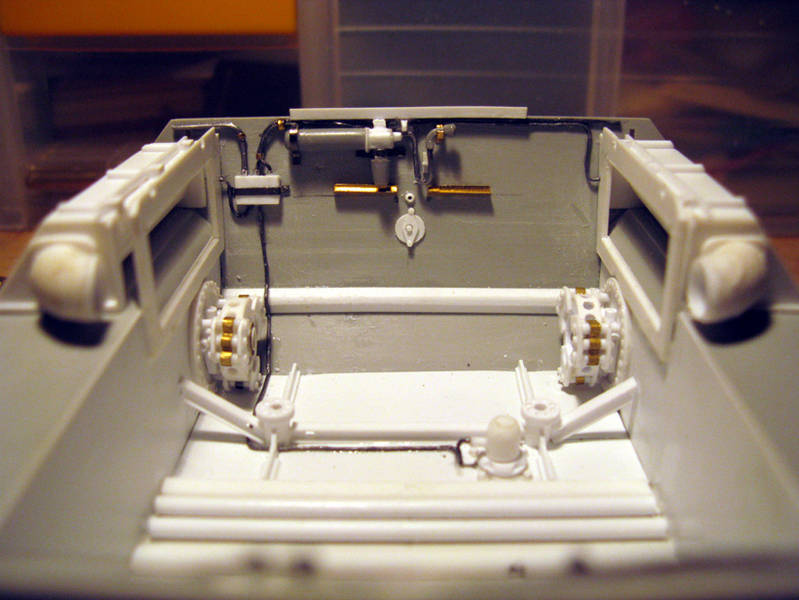
(Test of the correct position of both exhaust. I made the cables and pipes with lead wire of varying thicknesses, sold by the company PLUS MODEL ("Lead Wire," with thicknesses ranging from 0.2 to 1 mm.).In the foreground is seen playing the drainage pump from the rear.)
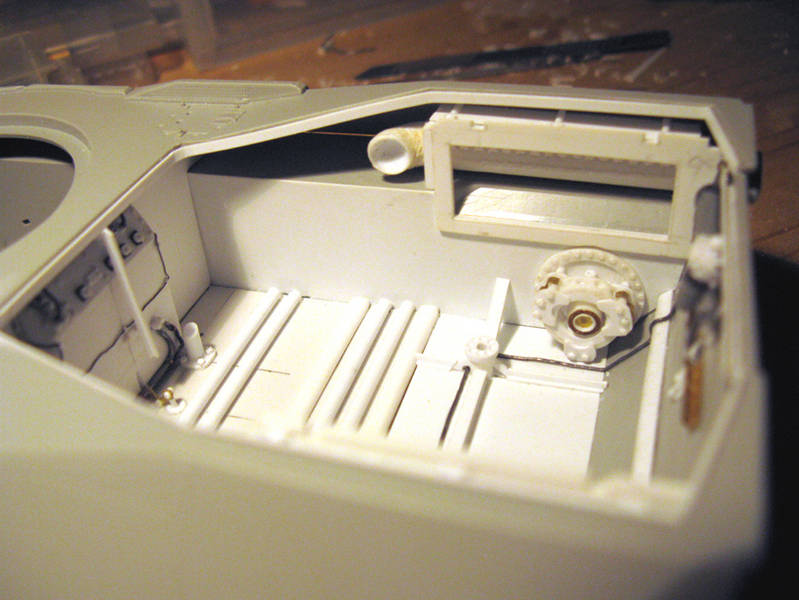
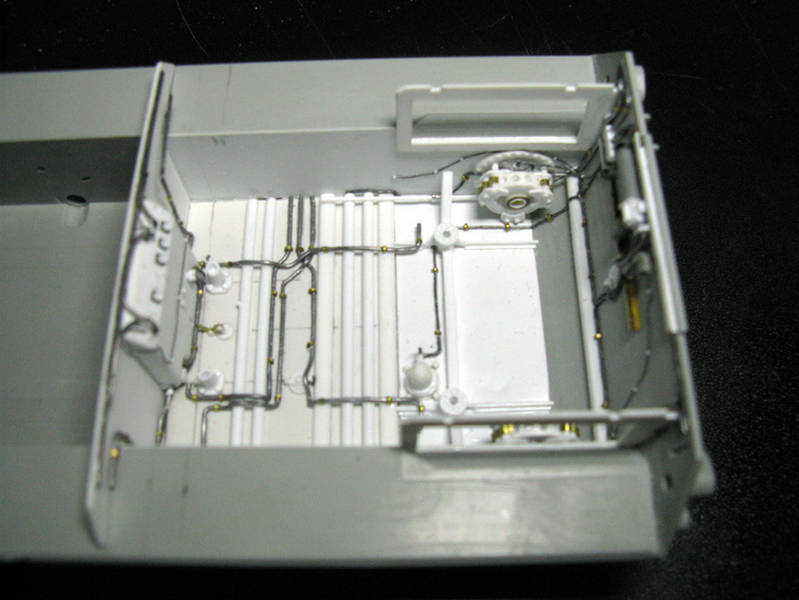
(General test with the upper plate of the hull.
I covered the bulkhead side of the hull with a thin sheet of plasticard, so I did not have to fill the positioning holes of the hull exterior details.)
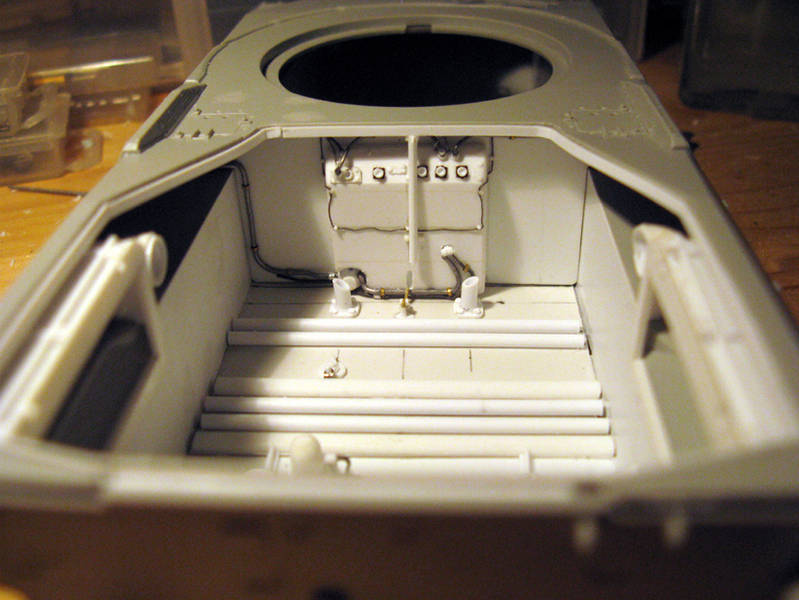
(General test with all the details made up to that time. The vertical bar that is seen in front of the relay box, it is a guide that allows to correctly position the motor when it is removed and thereafter reinstalled.)
(The engine compartment full of almost all the cables and pipes of various systems installed.
I cut the pipes and cables before mounding, because on those areas then I put the fuel tanks and other details, so it is useless to complete them.
(The images have improved because now I use a more sophisticated camera (my wife has given me it for Christmas ...;-))))
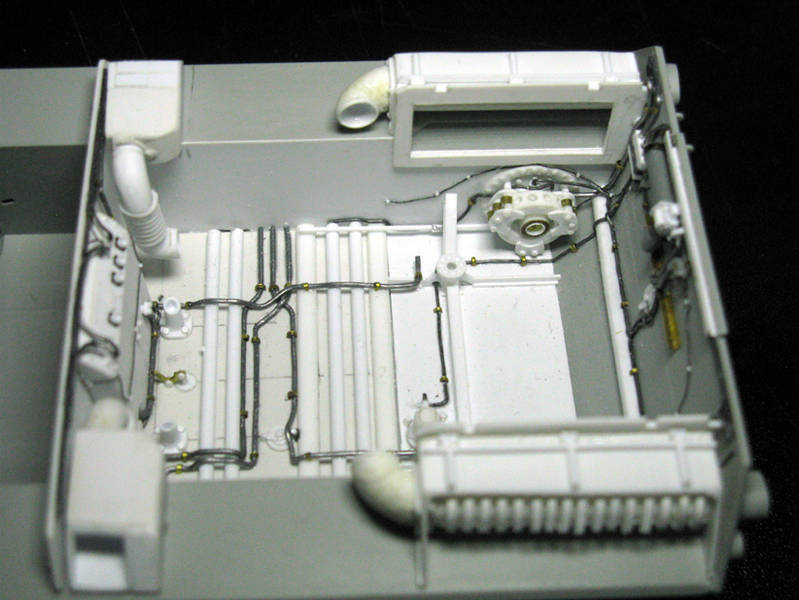
(Another view of the engine compartment near-complete of cables and pipes. The thin wire attached to the bulkhead side, which continues on the rear bulkhead, it is the sensor of the fire protection system.)
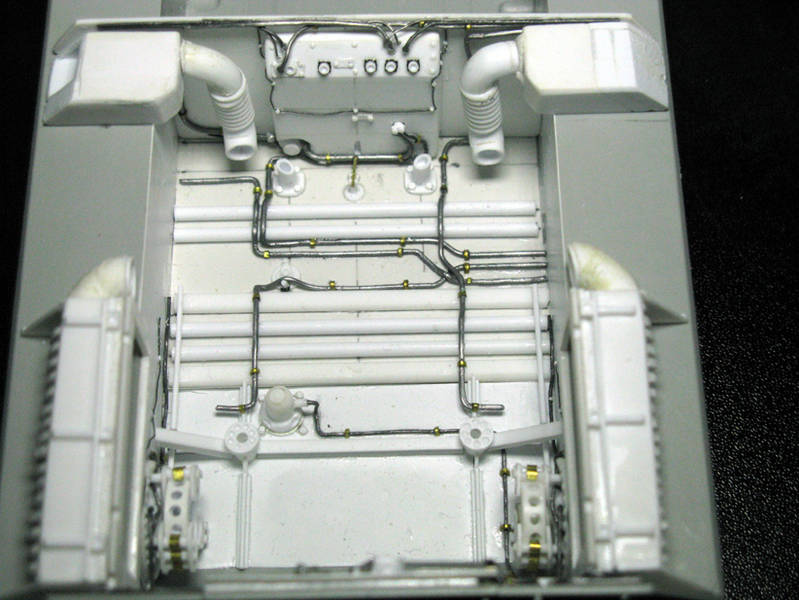
(Then I have made the containers of the air filters, which I have equipped with its corrugated pipes, and the end connectors that connect them to the feeding system of the engine. To realize the filters containers, I cut the rectangular profiles of plasticard and then I glued them to achieve the correct thickness. After, I adjusted them with file and sandpaper until they become the correct form.)
(You can see the construction of containers of air filters with pieces of plasticard in sections. I did not close the back of containers, because they will be in contact with the side bulkhead and will not be visible.)
(Top view of the engine compartment with the top plate of the hull in its place. This is also taking its final shape slowly, but is still much work to do.)
(Front view of the engine compartment with all the details that are part of the front bulkhead. The header pipes are too long, and I've shortened they by 4 mm to give them the correct form.)
See you soon with more pictures as soon I will complete other details.
Gianfranco
cagkancakir
Ankara, Turkey / Türkçe
Joined: April 28, 2011
KitMaker: 434 posts
Armorama: 409 posts
Joined: April 28, 2011
KitMaker: 434 posts
Armorama: 409 posts
Posted: Sunday, March 11, 2012 - 04:49 AM UTC
Looking amazing indeed..
What will you use for the engine? Will you scratch it too or use an aftermarket resin one?
retiredyank
Arkansas, United States
Joined: June 29, 2009
KitMaker: 11,610 posts
Armorama: 7,843 posts
Joined: June 29, 2009
KitMaker: 11,610 posts
Armorama: 7,843 posts
Posted: Sunday, March 11, 2012 - 05:30 AM UTC
Looks like you had a lot of fun plumbing.
Il_Colonnello
Modena, Italy
Joined: March 08, 2012
KitMaker: 140 posts
Armorama: 140 posts
Joined: March 08, 2012
KitMaker: 140 posts
Armorama: 140 posts
Posted: Sunday, March 11, 2012 - 05:52 AM UTC
Quoted Text
Looking amazing indeed..
What will you use for the engine? Will you scratch it too or use an aftermarket resin one?
Hello cagkancakir,
thank you but my job is not 100% perfect because I preferred to work quickly rather than being too precise.
Moreover, the end all the engine compartment will be aged heavily with grease, oil, dust and dirt (without cover various details).
Regarding the engine, I bought the resin model produced by society REAL (catalog No. 3504 RMA), which is a resin model very well done.
However, the entire engine is made into the tub of his compartment, so it it is fine if you just want to make the tank only without the top plate.
Instead I want to do my diorama with all the engine pulled out and hanging on the crane of Bergepanzer, so it touches me to build it from scratch ... a very big challenge, I assure you.
Il_Colonnello
Modena, Italy
Joined: March 08, 2012
KitMaker: 140 posts
Armorama: 140 posts
Joined: March 08, 2012
KitMaker: 140 posts
Armorama: 140 posts
Posted: Sunday, March 11, 2012 - 05:59 AM UTC
Quoted Text
Looks like you had a lot of fun plumbing.
Ah, ah, ah, ah...
You're right ...
You note that I could not put all the pipes and cables (because they could not see, thankfully ...), otherwise I would still now paste tubes and cables ... of lead ...
LeoCmdr
Alberta, Canada
Joined: January 19, 2005
KitMaker: 4,085 posts
Armorama: 3,917 posts
Joined: January 19, 2005
KitMaker: 4,085 posts
Armorama: 3,917 posts
Posted: Sunday, March 11, 2012 - 09:55 AM UTC
Excellent work! Too bad the real engine compartments were never that clean in the Leopards!
I am very surprised that no model producer has ever made the empty engine compartment and a separate Leopard 1 powerpack.
Good luck with the scratchbuilding of your powerpack!
I am very surprised that no model producer has ever made the empty engine compartment and a separate Leopard 1 powerpack.
Good luck with the scratchbuilding of your powerpack!
Spiderfrommars
Milano, Italy
Joined: July 13, 2010
KitMaker: 3,845 posts
Armorama: 3,543 posts
Joined: July 13, 2010
KitMaker: 3,845 posts
Armorama: 3,543 posts
Posted: Sunday, March 11, 2012 - 11:22 AM UTC
Amazing job indeed Gianfranco!!
I'll follow for sure
Ciao
I'll follow for sure
Ciao
ptruhe
Texas, United States
Joined: March 05, 2003
KitMaker: 2,092 posts
Armorama: 1,607 posts
Joined: March 05, 2003
KitMaker: 2,092 posts
Armorama: 1,607 posts
Posted: Sunday, March 11, 2012 - 03:47 PM UTC
Wow. Fantastic scratch on the engine bay. Your build photos are a good reference for a Leopard.
Paul
Paul
Il_Colonnello
Modena, Italy
Joined: March 08, 2012
KitMaker: 140 posts
Armorama: 140 posts
Joined: March 08, 2012
KitMaker: 140 posts
Armorama: 140 posts
Posted: Sunday, March 11, 2012 - 11:37 PM UTC
Quoted Text
Excellent work! Too bad the real engine compartments were never that clean in the Leopards!
I am very surprised that no model producer has ever made the empty engine compartment and a separate Leopard 1 powerpack.
Good luck with the scratchbuilding of your powerpack!
Thanks for the compliments, but now comes the hard work ... We'll see if I can still deserve them.
I also do not understand why the maker of aftermarket do not produce the engine compartment and the interior of the Leopard.
I am convinced that this good tank has not been well understood by the largest manufacturers of model so it there are too few models on the market and, therefore, aftermarket manufacturers also they've not found it convenient to produce accessories for this tank.
Too bad ...
Il_Colonnello
Modena, Italy
Joined: March 08, 2012
KitMaker: 140 posts
Armorama: 140 posts
Joined: March 08, 2012
KitMaker: 140 posts
Armorama: 140 posts
Posted: Sunday, March 11, 2012 - 11:43 PM UTC
Quoted Text
Amazing job indeed Gianfranco!!
I'll follow for sure
Ciao
Many thanks, Mauro.
I'll post more pictures of my work as soon as I made other details of my model.
This site is very important to learn other techniques and also to receive suggestions, as well as compliments.
So ... fire to the powder!
cagkancakir
Ankara, Turkey / Türkçe
Joined: April 28, 2011
KitMaker: 434 posts
Armorama: 409 posts
Joined: April 28, 2011
KitMaker: 434 posts
Armorama: 409 posts
Posted: Sunday, March 11, 2012 - 11:48 PM UTC
Quoted Text
I am convinced that this good tank has not been well understood by the largest manufacturers of model so it there are too few models on the market and, therefore, aftermarket manufacturers also they've not found it convenient to produce accessories for this tank.
Too bad ...
Exactly, Leopard 1 is an excellent tank in my opinion, it is a real "TANK"..
There are too few items for Leopard 1, and also they are hard to find, both kits and aftermarket products..