Mack NO6 - 7 1/2 ton artillery tractor

#521
Kentucky, United States
Joined: April 13, 2011
KitMaker: 9,465 posts
Armorama: 8,695 posts
Posted: Wednesday, May 15, 2013 - 01:21 PM UTC
THE CHASSIS
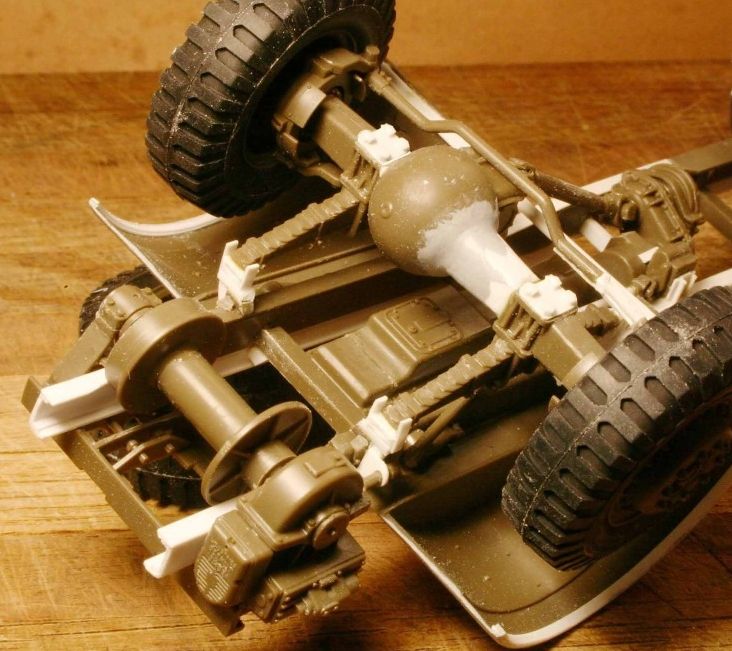
As I have said earlier, based on my experience with the Tamiya Dragon Wagon I started with a totally straight frame, big mistake, as seen here:
I also started with nearly straight leaf springs (WRONG) mounted to the top of the rear axles, common practice for almost all truck makers, but not Mack!
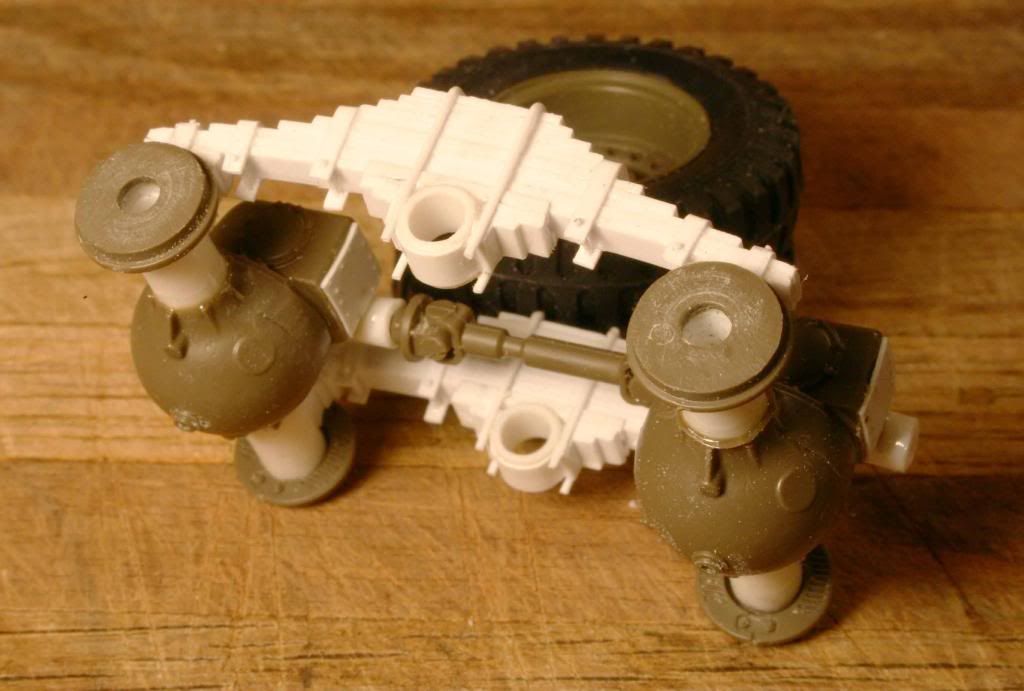
Again as said previously, this resulted in a chassis that rode WAY too tall in the saddle.
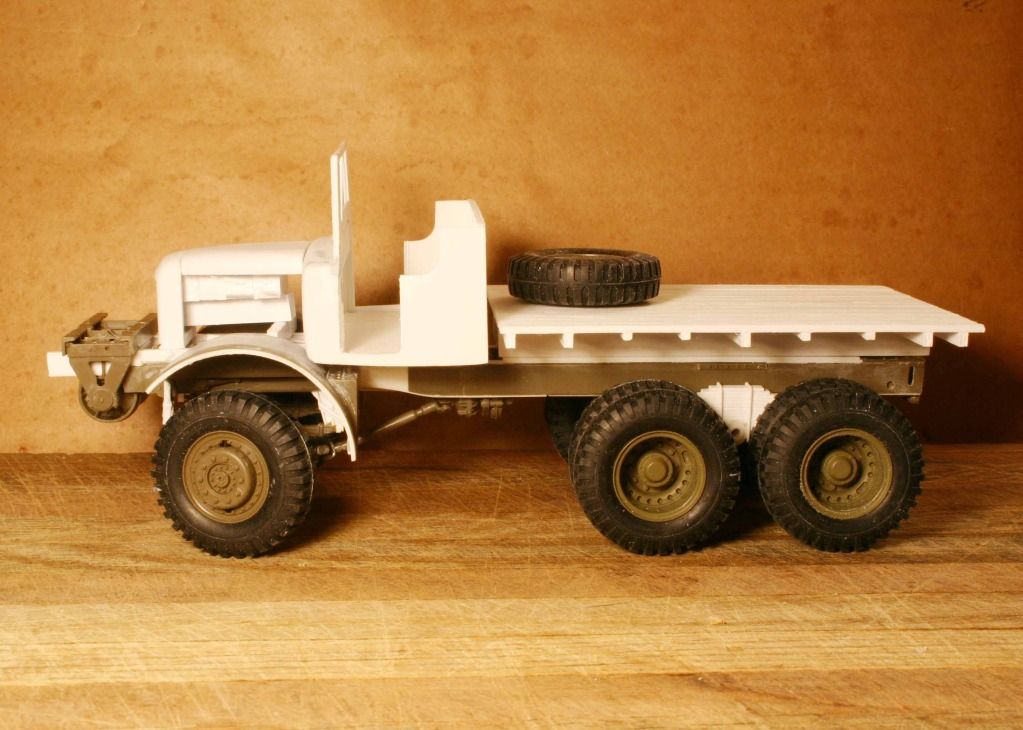
If you will check the frame side drawing posted earlier you will see that the Mack employed an off-set frame where the formed frame members make a vertical jog up and over the front axle. In this photo I have now added that vertical jog to the frame and STILL the vehicle is riding too high.

#521
Kentucky, United States
Joined: April 13, 2011
KitMaker: 9,465 posts
Armorama: 8,695 posts
Posted: Wednesday, May 15, 2013 - 01:46 PM UTC
To this day Mack trucks all employ a unique rear spring design; a double elispsodial underslung spring
as shown in this photo from the Army Tech Manual. Mack calls this spring style the "Camelback" design.
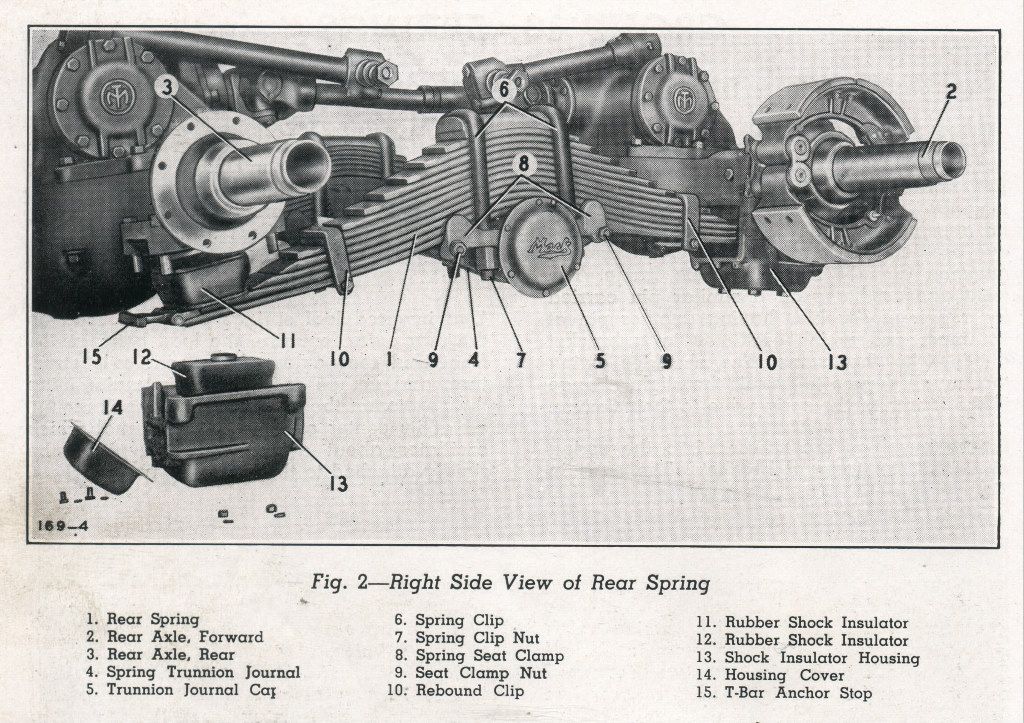 The above image comes from the collection of EASY 1 Productions - From the disc entitled "TM 10-1679; 7 1/2 ton 6x6 Prime Mover Mack NO"
Follow them on Facebook at:https://www.facebook.com/Easy1CD/
#521
Kentucky, United States
Joined: April 13, 2011
KitMaker: 9,465 posts
Armorama: 8,695 posts
Posted: Wednesday, May 15, 2013 - 02:12 PM UTC
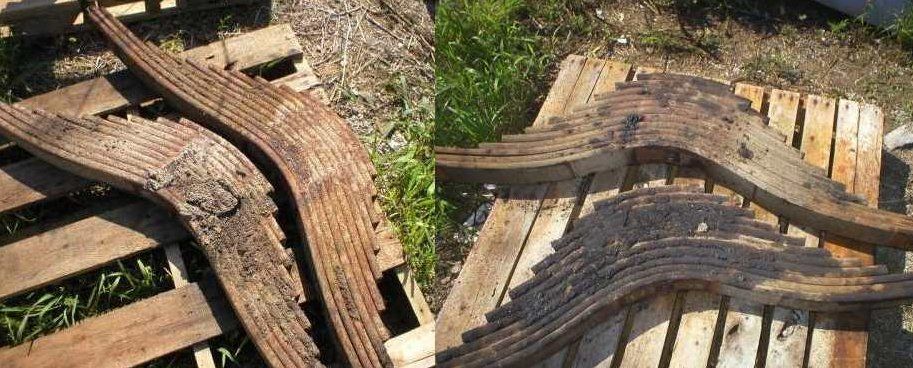
Some used Mack Camelback rear springs that I found tonight after a brief search on the web, up for sale.

#521
Kentucky, United States
Joined: April 13, 2011
KitMaker: 9,465 posts
Armorama: 8,695 posts
Posted: Wednesday, May 15, 2013 - 02:24 PM UTC
According to Mack this unique design actually helps steer the truck, smooth the ride and improve handling control.
As the heavy truck moves into a curve the centripetal force makes the truck body lean outward increasing the load on the outside wheels. This increased load compresses the outside springs causing the flattened spring to become longer. Looking downward on the two axle rear bogie from above, the wheels on the outside of the curve move further apart causing the axles to skew, this allows the rear boggie to "steer" a bit to better follow the bend in the road than would a conventional straight leaf spring design.

#521
Kentucky, United States
Joined: April 13, 2011
KitMaker: 9,465 posts
Armorama: 8,695 posts
Posted: Wednesday, May 15, 2013 - 03:10 PM UTC
The revised rear leaf springs under construction:
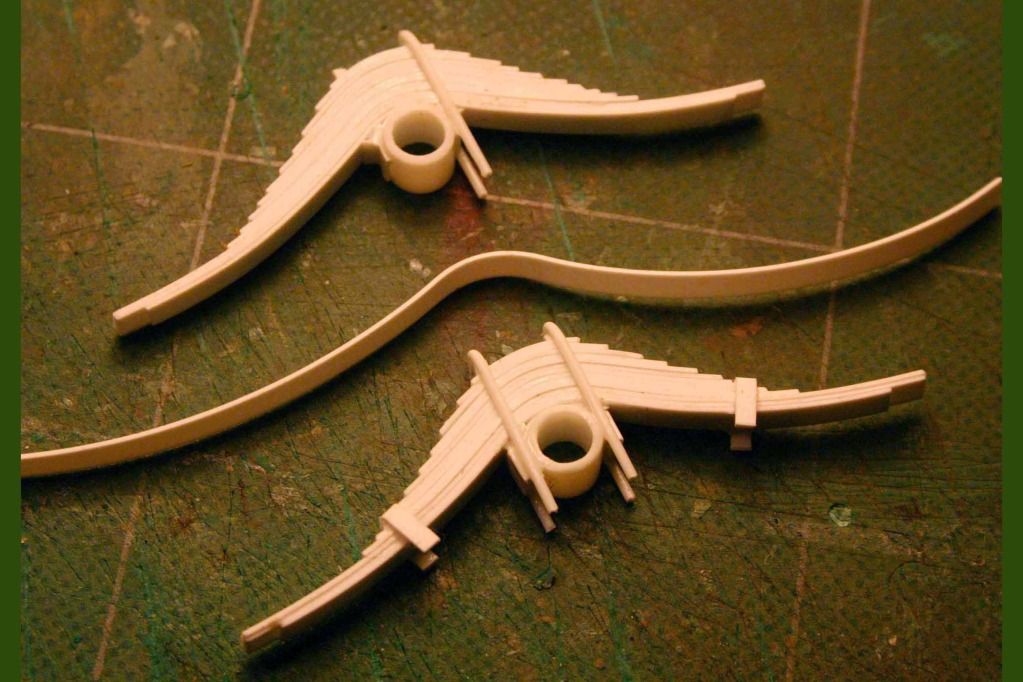
Just bend em, glue em, strap em and ya got em!
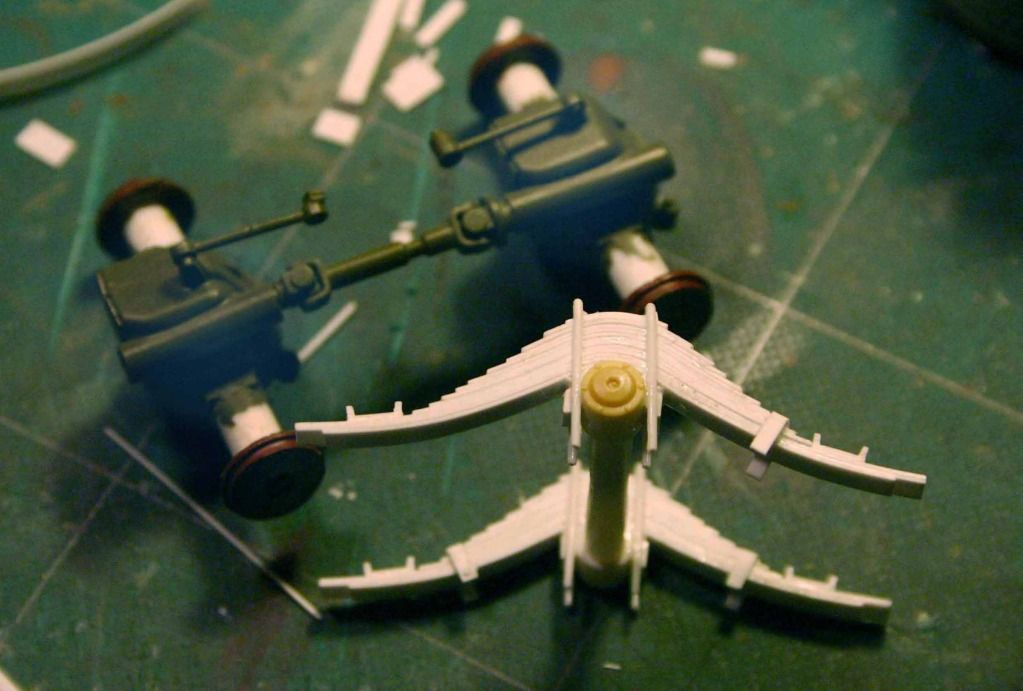
F.Y.I. - Yes, that is a Panzer IV road wheel bearing cover plate being used as the bearing cover plate on the Mack rear axle assembly. (Problem is on the real truck this cover plate has the script letters "Mack" stamped into it. Could not figure a way to simulate that!)
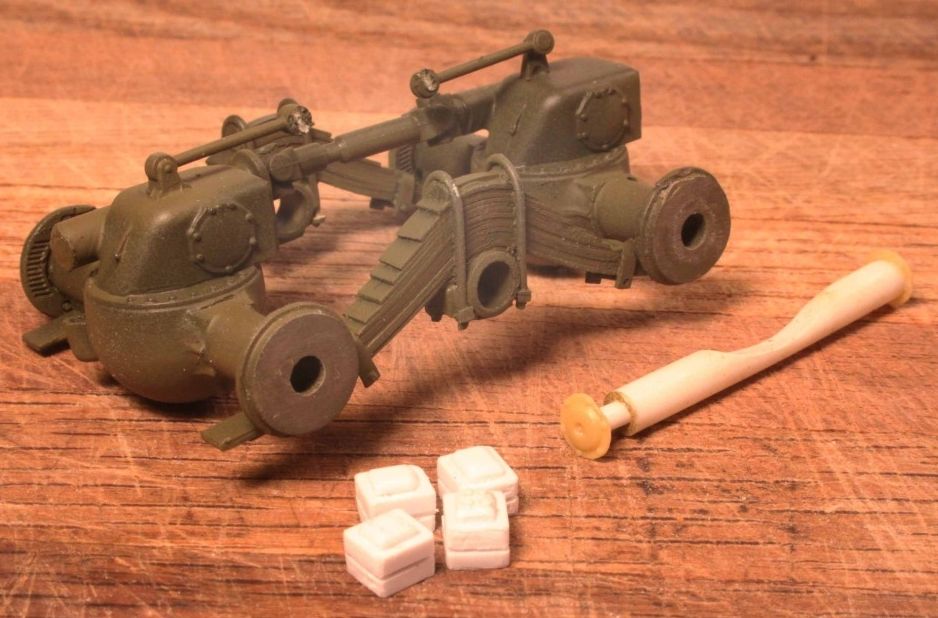
The square white blocks at the bottom of the photograph are the not yet mounted steel and rubber axle mounting blocks used to cushion and give flexibility to the spring and axle assembly. (8 individual pieces per block.)

#521
Kentucky, United States
Joined: April 13, 2011
KitMaker: 9,465 posts
Armorama: 8,695 posts
Posted: Wednesday, May 15, 2013 - 03:24 PM UTC
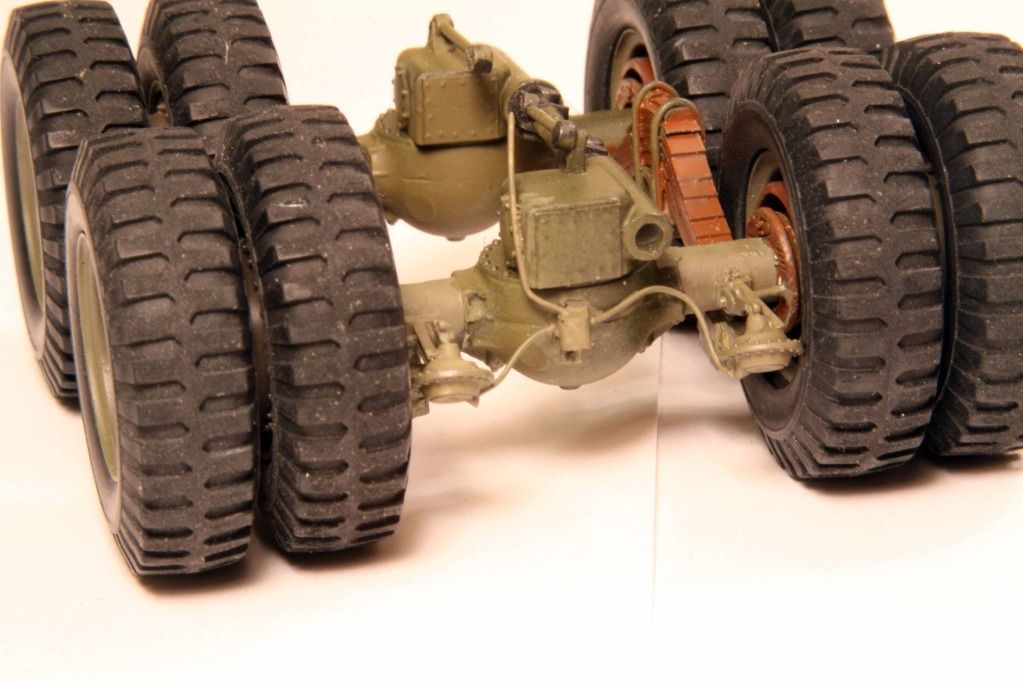
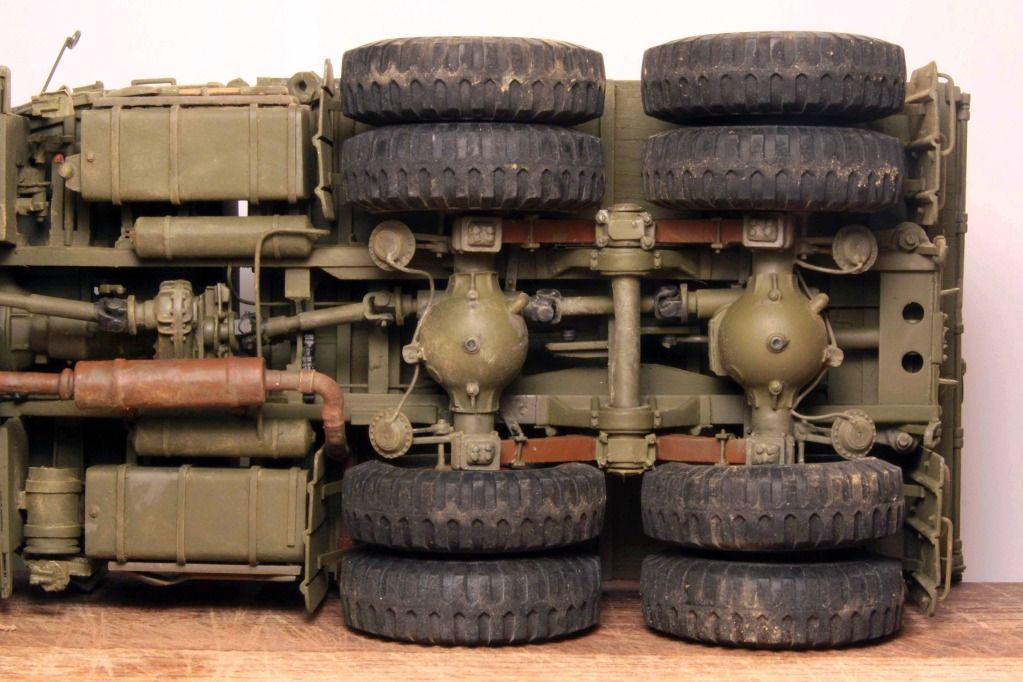
The rubber and steel cushioning blocks have now been mounted to the axles.

#521
Kentucky, United States
Joined: April 13, 2011
KitMaker: 9,465 posts
Armorama: 8,695 posts
Posted: Thursday, May 16, 2013 - 02:39 AM UTC
Let's break for something a little bit different:
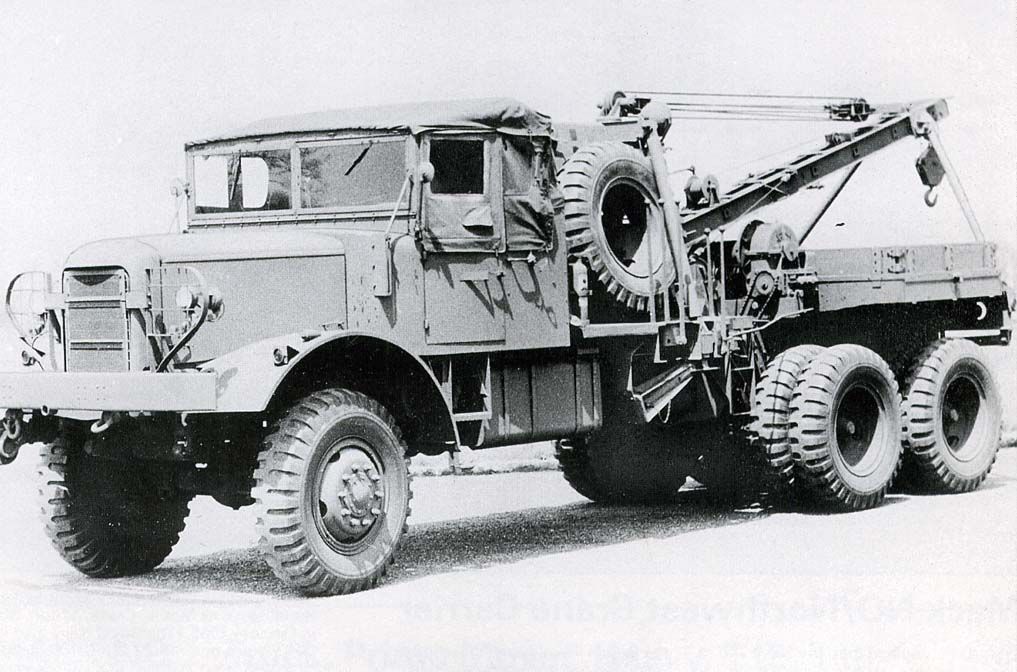
Mack built two long wheelbase NO prototypes for the military with Gar-Wood cranes installed. One for the Army and one for the Air Corps. Unfortunately neither were accepted into full scale production.
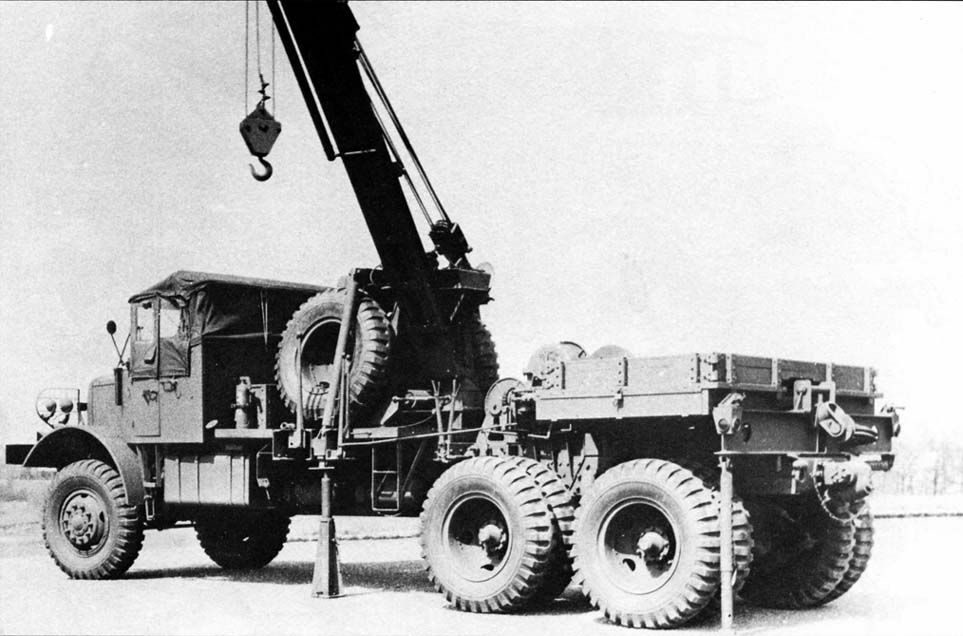
Above is shown the Army version with double Gar-Wood winches and a small load box.
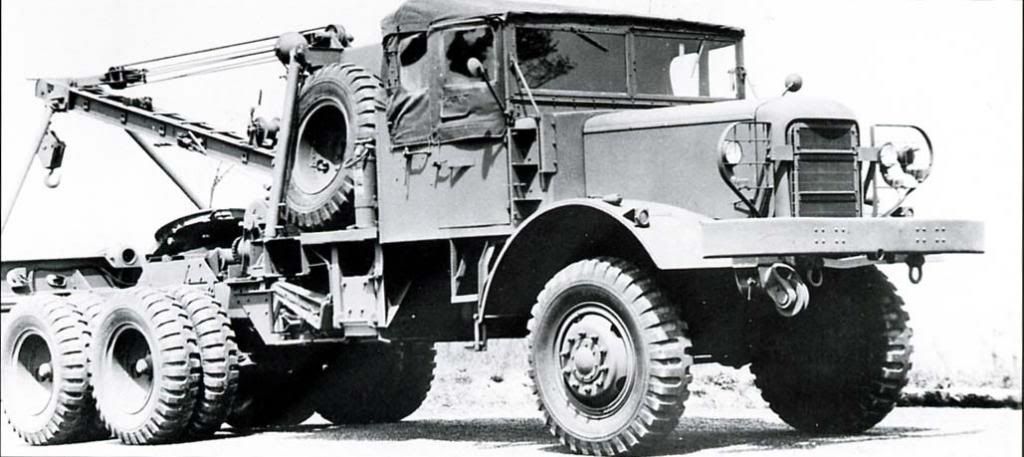
The third photo shows the Air Corps version with single winch and fifth wheel for towing an aircraft recovery trailer.
The Gar-Wood crane is, more or less, easy enough to scratch build but I just don't think I have the heart (or the years left) to build another Mack NO.
New York, United States
Joined: May 02, 2013
KitMaker: 4,403 posts
Armorama: 4,078 posts
Posted: Wednesday, May 22, 2013 - 05:31 AM UTC
GORGEOUS!!! Now if ONLY one of the plastic kit manufacturers would do one of the "standard" Mack NOs and the M1 240mm Howitzer... There's hope, though- look at some of the US WWII stuff that HOBBY BOSS and MIRROR MODELS have got in the works!!!


#521
Kentucky, United States
Joined: April 13, 2011
KitMaker: 9,465 posts
Armorama: 8,695 posts
Posted: Wednesday, May 22, 2013 - 06:01 AM UTC
Quoted Text
GORGEOUS!!! Now if ONLY one of the plastic kit manufacturers would do one of the "standard" Mack NOs and the M1 240mm Howitzer... There's hope, though- look at some of the US WWII stuff that HOBBY BOSS and MIRROR MODELS have got in the works!!! 
That is my hope: that one of the manufactures will come out with the NO6 and then I can modify that kit to portray #1 the original prototype NO with the "C" shaped cab and the self-distruct winch and #2 lenghten the frame and scratch build the Gar-Wood crane!
My needs are simple!


#521
Kentucky, United States
Joined: April 13, 2011
KitMaker: 9,465 posts
Armorama: 8,695 posts
Posted: Friday, May 24, 2013 - 06:23 AM UTC
REAR WHEEL MOUNTING:
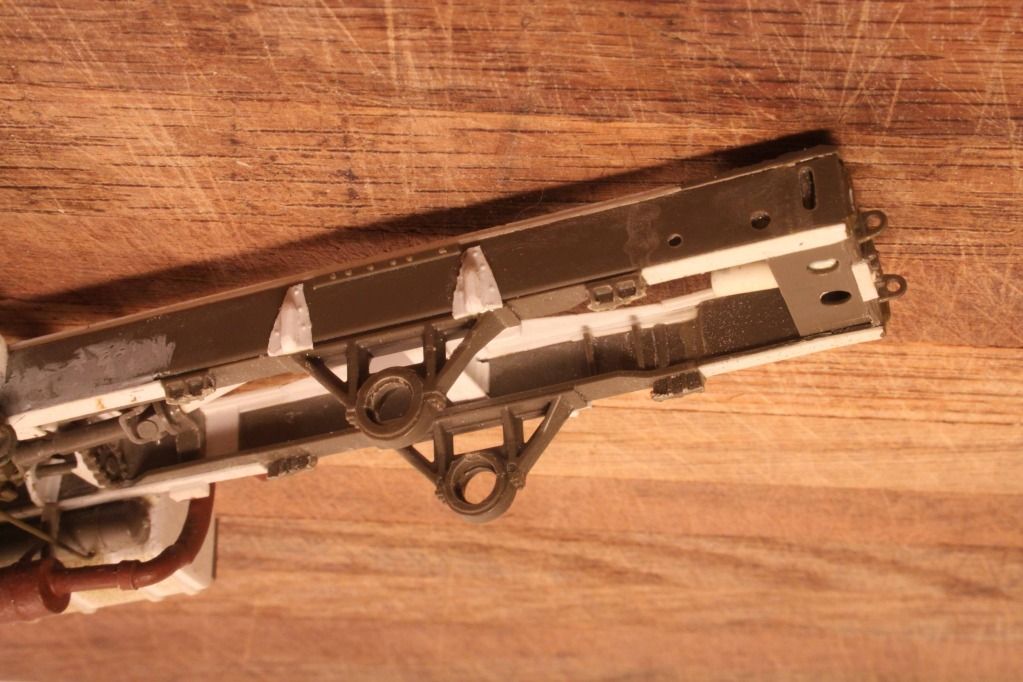
I started with the rear axle mounting towers that attach to the rear bogie springs. The towers provided by the Dragon Wagon measured out to be the correct height. All I had to do was shorten the rear frame channels to get the correct rear overhang length.

#521
Kentucky, United States
Joined: April 13, 2011
KitMaker: 9,465 posts
Armorama: 8,695 posts
Posted: Friday, May 24, 2013 - 06:39 AM UTC
The nearly complete rear bogie. The round tube with the end caps is the bogie support tube that goes thru the axle bearings and thru the axle mounting tower pillow blocks (bearings)and is capped offf on each end with a bearing cover plate with lub fittings. (I could not find bearing cover plates that said "Mack" on them so I had to settle for Panzer IV road wheel bearing cover plates which serve exactly the same purpose on the Panzer as they do on the Mack.


#521
Kentucky, United States
Joined: April 13, 2011
KitMaker: 9,465 posts
Armorama: 8,695 posts
Posted: Friday, May 24, 2013 - 06:43 AM UTC
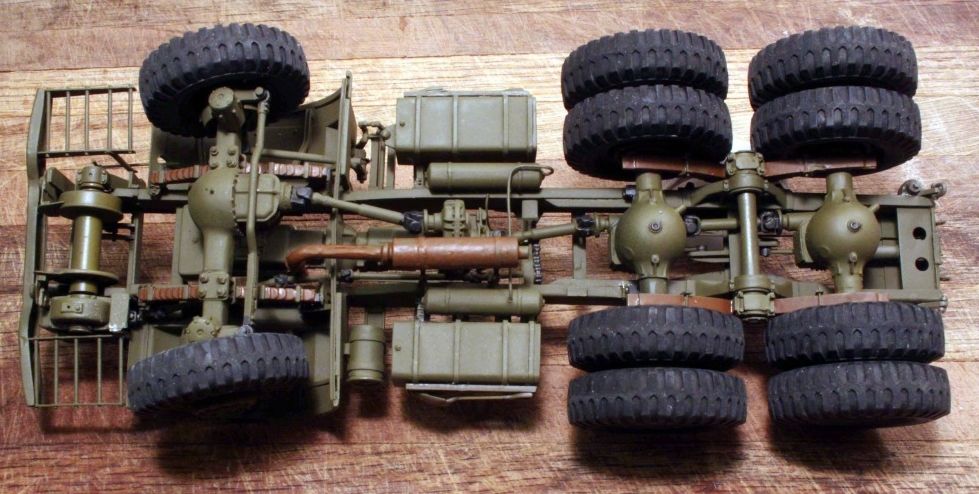
The nearly completed chassis and driveline:

#521
Kentucky, United States
Joined: April 13, 2011
KitMaker: 9,465 posts
Armorama: 8,695 posts
Posted: Tuesday, May 28, 2013 - 03:45 AM UTC
I cannot tell you how many times I cut down the front axle spring towers before getting the frame height to correct level.


#521
Kentucky, United States
Joined: April 13, 2011
KitMaker: 9,465 posts
Armorama: 8,695 posts
Posted: Tuesday, May 28, 2013 - 03:50 AM UTC
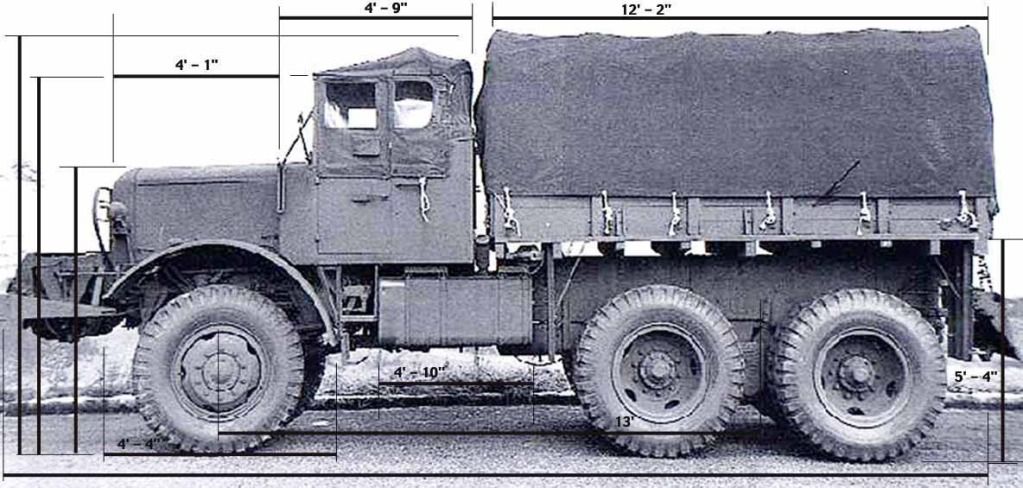
I scaled everything on my Mack NO off this photo. The only known measurement was the 24" wheel drums. Using a set of dividers on an 11x14 print I determined everything else. Remember the 24" is not the outside edge of the wheel rim in the photo but the next line in which represents the actual size of the drum.


#521
Kentucky, United States
Joined: April 13, 2011
KitMaker: 9,465 posts
Armorama: 8,695 posts
Posted: Tuesday, May 28, 2013 - 05:22 AM UTC
As I said, take your 24" scaling measurement from the inside drum of the wheel and not the rim of the wheel.


#521
Kentucky, United States
Joined: April 13, 2011
KitMaker: 9,465 posts
Armorama: 8,695 posts
Posted: Saturday, June 01, 2013 - 09:28 AM UTC
TREAD PLATE FOR THE FRONT FENDERS:
A fairly easy conversion using some of the tread plate that comes with the Dragon Wagon kit. I cut the plate down to size and very carefully worked it around a broom handle sized dowel to work up the curve. If you want to include even greater detail add 8 bolt heads, four along each side.


#521
Kentucky, United States
Joined: April 13, 2011
KitMaker: 9,465 posts
Armorama: 8,695 posts
Posted: Sunday, June 09, 2013 - 08:53 AM UTC
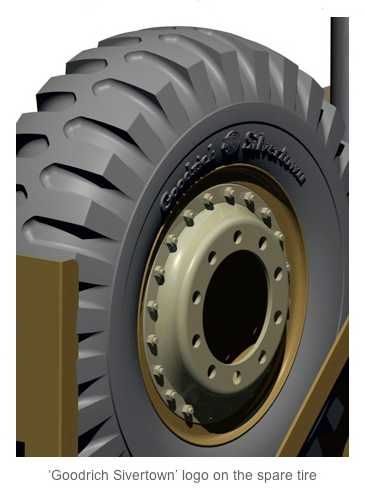
In the near future someone MIGHT be working on a raised letter tire for the M26 Dragon Wagon which would therefore also fit the Mack NO and the T26 Sterling.


#521
Kentucky, United States
Joined: April 13, 2011
KitMaker: 9,465 posts
Armorama: 8,695 posts
Posted: Saturday, June 15, 2013 - 05:37 PM UTC
New York, United States
Joined: May 02, 2013
KitMaker: 4,403 posts
Armorama: 4,078 posts
Posted: Thursday, June 20, 2013 - 02:46 AM UTC
HI, ALL! Mike, you've got an EXCELLENT Master for a plastic kit of the Mack NO!!! The Mack NO is one of my FAVORITE US softskins, right up there with the ubiquitous Jeep and GMC 2.5 ton truck!
New York, United States
Joined: May 02, 2013
KitMaker: 4,403 posts
Armorama: 4,078 posts
Posted: Thursday, June 20, 2013 - 03:05 AM UTC
Referring to your agonies with suspension and ride-height of your Mack, that's just ONE of the problems with the 1/35 WESPE Mack NO6- it sits way too high, making the vehicle look spindly in comparison with the brutish look of the real thing. Also, the tires and wheels of the WESPE kit are undersized and inaccurate. In the ADV/AZIMUT kit, I take issue with the vacuum-formed open cab and fenders- for the price of that kit, ADV/AZIMUT could have engineered a resin cab and fenders. Also an issue, the lightening holes of the wheels are badly misshapen and not even of uniform size. As I mentioned in one of my earlier posts, I'm going to kit-bash, scratch-build and modify my ADV/AZIMUT, and WESPE Mack NO6 kits with a spare TAMIYA M26 Recovery Vehicle.

#521
Kentucky, United States
Joined: April 13, 2011
KitMaker: 9,465 posts
Armorama: 8,695 posts
Posted: Thursday, June 20, 2013 - 05:31 AM UTC
One of the difficulties with building the Mack NO out of M26 parts is that the Mack requires two rear differentials. Because the M26 was chain drive it only required one differential.
I was fortunate in that I picked up both a fresh M26 AND a basket case all in one auction on eBay so I was guaranteed the two that I need plus beau coup spare parts!


#521
Kentucky, United States
Joined: April 13, 2011
KitMaker: 9,465 posts
Armorama: 8,695 posts
Posted: Thursday, June 20, 2013 - 11:01 AM UTC
The differentials are probably fairly good on the Azimut and Wespe kits so this should not be a problem for you.


#521
Kentucky, United States
Joined: April 13, 2011
KitMaker: 9,465 posts
Armorama: 8,695 posts
Posted: Friday, June 28, 2013 - 01:53 AM UTC
TECHNIQUE FOR MAKING EMBOSSED US MUDFLAPS:
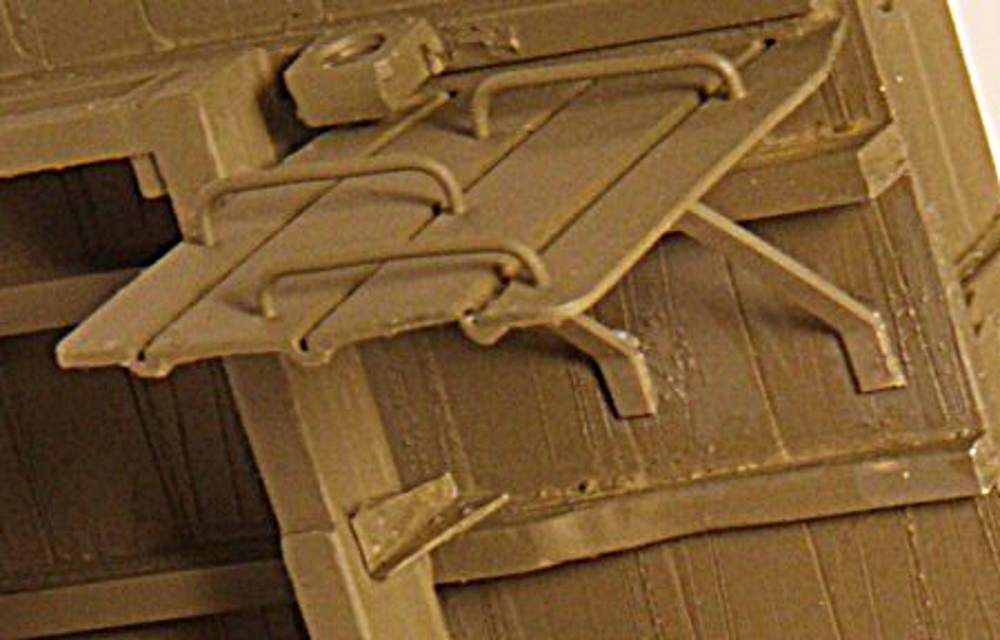
After a failed attempt to actually use brass sheet to make these embossed mudflaps I came across a technique that in some ways is very similar to the method for making the ladder racks that we discussed earlier.


#521
Kentucky, United States
Joined: April 13, 2011
KitMaker: 9,465 posts
Armorama: 8,695 posts
Posted: Friday, June 28, 2013 - 02:09 AM UTC
Again I start with appropriately spaced runners cut longer than the mupflap required. In this case I used runners long enought to give me all four needed mudflaps.

To this I glued on two horizontal spacer bars, one top and one bottom to keep the runners at the correct side to side spacing.
Finally I added small Evergreen angles to form the embossings and let all this dry completely.
The dashed lines represent the cuts I then made to give the mudflaps their final form.


#521
Kentucky, United States
Joined: April 13, 2011
KitMaker: 9,465 posts
Armorama: 8,695 posts
Posted: Friday, June 28, 2013 - 02:56 AM UTC
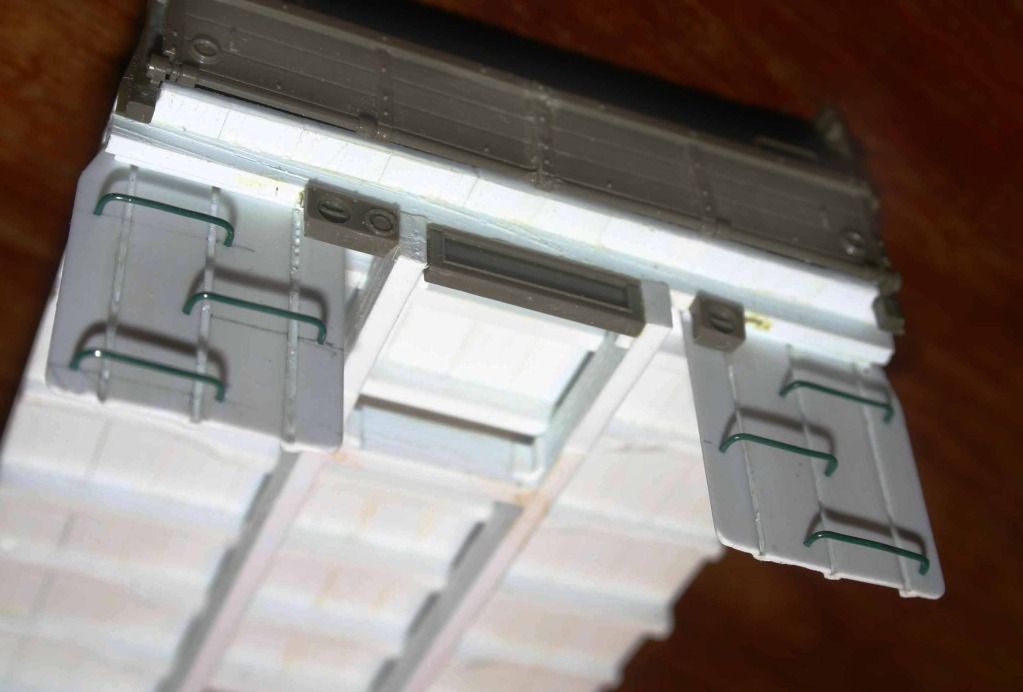
The finished product..


