Яusso-Soviэt Forum: Cold War Soviet Armor
For discussions related to cold war era Russo-Soviet armor.
MAZ 537 F/A Pusher Tractor
165thspc
#521
Visit this Community
Kentucky, United States
Joined: April 13, 2011
KitMaker: 9,465 posts
Armorama: 8,695 posts
Posted: Thursday, December 18, 2014 - 03:07 AM UTC
A how-to article/thread on the making of multiple duplicate parts appears at:

http://armorama.com/forums/229242&page=1#1931284

165thspc
#521
Visit this Community
Kentucky, United States
Joined: April 13, 2011
KitMaker: 9,465 posts
Armorama: 8,695 posts
Posted: Thursday, December 18, 2014 - 03:51 AM UTC
Starting work on the load box deck. I have very little reference of this area on the vehicle so the design will have to be mostly free-lanced. However I doubt there is much difference in the design engineering of this aspect of the MAZ missile vehicle than there would be in the design of the deck of a farm wagon or farm truck which I do have some experience with.


This last photo above reminds me that there should be two rather large air tanks mounted one on each side of the frame between the #3 and #4 axles. I will have to work on those!
165thspc
#521
Visit this Community
Kentucky, United States
Joined: April 13, 2011
KitMaker: 9,465 posts
Armorama: 8,695 posts
Posted: Thursday, December 18, 2014 - 10:08 AM UTC
So here it is; in all its' current glory . . . and that about wraps it up for the evening.
165thspc
#521
Visit this Community
Kentucky, United States
Joined: April 13, 2011
KitMaker: 9,465 posts
Armorama: 8,695 posts
Posted: Thursday, December 18, 2014 - 08:14 PM UTC
As you can see in the photo above; I have also started on the scratch built mid-ships fenders as well as the A frame support for the front bumper mounted "Stinger".

More photos posted tonight!
165thspc
#521
Visit this Community
Kentucky, United States
Joined: April 13, 2011
KitMaker: 9,465 posts
Armorama: 8,695 posts
Posted: Friday, December 19, 2014 - 09:15 AM UTC
FYI the white bars you see running along the fenders next to the engine covers are wire enclosure channels (Wireways). The high voltage power wiring from the generator for the active drive trailer runs down one side of the vehicle and the low voltage control wiring runs down the other side. They both meet in the center front of the vehicle, feed through the Stinger and into the trailer.
165thspc
#521
Visit this Community
Kentucky, United States
Joined: April 13, 2011
KitMaker: 9,465 posts
Armorama: 8,695 posts
Posted: Saturday, December 20, 2014 - 12:54 AM UTC
Been working today on the center support A-frame and the passenger side wireway leading around the cab.


165thspc
#521
Visit this Community
Kentucky, United States
Joined: April 13, 2011
KitMaker: 9,465 posts
Armorama: 8,695 posts
Posted: Saturday, December 20, 2014 - 01:17 AM UTC
Wanted to compare the after market resin wheels and tires from Tank Workshop against the ones offered in the kit.

[/URL
This photo compares the Tank Workshop wheel (On the right) with the kit tire and wheel on the left.

I have seen reports that the wheel center/gear reduction final drive case is too small on the Tank Workshop offerings. I would have to say that I agree, however there is the possibility that different 537 vehicles utilized different gear reduction ratios. If that is the case then a truck with a higher "speed ratio" might have a smaller center hub whereas a truck with a lower "power ratio" final drive might have a larger center hub. If so then it is unfortunate that Tank Workshop happened across the smaller and more rare, high speed hub when taking their measurements to make their pattern.


Smaller gears would mean a higher gear ratio and therefore a smaller hub size.

165thspc
#521
Visit this Community
Kentucky, United States
Joined: April 13, 2011
KitMaker: 9,465 posts
Armorama: 8,695 posts
Posted: Saturday, December 20, 2014 - 01:36 AM UTC
The only reason I am using the Tank Workshop wheels is b/c that was the only way I could get the spare tire I needed for this model.

I do very much like the Tank Workshop's very crisp tire tread pattern but all things being equal I would just as soon be using the kit tires if I could.

Of interesting note: Trumpeter appears to have re-mastered the rubber tire molding they are shipping with their more recent MAZ kits. The new master is more flexible, more rounded (like the real thing) with a very nice tread pattern and more realistic sidewall pattern. (Sorry still no raised sidewall lettering.)
pgb3476
Visit this Community
Texas, United States
Joined: March 11, 2007
KitMaker: 977 posts
Armorama: 976 posts
Posted: Saturday, December 20, 2014 - 02:33 AM UTC
I like the Resin tires much better. I used the same ones a couple years back on my Maz. You can't go wrong using them over the kit wheels.
165thspc
#521
Visit this Community
Kentucky, United States
Joined: April 13, 2011
KitMaker: 9,465 posts
Armorama: 8,695 posts
Posted: Saturday, December 20, 2014 - 03:28 AM UTC
Greg - I still plan to round off the molded sharp edge of the tire castings (between the tread and the sidewall.) I know it looks cool but it just does not match the reality of the "Scud" tire.

I am even considering weather I could cut the larger wheel hub out of the kit wheels and put them like caps over the hubs of the Tank Workshop wheels ? ? ?
165thspc
#521
Visit this Community
Kentucky, United States
Joined: April 13, 2011
KitMaker: 9,465 posts
Armorama: 8,695 posts
Posted: Saturday, December 20, 2014 - 05:20 AM UTC
Greg - you gave me an idea - I guess that is what this blog is all about!

Cut the Trumpeter hub out of the wheel and put it on the Tank Workshop resin wheel LIKE A HAT!


Eureka, it works!
165thspc
#521
Visit this Community
Kentucky, United States
Joined: April 13, 2011
KitMaker: 9,465 posts
Armorama: 8,695 posts
Posted: Saturday, December 20, 2014 - 05:23 AM UTC
That was OK but the hub still sat too tall and appeared TOO big . . . so then another idea:


Gotta thin the backside of the hub down a little bit more to get it to set down properly and it's in! Now I have the best of both worlds.

I added a thin shim inside the Trumpeter hub and now the hubs are such a perfect fit over the old hubs that once I pushed them on I had to pry them off with an exacto knife!

Seven more to go . . .


Dedicated thread on modifying these MAZ wheels can be viewed at:

http://armorama.kitmaker.net/forums/229914
165thspc
#521
Visit this Community
Kentucky, United States
Joined: April 13, 2011
KitMaker: 9,465 posts
Armorama: 8,695 posts
Posted: Saturday, December 20, 2014 - 05:30 AM UTC
Not just working on the wheels - also had time to get a little more detail added to the underside of the ballast box.

165thspc
#521
Visit this Community
Kentucky, United States
Joined: April 13, 2011
KitMaker: 9,465 posts
Armorama: 8,695 posts
Posted: Saturday, December 20, 2014 - 07:08 AM UTC
Before and after: Stock Tank Workshop wheel on the left, the modified wheel on the right. Both tires come from Tank Workshop.

Please Note: While I love the crisp and well defined shoulder of the Tank Workshop tires it, I am afraid, is not correct to prototype. So as you may notice I has rounded off the shoulder "edge" of the tire tread blocks with a file. I have also taken a smaller file and rounded off the "valleys" between the shoulder tread blocks.


The removable wheel hubs are sure going to make it easy to paint the whitewalls!

________________________________________________


Here's something to compare the wheels to; judge for yourself.
165thspc
#521
Visit this Community
Kentucky, United States
Joined: April 13, 2011
KitMaker: 9,465 posts
Armorama: 8,695 posts
Posted: Saturday, December 20, 2014 - 07:27 AM UTC
Also had some time today to work on the mid-ships fenders - not my best work ever. A lot of touch up is going to be required there.

Top side:


Underside:
pgb3476
Visit this Community
Texas, United States
Joined: March 11, 2007
KitMaker: 977 posts
Armorama: 976 posts
Posted: Saturday, December 20, 2014 - 11:02 AM UTC
Perfect wheel upgrade.
Stickframe
#362
Visit this Community
California, United States
Joined: December 01, 2013
KitMaker: 1,661 posts
Armorama: 1,202 posts
Posted: Saturday, December 20, 2014 - 01:11 PM UTC
Hi Mike - wow! Great build - I just rolled through the thread - nice!
Looking forward to your progress! Thanks for showing all the steps so far - inspiring stuff

Cheers
Nick
165thspc
#521
Visit this Community
Kentucky, United States
Joined: April 13, 2011
KitMaker: 9,465 posts
Armorama: 8,695 posts
Posted: Saturday, December 20, 2014 - 10:56 PM UTC
We mentioned earlier that Trumpeter must have changed suppliers for their molded rubber tires. I received the mounted tire (top) in an earlier MAZ kit and the unmounted tire (bottom) came later with the kit I am now working on.

Which one do you like better?

Since the unmounted tires are now in my spares box I am considering swapping them on my earlier work. I like the tread blocks better on the older tire but I think overall the new tire looks more real.


The two correct tread pattern options for the 537 and 543:

165thspc
#521
Visit this Community
Kentucky, United States
Joined: April 13, 2011
KitMaker: 9,465 posts
Armorama: 8,695 posts
Posted: Sunday, December 21, 2014 - 06:27 AM UTC
I know everyone is probably getting tired of me raving about the corrected wheel hubs but . . . One more time check this out!


Reality above:
_______________________________________________________

My work below:
165thspc
#521
Visit this Community
Kentucky, United States
Joined: April 13, 2011
KitMaker: 9,465 posts
Armorama: 8,695 posts
Posted: Sunday, December 21, 2014 - 10:05 AM UTC
Tonight's efforts focused on building the load box walls and tailgate.

Also I modified a third wheel/tire combo with the new larger drive hub - five more to go!


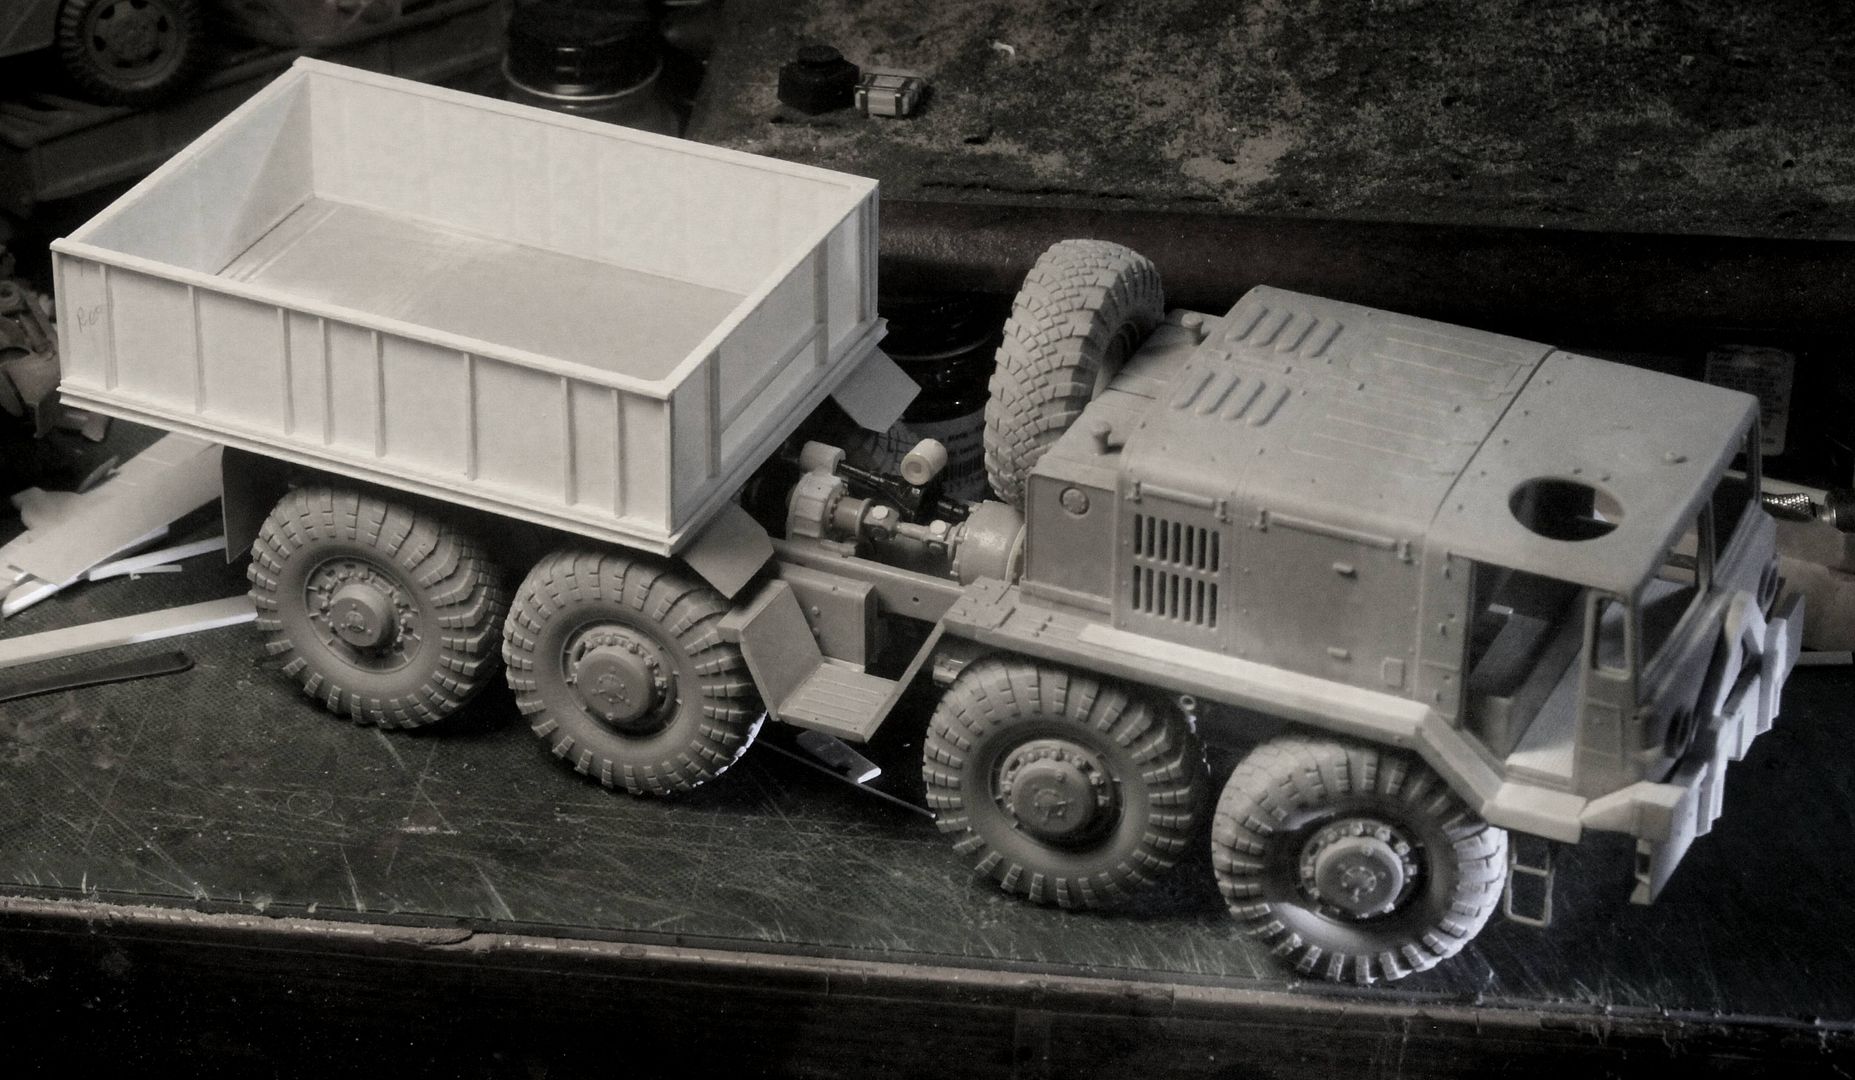
As you can see above three wheel hubs replaced and five yet to go.


Would that I could step up and view what is in that load box!

We can see some storage lockers in the front of the box. Also a standard loading jib crane is stowed further back.

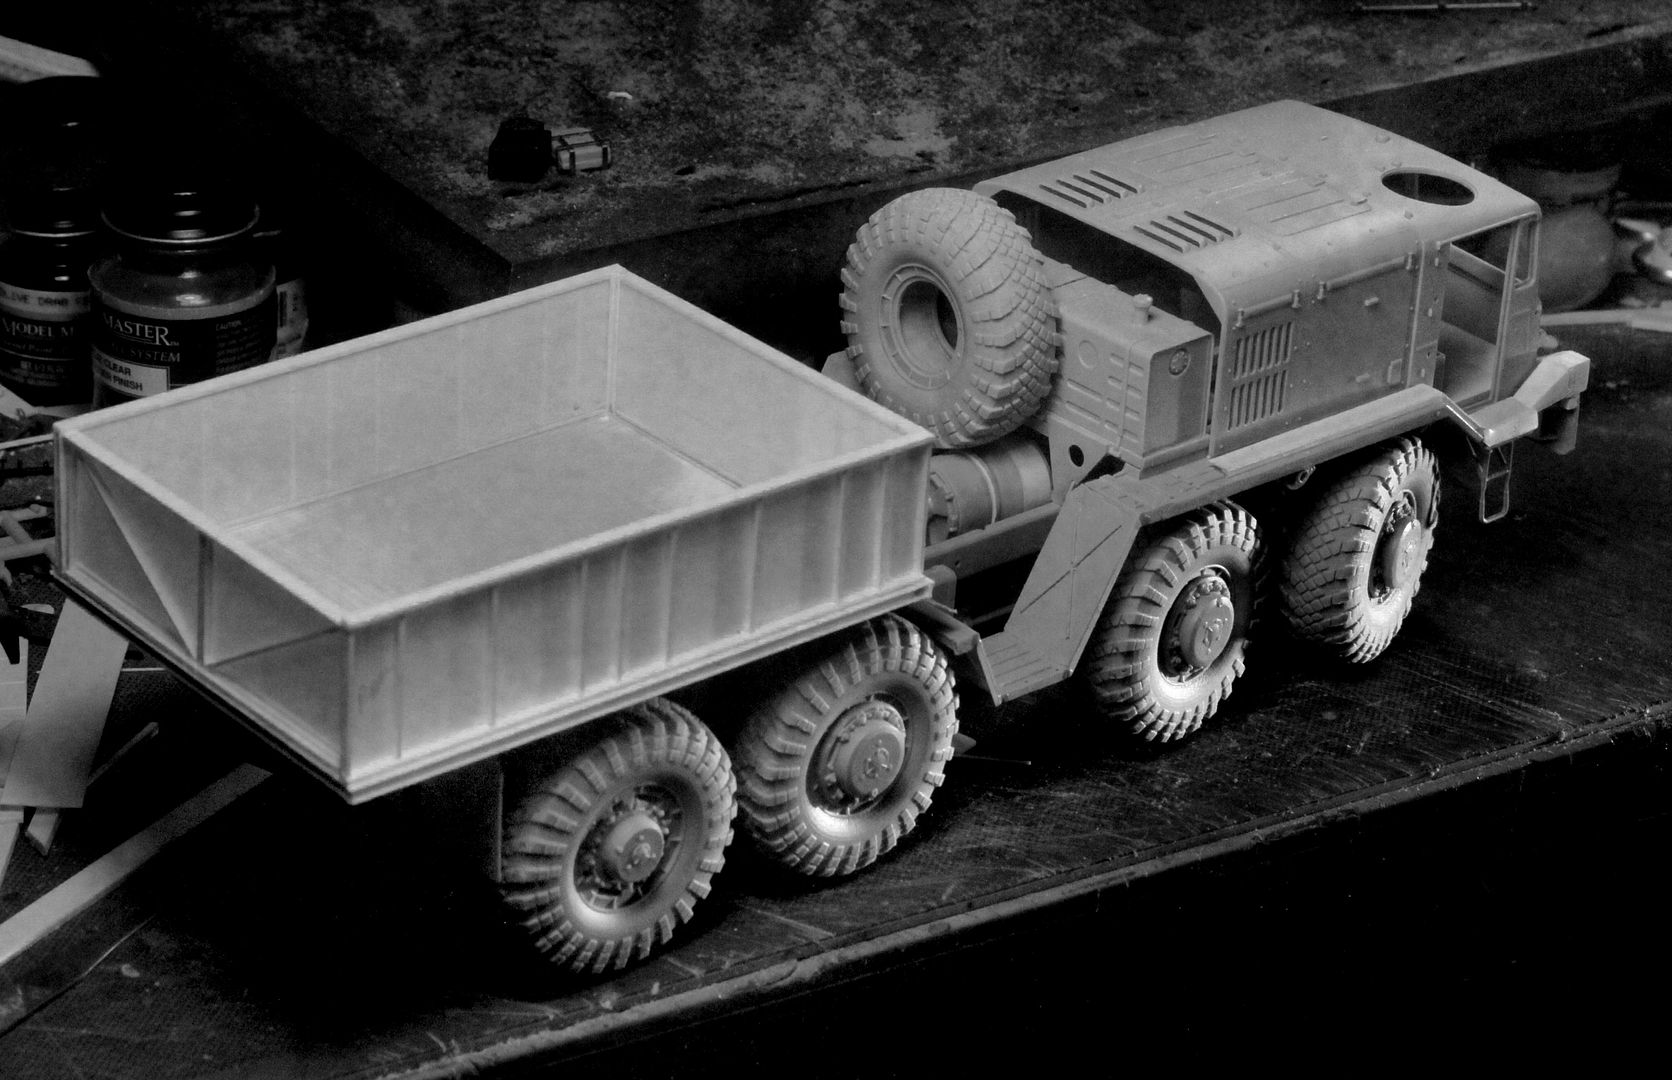
AND Two more items I can only suspect;

#1. I expect that the unusual length (and extreme overhang) of the load box is governed by the need to be able to carry the stinger probe when not is use. (As when returning from the silo back to the assembly plant, awaiting the next missile assignment). So there is probably some sort of cradle fixture required to store the stinger when not in use that runs down the center of the load box.
#2. This vehicle is clearly a ballast tractor, just like the MAZ airport tug or the M19 Diamond T ballast tractor. This vehicle would therefore require some sort of dead weight load to increase the tractive effort of the rear two axles. I therefore suspect there to be either four or six very large cast metal dead weights carried in this load box just as there is in the airport tug.

Any further thoughts anyone might offer on this subject would be greatly appricated.
pgb3476
Visit this Community
Texas, United States
Joined: March 11, 2007
KitMaker: 977 posts
Armorama: 976 posts
Posted: Sunday, December 21, 2014 - 06:59 PM UTC
Looking good.....I realy look the improved wheel with the larger hub....
165thspc
#521
Visit this Community
Kentucky, United States
Joined: April 13, 2011
KitMaker: 9,465 posts
Armorama: 8,695 posts
Posted: Sunday, December 21, 2014 - 07:12 PM UTC
Four wheels converted - four to go!

I'm getting better (and quicker) at making the conversion so things are moving along more smoothly now.

Also I am thinning the hub more so it really snugs down onto the wheel and looks like it is all one piece!

Ah, be one with the wheel grasshopper . . .
165thspc
#521
Visit this Community
Kentucky, United States
Joined: April 13, 2011
KitMaker: 9,465 posts
Armorama: 8,695 posts
Posted: Tuesday, December 23, 2014 - 12:12 AM UTC
I would like to suggest that it might look better (more realistic) to frame up the rear opening of the engine compartment rather than use the brass etch part provided by the manufacture.


I used .040 x .060 Evergreen to do the framing.

165thspc
#521
Visit this Community
Kentucky, United States
Joined: April 13, 2011
KitMaker: 9,465 posts
Armorama: 8,695 posts
Posted: Tuesday, December 23, 2014 - 12:13 AM UTC
Here is the flat brass etch part as it comes in the kit:


This thin etched piece is MORE correct for the early production tractor . . .


. . . but totally wrong on the late production vehicle


___________________________________________________________

Here is a shot of a previous MAZ build to better illustrate my point. I think the framing serves to stop the viewer's eye from straying into the depths of the engine compartment but rather keeps them focused on the surface detail. They might actually come away saying "oh no, that MAZ model HAD an engine!?

165thspc
#521
Visit this Community
Kentucky, United States
Joined: April 13, 2011
KitMaker: 9,465 posts
Armorama: 8,695 posts
Posted: Tuesday, December 23, 2014 - 12:23 AM UTC
I would say the framing on the late production vehicle is made up of welded 2"x3" rectangular tubing so the Evergreen plastic shapes will look more correct.

Here is the best photo I have ever found to illustrate this point.