MAZ 537 F/A Pusher Tractor

#521
Kentucky, United States
Joined: April 13, 2011
KitMaker: 9,465 posts
Armorama: 8,695 posts
Posted: Saturday, January 31, 2015 - 03:28 AM UTC
Right side mounted coolant reservoir. Somewhat different than that which is offered in the Trumpeter kit. Just saying . . . .

As you can see the tank is actually "L" shaped and there is quite a complex physical support framework surrounding the tank.


Forward end of coolant tank - - - - - - - - - - - - - - - - - - - - - - - - - - - - - - - - - Rear end of coolant tank

Assorted cooling lines running to the transmission
#521
Kentucky, United States
Joined: April 13, 2011
KitMaker: 9,465 posts
Armorama: 8,695 posts
Posted: Saturday, January 31, 2015 - 03:42 AM UTC

Hose layout on the transmission cooling system.
Not totally sure if this represents an oil or water based cooling system for the transmission??? I think it is oil (you usually don't have an inline water filter but such filters are quite common on an oil system.) Also I know there are several auxiliary coolers (radiators) installed on the MAZ-537 series of vehicles.
Clearly if I could read Russian it would help!
#521
Kentucky, United States
Joined: April 13, 2011
KitMaker: 9,465 posts
Armorama: 8,695 posts
Posted: Saturday, January 31, 2015 - 04:12 AM UTC
"L" shaped tank has been built as well as the lower support framework. Now all that is left are the end brackets and associated hoses.


Extra bar is running board support.
#521
Kentucky, United States
Joined: April 13, 2011
KitMaker: 9,465 posts
Armorama: 8,695 posts
Posted: Saturday, January 31, 2015 - 09:22 AM UTC
OK, Reservoir support brackets finished and plumbing done!


Texas, United States
Joined: March 11, 2007
KitMaker: 977 posts
Armorama: 976 posts
Posted: Saturday, January 31, 2015 - 07:23 PM UTC
Question, are you using low heat to bend the plastic rod?
Gregovich "I paint all my Models in 4BO Green" Beckman
Holder of the Knight's Cross, Hero of the Soviet Union, Dragon Slayer and Slinger of Massive BS.
#521
Kentucky, United States
Joined: April 13, 2011
KitMaker: 9,465 posts
Armorama: 8,695 posts
Posted: Saturday, January 31, 2015 - 08:11 PM UTC
No heat here but I keep meaning to give that a try. So far I have just been using round point needle nose pliers (otherwise known as "Rosary Pliers") and breaking a lot of plastic rod.
As I have said elsewhere, I am facing the upcoming challenge of creating six large, identical plastic rod frames for the rear loadbox. I am thinking of using some sort of homemade bending jig and hot water to "relax" the rod but it is all theory at this point.

Overijssel, Netherlands
Joined: July 01, 2010
KitMaker: 1,322 posts
Armorama: 1,239 posts
Posted: Saturday, January 31, 2015 - 08:44 PM UTC
For all the hydraulic pipes of my Trumpeter Faun LST I used a hairdryer and, as an alternative, boiling water. After it got the right shape I cooled it in ice water.
Requires quite some preparation (like making ice cubes) but works out fine.
#521
Kentucky, United States
Joined: April 13, 2011
KitMaker: 9,465 posts
Armorama: 8,695 posts
Posted: Tuesday, February 03, 2015 - 03:22 AM UTC
Paul can you provide us a link to some of your Faun build photos? We would love to see them! Another massive 8x8 to sink our teeth into.
Thanks
Mike
Namabiiru
 Associate Editor
#399
Rhode Island, United States
Joined: March 05, 2014
KitMaker: 2,888 posts
Armorama: 1,920 posts
Posted: Tuesday, February 03, 2015 - 03:45 AM UTC
Quoted Text
No heat here but I keep meaning to give that a try. So far I have just been using round point needle nose pliers (otherwise known as "Rosary Pliers") and breaking a lot of plastic rod.
As I have said elsewhere, I am facing the upcoming challenge of creating six large, identical plastic rod frames for the rear loadbox. I am thinking of using some sort of homemade bending jig and hot water to "relax" the rod but it is all theory at this point.
If I may make so bold as to offer a suggestion to one whose skills clearly surpass mine, I would suggest brass rod, rather than styrene, for the loadbox frames and definitely a bending jig. Will cost a bit more, but much easier and more forgiving for making small tweaks to get them all exactly the same.
Another idea that occurs to me for the frames is to use brass rod soldered in sections: You can easily cut the straight segments to the exact same length. Then make a coil of wire with a radius to match the radius of the corners and cut it into sections to create arcs of the proper dimensions. Solder it all together and you should end up with perfectly matched frames.
My $0.02....

#521
Kentucky, United States
Joined: April 13, 2011
KitMaker: 9,465 posts
Armorama: 8,695 posts
Posted: Tuesday, February 03, 2015 - 04:51 AM UTC
I really like that last part regarding the brass rod. Food for thought!
Thank you!
#521
Kentucky, United States
Joined: April 13, 2011
KitMaker: 9,465 posts
Armorama: 8,695 posts
Posted: Thursday, February 12, 2015 - 05:33 AM UTC
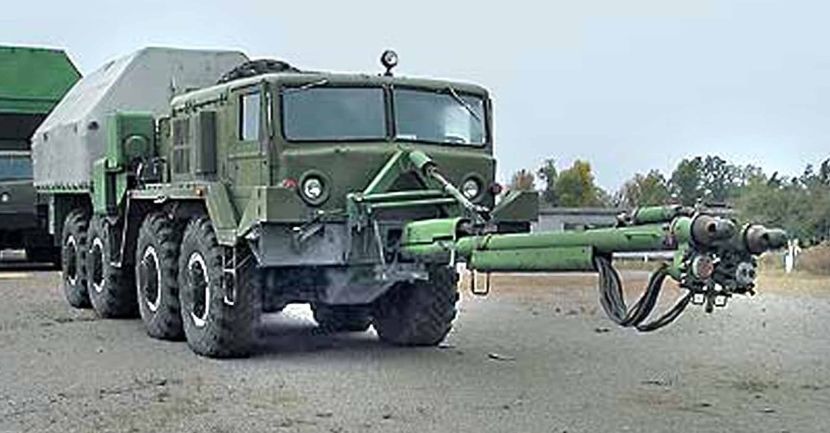
Working now on the forward connector for the "stinger", (Pusher Probe). This is my second attempt - wish me luck!


p.s. I need this forward piece to be removable otherwise the stinger will not stow in the rear truck bed. This front piece has a universal joint type swivel mounted just at the end of the push shaft and a top mounted stabilizer/shock absorber attached to it as well.
Kuwait / لعربية
Joined: February 09, 2009
KitMaker: 467 posts
Armorama: 392 posts
Posted: Wednesday, February 18, 2015 - 05:49 PM UTC
just spent a pretty cool hour - reading this awesome build ! dedication to detail here. I really like this project unique in all aspects.
Cant add much unfortunately I can barely scratchbuild a box, but im certainly looking forward to the updates.
best
Mark
http://krasnyaarme.blogspot.com/
"In the Soviet army it takes more courage to retreat than advance"
Joseph Stalin
#521
Kentucky, United States
Joined: April 13, 2011
KitMaker: 9,465 posts
Armorama: 8,695 posts
Posted: Monday, February 23, 2015 - 02:36 AM UTC
Been following another thread about Russian paint colors at:
https://armorama.kitmaker.net/forums/231699I have to admit my head is spinning from that discussion.
Can anyone just give me the spec for this Russian Whitish-Green that I see all the time in the photos?
Also can someone suggest a model paint that comes close to matching or a mixing formula to create one?
I'm not helpless, I can mix up something that will be close, no problem. I just figured others had gone down this road before me and so I hoped to not have to start from scratch.
Thanks for any help - Mike
p.s. Gotta read over that other thread one more time to see if I can make heads or tails of it!
Texas, United States
Joined: March 11, 2007
KitMaker: 977 posts
Armorama: 976 posts
Posted: Monday, February 23, 2015 - 03:09 AM UTC
Try Tamiya XF-4 Yellow Green, it's a great starting point for a very faded green.
Gregovich "I paint all my Models in 4BO Green" Beckman
Holder of the Knight's Cross, Hero of the Soviet Union, Dragon Slayer and Slinger of Massive BS.
Minnesota, United States
Joined: March 04, 2003
KitMaker: 4,630 posts
Armorama: 4,498 posts
Posted: Monday, February 23, 2015 - 06:50 AM UTC
The problem is the color you want is not a "standard" color. It is either a sun-bleached color, a incorrect museum refinish, a color imbalance in the photo....or a combination of all three. You will probably have to mix up a accurate color, but another close option (acrylic) at places like Walmart and such is Apple Barrel's 20472 Leaf Green.
Ex-34th ID MNANG - 13F and 63D
"Fire For Effect."
#521
Kentucky, United States
Joined: April 13, 2011
KitMaker: 9,465 posts
Armorama: 8,695 posts
Posted: Thursday, February 26, 2015 - 09:12 PM UTC
I too thought it might just be a non-standard museum paint job but the problem with that is, I see this color often in multiple locations????
Because I cannot find positive documentation on the color I am planning to avoid it on any Russian models for the time being.
Thanks Jacques for the assistance.
Minnesota, United States
Joined: March 04, 2003
KitMaker: 4,630 posts
Armorama: 4,498 posts
Posted: Saturday, February 28, 2015 - 07:41 AM UTC
There are multiple possible reasons for the color:
1. Lack of quality control at the factory. Especially in the 1990's and early 2000's.
2. Very old / original paint that has been bleached out by exposure over time.
3. (I am betting on this). The places taking care of museum pieces / gate guard vehicles only received a smaller portion of their necessary paint allotment, (or sold most of the paint on the black market for extra money....Russian military and museum personnel are not all paid that great, especially at the lower levels) and the paint was thinned out to make it stretch. If they used kerosene or something similar to thin it out, it will change the color and fade it out VERY fast.
Regardless of the reason, the color is NOT correct for a vehicle in service. But when building the model, you do not have to strictly follow the color guides unless YOU want to. Model building is as much art as it is following prototype.

Ex-34th ID MNANG - 13F and 63D
"Fire For Effect."
#521
Kentucky, United States
Joined: April 13, 2011
KitMaker: 9,465 posts
Armorama: 8,695 posts
Posted: Tuesday, April 07, 2015 - 09:54 PM UTC
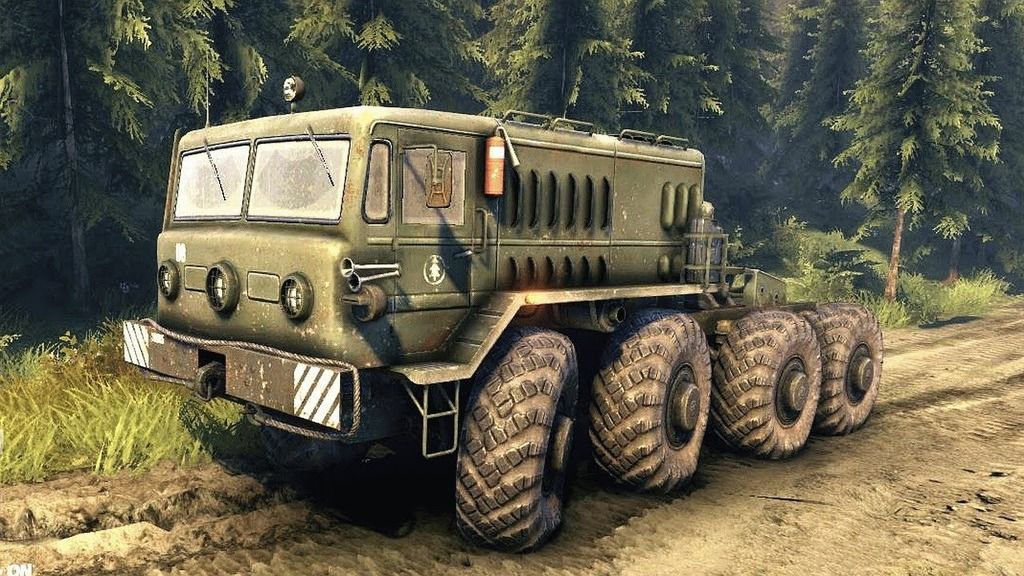
This is the paint scheme I will be going with as this appears to be the condition the vehicle was in when it first arrived at the missile museum:
Clearly it has since been painted in what appears to be a non-standard museum color.

Texas, United States
Joined: March 11, 2007
KitMaker: 977 posts
Armorama: 976 posts
Posted: Tuesday, April 07, 2015 - 11:55 PM UTC
So what color are you thinking?
Gregovich "I paint all my Models in 4BO Green" Beckman
Holder of the Knight's Cross, Hero of the Soviet Union, Dragon Slayer and Slinger of Massive BS.
#521
Kentucky, United States
Joined: April 13, 2011
KitMaker: 9,465 posts
Armorama: 8,695 posts
Posted: Wednesday, April 08, 2015 - 12:53 AM UTC
#521
Kentucky, United States
Joined: April 13, 2011
KitMaker: 9,465 posts
Armorama: 8,695 posts
Posted: Sunday, February 14, 2016 - 10:59 PM UTC
Want to test drive a 537 (at least on your computer?)
Check out a fairly recent video game entitled "Spin Tires".
YouTube demo video ay:
https://www.youtube.com/watch?v=Qv2-8IS-jfUArmed Forces Europe, United States
Joined: December 27, 2015
KitMaker: 290 posts
Armorama: 249 posts
Posted: Tuesday, February 16, 2016 - 01:03 AM UTC
What an interesting build. I will need a lot of time to go back and read this build over.
#521
Kentucky, United States
Joined: April 13, 2011
KitMaker: 9,465 posts
Armorama: 8,695 posts
Posted: Thursday, February 25, 2016 - 08:51 PM UTC
A bit stumped on building that forward connector fixture on the stinger. Have tried twice so far but it is still too big and just does not look right enough to suite me!
Time to focus on something else for awhile.
#521
Kentucky, United States
Joined: April 13, 2011
KitMaker: 9,465 posts
Armorama: 8,695 posts
Posted: Thursday, November 10, 2016 - 02:56 AM UTC
Somehow I missed the announcement on this MiniArt kit!
If you want an excellent and inexpensive starting point for an engine to install in those older MAZ 537 and 543 kits then here is your chance: