MAZ 537 F/A Pusher Tractor
Noord-Holland, Netherlands
Joined: January 28, 2007
KitMaker: 1,945 posts
Armorama: 282 posts
Posted: Tuesday, December 23, 2014 - 12:24 AM UTC
Impressive work so far! I like your attention to detail.
With the beam attached, how long will the model be? And will the color be that faded bright green that is shown in some of the pictures?
I agree that the PE is a bit on the thin side, but on the other hand the framing in the picture doesn't look that big.

Jelger
On the workbench:
- Tamiya P-47D 1/48
- Eduard Mig21 1/144

#521
Kentucky, United States
Joined: April 13, 2011
KitMaker: 9,465 posts
Armorama: 8,695 posts
Posted: Tuesday, December 23, 2014 - 12:53 AM UTC
Framing up this area creates an additional visual view block making it harder to see that there is NO engine offered in this model. It keeps the eye focused on the surface framing and makes the viewer less likely to try and look into the engine compartment.
#521
Kentucky, United States
Joined: April 13, 2011
KitMaker: 9,465 posts
Armorama: 8,695 posts
Posted: Tuesday, December 23, 2014 - 01:02 AM UTC
Jelger, I debated on just how large to make the framing members - I had my selection down to two sizes of plastic shapes. My rule of thumb is that if I have it down to two choices in scale modeling I always pick the smaller of the two.
Everyone is free to make the framing even larger if they choose to. My point remains the same: framing the opening looks more real than using the flat etch. I hope you agree.
#521
Kentucky, United States
Joined: April 13, 2011
KitMaker: 9,465 posts
Armorama: 8,695 posts
Posted: Tuesday, December 23, 2014 - 01:09 AM UTC
The base vehicle is right now at ELEVEN inches in length and I figure the probe will add at least another six inches so I am thinking that works out to 369mm.
Cote-d`Or, France
Joined: January 14, 2008
KitMaker: 257 posts
Armorama: 250 posts
Posted: Wednesday, December 24, 2014 - 11:28 PM UTC
Congratulations, it's a good idea to change the wheels !! excellent work
#521
Kentucky, United States
Joined: April 13, 2011
KitMaker: 9,465 posts
Armorama: 8,695 posts
Posted: Thursday, December 25, 2014 - 01:24 AM UTC
Merry Christmas to all!
Working today on the mechanism for the spare tire and the left side toolbox area:


Not totally finished but coming along.
#521
Kentucky, United States
Joined: April 13, 2011
KitMaker: 9,465 posts
Armorama: 8,695 posts
Posted: Thursday, December 25, 2014 - 01:40 AM UTC
Left side toolboxes that ride above the spare tire gearbox. That top box is the same one that is normally installed between the frame rails at the rear of the MAZ semi-tractor. Check the photos of the real thing and you will see that it is the same toolbox!
I have added the lock hasp and the box mounting framework but I still need to scare up two "jeep" style spring loaded hood hold downs for the lid to finish off this work.
Waste not, want not . . .

Texas, United States
Joined: March 11, 2007
KitMaker: 977 posts
Armorama: 976 posts
Posted: Thursday, December 25, 2014 - 01:51 AM UTC
Gregovich "I paint all my Models in 4BO Green" Beckman
Holder of the Knight's Cross, Hero of the Soviet Union, Dragon Slayer and Slinger of Massive BS.
#521
Kentucky, United States
Joined: April 13, 2011
KitMaker: 9,465 posts
Armorama: 8,695 posts
Posted: Thursday, December 25, 2014 - 05:38 AM UTC
I apologize for posting these two photos AGAIN but they are practically my only reference for this section of the MAZ build.
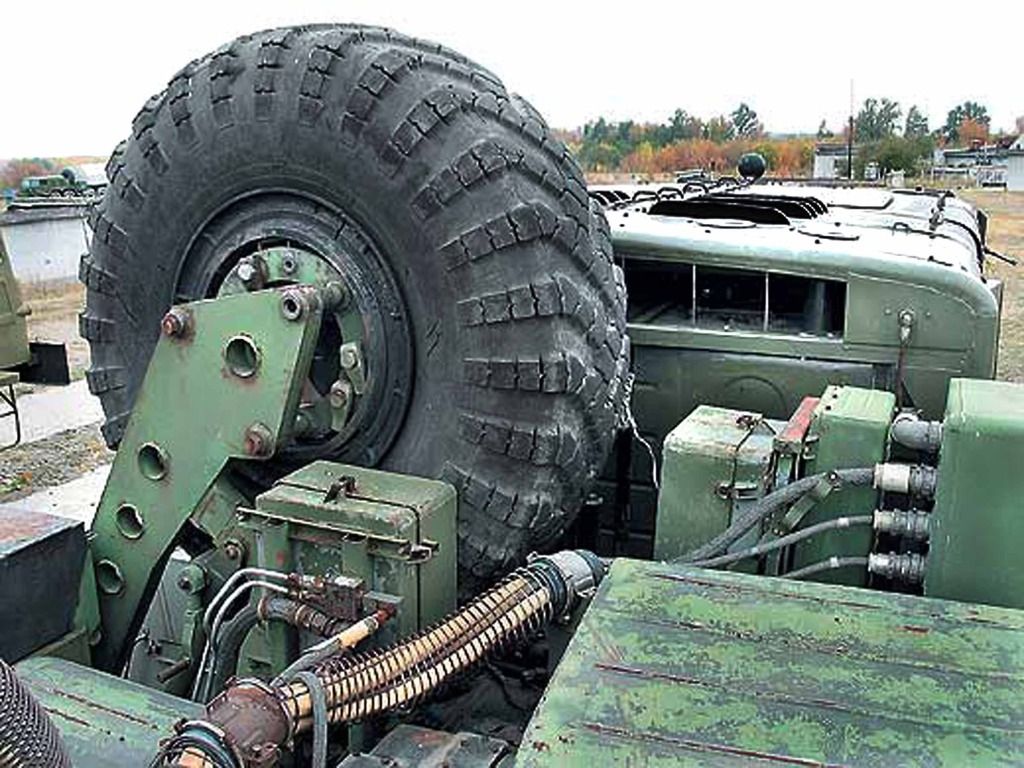
I have the manual for the Russian MAZ truck but for some reason it stops with the "D" series vehicle. It says nothing of the spare tire equipment nor the gen-set???
#521
Kentucky, United States
Joined: April 13, 2011
KitMaker: 9,465 posts
Armorama: 8,695 posts
Posted: Thursday, December 25, 2014 - 05:42 AM UTC
Thanks Greg. I appreciate your comments and your support! - Mike
#521
Kentucky, United States
Joined: April 13, 2011
KitMaker: 9,465 posts
Armorama: 8,695 posts
Posted: Thursday, December 25, 2014 - 02:36 PM UTC
The generator equipment will be the next challenge as I will more or less have to "imagineer" the design of most all the mechanism!
#521
Kentucky, United States
Joined: April 13, 2011
KitMaker: 9,465 posts
Armorama: 8,695 posts
Posted: Thursday, December 25, 2014 - 03:40 PM UTC
Next up I needed to create a gearbox to transmit power from the PTO on the transfer case to the transverse mounted generator.
(Photo is looking down into the space between the rear of the cab and the forward end of the load box.)

(The gearbox is just dry-fitted at this point so yes, right now it is sitting ON the main driveshaft.)
The front of the vehicle is to the upper left in this picture.
#521
Kentucky, United States
Joined: April 13, 2011
KitMaker: 9,465 posts
Armorama: 8,695 posts
Posted: Thursday, December 25, 2014 - 04:03 PM UTC
#1 - I knew the gearbox had to be of a 90 degree design because the PTO out put shaft is on a fore / aft axis whereas the generator input shaft is cross-wise as the generator sits transversely across the frame,
#2 - Also I knew the gear box could not be a simple bevel gear arrangement because both axles in a bevel gear arrangement tend to be at the same vertical height.

#3 - So it must be a helical gear set because helical gears can not only transmit power at a 90 degree angle but they also vertically off-set the two shafts by 1/2 the combined height of the two gears.

_____________________________________________
A standardized, off the shelf, small industrial helical gearbox found in an online industrial equipment catalog:

#521
Kentucky, United States
Joined: April 13, 2011
KitMaker: 9,465 posts
Armorama: 8,695 posts
Posted: Thursday, December 25, 2014 - 04:32 PM UTC
#521
Kentucky, United States
Joined: April 13, 2011
KitMaker: 9,465 posts
Armorama: 8,695 posts
Posted: Thursday, December 25, 2014 - 04:57 PM UTC
Forgive me but an industrial gearbox is a industrial gearbox -
Therefore my gearbox started life as a split axle differential off an Italeri IH built Russian Katyusha rocket launcher from my spares box. Likewise the short universal drive shaft came from the same source though it may end up being shortened even more.
The top part of the gearbox is just a piece of Evergreen tubing sculpted into the top edge of the differential. The bearing cover on the end of that tube is a Panzer IV road wheel hub which has a grease fitting in the center. (A few years back Tristar marketed a super detail set of Pz. IV road wheels, return rollers and final drives. I purchased this set simply because it came with 24 of these beautifully done bearing covers which are almost totally generic to all machinery regardless of country of origin!) The bearing ring at the other end of that top tube comes from the same Tristar set.


Small holes drilled in the top and bottom of the gearbox were filled with short lengths of plastic rod, trimmed to length and became the oil filler and drain ports.
______________________________________________
Pz IV road wheel bearing covers from Tristar:


The Tristar set contained bearing covers in a total of three different design styles.
Minnesota, United States
Joined: March 04, 2003
KitMaker: 4,630 posts
Armorama: 4,498 posts
Posted: Friday, December 26, 2014 - 12:23 AM UTC
Very nice illustration into the workings of the drive shaft. This is why I like modeling...it leads to a desire to know what all the bits actually do.
Ex-34th ID MNANG - 13F and 63D
"Fire For Effect."
#521
Kentucky, United States
Joined: April 13, 2011
KitMaker: 9,465 posts
Armorama: 8,695 posts
Posted: Friday, December 26, 2014 - 07:47 PM UTC
In my case it was the other way around; I was born with a crazy desire to know how things work inside the shell. I think this interest serves me here in "engineering" these scratch projects. Mike
#521
Kentucky, United States
Joined: April 13, 2011
KitMaker: 9,465 posts
Armorama: 8,695 posts
Posted: Saturday, December 27, 2014 - 07:25 AM UTC
Spent a part of the day today mounting the gearbox that will run between the PTO and the yet to be built electric generator. Also installed the first of the electric control boxes and a number of ancillaries on the rear of the fuel tanks - transmission oil filler spout, oil filter and starting fluid reservoir.


The spare tire is for now just sitting on the loading arm, hense it is not centered but will be once perminently installed.
#521
Kentucky, United States
Joined: April 13, 2011
KitMaker: 9,465 posts
Armorama: 8,695 posts
Posted: Saturday, December 27, 2014 - 09:16 AM UTC

Status of current progress 12/27/2014:
Texas, United States
Joined: March 11, 2007
KitMaker: 977 posts
Armorama: 976 posts
Posted: Saturday, December 27, 2014 - 07:46 PM UTC
Gregovich "I paint all my Models in 4BO Green" Beckman
Holder of the Knight's Cross, Hero of the Soviet Union, Dragon Slayer and Slinger of Massive BS.
#521
Kentucky, United States
Joined: April 13, 2011
KitMaker: 9,465 posts
Armorama: 8,695 posts
Posted: Monday, December 29, 2014 - 11:34 PM UTC
Working now on the generator deck - the generator itself, if modeled, would sit about a third of its' diameter down into that large white surface. But the generator enclosure extends both above and below this surface so the mechanism itself will not be seen.

Texas, United States
Joined: March 11, 2007
KitMaker: 977 posts
Armorama: 976 posts
Posted: Monday, December 29, 2014 - 11:43 PM UTC
That's too bad it won't be seen as you have a lot of detail there.
Gregovich "I paint all my Models in 4BO Green" Beckman
Holder of the Knight's Cross, Hero of the Soviet Union, Dragon Slayer and Slinger of Massive BS.
#521
Kentucky, United States
Joined: April 13, 2011
KitMaker: 9,465 posts
Armorama: 8,695 posts
Posted: Tuesday, December 30, 2014 - 12:06 AM UTC
Quoted Text
That's too bad it won't be seen as you have a lot of detail there.
The generator itself is fully enclosed but not to worry - everything else will be visible, though it may require some neck strain and a flashlight to see it all!
#521
Kentucky, United States
Joined: April 13, 2011
KitMaker: 9,465 posts
Armorama: 8,695 posts
Posted: Thursday, January 01, 2015 - 09:17 PM UTC
Been down over the holidays with a serious attack of the flu so no progress here. Sorry
#521
Kentucky, United States
Joined: April 13, 2011
KitMaker: 9,465 posts
Armorama: 8,695 posts
Posted: Monday, January 05, 2015 - 05:01 PM UTC
Does paint count as progress? It was very easy doing those whitewalls with the hubs being removable. Now I need to hit them with some matte clear dulling spray and some lite weathering.


Progress as of 1/5/2015: