


Hosted by Darren Baker
Late Tiger 1 Build Log
TMikeCurry

Joined: June 02, 2009
KitMaker: 128 posts
Armorama: 97 posts
Posted: Monday, November 12, 2012 - 11:42 AM UTC
Wow criminy that's an awesome level of detail. If you ever decide to write a handbook on "How to Work With Tiny Tiny Parts", I can tell you you've got a paying customer waiting to read it.

GregCloseCombat
Joined: June 30, 2008
KitMaker: 2,408 posts
Armorama: 2,394 posts

Posted: Monday, November 12, 2012 - 05:01 PM UTC
This Tiger will drive away when you're done. Great details and I bet you're learning a lot! 


Tiger_213
Joined: August 10, 2012
KitMaker: 1,510 posts
Armorama: 1,443 posts
Posted: Monday, November 12, 2012 - 05:17 PM UTC
Steven....certainly wasn't expecting to see this much detail. Really looking forward to seeing more.

SDavies

Joined: January 09, 2010
KitMaker: 979 posts
Armorama: 959 posts

Posted: Monday, November 12, 2012 - 08:43 PM UTC
Dear Trevor, Tmikecurry, Greg and Tiger213,
Thank you for your taking the time to comment, it helps motivate me to carry on what at time feels like a hopelessly complicated build.
One of the biggest problems that I am facing is the "Bovington Tiger effect" which really makes building a Late Tiger 1 interior much harder.
Since the Tiger went into production in August 1942 until it ceased production in August 1944 there were numerious changes to the design of the tank, the most noticable being the tank losing the ability to travel completely submerged underwater for short distances. These changes have been labled post war as initial, early, mid and late production Tigers and for the most part manufacturers have done a good job with the externals of the Tiger.
The internals are a diffrent matter, the changes in the capabilities of the Tiger had profound impacts on the layout of the internal fittings of the hull, again the removal of the submersible capabilities of the Tiger had an impact on the controls on the rear firewall of the Tiger and numerious other changes to ease mass production took place.
Most modern reference books on the Tiger 1 reference the Bovington Tiger almost exclusively. Tiger 131 was a early production tank that was captured in North Africa in 1943 and is quite diferent in many aspects from the late version of the tiger that I am building. I dont blame the authors at all, the engineers at Bovington presented the world with the unique opportunity to photograph an early Tiger 1 being taken apart and put back together in running condition, but their reference books often lead me to make modifications to my Tiger that are incorect for the late version that I am trying to depict.
For instance, I have had to remove several components form the firewall because all my reference books reference the Tiger in its early configuration and I was adding control handles which the crew would have used to make the Tiger ready for submersion.
I really wished they had used the Tiger in Saumur, it was in the same heavy Tank batallion, different company, that I am trying to represent (SS Batallion 102 - Normandy)
Until then I will have to keep on double checking my references.
S

BBD468
Joined: March 08, 2010
KitMaker: 2,465 posts
Armorama: 2,383 posts
Posted: Tuesday, November 13, 2012 - 03:13 PM UTC
Hello Steven,
Once again your masterful work is a joy to watch. I hope i can scratch build and solder like you when i grow up!! Looks fantastic bro!
Gary
Once again your masterful work is a joy to watch. I hope i can scratch build and solder like you when i grow up!!
Looks fantastic bro! Gary

Tiger_213
Joined: August 10, 2012
KitMaker: 1,510 posts
Armorama: 1,443 posts
Posted: Tuesday, November 13, 2012 - 05:11 PM UTC
I can only imagine your research issues Steven; as the old saying goes, Keep calm and carry on.

Braille

#135
Joined: August 05, 2007
KitMaker: 1,501 posts
Armorama: 1,485 posts

Posted: Tuesday, November 13, 2012 - 05:55 PM UTC
@ - Steven,
Its been a while since I looked through the book but I happen to have the Verlinden copy of the late production Tiger that I believe resides at Saumur? If youre interested just PM me and I could scan the interior photographs and send them over to you ?
~ Eddy
Its been a while since I looked through the book but I happen to have the Verlinden copy of the late production Tiger that I believe resides at Saumur? If youre interested just PM me and I could scan the interior photographs and send them over to you ?
~ Eddy
SDavies
Joined: January 09, 2010
KitMaker: 979 posts
Armorama: 959 posts
Posted: Sunday, November 18, 2012 - 11:33 AM UTC
Hello Everyone,
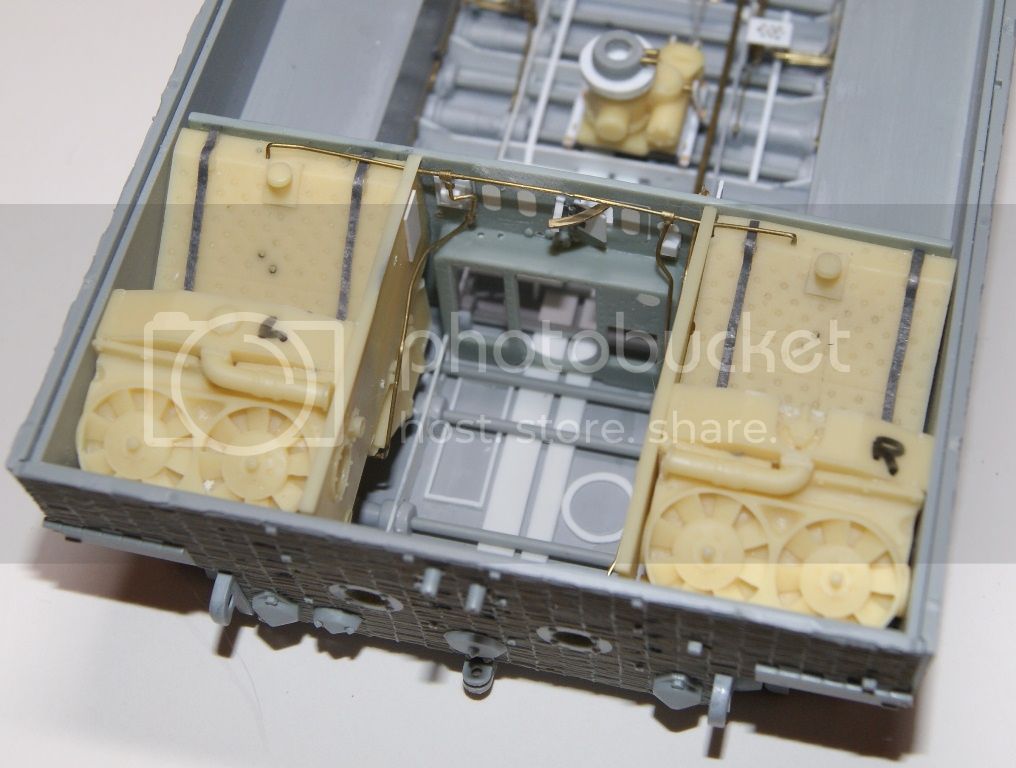
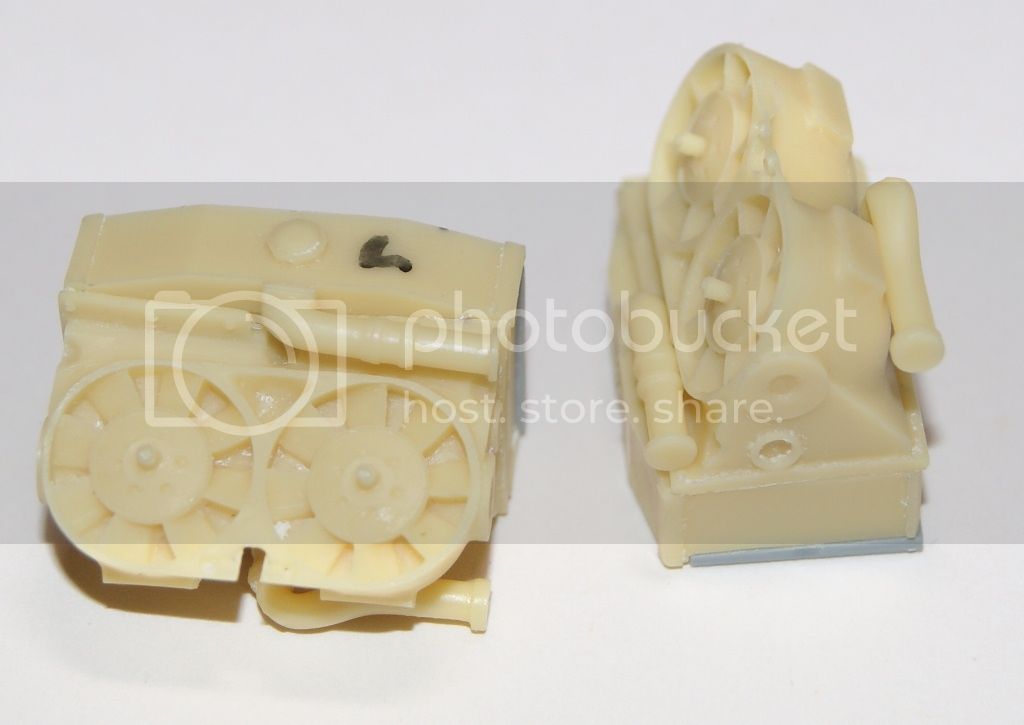
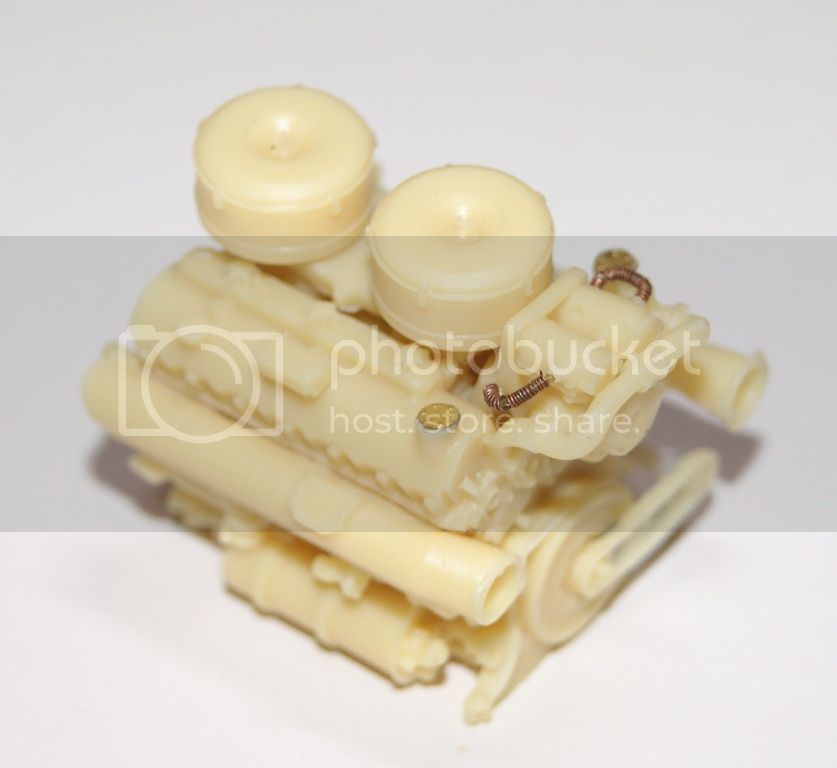
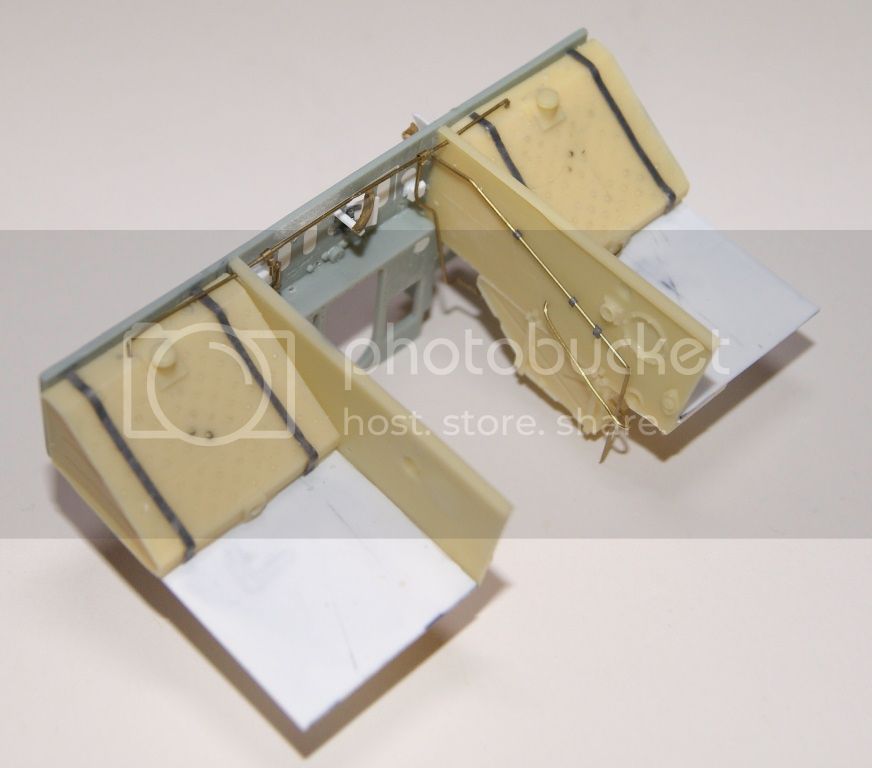
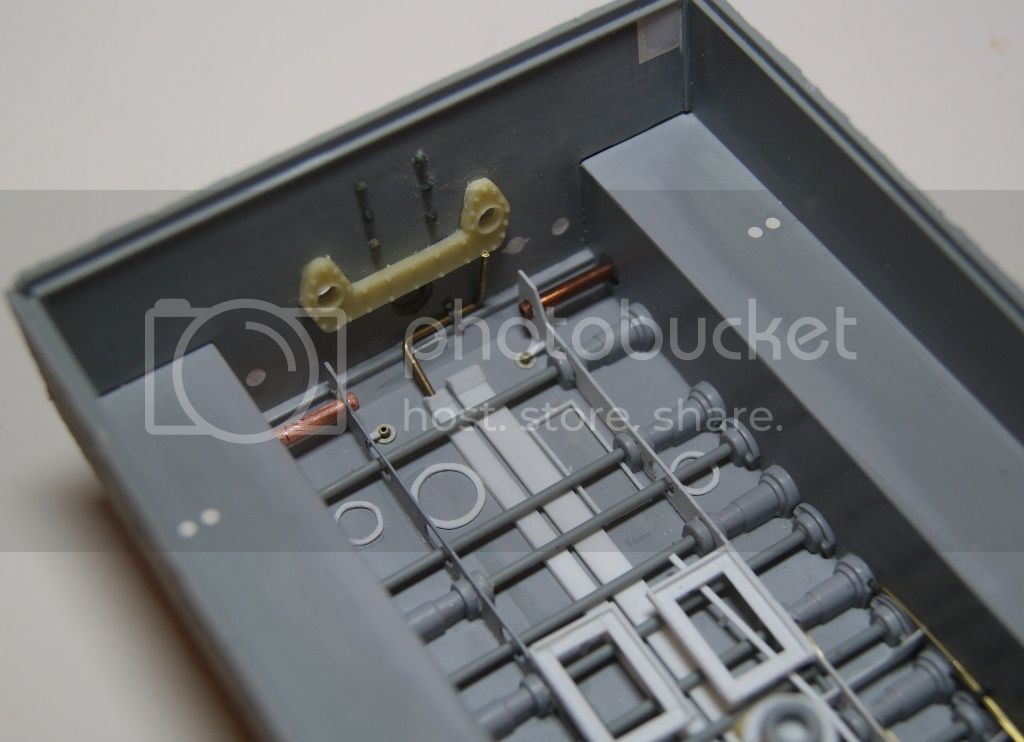
Quick update tonight to highlight recent progress. I have been working on the engine bay as the next step is to glue in the fire wall to the hull, something impossible without the addition of the engine and associated detail.
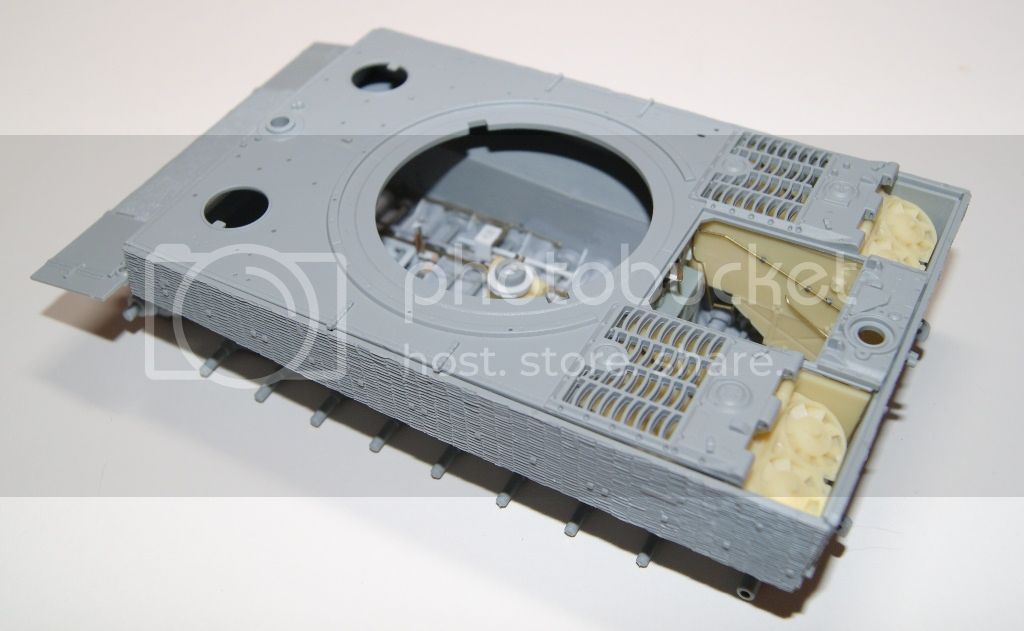
The first image is general view of the tank hull, while the images below highlights some of the fuel lines and the rear of the firewall.
I have added detail to the hull with the full understanding that such detail will never be seen when the engine is installed. Oh well.
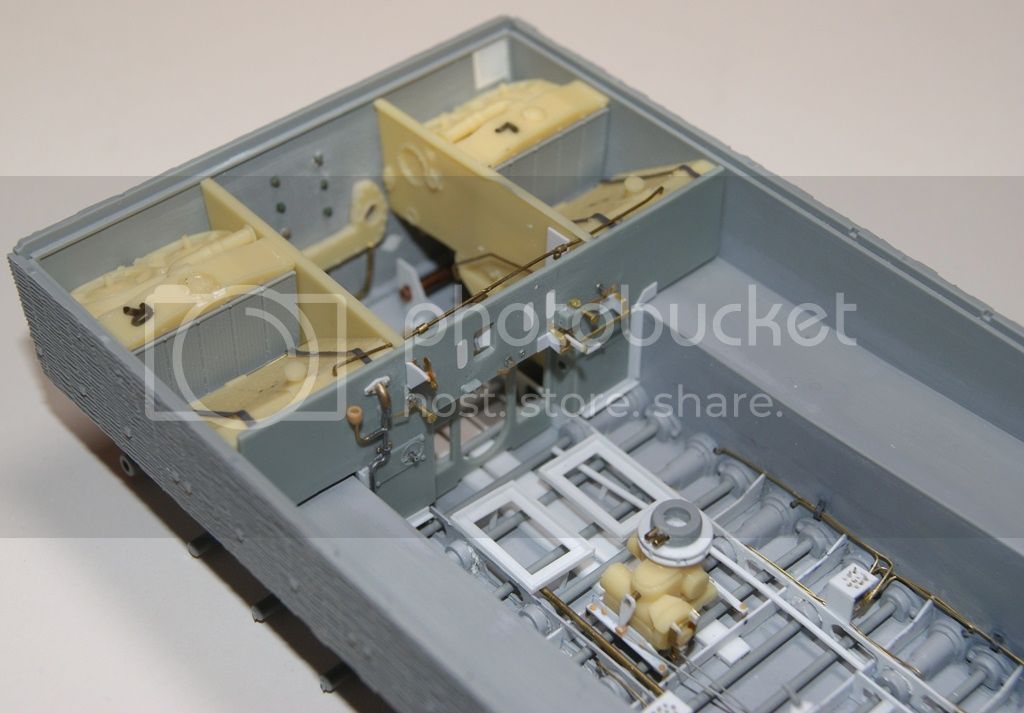
The above image shows the revised firewall layout, while the next two show the fan/radiator setup and the engine. Both will require some more modification
The next images shows the modified firewall in a little more detail
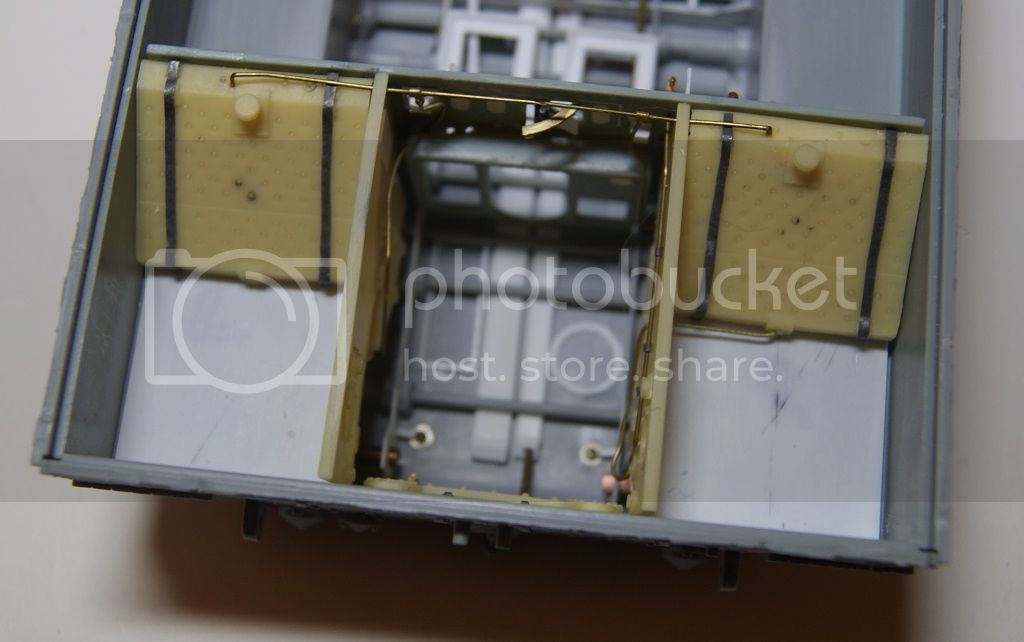
and the last a clear view of the Tiger floor
Lots more to add !
Thanks for looking
S
Quick update tonight to highlight recent progress. I have been working on the engine bay as the next step is to glue in the fire wall to the hull, something impossible without the addition of the engine and associated detail.
The first image is general view of the tank hull, while the images below highlights some of the fuel lines and the rear of the firewall.
I have added detail to the hull with the full understanding that such detail will never be seen when the engine is installed. Oh well.
The above image shows the revised firewall layout, while the next two show the fan/radiator setup and the engine. Both will require some more modification
The next images shows the modified firewall in a little more detail
and the last a clear view of the Tiger floor
Lots more to add !
Thanks for looking
S

imatanker
Joined: February 11, 2011
KitMaker: 1,654 posts
Armorama: 1,565 posts
Posted: Sunday, November 18, 2012 - 01:06 PM UTC
Steven,First let me say that this is an oustanding build.Kudos to you for having the will and talent to get it done.
I have been following this thread since it started,and at this point in time would like to make a suggestion,if you will let me.Maybe You have thought of this and maybe not .You mention that a lot of the work will not be seen.Most of your parts seem to be sub-assemblies,is the fit of the parts good enough so that you could just lay them in place so that when you are done you could "open up"everything so they could be displayed? If it could be done then all your hard work could be seen.Regards,Jeff T.
I have been following this thread since it started,and at this point in time would like to make a suggestion,if you will let me.Maybe You have thought of this and maybe not .You mention that a lot of the work will not be seen.Most of your parts seem to be sub-assemblies,is the fit of the parts good enough so that you could just lay them in place so that when you are done you could "open up"everything so they could be displayed? If it could be done then all your hard work could be seen.Regards,Jeff T.

SDavies
Joined: January 09, 2010
KitMaker: 979 posts
Armorama: 959 posts
Posted: Sunday, November 18, 2012 - 08:58 PM UTC
Dear Jeff,
Thanks for the comment!
The idea of leaving elements of the Tiger as subassemblies is an interesting one but not practicable unfortunately. The Engine for instance will be connected to the fuel tanks with fuel lines and electical wiring (depending on how much level of detail I am silly enough to add) as well as water pipes for the radiators.
I am thinking about not gluing on the upper hull, but that would leave a gap of 0.5 mm between the upper hull and the rear of the tank which is quite noticable.
I will make a decision as I proceed about the way to display the tiger to best effect
S
Dragon164
#226

Joined: February 20, 2012
KitMaker: 1,909 posts
Armorama: 1,066 posts

Posted: Sunday, November 18, 2012 - 09:53 PM UTC
Hi Steven,
I have also been following for some time, In regards to the upper hull I think if you could use rare earth magnets to hold it on you could fix that seam and still remove for display.
Cheers Rob.
PS, they come in some really small sizes.
I have also been following for some time, In regards to the upper hull I think if you could use rare earth magnets to hold it on you could fix that seam and still remove for display.
Cheers Rob.
PS, they come in some really small sizes.

TMikeCurry
Joined: June 02, 2009
KitMaker: 128 posts
Armorama: 97 posts
Posted: Monday, November 19, 2012 - 09:14 AM UTC
Wow your work is incredibly impressive. I'm just amazed at all the things you're doing with this model!
I was curious about the oil/lubricant lines to the torsion bars in the last photo -- do they actually stop there on the 1:1 tank, or did you leave them off "for now" so as not to be in the way of upcoming work?
I was curious about the oil/lubricant lines to the torsion bars in the last photo -- do they actually stop there on the 1:1 tank, or did you leave them off "for now" so as not to be in the way of upcoming work?
imatanker
Joined: February 11, 2011
KitMaker: 1,654 posts
Armorama: 1,565 posts
Posted: Monday, November 19, 2012 - 09:46 AM UTC
Quoted Text
Dear Jeff,
Thanks for the comment!
The idea of leaving elements of the Tiger as subassemblies is an interesting one but not practicable unfortunately. The Engine for instance will be connected to the fuel tanks with fuel lines and electical wiring (depending on how much level of detail I am silly enough to add) as well as water pipes for the radiators.
I am thinking about not gluing on the upper hull, but that would leave a gap of 0.5 mm between the upper hull and the rear of the tank which is quite noticable.
I will make a decision as I proceed about the way to display the tiger to best effect
S
Steven,Nothing ventured,nothing gained
 I'm sure You will figure something out.Once again,an outstanding build.Jeff T.
 Tiger_213
Joined: August 10, 2012
KitMaker: 1,510 posts
Armorama: 1,443 posts
Posted: Monday, November 19, 2012 - 09:59 AM UTC
Glad to see you're still pushing on Steven.
BBD468
Joined: March 08, 2010
KitMaker: 2,465 posts
Armorama: 2,383 posts
Posted: Monday, November 19, 2012 - 12:22 PM UTC
Lookin' bloody fantastic Steven! I still watchin' and learnin'!
Gary
Gary
SDavies
Joined: January 09, 2010
KitMaker: 979 posts
Armorama: 959 posts
Posted: Tuesday, November 20, 2012 - 08:56 PM UTC
Hello everyone,
Thank you for the comments, this project is not an easy one and will probably end up being really expensive with all the PE and reference books I have purchased.
I have just bought a Eduard Mid Production Interior set and a Aber Tiger 1 late external PE set although that really is it, there is nothing more to buy.
Rob, thats a good idea about the magnets, I will look into it
Mike, you are corect, I have left out the rear lubrication lines at the moment. They all go through the firewall and most of them will not be visible when the firewall is installed anyway. That does not mean that I will not install them.
Thanks for looking
S

asmodeuss
Joined: November 19, 2011
KitMaker: 1,389 posts
Armorama: 1,388 posts

Posted: Wednesday, November 21, 2012 - 03:06 AM UTC
Steven...Amazing work mate!!!!  Keep it coming.
Here is a link for rare earth magnets, it is where I buy mine.
http://www.leevalley.com/us/home/Search.aspx?action=n
Phil.
Keep it coming.Here is a link for rare earth magnets, it is where I buy mine.
http://www.leevalley.com/us/home/Search.aspx?action=n
Phil.
Dragon164
#226
Joined: February 20, 2012
KitMaker: 1,909 posts
Armorama: 1,066 posts
Posted: Wednesday, November 21, 2012 - 11:25 AM UTC
Hi all,
I get mine here:
http://www.supermagnetman.net/
They come in so many useful sizes, the 1mm cube ones are good for holding on parts that would break off when moving the model.
Cheers Rob.
I get mine here:
http://www.supermagnetman.net/
They come in so many useful sizes, the 1mm cube ones are good for holding on parts that would break off when moving the model.
Cheers Rob.

Airtake

Joined: August 29, 2012
KitMaker: 20 posts
Armorama: 19 posts
Posted: Friday, November 30, 2012 - 11:36 PM UTC
Hi Steve
Your work is absolutely amazing and inspiring. My newest project is a Academy Tiger 1 Early prodoctions version with interior and I will use your work as inspiration. Some questions, what do you use as fuel lines? Do you solder the different connections or glue them?
Keep up the good work
Your work is absolutely amazing and inspiring. My newest project is a Academy Tiger 1 Early prodoctions version with interior and I will use your work as inspiration. Some questions, what do you use as fuel lines? Do you solder the different connections or glue them?
Keep up the good work
SDavies
Joined: January 09, 2010
KitMaker: 979 posts
Armorama: 959 posts
Posted: Thursday, December 06, 2012 - 11:53 PM UTC
Hello Lennart
I use Griffon Model fine brass tubing, 0.3 and 0.5 mm. Unfortunely its really expensive. Any fine brass wire will do. I glue the wiring as there is a significant risk of heat distortion with soldering.
I am taking a minor break from the Tiger 1 until my 2 week annual leave at Christmas, so everything is in a holding pattern at the moment.
Thanks
Steven
Rouse713
Joined: February 03, 2009
KitMaker: 367 posts
Armorama: 326 posts
Posted: Friday, December 07, 2012 - 12:26 AM UTC
Steve,
I just got the following book. While there may not be a lot of actual images of a late tiger interior, there are a ton of black and white line drawings of the inside and turret configuration. They look to be pretty detailed and seem to not be done without reference.
If you would be interested in some specific shots, let me know. BTW, it is an awesome book! If you were thinking about getting a new tiger reference book, this is pretty comprehensive for mid-late tiger I's.
SDavies
Joined: January 09, 2010
KitMaker: 979 posts
Armorama: 959 posts
Posted: Saturday, December 08, 2012 - 01:35 AM UTC
Hello Mark,
That book sounds interesting, could you please post a few images of the hull interior and gearbox? Where did you buy the book from?
Steven
That book sounds interesting, could you please post a few images of the hull interior and gearbox? Where did you buy the book from?
Steven

Villiers

Joined: April 04, 2010
KitMaker: 50 posts
Armorama: 49 posts
Posted: Saturday, December 08, 2012 - 03:13 AM UTC

Byrden

Joined: July 12, 2005
KitMaker: 2,233 posts
Armorama: 2,221 posts
Posted: Saturday, December 08, 2012 - 03:24 AM UTC
Those turret interior drawings; is this one of them?

Because that's from the Turret Manual and you don't have to pay for it, it's in the archives...
David
Because that's from the Turret Manual and you don't have to pay for it, it's in the archives...
David

jrutman
Joined: April 10, 2011
KitMaker: 7,941 posts
Armorama: 7,934 posts
Posted: Saturday, December 08, 2012 - 03:47 AM UTC
Just whn I was getting very tired of looking at Tiger models I find this thread. Now I am interested again!!
Great job so far,very extensive and well made with a nice combo of scratchbuilding and aftermarket do-dads.
J
Great job so far,very extensive and well made with a nice combo of scratchbuilding and aftermarket do-dads.
J
 |

WEB HOSTING BY


Copyright ©2021 Armorama and Kitmaker Network, a subsidiary of Silver Star Enterprises
All Rights Reserved. Please read our Conditions of Use and Privacy Policy.
All Rights Reserved. Please read our Conditions of Use and Privacy Policy.