

Яusso-Soviэt Forum: Cold War Soviet Armor
For discussions related to cold war era Russo-Soviet armor.
For discussions related to cold war era Russo-Soviet armor.
Hosted by Jacques Duquette
Panzershop SS-15

Dzhaks

Joined: December 07, 2012
KitMaker: 87 posts
Armorama: 87 posts

Posted: Monday, December 10, 2012 - 09:17 AM UTC
Jim, sorry, it was my mistake! There is one jack in front of the machine. It's lower part has a pyramidal form without the top. I tried to paint it, but could do it only on the second picture. So you can see two tryes of painting, not two jacks)))

Teaker11

Joined: July 02, 2009
KitMaker: 962 posts
Armorama: 786 posts

Posted: Monday, December 10, 2012 - 09:33 AM UTC
I see that I have a picture on another website. I re read with a translator that there is only one ram in the middle , my guess is to keep the cab from leaning till it hit the full lift, any guess what the plate would look like, and thank you dimon_13 for useing one of my pictures in your blog. I have learned a lot from it.
Jim
Jim
Teaker11
Joined: July 02, 2009
KitMaker: 962 posts
Armorama: 786 posts
Posted: Tuesday, December 11, 2012 - 02:00 AM UTC
Evgeny and Dimon-13
I have some questions I hope you can answer:
1: where is the exhaust for the engine?
2: was the muffler outside
3: was there ladders or hand holds on the compartments
on the side of the launcher
4:was there a generator or turbine to make power to run the electric, if so where was the exhaust.
5: What kind of engine was used ?
6:Behind the seats were there electronics for the launcher on both sides.
7: looking from the front did the driver sit on the right or left?
8: did the driver use levers as a tank to turn.
9: was the color white used on the inside.
10: where was the gas cap to fuel the engine
If I understood the discription of the front leveler it came down like a bar to rest on the tracks? or was the triangel only part way across. The softwear that I have does not get every word. any answers would help. as there is no real detail on the model. I can put the piston and seats, but I think that is all you would be able to see from the outside. Thats why levers , latches, exhust, gas cap windshild wipers, door handles would help
Also on one of the drawings it shows a wheel crank up twords the front of the launch tube. Is there any walkaround photos of the launcher ? Russia never throws away anthing. I know only a few were built, I know there is a simular launcher that had a shorter missle is the same?
I know its a lot to ask but any help would help this very basic kit
Thanks
Jim
Dzhaks
Joined: December 07, 2012
KitMaker: 87 posts
Armorama: 87 posts
Posted: Tuesday, December 11, 2012 - 03:11 AM UTC
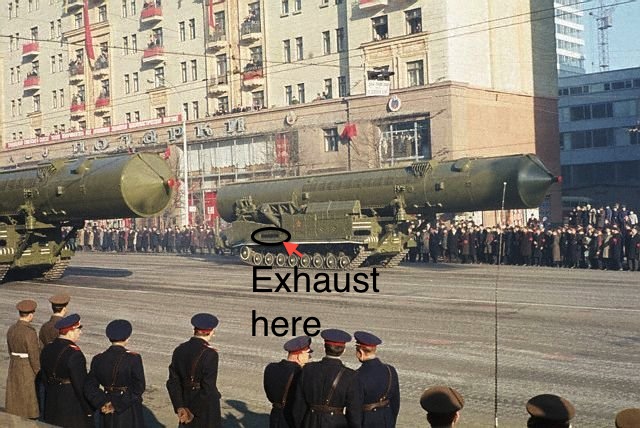
1 and 2 - watch this photo and you'll understand, black parts of tank body show you the place where smoke goes out:

our tanks didn't have mufflers outside since 1950s
3 - I don't know, but IMHO, it was no need to get up closer by the nuclear rocket)))
4 - I don't know yet
5 - This missle launcher is based on T-10 or T-10M chassis (it was it's picture above), so you can easily find basic information about it. And about it's wheels and tracks. This kit was made with some mistakes. Thank god, they remind us to be a professional modeller to make this model)))
6, 7, 8 - my translation of Dimon-13 post from another site...
If you look at the doors from outside, you'll see driver's seat in the right with levers and pedals. There is a thin septum behind him, which begins from the wall and goes to hydraulic jack. It also protect the driver from the ligt, which is nessecary for missle operator. There is a missle control panel behind the septum and it also connected with the wall.
There is a moveable commander's seat behind the left door (you stay in front of machine and look at the doors, remember?). When it is rised, you can get inside to sit down at the operator's turning seat. But this information needs to be studied more neatly and correctly. It's the description of PT-15 interior. We only hope, that it were no differences between our PT-20П interior...
9 - our military techics are coloured white inside.
10 - I don't know yet)))
About wheels and tracks - read about T-10, there are no differences with our machine. It is better to see pictures.
About front lever. Inside it was only tube, as I understood. And the pyramidal part was inside the tank body or outside, I don't know yet...
Hope, I could help you little bit. Hope, Dimon-13 will come and answer those questions too. Have a nice building!
Teaker11
Joined: July 02, 2009
KitMaker: 962 posts
Armorama: 786 posts
Posted: Tuesday, December 11, 2012 - 03:35 AM UTC
Evgeny
Thank you for takeing the time to answer my questions. The picture of the T-10 is not a video link. Its a good picture though,
Jim
Thank you for takeing the time to answer my questions. The picture of the T-10 is not a video link. Its a good picture though,
Jim
Dzhaks
Joined: December 07, 2012
KitMaker: 87 posts
Armorama: 87 posts
Posted: Tuesday, December 11, 2012 - 03:47 AM UTC
Jim, I think, this one will be better for you to understand)))

Teaker11
Joined: July 02, 2009
KitMaker: 962 posts
Armorama: 786 posts
Posted: Tuesday, December 11, 2012 - 04:17 AM UTC
DUH, I was looking for a pipe. I get it now! Nice drawing.
as it seem my work is sloopy a quote from only-paper.ru
dimon-13
"But on Armorame I thought that something similar will end. Jim painfully sloppy work. And probably the model zaporol. But the plastic model is hard to screw up. All details are being scaled up and remade. The model is then will bleed. Who would he suggested? "
dimon-13 go buy the kit and see what you can do with it.
Sorry guys I was trying to do my best with what I had to work with .
Jim

arpikaszabo

Joined: February 13, 2006
KitMaker: 674 posts
Armorama: 637 posts

Posted: Tuesday, December 11, 2012 - 05:17 AM UTC
Why do You care what some random guy from a foreign forum thinks about Your work? Plenty of people are interested in this build. Anyway, I do not understand how can anyone build accurately a kit which has no reference available. And, well, from experience, Panzershop is a different league...

Kylewaaagh
Joined: October 03, 2007
KitMaker: 34 posts
Armorama: 32 posts

Posted: Tuesday, December 11, 2012 - 05:28 AM UTC
Quoted Text
Why do You care what some random guy from a foreign forum thinks about Your work? Plenty of people are interested in this build. Anyway, I do not understand how can anyone build accurately a kit which has no reference available. And, well, from experience, Panzershop is a different league...
Here here!
Keep on' posting your progress!
Teaker11
Joined: July 02, 2009
KitMaker: 962 posts
Armorama: 786 posts
Posted: Tuesday, December 11, 2012 - 05:40 AM UTC
Im Sorry guys, I was just fed up following 2 forums trying to get information to build a more accurate kit . I will still post but I am not going to make an interior, it has pretty much stoped this build. I will get back to building.
pictures to follow today
Jim
pictures to follow today
Jim
Dzhaks
Joined: December 07, 2012
KitMaker: 87 posts
Armorama: 87 posts
Posted: Tuesday, December 11, 2012 - 05:44 AM UTC
Jim, are you so impressible??? Our modellers like to study the construction of the prototype closely. Dimon-13 builds a paper PRE-model. His model will be much later to built. And he goes to write a book about this machine... As for me, I'm glad to watch both his and yours buildings to build my own kit properly.
Maybe, he told so because you didn't get enough information and trusted to instruction. But I see, that you want to build it seriously and try to help you.
Another advice: don't believe to transleters))) The language of Pushkin and Dostoevskiy is not so popular in our speech and most of the words had lost they initial meaning)))

dimon-13

Joined: December 01, 2012
KitMaker: 10 posts
Armorama: 10 posts
Posted: Tuesday, December 11, 2012 - 05:44 AM UTC
Exhaust.


Teaker11
Joined: July 02, 2009
KitMaker: 962 posts
Armorama: 786 posts
Posted: Tuesday, December 11, 2012 - 06:14 AM UTC
Its my mistake, Thank you for your information. I am back to building.
Jim
Jim
Dzhaks
Joined: December 07, 2012
KitMaker: 87 posts
Armorama: 87 posts
Posted: Tuesday, December 11, 2012 - 06:40 AM UTC
Quoted Text
I am back to building.
Jim
And it's right! Glory to work!

Teaker11
Joined: July 02, 2009
KitMaker: 962 posts
Armorama: 786 posts
Posted: Tuesday, December 11, 2012 - 07:54 AM UTC
Ok Todays update:
Freash paint in the interior and windows installed with a coat of "Pledge" floor cleaner.
Starting on the front posts for the launch tube I put 1.13 mm or .044 brass rod and expoxy the parts toghter


now I have a good strong platform, on the top I used .090 mm
or 0.036 plastic, it will be easyer to cut after the expoxy dries,
Here are my 2 favorate tools one you wont like, a denest drill eeeeeee and a Bager Velocity air brush 90% of cutting tools are air, they stay cool to the touch and are small and light.

Thats it for today, my back is killing me and the meds are kicking in. I am sorry for my melt down this morning, please for give me
have a good day
Jim
Freash paint in the interior and windows installed with a coat of "Pledge" floor cleaner.
Starting on the front posts for the launch tube I put 1.13 mm or .044 brass rod and expoxy the parts toghter
now I have a good strong platform, on the top I used .090 mm
or 0.036 plastic, it will be easyer to cut after the expoxy dries,
Here are my 2 favorate tools one you wont like, a denest drill eeeeeee and a Bager Velocity air brush 90% of cutting tools are air, they stay cool to the touch and are small and light.
Thats it for today, my back is killing me and the meds are kicking in. I am sorry for my melt down this morning, please for give me
have a good day
Jim
Dzhaks
Joined: December 07, 2012
KitMaker: 87 posts
Armorama: 87 posts
Posted: Tuesday, December 11, 2012 - 08:27 AM UTC
I can't understand: is it plastic or resin?
Teaker11
Joined: July 02, 2009
KitMaker: 962 posts
Armorama: 786 posts
Posted: Tuesday, December 11, 2012 - 09:38 AM UTC
The model is cast resin, also photo etch, white metal cast wheels, Metal tracks and the rocket tube looks to be fiberglass. I am useing expoxy and adding pins to some parts to keep them from breaking off.
Jim
Jim
Teaker11
Joined: July 02, 2009
KitMaker: 962 posts
Armorama: 786 posts
Posted: Wednesday, December 12, 2012 - 11:52 AM UTC
Just a little update I tried to use Blacken-it and after 10 mintues it hardly changed colors, yes I cleaned them before I tried. then my wife does stained glass and has a product called Novacan Black Patina, after 5 minutes black tracks
Painted the bottom of the hull so I can install tracks and the glue the top. one problem I noticed on the tracks littie pockets did not turn black so I will have to go back with a paint brush and fix
Jim

Painted the bottom of the hull so I can install tracks and the glue the top. one problem I noticed on the tracks littie pockets did not turn black so I will have to go back with a paint brush and fix
Jim
Teaker11
Joined: July 02, 2009
KitMaker: 962 posts
Armorama: 786 posts
Posted: Thursday, December 13, 2012 - 09:36 AM UTC
Good day all
I have given up on an interior, I just can not find any information out there. This wepeon system from what I have foud out there were few made and another delevry system was was used instead.
This I think was a black project and records are either sealed or have been destroyed. with that said its time to move on. a small history lesson. the rocket was 2 stage. 1st stage was a chemical rocket and the 2nd stage was a liquid fueled rocket. this launcher is not in my opion large enough to carry the liquid fuel. there are a couple films of the rocket being assembled and loaded into the launch tube. Then the whole assembly was loaded onto the launch viechiel. when time to launch 3 hydrolic rams were lowered to stabilize the platform as the tube was raised. here is what I can't find is when the rocket was raized did the load the rocket fuel at that time or was it loaded when lowered. as crosive as rocket fuel is it could not be loaded for a long period. so support trucks would have to be there. This is my opion and I could be completly wrong.
so back to the build:
I added the front hdryolic cylinder useing 2 different sizes of aluminun tube abd installed the tracks and gluded the top section into place. There are two nasty seams to be filled on the fenders


I used a 30 minute expoxy to glue the top down so I will let it sit for a day.
If any one knows how this launch system worked I would like to know. I could make a nice diroma of workers loading the rocket fuel.
even with details missing it still wil make a nice build
Please excuse my spelling.
Have a great evening
Jim
I have given up on an interior, I just can not find any information out there. This wepeon system from what I have foud out there were few made and another delevry system was was used instead.
This I think was a black project and records are either sealed or have been destroyed. with that said its time to move on. a small history lesson. the rocket was 2 stage. 1st stage was a chemical rocket and the 2nd stage was a liquid fueled rocket. this launcher is not in my opion large enough to carry the liquid fuel. there are a couple films of the rocket being assembled and loaded into the launch tube. Then the whole assembly was loaded onto the launch viechiel. when time to launch 3 hydrolic rams were lowered to stabilize the platform as the tube was raised. here is what I can't find is when the rocket was raized did the load the rocket fuel at that time or was it loaded when lowered. as crosive as rocket fuel is it could not be loaded for a long period. so support trucks would have to be there. This is my opion and I could be completly wrong.
so back to the build:
I added the front hdryolic cylinder useing 2 different sizes of aluminun tube abd installed the tracks and gluded the top section into place. There are two nasty seams to be filled on the fenders
I used a 30 minute expoxy to glue the top down so I will let it sit for a day.
If any one knows how this launch system worked I would like to know. I could make a nice diroma of workers loading the rocket fuel.
even with details missing it still wil make a nice build
Please excuse my spelling.
Have a great evening
Jim
Dzhaks
Joined: December 07, 2012
KitMaker: 87 posts
Armorama: 87 posts
Posted: Thursday, December 13, 2012 - 10:00 AM UTC
You did a perfect jack! Would you do anything with the tracks? Polishing them by Gun Metal, a pigment by MIG prodictions, for example?
I have the same problem with Friul tracks and Blacken It... There are little bubbles in those pockets and they prevent the contact with the fluid... My decision is using pigmets (earth, dust, sand)...
This rockets could be ready for the launch for 15-30 minutes after refueling by the licquid fuel. When the time gone out they should be launched or the fuel should be taken off. If you saw videos you should see a lot of people around this machine before rocket launch. It was it's prepeare for the start. I will try to find information about this process after weekends.
As for me, I don't go to make a diorama, only a piece of Red Square or the earth with crew, but if you can do it, maybe I'll rewatch my decision)))
Dzhaks
Joined: December 07, 2012
KitMaker: 87 posts
Armorama: 87 posts
Posted: Thursday, December 13, 2012 - 10:04 AM UTC
And some photos of the correct model from Kirov's Factory in Saint-Petersburg. Object 821 was built there...


Teaker11
Joined: July 02, 2009
KitMaker: 962 posts
Armorama: 786 posts
Posted: Thursday, December 13, 2012 - 10:33 AM UTC
Ok Back to the videos again. 
Dzhaks
Joined: December 07, 2012
KitMaker: 87 posts
Armorama: 87 posts
Posted: Thursday, December 13, 2012 - 11:04 AM UTC
Maybe these videos can help you in studying pre-start prepairing:
http://www.youtube.com/watch?v=Zjzk_GCrQjw from 06:34
http://www.youtube.com/watch?v=dqT90VmYgEU
http://www.youtube.com/watch?v=nVPV9JDFxk8 from 20:03
There is no many information, I should try to watch books...
http://www.youtube.com/watch?v=Zjzk_GCrQjw from 06:34
http://www.youtube.com/watch?v=dqT90VmYgEU
http://www.youtube.com/watch?v=nVPV9JDFxk8 from 20:03
There is no many information, I should try to watch books...
Teaker11
Joined: July 02, 2009
KitMaker: 962 posts
Armorama: 786 posts
Posted: Friday, December 14, 2012 - 02:52 AM UTC
Evgeny
Something has bothered me about the drawing you drew with the exhaust on the t-10, now that I have the engine deck glued in place, if the engine exhaust was there it would be blowing right on the missle tube, heat + chemical rocket = Boom no more rocket.
Jim
Something has bothered me about the drawing you drew with the exhaust on the t-10, now that I have the engine deck glued in place, if the engine exhaust was there it would be blowing right on the missle tube, heat + chemical rocket = Boom no more rocket.
Jim
Jacques
Joined: March 04, 2003
KitMaker: 4,630 posts
Armorama: 4,498 posts

Posted: Friday, December 14, 2012 - 10:03 AM UTC
Hey Jim! 
And keep moving forward man. Don't let "the haters" get to you, and remember that translators still stink...
And keep moving forward man. Don't let "the haters" get to you, and remember that translators still stink...

 |

WEB HOSTING BY


Copyright ©2021 Armorama and Kitmaker Network, a subsidiary of Silver Star Enterprises
All Rights Reserved. Please read our Conditions of Use and Privacy Policy.
All Rights Reserved. Please read our Conditions of Use and Privacy Policy.