Campaigns: Completed Campaigns
Campaigns that are completed should be grouped here.
Hosted by Richard S.
Churchill Group Build
beefy66
Visit this Community
England - North East, United Kingdom
Joined: October 22, 2007
KitMaker: 971 posts
Armorama: 280 posts
Posted: Sunday, July 06, 2014 - 12:39 AM UTC
And still getting used to posting photos after all these years on the site

Keith
pablo_g
Visit this Community
Wojewodztwo Slaskie, Poland
Joined: October 21, 2003
KitMaker: 529 posts
Armorama: 500 posts
Posted: Monday, July 07, 2014 - 08:04 AM UTC
Hi guys, Here are some pictures of my Churchill, himself a tank even though it is a bit nasty, I like it more and more.


Paweł
Jamesite
Visit this Community
United Kingdom
Joined: December 05, 2006
KitMaker: 2,208 posts
Armorama: 2,152 posts
Posted: Monday, July 07, 2014 - 03:42 PM UTC
Nice to see some progress on here, good work lads. Inspired me to post an update:

Got my base coats on, went for a slightly 'modular approach' over emphasising the highlights. All sprayed with Tamiya acrylics (in mixes I can't remember the ratios of sorry!)

The tank:


The Bridge:


Together:


Tracks:


All Together:
AlanL
Visit this Community
England - East Anglia, United Kingdom
Joined: August 12, 2005
KitMaker: 14,499 posts
Armorama: 11,675 posts
Posted: Monday, July 07, 2014 - 09:42 PM UTC
Some cracking builds here folks, I never got OOB.

Nice work guys.

Al
AikinutNY
Visit this Community
Pennsylvania, United States
Joined: October 21, 2003
KitMaker: 683 posts
Armorama: 630 posts
Posted: Tuesday, July 08, 2014 - 01:39 AM UTC
I almost have my bench set up, so I'll throw my Churchill in the ring. It will be a OOB Croc that I was going to use for an AVRE conversion, but some company is making them now!
D_J_W
Visit this Community
Hamilton, New Zealand
Joined: December 30, 2005
KitMaker: 436 posts
Armorama: 367 posts
Posted: Friday, July 11, 2014 - 02:33 PM UTC
Finally got my A into G and got my Churchill built and now the grand-kids have been returned to parents I should be able to get some painting done.


cheers
David
tatbaqui
Staff MemberNews Writer
ARMORAMA
#040
Visit this Community
Metro Manila, Philippines
Joined: May 06, 2007
KitMaker: 2,713 posts
Armorama: 2,451 posts
Posted: Monday, July 14, 2014 - 05:17 PM UTC
My order just came in today. Startup pic:


Cheers,

Tat
beefy66
Visit this Community
England - North East, United Kingdom
Joined: October 22, 2007
KitMaker: 971 posts
Armorama: 280 posts
Posted: Tuesday, July 15, 2014 - 03:35 AM UTC
Dave like the look of that new AFV kit will be following to see what you make of it.

Keith
PantherF
Visit this Community
Indiana, United States
Joined: June 10, 2005
KitMaker: 6,188 posts
Armorama: 5,960 posts
Posted: Tuesday, July 15, 2014 - 08:29 AM UTC
Does that come with an aluminum barrel David?


It looks AWESOME!


Jeff
Jamesite
Visit this Community
United Kingdom
Joined: December 05, 2006
KitMaker: 2,208 posts
Armorama: 2,152 posts
Posted: Tuesday, July 15, 2014 - 11:38 AM UTC

Quoted Text

It looks AWESOME!
Jeff


Certainly does!

Always liked the look of this beast and now there is a styrene kit out I'll have to get it on my to-do list!

James
D_J_W
Visit this Community
Hamilton, New Zealand
Joined: December 30, 2005
KitMaker: 436 posts
Armorama: 367 posts
Posted: Tuesday, July 15, 2014 - 05:17 PM UTC

Quoted Text

Does that come with an aluminum barrel David?
It looks AWESOME!


Many gents thanks for the comments.

The aluminium barrel is the only option with the kit and it even has rifling in it I have just got a set of AFV Club workable track to replace the rubber bands, something to do over the next few nights before I start the painting.

cheers
David
tatbaqui
Staff MemberNews Writer
ARMORAMA
#040
Visit this Community
Metro Manila, Philippines
Joined: May 06, 2007
KitMaker: 2,713 posts
Armorama: 2,451 posts
Posted: Wednesday, July 23, 2014 - 02:44 AM UTC
Hello,

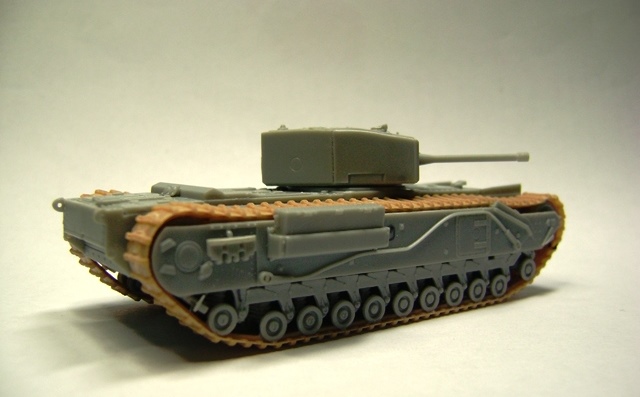
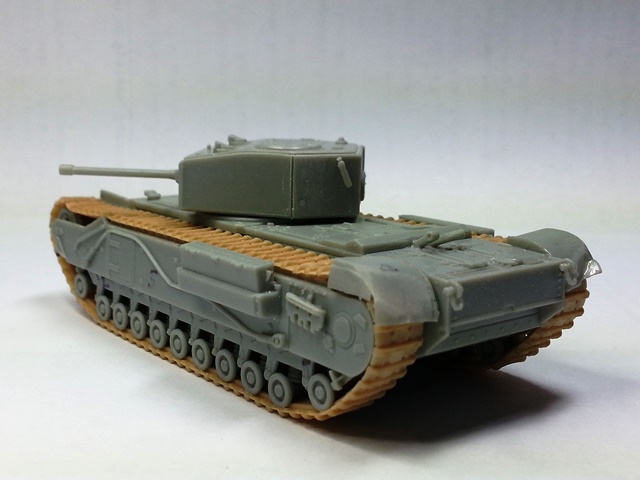
First time ever to build a Churchill. I chose braille scale thinking that less parts = less complications thus have an easy quick build.

Comes the mistake:


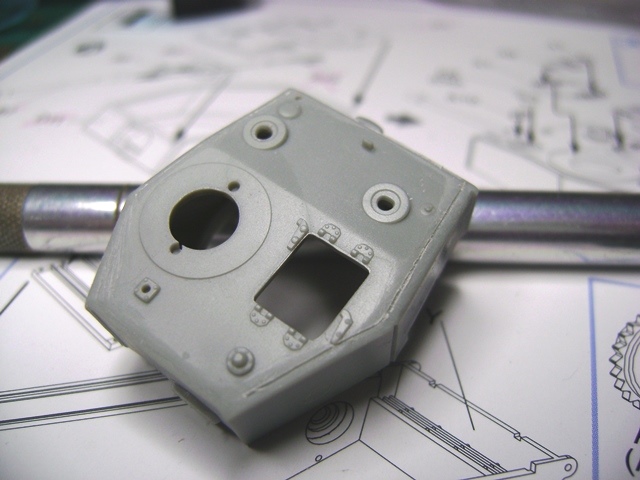
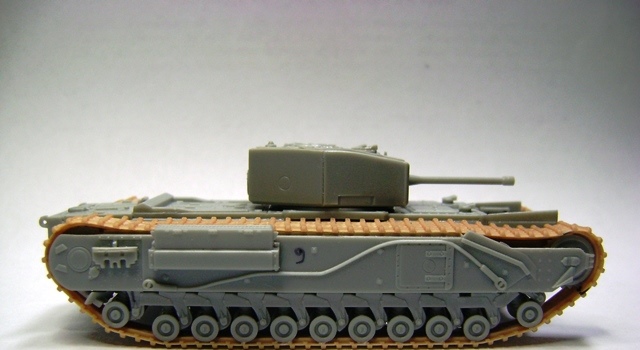
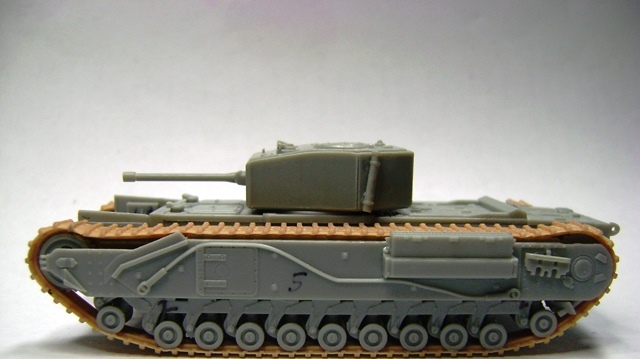
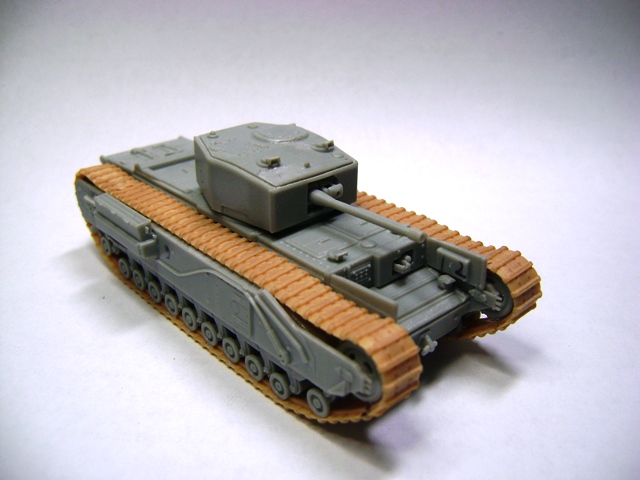
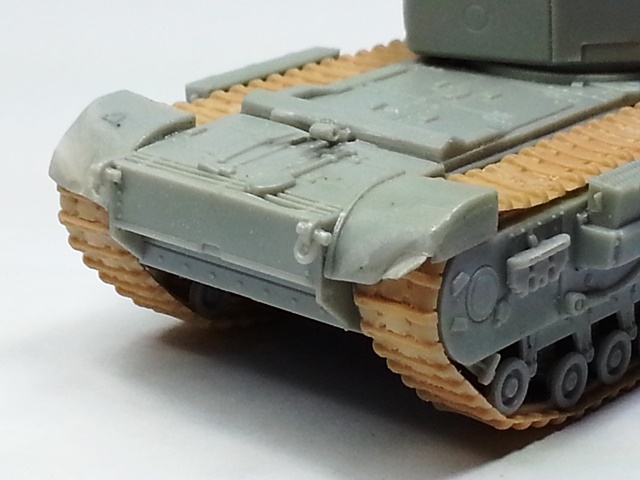
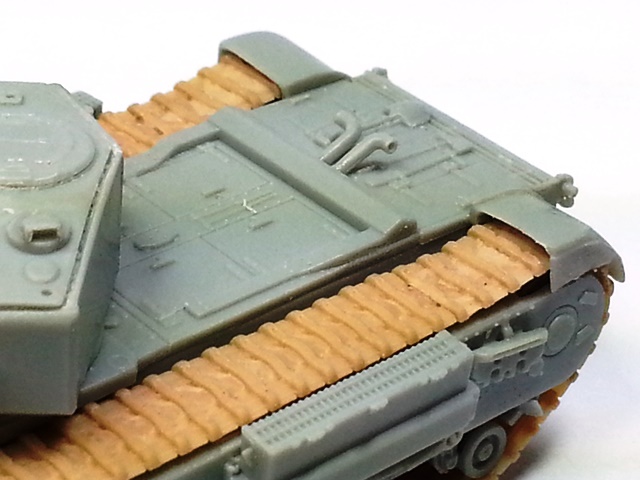
I thought the upper plate was a bad fit and that it should have lain flushed on the turret structure. Surely enough the references I have later checked indicated that I should have left it alone!


There goes my quick, one-session build. I sat there musing what to do next. After a day, I decided to try a fix:


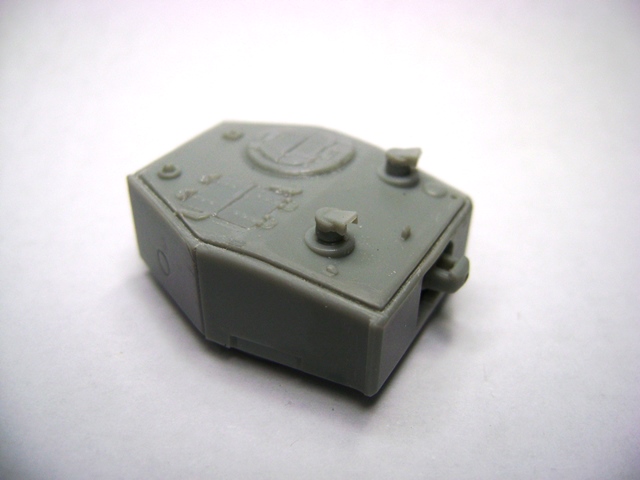
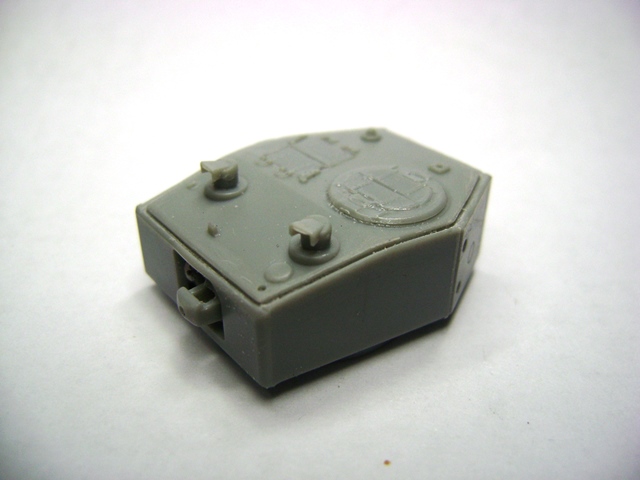
I've re-scribed the outline with a #11 blade, and sanded down the outer edges to "raise" the plate. Seems to have worked.


I then moved on to build the hull tub and road wheels. This part also got me stumped for a while. For those building the Dragon #7510 kit -- the instructions have it wrong. For the drive sprockets it should be A24 + A27, and A25 + A28. For the parts that had the external road wheeels molded (B1 and B2) -- the installation should be the other way around not as what is stated in the instructions.

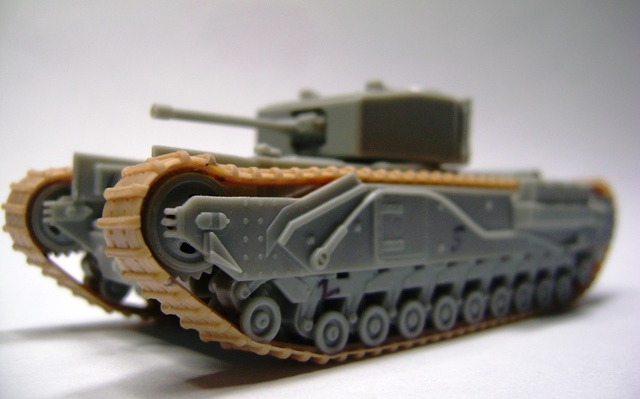
Next to tackle were the DS tracks -- never worked on DS before so I decided to google it up and see how it gets installed. Happy to have read that it does not need any special adhesive, but one just has to be careful not to use too much.

Instead of first gluing the ends and installing it, I found it easier to lay it on in stages and just wrap it around:


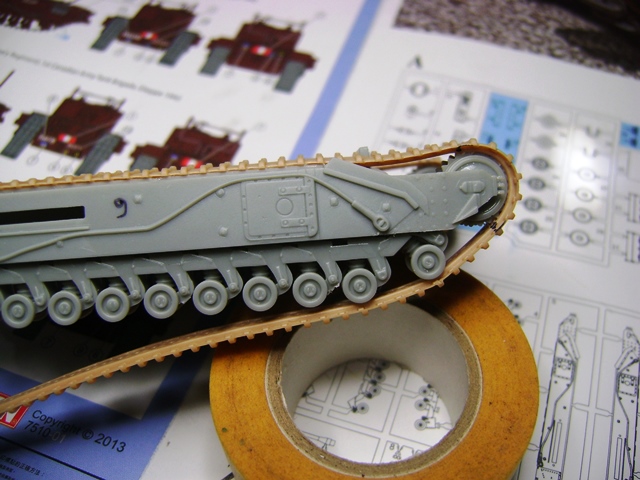
And yes, the Tamiya Thin Cement holds it quite nicely!

More to come.

Cheers,

Tat
Jamesite
Visit this Community
United Kingdom
Joined: December 05, 2006
KitMaker: 2,208 posts
Armorama: 2,152 posts
Posted: Wednesday, July 23, 2014 - 03:10 PM UTC
Hey Tat,

Nice work, good to see someone else tackling the smaller scale.
Something you may want to check out are those periscopes - they are sitting too high by the looks of things.

However, moulding quality etc. looks a lot better than my old Airfix kit.

Cheers,

James
Jamesite
Visit this Community
United Kingdom
Joined: December 05, 2006
KitMaker: 2,208 posts
Armorama: 2,152 posts
Posted: Wednesday, July 23, 2014 - 03:33 PM UTC
Ok guys might as well put some more progress up.

I have varnished the base and painted the edges black, so this one is ready for mounting now (although not sure what I'll use to fix it - open to ideas here!

I wish more companies made transfers for their kits that could be used as name plates for mounting the models, also would be great to be included in PE sets like Tamiya did for their 1/35 Challenger 2. I think it allows for a nice presentation piece which would be much cheaper than having to get one made up.


Also have progressed my painting, after spraying highlights I used some thinned humbrol enamels to brush paint highlights. Wouldn't go as far to say this is the colour modulation technique or anything, put for a small vehicle I wanted to over emphasise the highlights, hopefully will blend in nicely with subsequent weathering...


and a more detailed view:


Here's a pic of the bridge after applying a thin oil wash, shows here I'm heading with the look of the build:


That's all for now, look forward to any feedback.

Cheers,

James
IronOwl
Visit this Community
Georgia, United States
Joined: January 07, 2013
KitMaker: 572 posts
Armorama: 302 posts
Posted: Friday, July 25, 2014 - 06:11 AM UTC
Outstanding work sir very well done

Sascha(Ironowl)
Jamesite
Visit this Community
United Kingdom
Joined: December 05, 2006
KitMaker: 2,208 posts
Armorama: 2,152 posts
Posted: Sunday, July 27, 2014 - 05:54 PM UTC

Quoted Text

Outstanding work sir very well done

Sascha(Ironowl)


If that's directed at me then thank you very much Sascha!

Cheers,

James
tatbaqui
Staff MemberNews Writer
ARMORAMA
#040
Visit this Community
Metro Manila, Philippines
Joined: May 06, 2007
KitMaker: 2,713 posts
Armorama: 2,451 posts
Posted: Wednesday, July 30, 2014 - 03:08 AM UTC
Thanks James. My compliments to your painting -- I like it.

Indeed I find the periscopes' heights odd but that's how it settles in the kit. The box art reflect it as well. Actual pics don't seem to be the case so I've made the adjustments to have it sit lower.

Almost done with the build, save for the rear track guards:


It was my first try on DS tracks -- seems to be a good material to work on. As I am a slob with super glue, I was quite relieved it did not need such, or any special adhesive for that matter. Happy to be able to depict some sag:


Almost forgot -- I still need to put in the exhaust pipe. Will need to cut the kit-supplied part though, as I intend to finish this Churchill as a beute.


All the beute pics I've seen do not have a view as to how long the extended pipes were retained so I will have to make a guess on this.


Till next update.

Cheers,

Tat
Jamesite
Visit this Community
United Kingdom
Joined: December 05, 2006
KitMaker: 2,208 posts
Armorama: 2,152 posts
Posted: Wednesday, July 30, 2014 - 11:31 AM UTC
Thanks Tat,

Nice work! Looks like that kit goes together well and the DS tracks look great.

Interesting subject vehicle - good choice. Is it likely to be dunklegrau or bronze green?

James
tatbaqui
Staff MemberNews Writer
ARMORAMA
#040
Visit this Community
Metro Manila, Philippines
Joined: May 06, 2007
KitMaker: 2,713 posts
Armorama: 2,451 posts
Posted: Thursday, July 31, 2014 - 12:58 AM UTC
Thanks James. I would think the Germans following the Dieppe Raid would still have very much the resources or say luxury of repainting these captured Churchills to their 1942 standards -- thus I'd go for dunkelgrau here. Cheers, Tat
tatbaqui
Staff MemberNews Writer
ARMORAMA
#040
Visit this Community
Metro Manila, Philippines
Joined: May 06, 2007
KitMaker: 2,713 posts
Armorama: 2,451 posts
Posted: Saturday, August 02, 2014 - 12:20 PM UTC
My attempt on depicting damage to the rear fender guards.


I have also cut down the exhaust pipes. More a guess, having no references on hand.


Build phase complete. Waiting for good weather to get started on some warpaint.


Cheers,

Tat
IronOwl
Visit this Community
Georgia, United States
Joined: January 07, 2013
KitMaker: 572 posts
Armorama: 302 posts
Posted: Saturday, August 02, 2014 - 09:50 PM UTC
well I was fixing to start the Mk VII and took the start pic and started checking the parts when it dawned on me that I had two sections that were Identical. no road wheels and well put it this way half the tank is not in the box turret and upper and lower accounted for, but two main guns any who am gonna have to figure out what to do next any Ideas ? this is the first time I have ever had this happen so other than buying another kit not sure what im gonna do.

Sascha(ironowl)
Cookiescool2
Visit this Community
Georgia, United States
Joined: May 09, 2014
KitMaker: 273 posts
Armorama: 270 posts
Posted: Sunday, August 03, 2014 - 06:25 AM UTC
I'm considering this build complete! I may put this in a diorama later but that won't be for a while.

Happy Modelling!


IronOwl
Visit this Community
Georgia, United States
Joined: January 07, 2013
KitMaker: 572 posts
Armorama: 302 posts
Posted: Sunday, August 03, 2014 - 07:28 AM UTC
Nice builds going on here Congrats to those who have finished already and just a friendly reminder to post your finished build photos in the gallery as well. as for my Churchill issues well lets just say the wife surprised me by ordering me another kit so I should be starting soon.

Sascha(ironowl)
D_J_W
Visit this Community
Hamilton, New Zealand
Joined: December 30, 2005
KitMaker: 436 posts
Armorama: 367 posts
Posted: Monday, August 04, 2014 - 02:16 PM UTC
Greetings all, some progress on my 3-inch Gun Carrier, a couple of licks of paint S.C.C. No.2 (brown) and S.C.C. No. 1A (very dark brown), Mike Starmers recipes using Tamiya paints.


Now on to the markings, just WD numbers and weathering.

cheers
David
IronOwl
Visit this Community
Georgia, United States
Joined: January 07, 2013
KitMaker: 572 posts
Armorama: 302 posts
Posted: Wednesday, August 06, 2014 - 11:09 AM UTC
everybodys Kits are looking very good


Heres my kit

Sascha(Ironowl)